Part2-2-2 webpack
Posted 沿着路走到底
tags:
篇首语:本文由小常识网(cha138.com)小编为大家整理,主要介绍了Part2-2-2 webpack相关的知识,希望对你有一定的参考价值。
Webpack 快速上手
安装 webpack核心模块以及webpack cli 模块
yarn add webpack webpack-cli --dev本文中webpack使用的版本
"devDependencies": {
    "webpack": "^4.40.2",
    "webpack-cli": "^3.3.9"
  }
打包命令
yarn webpack
webpack 配置文件
webpack4以后,支持0配置打包
按照约定,会将 src目录下的index.js 作为打包入口,打包结果放入 dist目录下的 main.js 中
src/index.js ===> dist/main.js
项目根目录下添加 webpack.config.js 文件,作为webpack的配置文件
因为 webpack.config.js 是运行在 node 环境下的 js 文件,所以必须遵循 commonJS 规范
最终结果, module.exports = {} 导出
添加 entry 属性,指定webpack打包入口文件的路径
添加 output 属性,指定输出文件的位置,
output属性的值必须是一个对象:
- filename:输出文件的名称
- path:输出文件的目录
module.exports = {
  entry: './src/main.js',
  output: {
    filename: 'bundle.js',
    path: path.join(__dirname, 'output')
  }
}
webpack 工作模式
webpack4以后新增了 工作模式 用法
简化了 webpack 的复杂程度
针对不同环境都有其预设的配置
mode 属性默认 production,也就是会默认按照 production 的预设配置进行打包
mode属性的值:production、development、none
mode属性为none时,没有预设配置,也就是进行最原始的打包
const path = require('path')

module.exports = {
  // 这个属性有三种取值,分别是 production、development 和 none。
  // 1. 生产模式下,Webpack 会自动优化打包结果;
  // 2. 开发模式下,Webpack 会自动优化打包速度,添加一些调试过程中的辅助;
  // 3. None 模式下,Webpack 就是运行最原始的打包,不做任何额外处理;
  mode: 'development',
  entry: './src/main.js',
  output: {
    filename: 'bundle.js',
    path: path.join(__dirname, 'dist')
  }
}
webpack 打包结果运行原理
将打包后的 bundle.js 折叠
可以看到 打包后的JS是一个 立即执行函数,这个函数是 webpack 工作入口

将传入的参数展开
传入的参数是一个数组,
数组里的每一项是 参数 相同的函数,
这个函数对应的就是 原代码 中的模块,
也就是说原代码中的模块最终都会被包裹进这个函数中,
从而实现模块的私有作用域
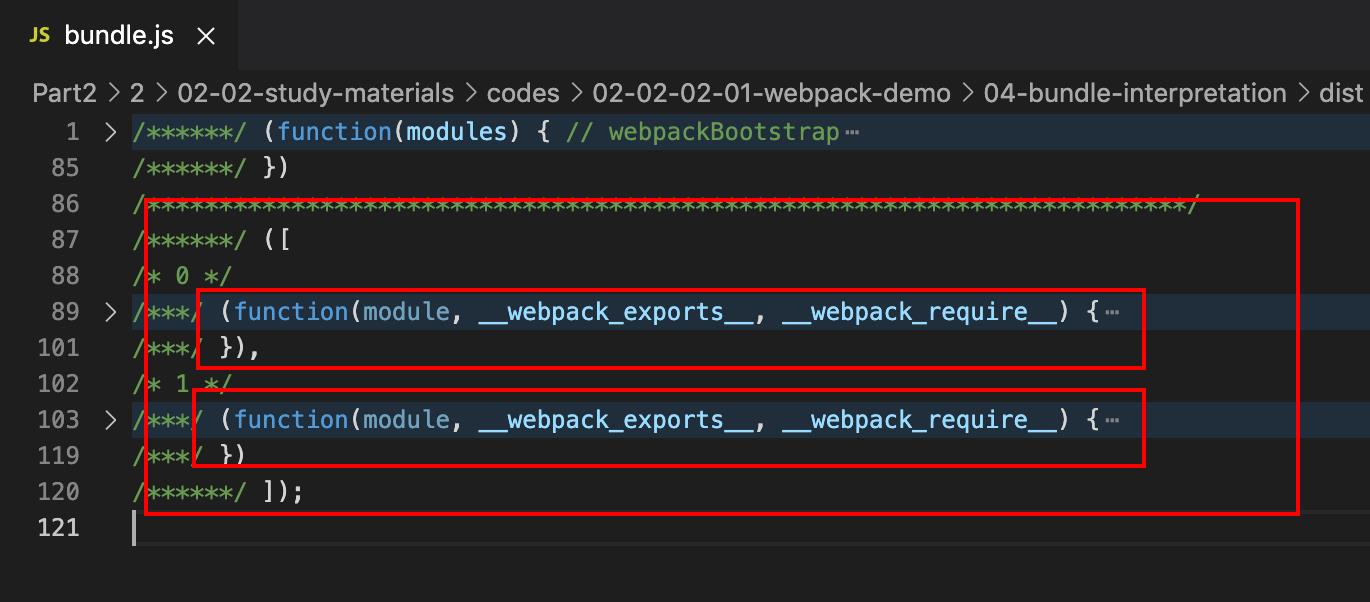
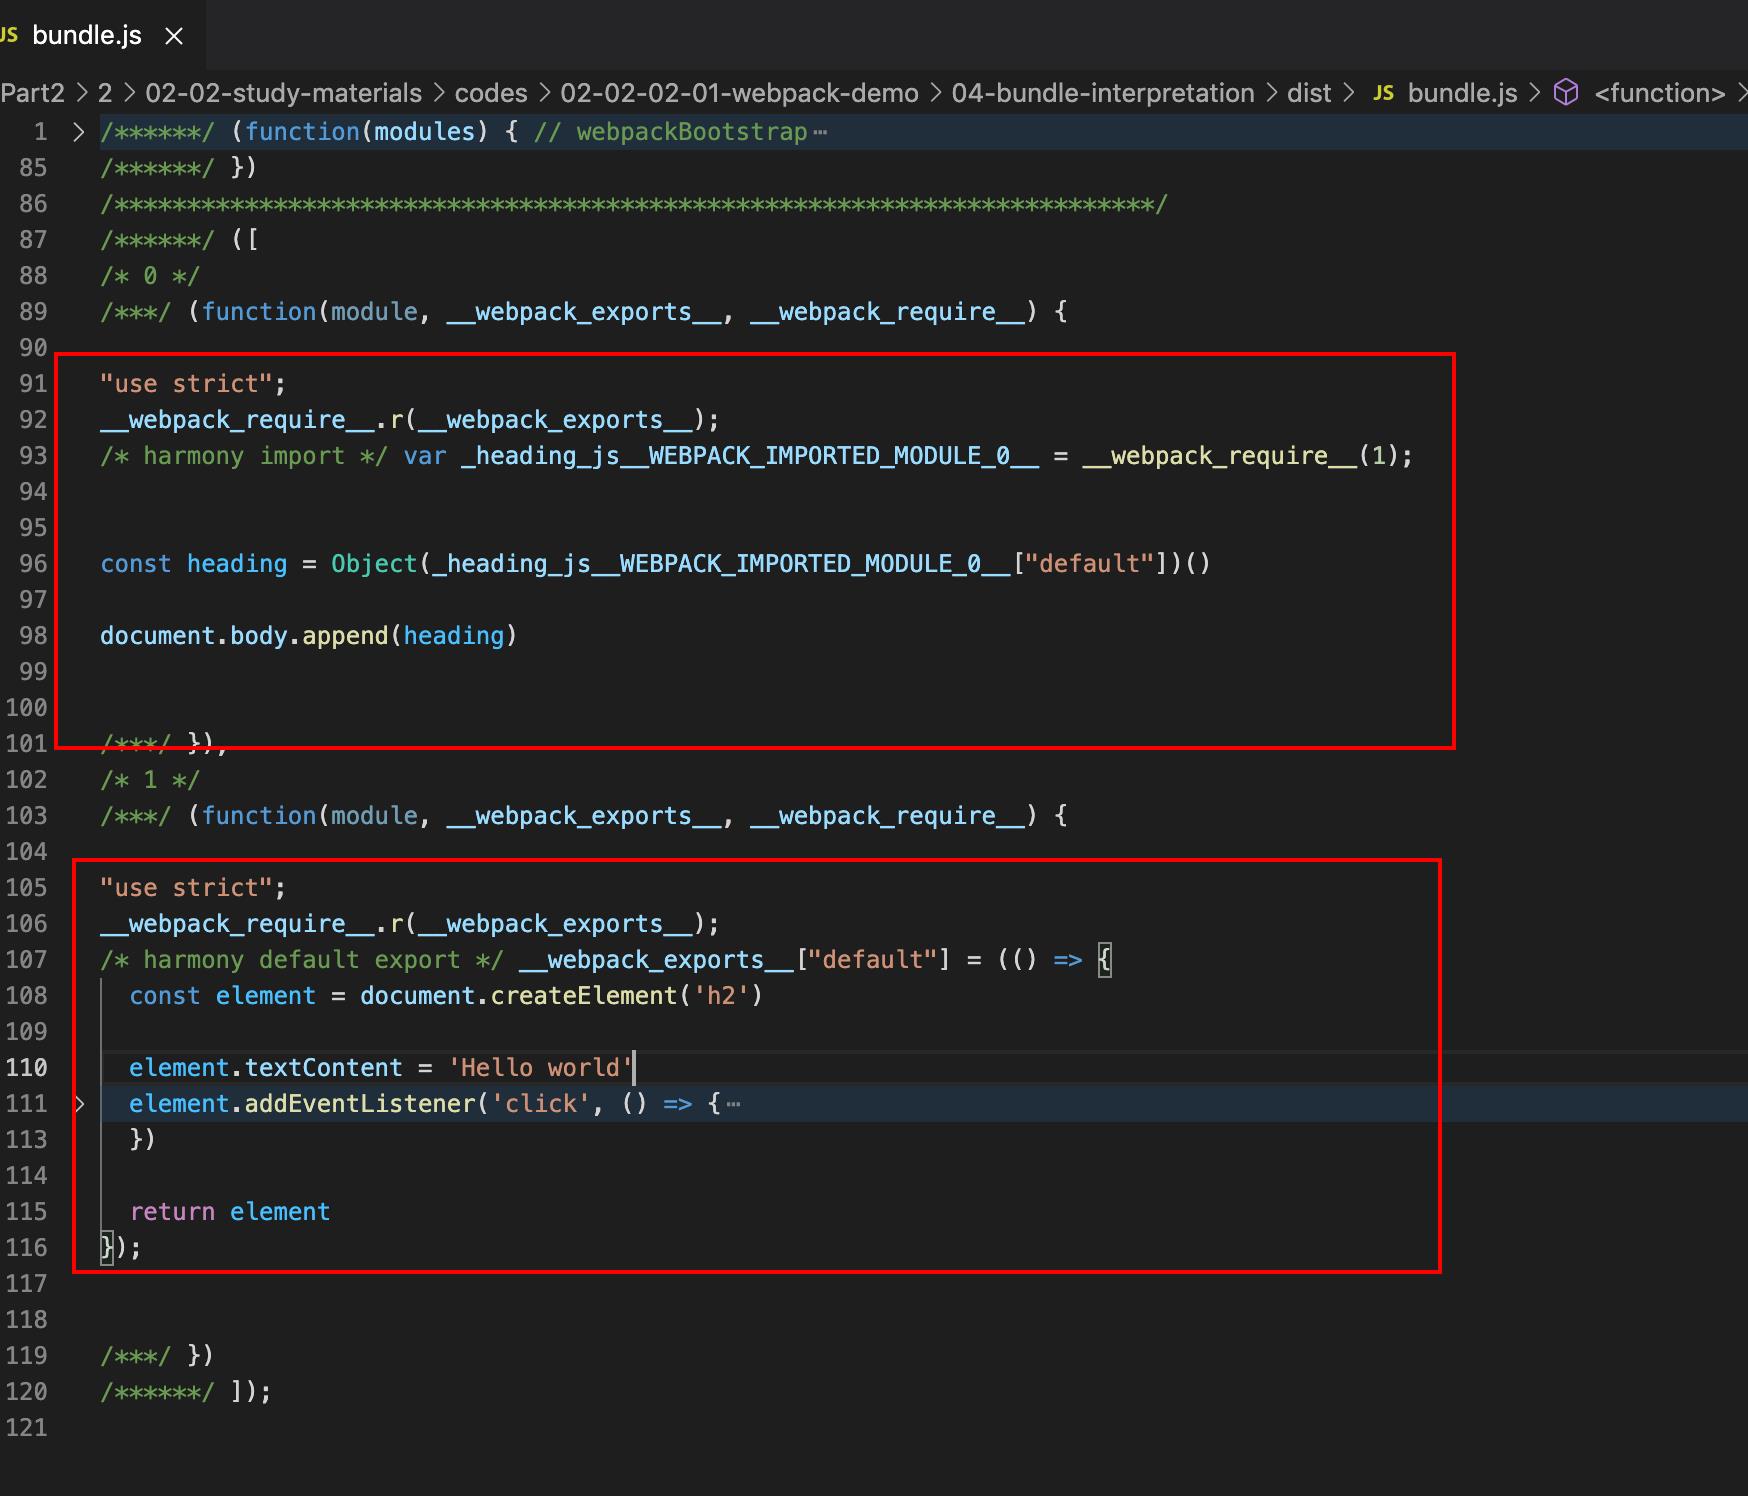
展开 webpack 的工作入口函数
/******/ (function(modules) { // webpackBootstrap
/******/ 	// The module cache 用于缓存我们加载过的模块
/******/ 	var installedModules = {};
/******/
/******/ 	// The require function
          // 定义了一个 require 函数,这个函数就是用来加载模块的
/******/ 	function __webpack_require__(moduleId) {
/******/
/******/ 		// Check if module is in cache
            // 先判断这个模块有没有被加载过,如果加载过,就从缓存里读
/******/ 		if(installedModules[moduleId]) {
/******/ 			return installedModules[moduleId].exports;
/******/ 		}
/******/ 		// Create a new module (and put it into the cache)
            // 如果没有加载过,就 创建一个新的对象
/******/ 		var module = installedModules[moduleId] = {
/******/ 			i: moduleId,
/******/ 			l: false,
/******/ 			exports: {}
/******/ 		};
/******/
/******/ 		// Execute the module function
            // 调用这个模块所对应的函数
/******/ 		modules[moduleId].call(module.exports, module, module.exports, __webpack_require__);
/******/
/******/ 		// Flag the module as loaded
/******/ 		module.l = true;
/******/
/******/ 		// Return the exports of the module
/******/ 		return module.exports;
/******/ 	}
/******/
/******/  // 以下 在 require函数上 挂了一些工具函数和数据
/******/ 	// expose the modules object (__webpack_modules__)
/******/ 	__webpack_require__.m = modules;
/******/
/******/ 	// expose the module cache
/******/ 	__webpack_require__.c = installedModules;
/******/
/******/ 	// define getter function for harmony exports
/******/ 	__webpack_require__.d = function(exports, name, getter) {
/******/ 		if(!__webpack_require__.o(exports, name)) {
/******/ 			Object.defineProperty(exports, name, { enumerable: true, get: getter });
/******/ 		}
/******/ 	};
/******/
/******/ 	// define __esModule on exports
/******/ 	__webpack_require__.r = function(exports) {
/******/ 		if(typeof Symbol !== 'undefined' && Symbol.toStringTag) {
/******/ 			Object.defineProperty(exports, Symbol.toStringTag, { value: 'Module' });
/******/ 		}
/******/ 		Object.defineProperty(exports, '__esModule', { value: true });
/******/ 	};
/******/
/******/ 	// create a fake namespace object
/******/ 	// mode & 1: value is a module id, require it
/******/ 	// mode & 2: merge all properties of value into the ns
/******/ 	// mode & 4: return value when already ns object
/******/ 	// mode & 8|1: behave like require
/******/ 	__webpack_require__.t = function(value, mode) {
/******/ 		if(mode & 1) value = __webpack_require__(value);
/******/ 		if(mode & 8) return value;
/******/ 		if((mode & 4) && typeof value === 'object' && value && value.__esModule) return value;
/******/ 		var ns = Object.create(null);
/******/ 		__webpack_require__.r(ns);
/******/ 		Object.defineProperty(ns, 'default', { enumerable: true, value: value });
/******/ 		if(mode & 2 && typeof value != 'string') for(var key in value) __webpack_require__.d(ns, key, function(key) { return value[key]; }.bind(null, key));
/******/ 		return ns;
/******/ 	};
/******/
/******/ 	// getDefaultExport function for compatibility with non-harmony modules
/******/ 	__webpack_require__.n = function(module) {
/******/ 		var getter = module && module.__esModule ?
/******/ 			function getDefault() { return module['default']; } :
/******/ 			function getModuleExports() { return module; };
/******/ 		__webpack_require__.d(getter, 'a', getter);
/******/ 		return getter;
/******/ 	};
/******/
/******/ 	// Object.prototype.hasOwnProperty.call
/******/ 	__webpack_require__.o = function(object, property) { return Object.prototype.hasOwnProperty.call(object, property); };
/******/
/******/ 	// __webpack_public_path__
/******/ 	__webpack_require__.p = "";
/******/
/******/
/******/ 	// Load entry module and return exports
          // 调用 require 函数,开始加载模块  0 就是 上面传入的 modules 数组的下标
          // 加载 id 为 0 的模块
          // 也就是这里 才开始加载 入口文件
/******/ 	return __webpack_require__(__webpack_require__.s = 0);
/******/ })
/************************************************************************/
/******/ ([
/* 0 */
/***/ (function(module, __webpack_exports__, __webpack_require__) {

"use strict";
__webpack_require__.r(__webpack_exports__);
/* harmony import */ var _heading_js__WEBPACK_IMPORTED_MODULE_0__ = __webpack_require__(1);


const heading = Object(_heading_js__WEBPACK_IMPORTED_MODULE_0__["default"])()

document.body.append(heading)


/***/ }),
/* 1 */
/***/ (function(module, __webpack_exports__, __webpack_require__) {

"use strict";
__webpack_require__.r(__webpack_exports__);
/* harmony default export */ __webpack_exports__["default"] = (() => {
  const element = document.createElement('h2')

  element.textContent = 'Hello world'
  element.addEventListener('click', () => {
    alert('Hello webpack')
  })

  return element
});


/***/ })
/******/ ]);
webpack 资源模块加载
webpack 会将所有类型的文件当做 js 来处理,因此处理 css 等类型的文件,就会报错
可以为不同类型的文件添加不同的 loader
loader是整个webpack实现模块化的核心,通过loader可以加载任何类型的资源
处理 css 类型文件,可以安装 css loader yarn add css-loader --dev
const path = require('path')

module.exports = {
  mode: 'none',
  entry: './src/main.css',
  output: {
    filename: 'bundle.js',
    path: path.join(__dirname, 'dist')
  },
  module: {
    rules: [
      {
        test: /.css$/,
        use: 'css-loader'
      }
    ]
  }
}
打包后,样式并没有生效,
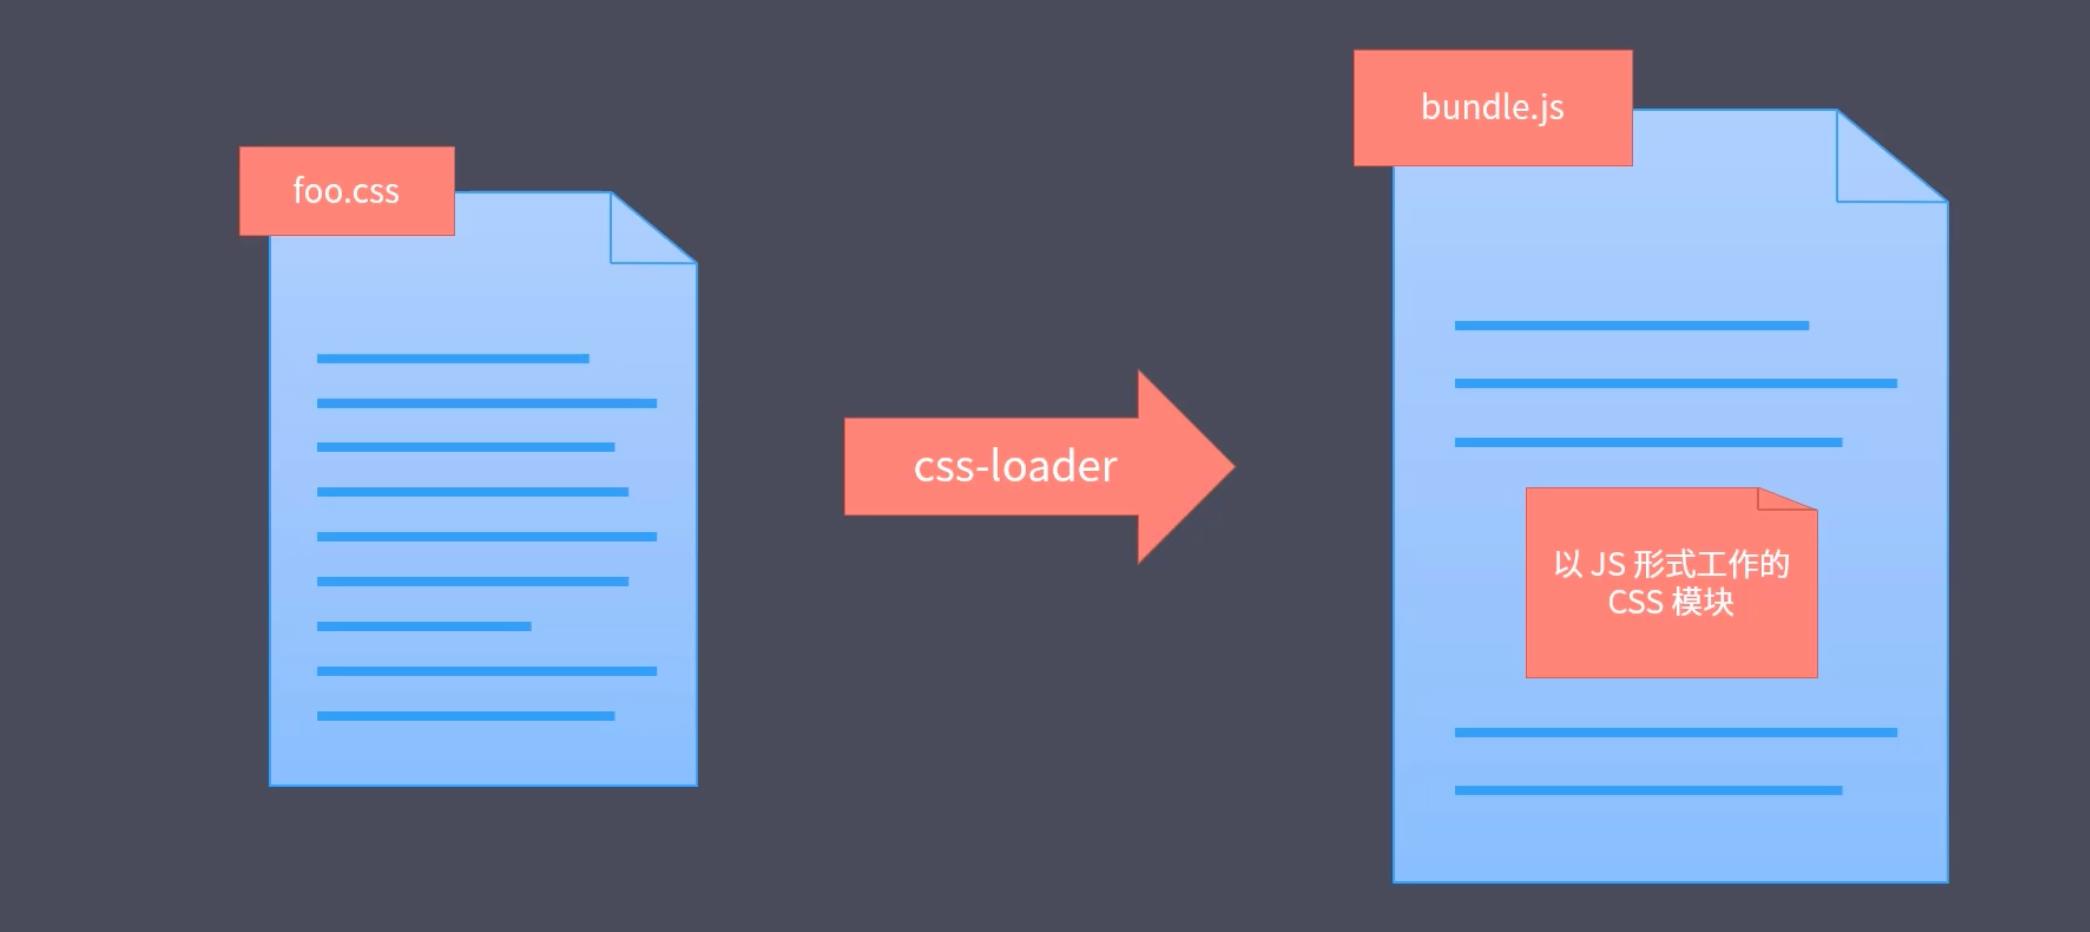
因为 css-loader 的作用只是将 css 转化为 js 模块

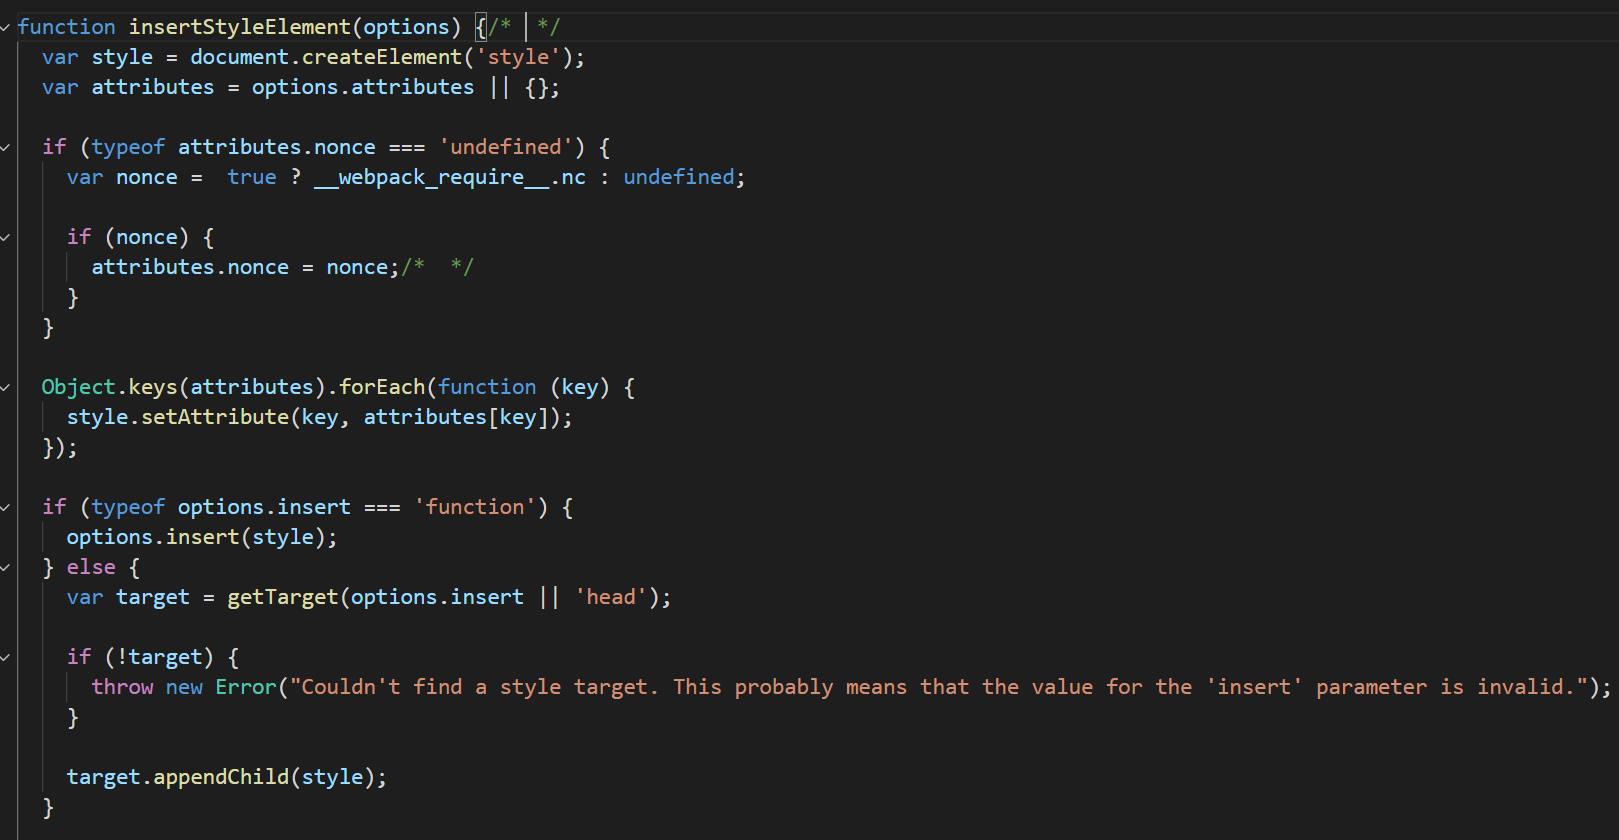
所以需要再添加一个 style-loader,style-loader 的作用就是将 css-loader转化的样式添加到 style 标签上
const path = require('path')

module.exports = {
  mode: 'none',
  entry: './src/main.css',
  output: {
    filename: 'bundle.js',
    path: path.join(__dirname, 'dist')
  },
  module: {
    rules: [
      {
        test: /.css$/,
        use: [
          'style-loader',
          'css-loader'
        ]  // use 使用多个loader 的时候,加载顺序是 从右到左,从下到上
      }
    ]
  }
}
将css样式挂载到了页面的style标签中
webpack 导入资源模块
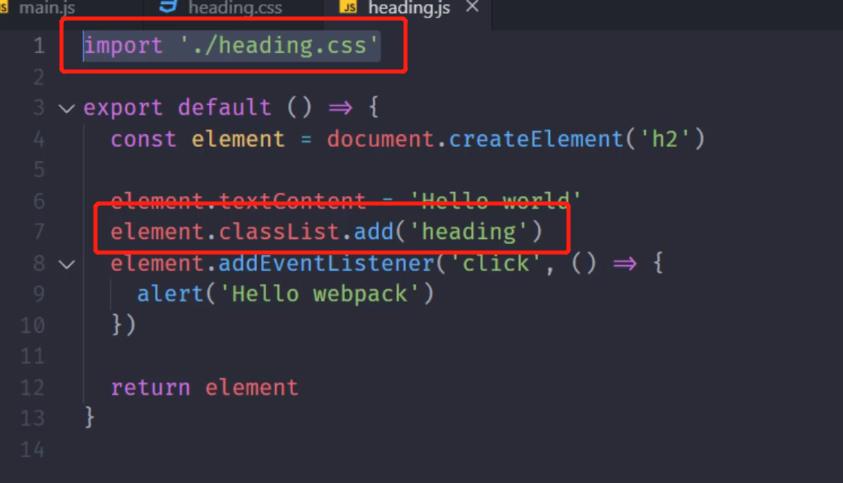
根据代码的需要动态导入资源
需要资源的不是应用,而是代码
逻辑合理,JS确实需要这些资源文件
确保上线资源不缺失,依赖的资源都是必要的
webpack 文件资源加载器
安装文件loader yarn add file-loader --dev
const path = require('path')

module.exports = {
  mode: 'none',
  entry: './src/main.js',
  output: {
    filename: 'bundle.js',
    path: path.join(__dirname, 'dist'),
    publicPath: 'dist/'  // 指定根目录
  },
  module: {
    rules: [
      {
        test: /.css$/,
        use: [
          'style-loader',
          'css-loader'
        ]
      },
      {
        test: /.png$/,
        use: 'file-loader'
      }
    ]
  }
}
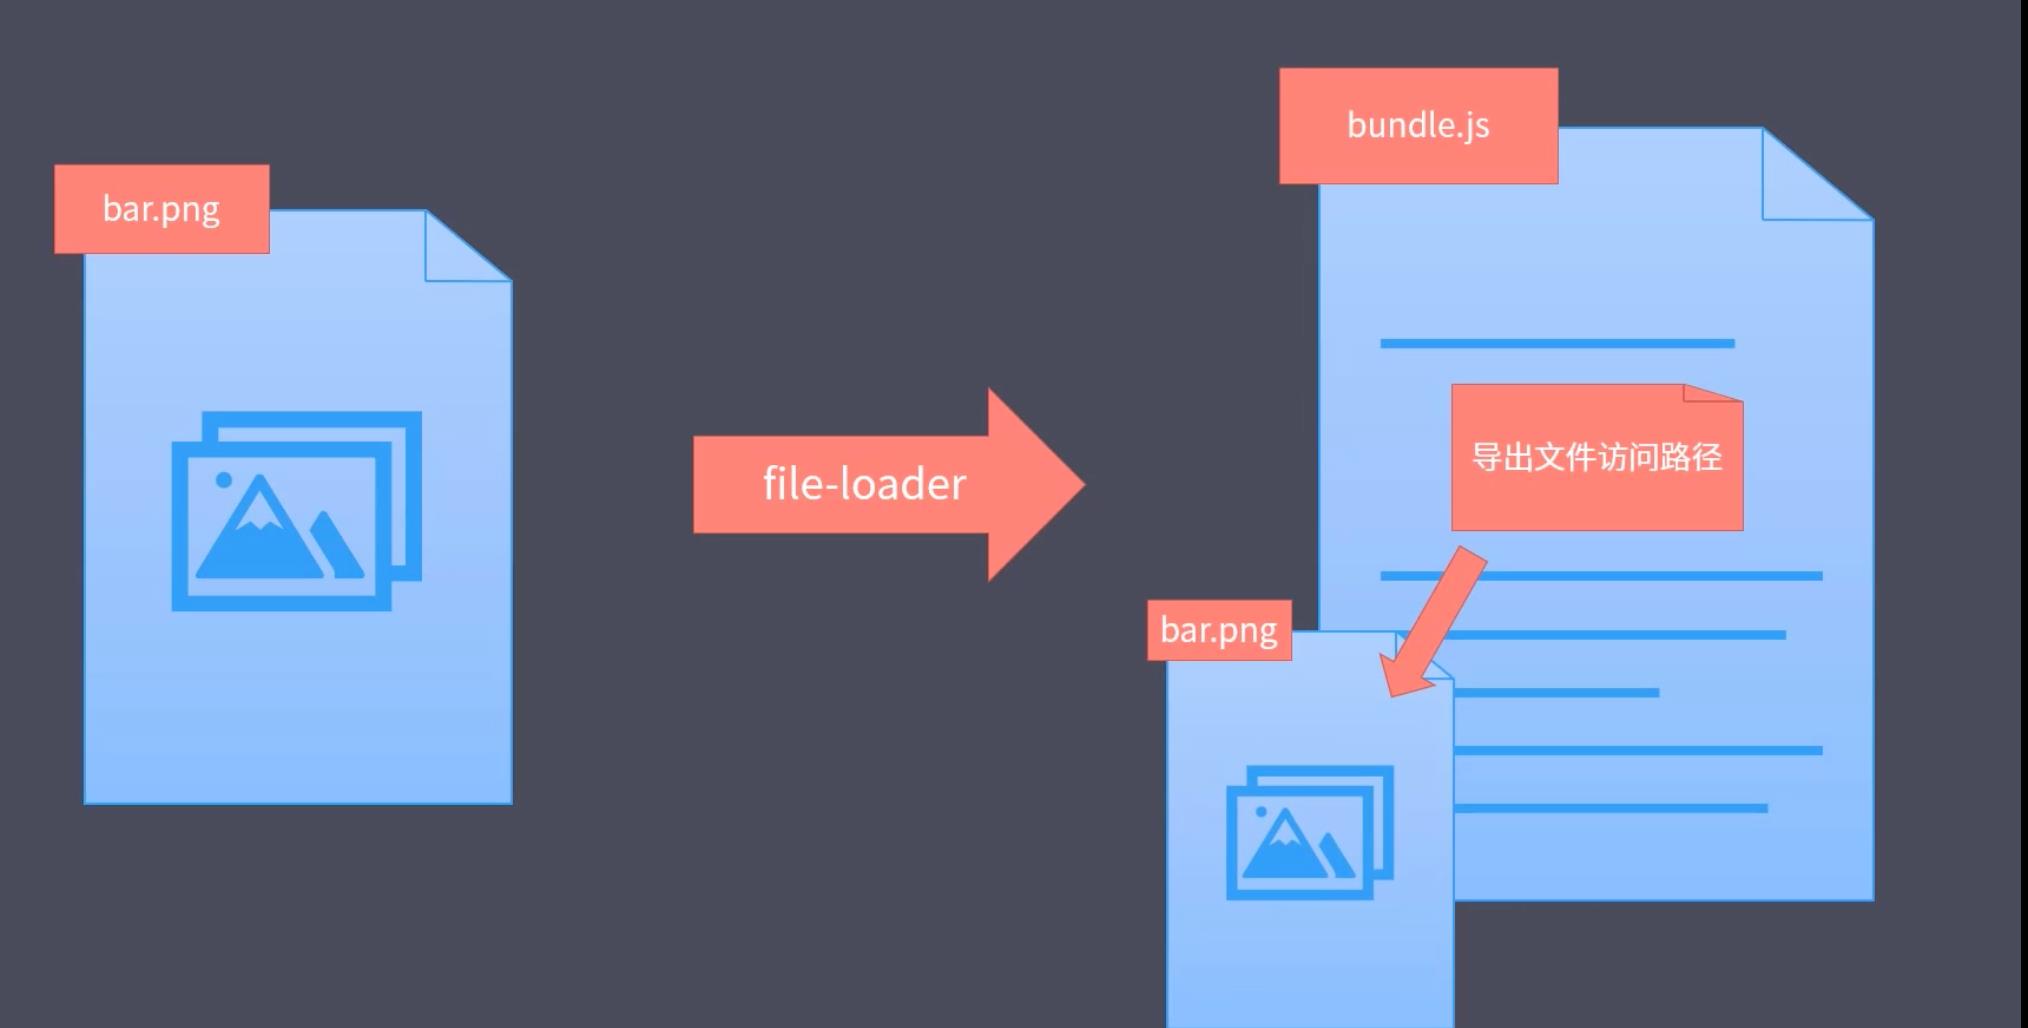
打包后的文件,可以看到 将生成的图片名称 导出

在入口文件内,使用导出的文件名

webpack url 加载器
安装 url loader yarn add url-loader --dev
const path = require('path')

module.exports = {
  mode: 'none',
  entry: './src/main.js',
  output: {
    filename: 'bundle.js',
    path: path.join(__dirname, 'dist'),
    publicPath: 'dist/'
  },
  module: {
    rules: [
      {
        test: /.css$/,
        use: [
          'style-loader',
          'css-loader'
        ]
      },
      {
        test: /.png$/,
        use: {
          loader: 'url-loader',
          options: {
            limit: 10 * 1024 // 10 KB
          }
        }
      }
    ]
  }
}
url-loader 会将图片导出 base64 数据

最佳实践:
小文件使用 Data URLs,减少请求次数
大文件单独提取存放,提高加载速度
使用 url-loader,还是要安装 file-loader,因为url-loader 对于超出指定大小的图片,还是会去调用 file-loader
webpack 常用加载器分类
编译转换类:将加载的资源模块转化为 javascript 代码
文件操作类:将加载的资源模块拷贝到输出目录,将文件的访问路径向外导出
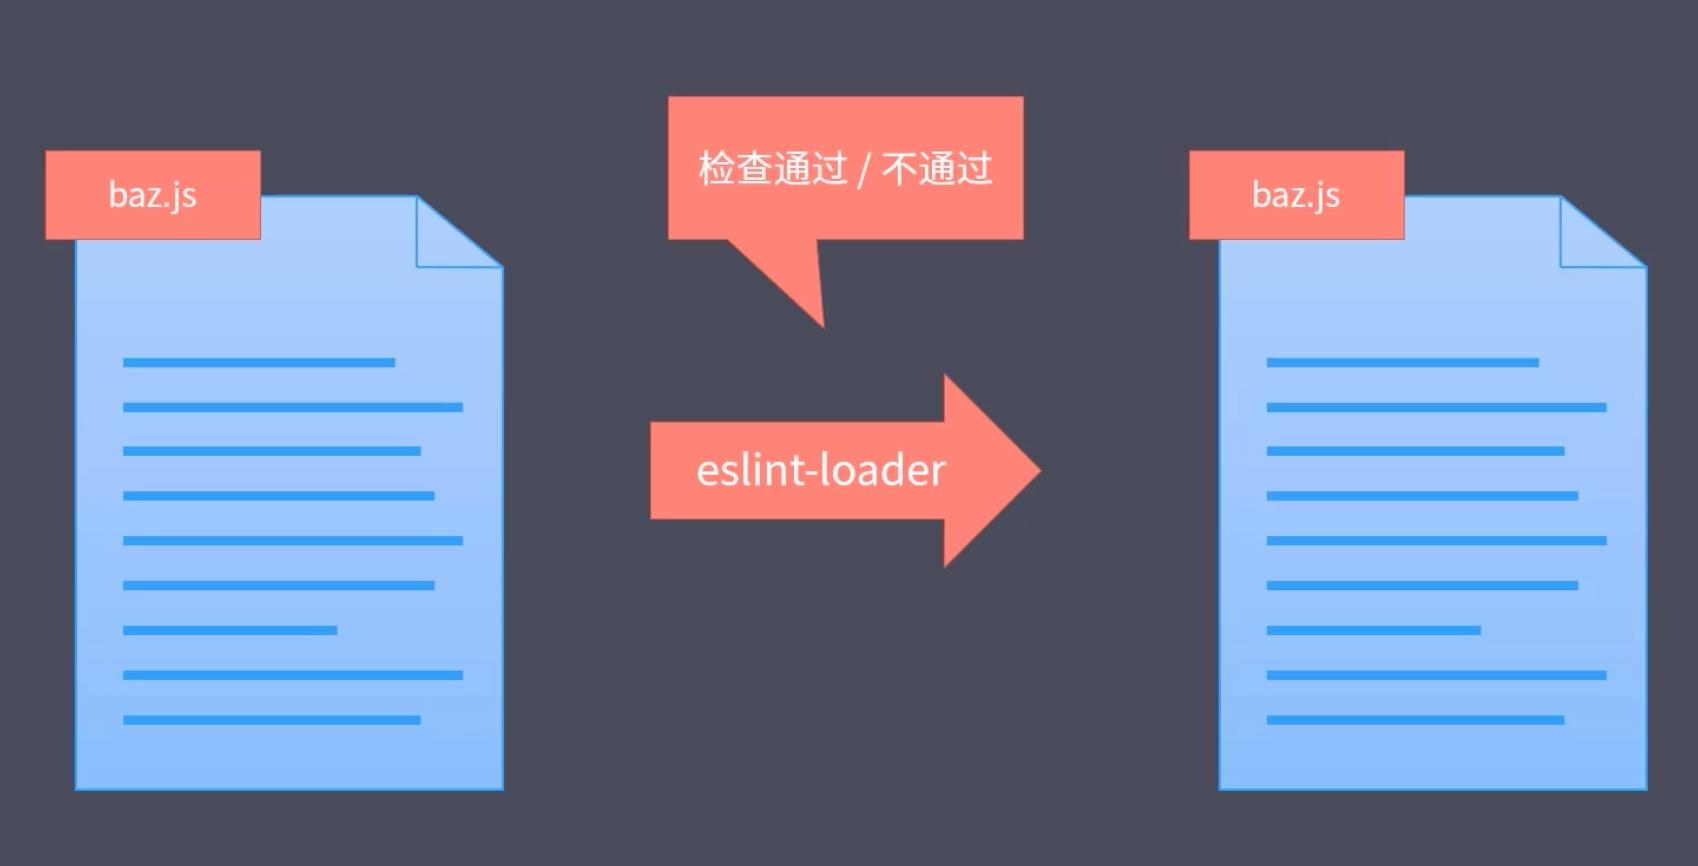
代码检查类:将加载到代码进行校验,统一代码风格,提高代码质量
webpack 处理2015
webpack 因为模块打包需要,所以处理 import 和 export,但是除此之外,并不能处理 ES6新特性
安装 babel-loader、babel的核心模块、用于具体特性转换插件集合 yarn add babel-loader @babel/core @babel/preset-env --dev
const path = require('path')

module.exports = {
  mode: 'none',
  entry: './src/main.js',
  output: {
    filename: 'bundle.js',
    path: path.join(__dirname, 'dist'),
    publicPath: 'dist/'
  },
  module: {
    rules: [
      {
        test: /.js$/,
        use: {
          loader: 'babel-loader',
          options: {
            presets: ['@babel/preset-env'] // 这个插件集合包含了全部ES最新特性
          }
        }
      },
      {
        test: /.css$/,
        use: [
          'style-loader',
          'css-loader'
        ]
      },
      {
        test: /.png$/,
        use: {
          loader: 'url-loader',
          options: {
            limit: 10 * 1024 // 10 KB
          }
        }
      }
    ]
  }
}
webpack 模块加载方式
遵循 ES Modules 标准的 import 声明
遵循 CommonJS 标准的 require 函数
遵循 AMD 标准的 define 函数 和 require 函数
Loader 加载的非 JavaScript 也会触发资源加载
样式代码中的 @import指令 和 url 函数
html代码中图片标签的 src 属性
这些需要加载的资源也会触发 url-loader 做处理
HTML代码中的src使用需要使用 html-loader, yarn add html-loader --dev
const path = require('path')

module.exports = {
  mode: 'none',
  entry: './src/main.js',
  output: {
    filename: 'bundle.js',
    path: path.join(__dirname, 'dist'),
    publicPath: 'dist/'
  },
  module: {
    rules: [
      {
        test: /.js$/,
        use: {
          loader: 'babel-loader',
          options: {
            presets: ['@babel/preset-env']
          }
        }
      },
      {
        test: /.css$/,
        use: [
          'style-loader',
          'css-loader'
        ]
      },
      {
        test: /.png$/,
        use: {
          loader: 'url-loader',
          options: {
            limit: 10 * 1024 // 10 KB
          }
        }
      },
      {
        test: /.html$/,
        use: {
          loader: 'html-loader',
          options: {
            attrs: ['img:src', 'a:href'] // html-loader 默认只会处理 img 标签的 src 属性
          }
        }
      }
    ]
  }
}
webpack loader 的工作原理
Loader 的原理就是 负责资源文件从输入到输出的转换。
对于同一个资源可以依次使用多个Loader。
// markdown-loader.js
const marked = require('marked')

module.exports = source => {
  // console.log(source)
  // return 'console.log("hello ~")'
  const html = marked(source)
  // return html
  // return `module.exports = "${html}"`
  // return `export default ${JSON.stringify(html)}`

  // 返回 html 字符串交给下一个 loader 处理
  return html
}


//webpack.config.js
const path = require('path')

module.exports = {
  mode: 'none',
  entry: './src/main.js',
  output: {
    filename: 'bundle.js',
    path: path.join(__dirname, 'dist'),
    publicPath: 'dist/'
  },
  module: {
    rules: [
      {
        test: /.md$/,
        use: [
          'html-loader',   // markdown-loader 返回的如果是html,再用html-loader继续处理
          './markdown-loader'
        ]
      }
    ]
  }
}
webpack 插件机制介绍
增强 webpack 自动化能力
Loader 专注实现资源模块加载
Plugin 解决其他自动化工作
- 清除 dist 目录
- 拷贝静态文件至输出目录
- 压缩输出代码
webpack 自动清理输出目录插件
yarn add clean-webpack-plugin --dev
const path = require('path')
const { CleanWebpackPlugin } = require('clean-webpack-plugin')

module.exports = {
  mode: 'none',
  entry: './src/main.js',
  output: {
    filename: 'bundle.js',
    path: path.join(__dirname, 'dist'),
    publicPath: 'dist/'
  },
  module: {
    rules: [
      {
        test: /.css$/,
        use: [
          'style-loader',
          'css-loader'
        ]
      },
      {
        test: /.png$/,
        use: {
          loader: 'url-loader',
          options: {
            limit: 10 * 1024 // 10 KB
          }
        }
      }
    ]
  },
  plugins: [
    new CleanWebpackPlugin()
  ]
}
Webpack 自动生成HTML插件
自动生成使用bundle.js的HTML
通过 webpack 输出 HTML 文件
yarn add html-webpack-plugin --dev
const path = require('path')
const { CleanWebpackPlugin } = require('clean-webpack-plugin')
const HtmlWebpackPlugin = require('html-webpack-plugin')

module.exports = {
  mode: 'none',
  entry: './src/main.js',
  output: {
    filename: 'bundle.js',
    path: path.join(__dirname, 'dist'),
    // publicPath: 'dist/' // 使用 HtmlWebpackPlugin自动生成html,就不再需要设置这个属性来指定根目录
  },
  module: {
    rules: [
      {
        test: /.css$/,
        use: [
          'style-loader',
          'css-loader'
        ]
      },
      {
        test: /.png$/,
        use: {
          loader: 'url-loader',
          options: {
            limit: 10 * 1024 // 10 KB
          }
        }
      }
    ]
  },
  plugins: [
    new CleanWebpackPlugin(),
    // 用于生成 index.html  生成的 html 文件默认名是 index.html
    new HtmlWebpackPlugin({
      title: 'Webpack Plugin Sample', // 设置 html 标题
      meta: { // meta 属性用来设置 html 的元数据标签
        viewport: 'width=device-width'
      },
      template: './src/index.html' // 指定html模板文件
    }),
    // 用于生成 about.html 同时输出多个页面文件
    new HtmlWebpackPlugin({
      filename: 'about.html'
    })
  ]
}
webpack 常用插件
对于不需要构建的静态文件,最终也需要发布到线上,yarn add copy-webpack-plugin --dev
const path = require('path')
const { CleanWebpackPlugin } = require('clean-webpack-plugin')
const HtmlWebpackPlugin = require('html-webpack-plugin')
const CopyWebpackPlugin = require('copy-webpack-plugin')

module.exports = {
  mode: 'none',
  entry: './src/main.js',
  output: {
    filename: 'bundle.js',
    path: path.join(__dirname, 'dist'),
    // publicPath: 'dist/'
  },
  module: {
    rules: [
      {
        test: /.css$/,
        use: [
          'style-loader',
          'css-loader'
        ]
      },
      {
        test: /.png$/,
        use: {
          loader: 'url-loader',
          options: {
            limit: 10 * 1024 // 10 KB
          }
        }
      }
    ]
  },
  plugins: [
    new CleanWebpackPlugin(),
    // 用于生成 index.html
    new HtmlWebpackPlugin({
      title: 'Webpack Plugin Sample',
      meta: {
        viewport: 'width=device-width'
      },
      template: './src/index.html'
    }),
    // 用于生成 about.html
    new HtmlWebpackPlugin({
      filename: 'about.html'
    }),
    new CopyWebpackPlugin([ // 指定需要拷贝的静态资源路径
      // 'public/**'
      'public'
    ])
  ]
}
webpack plugin 的工作原理
const path = require('path')
const { CleanWebpackPlugin } = require('clean-webpack-plugin')
const HtmlWebpackPlugin = require('html-webpack-plugin')
const CopyWebpackPlugin = require('copy-webpack-plugin')

class MyPlugin {
  apply (compiler) { // compiler 包含了所有配置信息
    console.log('MyPlugin 启动')

    // compiler.hooks.emit 在webpack打包后即将向输出目录输出文件时执行
    compiler.hooks.emit.tap('MyPlugin', compilation => {
      // compilation => 可以理解为此次打包的上下文
      // compilation.assets 获取到所有即将写入输入目录的资源文件信息
      for (const name in compilation.assets) {
        // console.log(name)
        // console.log(compilation.assets[name].source())
        if (name.endsWith('.js')) {
          // compilation.assets[name].source() 获取到文件的内容
          const contents = compilation.assets[name].source()
          const withoutComments = contents.replace(/\\/\\*\\*+\\*\\//g, '')
          compilation.assets[name] = {
            source: () => withoutComments,
            size: () => withoutComments.length
          }
        }
      }
    })
  }
}

module.exports = {
  mode: 'none',
  entry: './src/main.js',
  output: {
    filename: 'bundle.js',
    path: path.join(__dirname, 'dist'),
    // publicPath: 'dist/'
  },
  module: {
    rules: [
      {
        test: /.css$/,
        use: [
          'style-loader',
          'css-loader'
        ]
      },
      {
        test: /.png$/,
        use: {
          loader: 'url-loader',
          options: {
            limit: 10 * 1024 // 10 KB
          }
        }
      }
    ]
  },
  plugins: [
    new CleanWebpackPlugin(),
    // 用于生成 index.html
    new HtmlWebpackPlugin({
      title: 'Webpack Plugin Sample',
      meta: {
        viewport: 'width=device-width'
      },
      template: './src/index.html'
    }),
    // 用于生成 about.html
    new HtmlWebpackPlugin({
      filename: 'about.html'
    }),
    new CopyWebpackPlugin([
      // 'public/**'
      'public'
    ]),
    new MyPlugin()
  ]
}
Webpack Dev Server
yarn add webpack-dev-server --dev
webpack-dev-server 集成 自动编译 和 自动刷新浏览器 等功能
启动命令 yarn webpack-dev-server
yarn webpack-dev-server --open open 参数会自动打开浏览器
webpack-dev-server 为了提高工作效率,并不会将打包结果写入磁盘中,也就不会生成dist目录,将打包结果暂时存放在内存中。
而 httpserver 也是从内存中将这些文件读出来,然后发送给浏览器,这样就能减少很多不必要的磁盘读写操作,从而提高工作效率
devServer 为 webpack-dev-server 配置相关选项
contentBase 属性 额外为开发服务器指定查找资源目录
const path = require('path')
const { CleanWebpackPlugin } = require('clean-webpack-plugin')
const HtmlWebpackPlugin = require('html-webpack-plugin')
const CopyWebpackPlugin = require('copy-webpack-plugin')

module.exports = {
  mode: 'none',
  entry: './src/main.js',
  output: {
    filename: 'bundle.js',
    path: path.join(__dirname, 'dist')
  },
  // devServer 为 webpack-dev-server 配置相关选项
  devServer: {
    contentBase: './public', // 额外为开发服务器指定查找资源目录,多个路径用数组 ['./public']
    // proxy 属性用来配置代理服务
    proxy: {
      '/api': {
        // http://localhost:8080/api/users -> https://api.github.com/api/users
        target: 'https://api.github.com',
        // http://localhost:8080/api/users -> https://api.github.com/users
        pathRewrite: {
          '^/api': ''
        },
        // 不能使用 localhost:8080 作为请求 GitHub 的主机名
        // changeOrigin 设置为 true,会以代理主机名的域名去请求
        changeOrigin: true
      }
    }
  },
  module: {
    rules: [
      {
        test: /.css$/,
        use: [
          'style-loader',
          'css-loader'
        ]
      },
      {
        test: /.png$/,
        use: {
          loader: 'url-loader',
          options: {
            limit: 10 * 1024 // 10 KB
          }
        }
      }
    ]
  },
  plugins: [
    new CleanWebpackPlugin(),
    // 用于生成 index.html
    new HtmlWebpackPlugin({
      title: 'Webpack Tutorials',
      meta: {
        viewport: 'width=device-width'
      },
      template: './src/index.html'
    }),
    // 开发阶段最好不要使用这个插件
    // 因为开发阶段会频繁的打包,如果拷贝的文件比较多,比较大的话,打包的开销会比较大,
    // 打包速度就会比较慢,会降低效率
    // new CopyWebpackPlugin(['public'])
  ]
}
Webpack 配置 Source Map
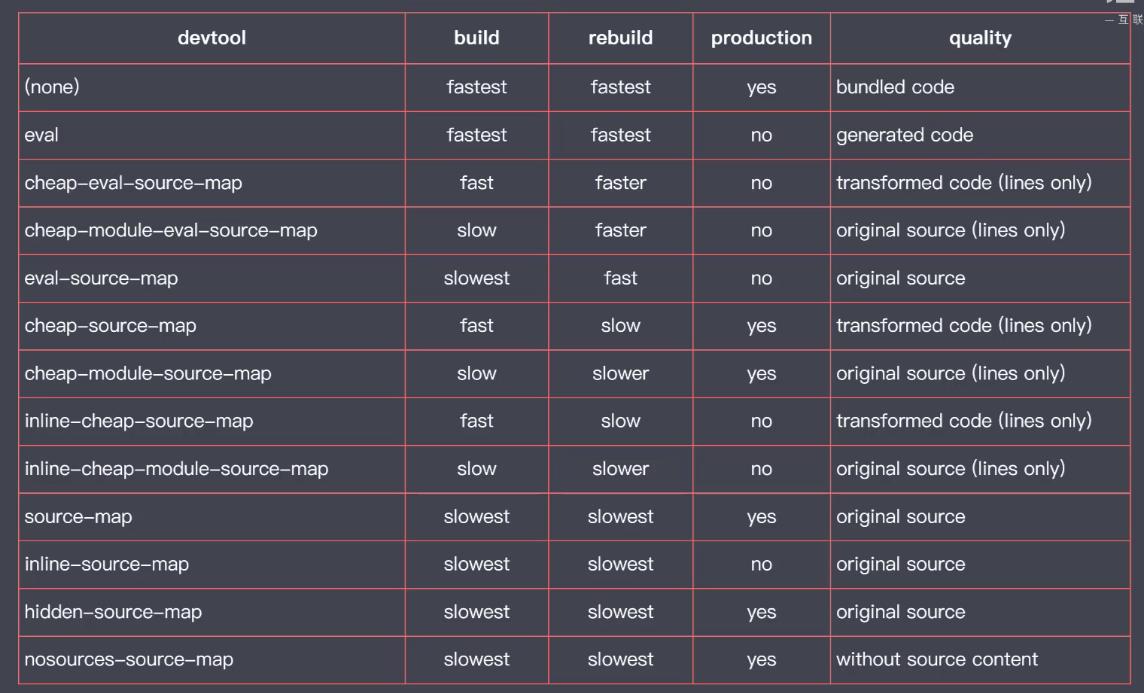
webpack 支持12种 source map 方式,每种方式的效率和效果各不相同
eval:将模块代码放入eval函数中去执行,并通过 sourceUrl去标注文件路径,这种模式并没有生成对应的sourcemap,所以只能定位是哪一个文件出了错误,不能定位行列。
eval-source-map:也是将模块代码放入eval函数中去执行,但是因为这个模式生成了sourcemap,所以不但可以定位具体的文件,也可以定位到具体的行列。
cheap-eval-source-map:这个模式相比于eval-source-map,做了简化,只能定位到行,不能定位到列,但是速度相对快很多。
cheap-module-eval-source-map:定位到的代码和源代码相同,也就是得到 loader处理之前的代码。开发模式推荐选择。
cheap-source-map:没有使用 eval 函数执行代码,定位到的代码也是 Loader 处理过后的代码。
inline-source-map:source map 以 DATA URL 的形式嵌入到代码中。会使代码体积变大很多,几乎不可能用到。
hidden-source-map:没有引入source-map, 多用于第三方插件。
nosources-source-map:看不到源代码,但是能定位到行信息。在生产环境中,可以保护源代码不被暴露。
eval:是否使用 eval 执行模块代码。
cheap:source map 是否包含行信息。
module:是否能够得到 Loader 处理之前的源代码。
开发模式下推荐使用 cheap-module-eval-source-map
理由:
1、一行代码一般在80到100个字符,定位到行一般也就足够能够定位到问题了。
2、代码经过 Loader 转换后差异会比较大。
3、首次打包速度慢无所谓,重写打包相对较快。
生产模式下一般选择 none,不生成 source map
1、source map 会暴露 源代码
2、调试是开发阶段的事情
const path = require('path')
const { CleanWebpackPlugin } = require('clean-webpack-plugin')
const HtmlWebpackPlugin = require('html-webpack-plugin')
const CopyWebpackPlugin = require('copy-webpack-plugin')

module.exports = {
  mode: 'none',
  entry: './src/main.js',
  output: {
    filename: 'bundle.js',
    path: path.join(__dirname, 'dist')
  },
  devtool: 'cheap-module-eval-source-map', // 推荐选择
  module: {
    rules: [
      {
        test: /.css$/,
        use: [
          'style-loader',
          'css-loader'
        ]
      },
      {
        test: /.png$/,
        use: {
          loader: 'url-loader',
          options: {
            limit: 10 * 1024 // 10 KB
          }
        }
      }
    ]
  },
  plugins: [
    new CleanWebpackPlugin(),
    // 用于生成 index.html
    new HtmlWebpackPlugin({
      title: 'Webpack Tutorials',
      meta: {
        viewport: 'width=device-width'
      },
      template: './src/index.html'
    }),
    new CopyWebpackPlugin([
      // 'public/**'
      'public'
    ])
  ]
}
Webpack HMR Hot Module Replacement 模块热替换
热替换只将修改的模块实时替换至应用中,而不必刷新整个应用。
webpack 中的 HMR 并不可以开箱即用,因此,css修改了,可以实现页面更新,但是js更新,会使页面刷新,丢失页面状态。
因为样式是经过了 loader 处理,style-loader 就已经自动做了 样式的 热更新 处理,会将 修改过的 css 代码 替换掉 之前的 css 代码,从而实现样式文件的更新。
而 javascript 模块没有任何规律,在 javascript 模块中导出的内容不固定,对导出的成员的使用也不相同,所以 webpack 就不知道如何去处理更新后的模块。
因此我们需要手动处理 JS 模块更新后的热替换。
js 文件
使用 module.hot.accept 方法 注册模块更新后的处理函数。
这个方法需要传入2个参数,第一个参数就是依赖模块的路径,第二个参数就是依赖更新后的处理函数。
// editor.js
import './editor.css'

export default () => {
  const editorElement = document.createElement('div')

  editorElement.contentEditable = true
  editorElement.className = 'editor'
  editorElement.id = 'editor'

  console.log('editor init completed')

  return editorElement
}


// main.js

import createEditor from './editor'
import background from './better.png'
import './global.css'

const editor = createEditor()
document.body.appendChild(editor)

const img = new Image()
img.src = background
document.body.appendChild(img)

// ============ 以下用于处理 HMR,与业务代码无关 ============

// console.log(createEditor)

if (module.hot) {
  let lastEditor = editor
  module.hot.accept('./editor', () => {
    // console.log('editor 模块更新了,需要这里手动处理热替换逻辑')
    // console.log(createEditor)

    const value = lastEditor.innerHTML
    document.body.removeChild(lastEditor)
    const newEditor = createEditor()
    newEditor.innerHTML = value
    document.body.appendChild(newEditor)
    lastEditor = newEditor
  })

  module.hot.accept('./better.png', () => {
    img.src = background
    console.log(background)
  })
}
webpack配置文件
const webpack = require('webpack')
const HtmlWebpackPlugin = require('html-webpack-plugin')

module.exports = {
  mode: 'development',
  entry: './src/main.js',
  output: {
    filename: 'js/bundle.js'
  },
  devtool: 'source-map',
  devServer: {
    hot: true
    // hotOnly: true // 设置 hotOnly ,不会刷新浏览器,这样module.hot.accept的错误也能监测到
  },
  module: {
    rules: [
      {
        test: /\\.css$/,
        use: [
          'style-loader',
          'css-loader'
        ]
      },
      {
        test: /\\.(png|jpe?g|gif)$/,
        use: 'file-loader'
      }
    ]
  },
  plugins: [
    new HtmlWebpackPlugin({
      title: 'Webpack Tutorial',
      template: './src/index.html'
    }),
    new webpack.HotModuleReplacementPlugin()
  ]
}
Webpack 不同环境下的配置
1、配置文件根据环境不同导出不同配置
yarn webpack --env production
const webpack = require('webpack')
const { CleanWebpackPlugin } = require('clean-webpack-plugin')
const HtmlWebpackPlugin = require('html-webpack-plugin')
const CopyWebpackPlugin = require('copy-webpack-plugin')

// env 通过 cli 传递的环境名参数
// argv 运行 cli 过程中所传递的所有参数
module.exports = (env, argv) => {
  const config = {
    mode: 'development',
    entry: './src/main.js',
    output: {
      filename: 'js/bundle.js'
    },
    devtool: 'cheap-eval-module-source-map',
    devServer: {
      hot: true,
      contentBase: 'public'
    },
    module: {
      rules: [
        {
          test: /\\.css$/,
          use: [
            'style-loader',
            'css-loader'
          ]
        },
        {
          test: /\\.(png|jpe?g|gif)$/,
          use: {
            loader: 'file-loader',
            options: {
              outputPath: 'img',
              name: '[name].[ext]'
            }
          }
        }
      ]
    },
    plugins: [
      new HtmlWebpackPlugin({
        title: 'Webpack Tutorial',
        template: './src/index.html'
      }),
      new webpack.HotModuleReplacementPlugin()
    ]
  }

  if (env === 'production') {
    config.mode = 'production'
    config.devtool = false
    config.plugins = [
      ...config.plugins,
      new CleanWebpackPlugin(),
      new CopyWebpackPlugin(['public'])
    ]
  }

  return config
}
2、一个文件对应一个配置文件
webpack.common.js
const HtmlWebpackPlugin = require('html-webpack-plugin')

module.exports = {
  entry: './src/main.js',
  output: {
    filename: 'js/bundle.js'
  },
  module: {
    rules: [
      {
        test: /\\.css$/,
        use: [
          'style-loader',
          'css-loader'
        ]
      },
      {
        test: /\\.(png|jpe?g|gif)$/,
        use: {
          loader: 'file-loader',
          options: {
            outputPath: 'img',
            name: '[name].[ext]'
          }
        }
      }
    ]
  },
  plugins: [
    new HtmlWebpackPlugin({
      title: 'Webpack Tutorial',
      template: './src/index.html'
    })
  ]
}
webpack.dev.js
const webpack = require('webpack')
const merge = require('webpack-merge')
const common = require('./webpack.common')

module.exports = merge(common, {
  mode: 'development',
  devtool: 'cheap-eval-module-source-map',
  devServer: {
    hot: true,
    contentBase: 'public'
  },
  plugins: [
    new webpack.HotModuleReplacementPlugin()
  ]
})
webpack.prod.js
const merge = require('webpack-merge')
const { CleanWebpackPlugin } = require('clean-webpack-plugin')
const CopyWebpackPlugin = require('copy-webpack-plugin')
const common = require('./webpack.common')

module.exports = merge(common, {
  mode: 'production',
  plugins: [
    new CleanWebpackPlugin(),
    new CopyWebpackPlugin(['public'])
  ]
})
package.json
"scripts": {
    "build": "webpack --config webpack.prod.js"
  },
Webpack production 模式下 自动启用的插件
DefinePlugin
为代码注入全局成员: process.env.NODE_ENV
const webpack = require('webpack')

module.exports = {
  mode: 'none',
  entry: './src/main.js',
  output: {
    filename: 'bundle.js'
  },
  plugins: [
    new webpack.DefinePlugin({
      // 值要求的是一个代码片段
      API_BASE_URL: JSON.stringify('https://api.example.com')
    })
  ]
}
main.js
console.log(API_BASE_URL)
Tree Shaking 摇树
摇掉代码中未引用部分
Tree Shaking 并不是指某个配置选项,是一组功能搭配使用后的优化效果
usedExports属性 负责标记 枯树叶
minimize属性 负责摇掉 它们
concatenateModules属性 尽可能的将所有模块合并输出到一个函数中,使得作用域提升,既提升了运行效率,又减少了代码的体积。
Tree Shaking 的前提是 ES Modules,由 Webpack 打包的代码必须使用 ESM
而为了转换代码中的 ECMAScript 新特性,需要使用 babel-loader 处理 JS 代码,
babel-loader 在转换代码时,就有可能 将 ES Modules 转换成了 CommonJS
@babel/preset-env 插件会 将 ES Modules 转换成了 CommonJS,使得 Tree Shaking 失效
而新版本的 babel-loader 会自动关闭 ESM 转换,这样就不会影响 Tree Shaking
module.exports = {
  mode: 'none',
  entry: './src/index.js',
  output: {
    filename: 'bundle.js'
  },
  module: {
    rules: [
      {
        test: /\\.js$/,
        use: {
          loader: 'babel-loader',
          options: {
            presets: [
              // 如果 Babel 加载模块时已经转换了 ESM,则会导致 Tree Shaking 失效
              // ['@babel/preset-env', { modules: 'commonjs' }]
              // ['@babel/preset-env', { modules: false }]
              // 也可以使用默认配置,也就是 auto,这样 babel-loader 会自动关闭 ESM 转换
              ['@babel/preset-env', { modules: 'auto' }]
            ]
          }
        }
      }
    ]
  },
  // optimization: 集中优化配置 webpack 内部功能
  optimization: {
    // 模块只导出被使用的成员
    usedExports: true,
    // 尽可能合并每一个模块到一个函数中
    concatenateModules: true,
    // 压缩输出结果
    minimize: true
  }
}
sideEffects 副作用
副作用:模块执行时除了导出成员之外所作的事情
sideEffects 一般用于 npm 包标记是否有副作用
optimization 的 sideEffects 属性用来开启副作用
package.json 的 sideEffects 用来标识 代码没有副作用
这2个属性设置后,没有用到的代码将不会被打包
webpack.config.js
module.exports = {
  mode: 'none',
  entry: './src/index.js',
  output: {
    filename: 'bundle.js'
  },
  module: {
    rules: [
      {
        test: /\\.css$/,
        use: [
          'style-loader',
          'css-loader'
        ]
      }
    ]
  },
  optimization: {
    sideEffects: true,  // 开启副作用
    // 模块只导出被使用的成员
    // usedExports: true,
    // 尽可能合并每一个模块到一个函数中
    // concatenateModules: true,
    // 压缩输出结果
    // minimize: true,
  }
}
package.json
sideEffects 设置 false ,表示所有文件都不会产生 副作用
"sideEffects": false当有代码会产生 副作用时,sideEffects 属性要标识有副作用的 代码文件,这样就会被一起打包
"sideEffects": [
    "./src/extend.js",
    "*.css"
  ]
Code Splitting 代码分割
如果所有代码最终都打包到一起,bundle.js 就会体积过大,
但并不是每个模块在启动时都是必要的,
所以需要 分包,按需加载
多入口打包
适用于 多页应用程序
一个页面对应一个打包入口
不同页面之间 公共部分单独提取
const { CleanWebpackPlugin } = require('clean-webpack-plugin')
const HtmlWebpackPlugin = require('html-webpack-plugin')

module.exports = {
  mode: 'none',
  entry: {
    index: './src/index.js',
    album: './src/album.js'
  },
  output: {
    filename: '[name].bundle.js'
  },
  optimization: {
    splitChunks: {
      // 自动提取所有公共模块到单独 bundle
      chunks: 'all'
    }
  },
  module: {
    rules: [
      {
        test: /\\.css$/,
        use: [
          'style-loader',
          'css-loader'
        ]
      }
    ]
  },
  plugins: [
    new CleanWebpackPlugin(),
    new HtmlWebpackPlugin({
      title: 'Multi Entry',
      template: './src/index.html',
      filename: 'index.html',
      chunks: ['index'] // 指定 输出的 html 所使用的 bundle.js
    }),
    new HtmlWebpackPlugin({
      title: 'Multi Entry',
      template: './src/album.html',
      filename: 'album.html',
      chunks: ['album']
    })
  ]
}
动态导入
按需加载,需要用到某个模块时,再加载这个模块
动态导入的模块会被自动分包
// import posts from './posts/posts'
// import album from './album/album'

const render = () => {
  const hash = window.location.hash || '#posts'

  const mainElement = document.querySelector('.main')

  mainElement.innerHTML = ''

  if (hash === '#posts') {
    // mainElement.appendChild(posts())
    import(/* webpackChunkName: 'components' */'./posts/posts').then(({ default: posts }) => {
      mainElement.appendChild(posts())
    })
  } else if (hash === '#album') {
    // mainElement.appendChild(album())
    import(/* webpackChunkName: 'components' */'./album/album').then(({ default: album }) => {
      mainElement.appendChild(album())
    })
  }
}

render()

window.addEventListener('hashchange', render)
MiniCssExtractPlugin 提取CSS到单个文件
yarn add mini-css-extract-plugin --dev
css 内容比较少的情况,建议不需要提取到单个文件, 可以减少一次请求
webpack 内置的压缩插件仅仅针对于 js 文件,所以 css 文件压缩需要使用插件 OptimizeCssAssetsWebpackPlugin
OptimizeCssAssetsWebpackPlugin:压缩输出的 css 文件 yarn add optimize-css-assets-webpack-plugin --dev
如果将 OptimizeCssAssetsWebpackPlugin 配置在 plugins 数组中,那么 OptimizeCssAssetsWebpackPlugin 将会在任何情况下工作
所以 建议压缩类插件配置在 optimization 的 minimizer 属性中,这样只有 minimizer 特性开启时,此类插件才会工作
在 生产模式下,optimization 的 minimizer属性会自动开启
如果配置了 minimizer 属性,webpack 会认为我们需要自定义 压缩插件,
这样原本内置的 js压缩 将会被覆盖掉,所以需要手动再添加回来
yarn add terser-webpack-plugin --dev
const { CleanWebpackPlugin } = require('clean-webpack-plugin')
const HtmlWebpackPlugin = require('html-webpack-plugin')
const MiniCssExtractPlugin = require('mini-css-extract-plugin')
const OptimizeCssAssetsWebpackPlugin = require('optimize-css-assets-webpack-plugin')
const TerserWebpackPlugin = require('terser-webpack-plugin')

module.exports = {
  mode: 'none',
  entry: {
    main: './src/index.js'
  },
  output: {
    filename: '[name].bundle.js'
  },
  optimization: {
    minimizer: [
      new TerserWebpackPlugin(),
      new OptimizeCssAssetsWebpackPlugin()
    ]
  },
  module: {
    rules: [
      {
        test: /\\.css$/,
        use: [
          // 'style-loader', // 将样式通过 style 标签注入
          MiniCssExtractPlugin.loader, // 提取CSS到单个文件
          'css-loader'
        ]
      }
    ]
  },
  plugins: [
    new CleanWebpackPlugin(),
    new HtmlWebpackPlugin({
      title: 'Dynamic import',
      template: './src/index.html',
      filename: 'index.html'
    }),
    new MiniCssExtractPlugin()
  ]
}
Webpack 输出文件名 Hash
hash: 整个项目级别
一旦项目中有任何一个地方发生改动,那打包过程中发生的 hash 值 都会发生变化
chunkhash:chunk级别
当发生改动,同一chunk下 的文件及其 相关引用的 hash 值都会发生变化
contenthash:文件级别
当发生改动,当前改动文件及其 相关引用的 hash 值都会发生变化
推荐:contenthash:8
const { CleanWebpackPlugin } = require('clean-webpack-plugin')
const HtmlWebpackPlugin = require('html-webpack-plugin')
const MiniCssExtractPlugin = require('mini-css-extract-plugin')
const OptimizeCssAssetsWebpackPlugin = require('optimize-css-assets-webpack-plugin')
const TerserWebpackPlugin = require('terser-webpack-plugin')

module.exports = {
  mode: 'none',
  entry: {
    main: './src/index.js'
  },
  output: {
    filename: '[name]-[contenthash:8].bundle.js'
  },
  optimization: {
    minimizer: [
      new TerserWebpackPlugin(),
      new OptimizeCssAssetsWebpackPlugin()
    ]
  },
  module: {
    rules: [
      {
        test: /\\.css$/,
        use: [
          // 'style-loader', // 将样式通过 style 标签注入
          MiniCssExtractPlugin.loader,
          'css-loader'
        ]
      }
    ]
  },
  plugins: [
    new CleanWebpackPlugin(),
    new HtmlWebpackPlugin({
      title: 'Dynamic import',
      template: './src/index.html',
      filename: 'index.html'
    }),
    new MiniCssExtractPlugin({
      filename: '[name]-[contenthash:8].bundle.css'
    })
  ]
}
1
以上是关于Part2-2-2 webpack的主要内容,如果未能解决你的问题,请参考以下文章