NO.A.0003.zabbix_lnmp_zabbix.server/zabbix.agent编译安装教程
Posted Java BBS
tags:
篇首语:本文由小常识网(cha138.com)小编为大家整理,主要介绍了NO.A.0003.zabbix_lnmp_zabbix.server/zabbix.agent编译安装教程相关的知识,希望对你有一定的参考价值。
Zabbix Server端和Zabbix Agent执行如下代码:
Zabbix监控平台部署,至少需要安装四个组件,分别是Zabbix_Server/Zabbix_Web/Databases/Zabbix_Agent,如下为Zabbix监控平台安装配置详细步骤:
部署环境:
Server端 ————>192.168.1.59Agent端 ————>192.168.1.60CentOS版本 ————>CentOS 7.6.1810ZABBIX版本 ————>Zabbix 4.0.19
1、下载zabbix版本,各个版本之间安装方法相差不大,可以根据实际情况选择安装版本,本文版本为Zabbix-4.0.25.tar.gz。
// zabbix源码下载地址(建议从官网下载):// https://www.zabbix.com/download_sources#tab:40LTS//OR[root@localhost ~]# wget -c https://cdn.zabbix.com/zabbix/sources/stable/4.0/> zabbix-4.0.25.tar.gz //-c:断点续传[root@localhost ~]# md5sum zabbix-4.0.25.tar.gz //查看他的md5值0694c540b1d014cdc5c6a50d361d77f2 zabbix-4.0.25.tar.gz//因为zabbix基于C语言开发;安装编译时依赖包、库文件:[root@localhost ~]# yum -y install gcc curl curl-devel net-snmp net-snmp-devel perl-DBI> libxml2-devel libevent-devel pcre mysql-devel//创建用户和用户组:[root@localhost ~]# groupadd zabbix[root@localhost ~]# useradd -g zabbix zabbix[root@localhost ~]# usermod -s /sbin/nologin zabbix
2、编译安装zabbix-server:
//解压zabbix-4.0.25.tar.gz[root@localhost ~]# tar -xzvf zabbix-4.0.25.tar.gz//-x extract解压,-z gzip压缩,-v verbose详细,-f file文件//zabbix-server编译安装,需要通过源代码部署三个步骤://预编译:[root@localhost zabbix-4.0.25]# ./configure --prefix=/usr/local/zabbix --enable-server--with-mysql --enable-ipv6 --with-net-snmp --with-libcurl --with-libxml2[root@localhost zabbix-4.0.25]# ./configure --help |more /查看每个参数的含义,// --prefix=/usr/local/zabbix :源码安装目录绝对路径// --enable-server :开启核心组件server;// --with-mysql=源码地址 :若mysql是源码安装的,需把mysql的安装库指导源代码的安装目录;// --enable-ipv6 :开启IPV6,后续支持IPV6监控,// --with-net-snmp:通过snmp监控客户端// --with-libcurl:支持curl,去获取网页的关键词,做web监控是用到库文件// --with-libxml2:web接口//编译[root@localhost zabbix-4.0.25]# make//安装:[root@localhost zabbix-4.0.25]# make install//添加软链接(相当于快捷方式);启动脚本要找/usr/local/sbin;不然启动时会报错[root@localhost ~]# ln -s /usr/local/zabbix/sbin/zabbix_* /usr/local/sbin/// 将/usr/local/zabbix/etc/zabbix_server.conf配置文件中代码设置为如下:[root@localhost ~]#cp /usr/local/zabbix/etc/zabbix_server.conf zabbix-server.conf.bak[root@localhost ~]#vim /usr/local/zabbix/etc/zabbix_server.confLogFile=/tmp/zabbix_server.logDBHost=localhost //数据库主机 显示NO的话DBHost=127.0.0.1DBName=zabbix //数据库名称DBUser=zabbix //数据库用户名DBPassword=123456 //数据库密码#DBSocket=/var/lib/mysql/mysql.sock //数据库mysql.sock文件
//同时cp zabbix_server启动脚本至/etc/init.d/目录,//启动zabbix_server Zabbix_server默认监听端口为10051[root@localhost zabbix-4.0.25]#cp misc/init.d/tru64/zabbix_server /etc/init.d/zabbix_server[root@localhost ~]# chmod o+x /etc/init.d/zabbix_server[root@localhost ~]# /etc/init.d/zabbix_server restart[root@localhost ~]# netstat -tunlp |grep -aw 10051tcp 0 0 0.0.0.0:10051 LISTEN 6195/zabbix_servertcp6 0 0 :::10051 LISTEN 6195/zabbix_server
3、部署Zabbix-WEB
//安装epel-release扩展源:[root@localhost ~]# yum install epel-release -y[root@localhost ~]# ll /etc/yum.repos.d/|grep -aw epel //查看有没有如下两个文件-rw-r--r-- 1 root root 951 Oct 3 2017 epel.repo-rw-r--r-- 1 root root 1050 Oct 3 2017 epel-testing.repo#安装nginx软件包;[root@localhost ~]# yum install -y nginx#安装Mariadb(数据库)、PHP、PHP-FPM环境;//待确定[root@localhost ~]# yum install -y mariadb-server mariadb-devel php php-devel php-fpm[root@localhost ~]# yum install -y mariadb-server mariadb-devel php php-cli> php-common php-gd php-ldap php-mbstring php-mcrypt php-mysql php-pdo php-fpm
3.1、配置Mariadb database
//安装Mariadb database[root@localhost ~]# systemctl start mariadb.service //启动数据库[root@localhost ~]# msyql_secure_installation //设置Mariadbroot初始化密码[root@localhost ~]# mysql -uroot -p123456MariaDB [(none)]> create database zabbix character set utf8 collate utf8_bin;//创建数据库,名称为zabbix并且字符为utf8MariaDB [(none)]> create user 'zabbix'@'localhost' identified by '123456';//创建zabbix用户并设置密码MariaDB [(none)]> grant all privileges on zabbix.* to 'zabbix'@'localhost';//授权zabbix用户从localhost访问,对zabbix数据库有完全控制权限MariaDB [(none)]> flush privileges; //刷新权限MariaDB [(none)]> exit // 退出// 用源码安装的话需手动将Zabbix基础SQL文件导入数据至Zabbix数据库:[root@localhost ~]# cd zabbix-4.0.25[root@localhost ~]# mysql -uzabbix -p123456 zabbix <database/mysql/schema.sql[root@localhost ~]# mysql -uzabbix -p123456 zabbix <database/mysql/images.sql[root@localhost ~]# mysql -uzabbix -p123456 zabbix < database/mysql/data.sql// 切换到zabbix数据库之下:[root@localhost ~]# mysql -uroot -p123456MariaDB [(none)]> use zabbix; //切到zabbix用户之下MariaDB [zabbix]> show tables;// 查看数据导入是否成功
3.2、配置nginx和php-fpm
//配置nginx和php-fpm整合,执行方案如下:[root@localhost ~]# cd /etc/nginx/[root@localhost nginx]# vim nginx.conf //查看nginx.conf文件//配置nginx.conf.default文件有PHP文件代码的配置[root@localhost nginx]# vim nginx.conf.defaultlocation / { //第二步root html;index index.php index.html index.htm; //加上nginx.php表示引导页。location ~ .php$ {root /usr/share/nginx/html; //更改发布目录 //第一步fastcgi_pass 127.0.0.1:9000;fastcgi_index index.php;fastcgi_param SCRIPT_FILENAME $document_root$fastcgi_script_name;//添加$document_root;表示发布目录 //第三步include fastcgi_params;}//查看nginx.conf.default文件并去掉#号空行。[root@localhost nginx]# grep -vE "#|^$" nginx.conf.defaultworker_processes 1;events {worker_connections 1024;}http {include mime.types;default_type application/octet-stream;sendfile on;keepalive_timeout 65; //以上为全局配置server { //以下为server主机的配置listen 80;server_name localhost;location / { //location /是正常匹配,处于正则匹配后执行。root html;index index.php index.html index.htm;}error_page 500 502 503 504 /50x.html;location = /50x.html {root html;}location ~ .php$ { //location ~是正则匹配,是优先匹配,root /usr/share/nginx/html;fastcgi_pass 127.0.0.1:9000;fastcgi_index index.php;fastcgi_param SCRIPT_FILENAME $document_root$fastcgi_script_name;include fastcgi_params;}}}
//把修改后的nginx.conf.default文件覆盖掉nginx.conf的默认文件内容[root@localhost nginx]# grep -vE "#|^$" nginx.conf.default >nginx.conf[root@localhost nginx]# systemctl start php-fpm.service //启动php-fpm服务[root@localhost nginx]# netstat -tunlp |grep 9000tcp 0 0 127.0.0.1:9000 LISTEN 9719/php-fpm: maste[root@localhost nginx]# ps -ef |grep phproot 9068 8641 0 02:29 pts/0 00:00:00 grep --color=auto php[root@localhost nginx]# netstat -tunlp |grep -aw 9000tcp 0 0 127.0.0.1:9000 LISTEN 5759/php-fpm: pool[root@localhost nginx]# nginx -tnginx: the configuration file /etc/nginx/nginx.conf syntax is oknginx: configuration file /etc/nginx/nginx.conf test is successful[root@localhost nginx]# systemctl restart nginx.service//拷贝Zabbix-web网站程序至Nginx发布目录,文件位置在/root/zabbix-4.0.25/frontends/php[root@localhost php]# cp -a /root/zabbix-4.0.25/frontends/php/* /usr/share/nginx/html///反斜杠表示强制拷贝不提示。
4、启动所有服务,并设置开机自启动。
//启动并配置开机自启动程序:[root@localhost ~]# /etc/init.d/zabbix_server restart[root@localhost ~]# systemctl start mariadb.service[root@localhost ~]# systemctl start nginx.service[root@localhost ~]# systemctl start php-fpm.service//并为其执行enable操作,设置开机自启动
5、通过Zabbix Web GUI安装设置:
通过浏览器Zabbix_WEB验证,通过浏览器访问http://192.168.1.59
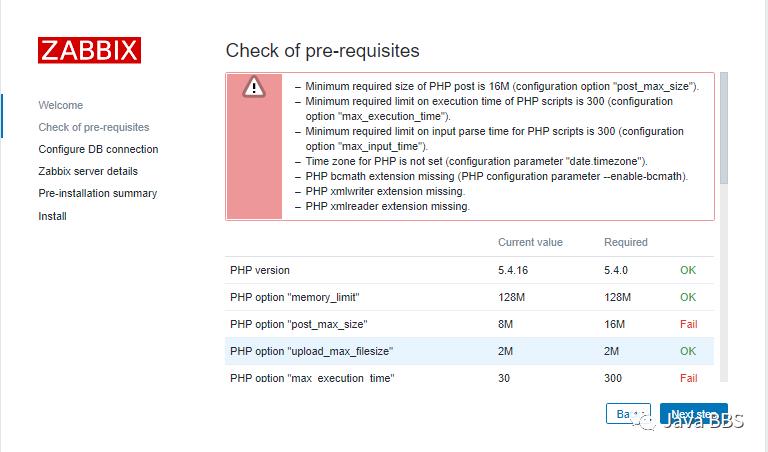
如上异常错误解决方法代码如下,安装缺失的软包,并修改php.ini对应参数的值即可:
[root@localhost ~]# yum install php-mbstring php-bcmath php-gd php-xml -y[root@localhost ~]# yum install gd gd-devel -y //解决上图报错问题[root@localhost ~]# sed -i '/post_max_size/s/8/16/g;/max_execution_time/s/30/300/g;> /max_input_time/s/60/300/g;s/;date.timezone.*/date.timezone> = PRC/g;s/;always_populate_raw_post_data/always_populate_raw_post_data/g' /etc/php.ini[root@localhost ~]# systemctl start php-fpm.service
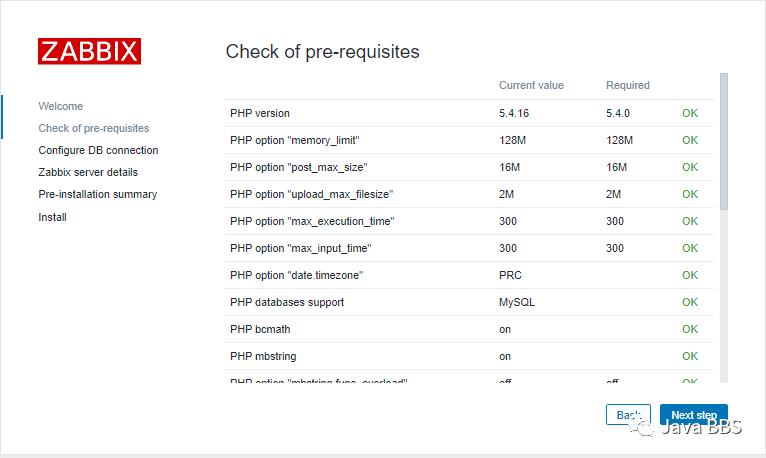
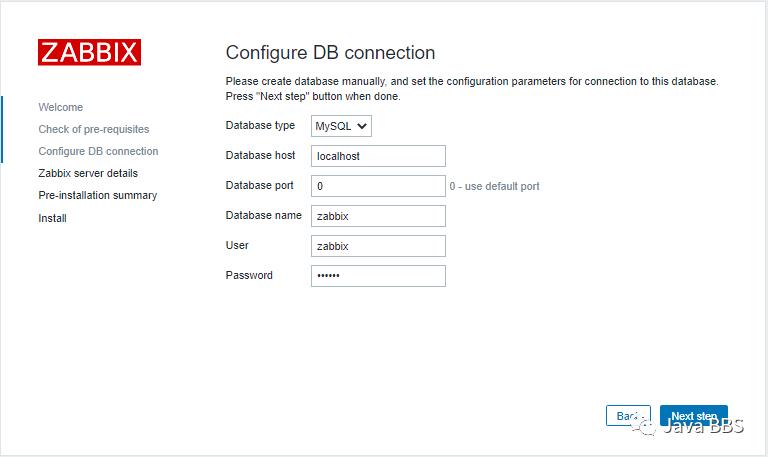
配置数据库连接,输入数据库名、用户、密码,单击Test connection,显示OK,单击下一步即可
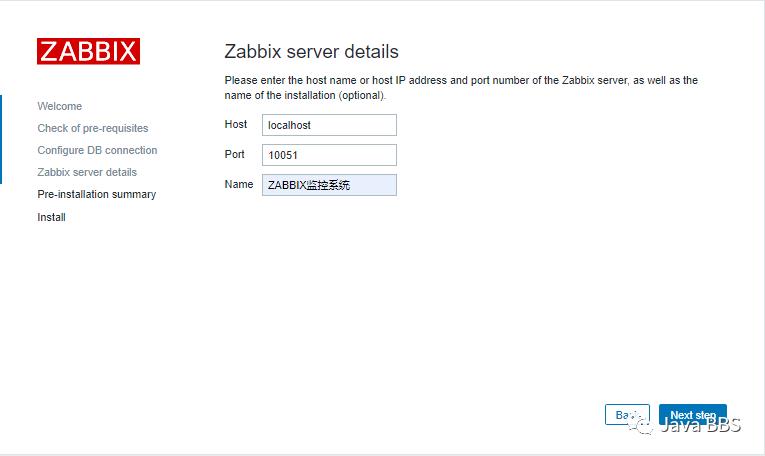
填写Zabbix Title显示,可以为空,可以输入自定义的名称
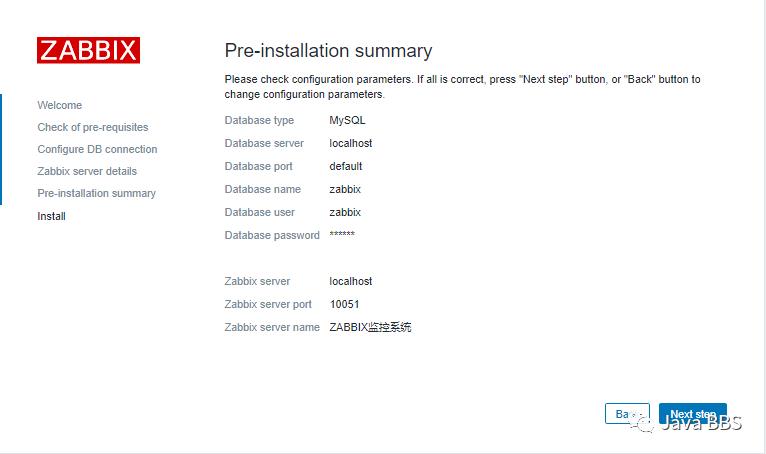
查看安装前摘要,确认信息是否正确:
需修创建zabbix.conf.php文件,执行如下命令,zabbix.conf.php内容代码如下。
或者单击“Download the configuration file”下载zabbix.conf.php文件,并将该文件上传至/usr/share/nginx/html/conf/,并设置可写权限。
刷新WEB页面,最后单击Finish即可:
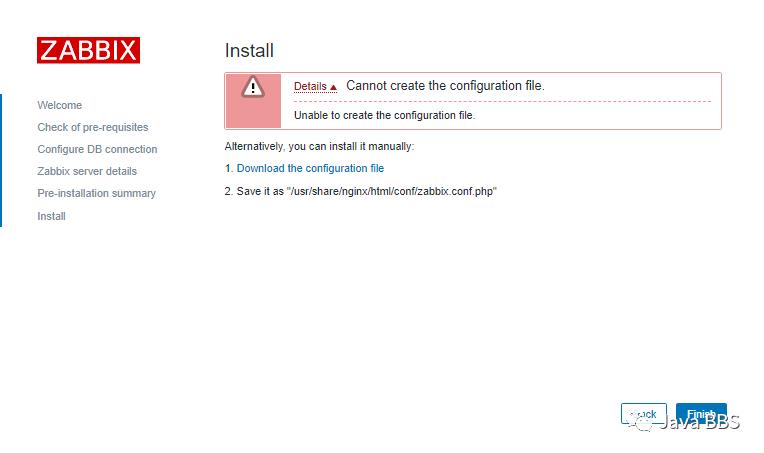
// Zabbix GUI configuration file.global $DB;$DB['TYPE'] = 'MYSQL';$DB['SERVER'] = 'localhost';$DB['PORT'] = '0';$DB['DATABASE'] = 'zabbix';$DB['USER'] = 'zabbix';$DB['PASSWORD'] = '123456';// Schema name. Used for IBM DB2 and PostgreSQL.$DB['SCHEMA'] = '';$ZBX_SERVER = 'localhost';$ZBX_SERVER_PORT = '10051';$ZBX_SERVER_NAME = 'ZABBIX监控系统';$IMAGE_FORMAT_DEFAULT = IMAGE_FORMAT_PNG;
刷新页面显示:恭喜你!你已安装zabbix前端;
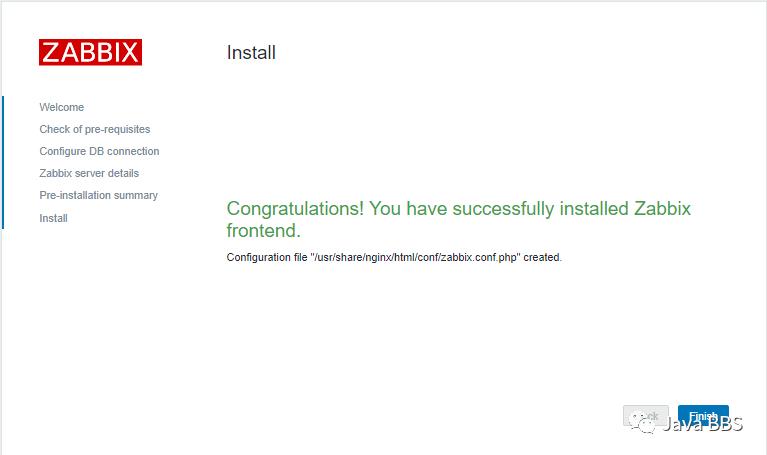
登录Zabbix WEB界面,默认用户名和密码为:Admin/zabbix

zabbix后台管理界面:

6、源码编译安装Zabbix Agent端(本机)
6.1、下载zabbix版本,各个版本之间安装方法相差不大,可以根据实际情况选择安装版本,本文版本为Zabbix-4.0.25.tar.gz。
// zabbix源码下载地址(建议从官网下载):// https://www.zabbix.com/download_sources#tab:40LTS//OR[root@localhost ~]#> wget -c https://cdn.zabbix.com/zabbix/sources/stable/4.0/zabbix-4.0.25.tar.gz //-c:断点续传[root@localhost ~]# md5sum zabbix-4.0.25.tar.gz //查看他的md5值0694c540b1d014cdc5c6a50d361d77f2 zabbix-4.0.25.tar.gz//因为zabbix基于C语言开发;安装编译时依赖包、库文件://本机不用安装,编译zabbix_server时已安装[root@localhost ~]# yum -y install gcc curl curl-devel net-snmp net-snmp-devel perl-DBI> libxml2-devel libevent-devel pcre mysql-devel
2、编译安装zabbix-Agent:
//解压zabbix-4.0.25.tar.gz[root@localhost ~]# tar -xzvf zabbix-4.0.25.tar.gz//-x extract解压,-z gzip压缩,-v verbose详细,-f file文件//zabbix-server编译安装,需要通过源代码部署三个步骤://1、预编译:[root@localhost zabbix-4.0.25]# ./configure --prefix=/usr/local/zabbix --agent-server> --with-mysql --enable-ipv6 --with-net-snmp --with-libcurl --with-libxml2[root@localhost zabbix-4.0.25]# ./configure --help |more /查看每个参数的含义,// --prefix=/usr/local/zabbix :源码安装目录绝对路径// --enable-agent :开启核心组件agent;// --with-mysql=源码地址 :若mysql是源码安装的,需把mysql的安装库指导源代码的安装目录;// --enable-ipv6 :开启IPV6,后续支持IPV6监控,// --with-net-snmp:通过snmp监控客户端// --with-libcurl:支持curl,去获取网页的关键词,做web监控是用到库文件// --with-libxml2:web接口//2、编译[root@localhost zabbix-4.0.25]# make//3、安装:[root@localhost zabbix-4.0.25]# make install//4、添加软链接(相当于快捷方式);启动脚本要找/usr/local/sbin;不然启动时会报错[root@localhost ~]# ln -s /usr/local/zabbix/sbin/zabbix_agentd /usr/local/sbin/
//5、同时cp zabbix_server启动脚本至/etc/init.d/目录,// 启动zabbix_agent Zabbix_agent默认监听端口为10050[root@localhost zabbix-4.0.25]#cp misc/init.d/tru64/zabbix_agentd /etc/init.d/zabbix_agentd[root@localhost ~]# chmod o+x /etc/init.d/zabbix_agentd[root@localhost ~]# /etc/init.d/zabbix_agentd restart
zabbix-agent的监听端口为10050
[root@localhost ~]# netstat -tunlp |grep -aw 10050tcp 0 0 0.0.0.0:10050 LISTEN 14210/zabbix_agentdtcp6 0 0 :::10050 LISTEN 14210/zabbix_agentd
END
声明:JavaBBS论坛主要用于IT技术专题的交流学习,为开源技术爱好者提供广泛、权威的技术资料。若您在技术专题有更好的想法或者建议,欢迎交流!!!


推荐阅读
Recommended reading

JavaBBS→
JavaBBS大数据/dsj
JavaBBS云存储/ycc
JavaBBS数据库→/sjk
JavaBBS云计算/yjs
JavaBBSIT.Log→
JavaBBSNginx→/ngx
JavaBBSzabbix→ /zbx
JavaBBSJavaSE→ /jse JavaBBS社区文章→ /bwz
JavaBBS社区资料→/bzl
以上是关于NO.A.0003.zabbix_lnmp_zabbix.server/zabbix.agent编译安装教程的主要内容,如果未能解决你的问题,请参考以下文章