c#如何分割图片并展示原图中一部分
Posted
tags:
篇首语:本文由小常识网(cha138.com)小编为大家整理,主要介绍了c#如何分割图片并展示原图中一部分相关的知识,希望对你有一定的参考价值。
picturebox1中打开了一副图像,现在的话,在picturebox1中选取了两个点(x0,y0)以及(x1,y1)。如何在picturebox2中绘制坐标x0~x2,y0~y1这部分的图像?代码的话又该怎么写呢?
那么如何将改部分的图像在picturebox2中显示呢?下面代码的在运行时会报错,错误为:pictureBox2.Image =
bmSmall;这一句
未将对象引用设置到对象的实例。
Rectangle rect = new Rectangle(x0,y0,(x1-x0),(y1-y0));
Bitmap bmSmall = new Bitmap(rect.Width, rect.Height,
System.Drawing.Imaging.PixelFormat.Format32bppRgb);
using
(Graphics grSmall = Graphics.FromImage(bmSmall))
grSmall.DrawImage(pictureBox1.Image, new
System.Drawing.Rectangle(0, 0, bmSmall.Width, bmSmall.Height), rect,
GraphicsUnit.Pixel);
grSmall.Dispose();
pictureBox2.Image =
bmSmall;
Rectangle rect = new Rectangle (x0,y0,(x1-x0),(y1-y0));
再调用如下的函数可得到截取的图像
/// <summary>
/// 截取图像的矩形区域
/// </summary>
/// <param name="source">源图像对应picturebox1</param>
/// <param name="rect">矩形区域,如上初始化的rect</param>
/// <returns>矩形区域的图像</returns>
public static Image AcquireRectangleImage(Image source, Rectangle rect)
if (source == null || rect.IsEmpty) return null;
Bitmap bmSmall = new Bitmap(rect.Width, rect.Height, System.Drawing.Imaging.PixelFormat.Format32bppRgb);
//Bitmap bmSmall = new Bitmap(rect.Width, rect.Height, source.PixelFormat);
using (Graphics grSmall = Graphics.FromImage(bmSmall))
grSmall.DrawImage(source,
new System.Drawing.Rectangle(0, 0, bmSmall.Width, bmSmall.Height),
rect,
GraphicsUnit.Pixel);
grSmall.Dispose();
return bmSmall;
追问
那么如何将改部分的图像在picturebox2中显示呢?追问中无法写了,我写在补充问题里了,麻烦你看一下
追答AcquireRectangleImage函数返回的是一个Image对象
直接
picturebox2.image = AcquireRectangleImage就可以了。
具体自己试一下。
public:
void DrawImage(
Image^ image,
Rectangle destRect,
float srcX,
float srcY,
float srcWidth,
float srcHeight,
GraphicsUnit srcUnit,
ImageAttributes^ imageAttrs
)
参数
image
类型:System.Drawing..::.Image
要绘制的 Image。
destRect
类型:System.Drawing..::.Rectangle
Rectangle 结构,它指定所绘制图像的位置和大小。 将图像进行缩放以适合该矩形。
srcX
类型:System..::.Single
要绘制的源图像部分的左上角的 x 坐标。
srcY
类型:System..::.Single
要绘制的源图像部分的左上角的 y 坐标。
srcWidth
类型:System..::.Single
要绘制的源图像部分的宽度。
srcHeight
类型:System..::.Single
要绘制的源图像部分的高度。
srcUnit
类型:System.Drawing..::.GraphicsUnit
GraphicsUnit 枚举的成员,它指定用于确定源矩形的度量单位。
imageAttrs
类型:System.Drawing.Imaging..::.ImageAttributes
ImageAttributes,它指定 image 对象的重新着色和伽玛信息。
下面的代码示例设计用于 Windows 窗体,它需要 PaintEventArgse(这是 Paint 事件处理程序的参数)。 代码执行下列操作:
从示例文件夹中的 JPEG 文件 SampImag.jpg 创建图像。
创建要在其中绘制图像的目标矩形。
创建要从中提取图像的一部分的源矩形的坐标。
将源矩形的度量单位设置为像素。
将原始图像绘制到屏幕。
创建要在其中绘制调整后的图像的附加矩形。
创建并设置调整后图像的特性,使其伽玛值大于正常值。
将调整后的图像绘制到屏幕。
对于原始的、未调整的目标矩形,该位置确定图像在屏幕上的位置,源矩形和目标矩形的大小确定所绘制图像的缩放,而源矩形的大小确定将原始图像的哪个部分绘制到屏幕。
private void DrawImageRect4FloatAttrib(PaintEventArgs e)
// Create image.
Image newImage = Image.FromFile("SampImag.jpg");
// Create rectangle for displaying original image.
Rectangle destRect1 = new Rectangle(100, 25, 450, 150);
// Create coordinates of rectangle for source image.
float x = 50.0F;
float y = 50.0F;
float width = 150.0F;
float height = 150.0F;
GraphicsUnit units = GraphicsUnit.Pixel;
// Draw original image to screen.
e.Graphics.DrawImage(newImage, destRect1, x, y, width, height, units);
// Create rectangle for adjusted image.
Rectangle destRect2 = new Rectangle(100, 175, 450, 150);
// Create image attributes and set large gamma.
ImageAttributes imageAttr = new ImageAttributes();
imageAttr.SetGamma(4.0F);
// Draw adjusted image to screen.
e.Graphics.DrawImage(newImage, destRect2, x, y, width, height, units, imageAttr);
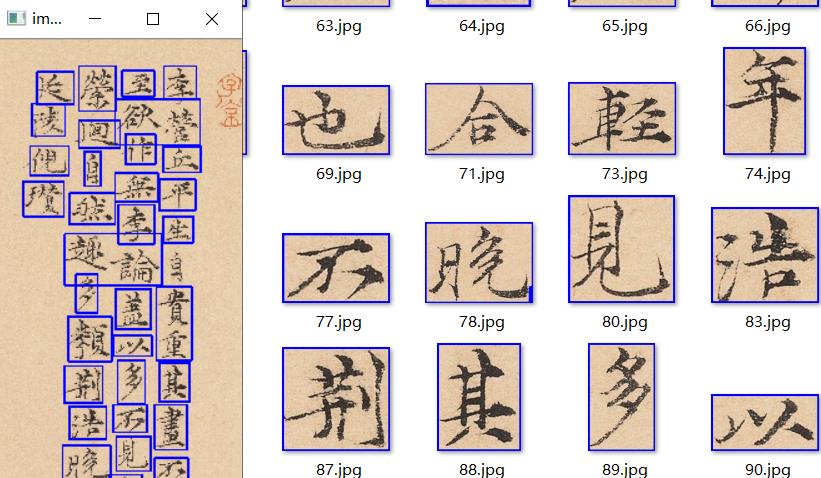
用python实现识别框选图片字体部分,并分割成单独图片
CSDN问答频道为您的问题找到合适的答案,帮助用户获得可信赖的优质解答
原问题来自于CSDN问答频道,该问题来源:https://ask.csdn.net/questions/7415845
问题描述:
如何通过代码可以识别框选字体部分(矩形框),并分割成单独图片

用python实现,需要安装opencv、numpy模块:切割准确率95%以上, 效果图:
具体代码如下:
#juzicode.com/vx:桔子code
import os,sys,time,cv2
import numpy as np

dbg_is_show = False
def show_img(win_name,img,wait_time=0,img_ratio=0.15,is_show=True):
    if is_show is not True:
        return
    rows = img.shape[0]
    cols = img.shape[1]
    cv2.namedWindow(win_name, cv2.WINDOW_NORMAL )#cv2.WINDOW_AUTOSIZE)
    cv2.resizeWindow(win_name,(int(cols*img_ratio),int(rows*img_ratio)))
    cv2.imshow(win_name,img)
    cv2.waitKey(wait_time)

if not os.path.exists('out'):
    os.mkdir('out')

print('juzicode.com/vx:桔子code')
print(cv2.__version__)
img_src = cv2.imread('src.jpg')
print(img_src.shape)

show_img('img_src',img_src,is_show=dbg_is_show)

#获取灰度图
img_b, img_g, img_r = cv2.split(img_src)
show_img('img_r',img_r,is_show=dbg_is_show)

img_gray = cv2.bitwise_not(img_r)
img_gray= cv2.medianBlur(img_gray,5)

#二值化
thresh_bin,img_bin= cv2.threshold(img_gray,127,255,cv2.THRESH_BINARY)
show_img('img_bin',img_bin,is_show=dbg_is_show)

kernel = cv2.getStructuringElement(cv2.MORPH_RECT,(3, 3))
img_eroded = cv2.erode(img_bin,kernel)
show_img('img_eroded',img_eroded)

kernel = cv2.getStructuringElement(cv2.MORPH_RECT,(29, 29))
img_dilated = cv2.dilate(img_eroded,kernel)
show_img('img_dilated',img_dilated)

res = cv2.findContours(img_dilated,cv2.RETR_TREE,cv2.CHAIN_APPROX_SIMPLE)
contours=res[1]
print ('len(contours):',len(contours))

for i in range(0,len(contours)):
    x, y, w, h = cv2.boundingRect(contours[i])
    print(i,len(contours[i]))
    if len(contours[i])<80:continue
    cv2.rectangle(img_src, (x,y), (x+w,y+h), (255,0,0), 10)
    newimage=img_src[y:y+h,x:x+w]
    cv2.imwrite( 'out\\\\'+str(i)+".jpg",newimage)

show_img("img_dilated_with_contour", img_src)
有问题欢迎到CSDN问答频道提问,欢迎各位到问答频道回答,您的回答是对题主最大的帮助!
以上是关于c#如何分割图片并展示原图中一部分的主要内容,如果未能解决你的问题,请参考以下文章
python-Unet计算机视觉~舌象舌头图片分割~机器学习
图像语义分割出的json文件和原图,用plt绘制图像mask
c# splitContainer能把窗体分割成三部分或者更多的部分吗?