Spring 从入门到精通系列 11—— Spring 中的 JdbcTemplate
Posted Xiu Yan
tags:
篇首语:本文由小常识网(cha138.com)小编为大家整理,主要介绍了Spring 从入门到精通系列 11—— Spring 中的 JdbcTemplate相关的知识,希望对你有一定的参考价值。
本文针对 Spring 中的 JdbcTemplate 进行了分析,并实现对数据库的操作。

文章目录
一、JdbcTemplate 概述
它是 spring 框架中提供的一个对象,是对原始 Jdbc API 对象的简单封装。spring 框架为我们提供了很多的操作模板类。
- 操作关系型数据的:
jdbcTemplate
HibernateTemplate - 操作 nosql 数据库的:
RedisTemplate - 操作消息队列的:
JmsTemplate
JdbcTemplate在 spring-jdbc-5.0.2.RELEASE.jar 中,我们在导包的时候,除了要导入这个 jar 包
外,还需要导入一个 spring-tx-5.0.2.RELEASE.jar(它是和事务相关的),也可以在maven工程中也可以导入依赖:
<dependency>
    <groupId>org.springframework</groupId>
    <artifactId>spring-jdbc</artifactId>
    <version>5.1.14.RELEASE</version>
</dependency>
<dependency>
    <groupId>org.springframework</groupId>
    <artifactId>spring-tx</artifactId>
    <version>5.1.3.RELEASE</version>
</dependency>
二、JdbcTemplate 对象的创建

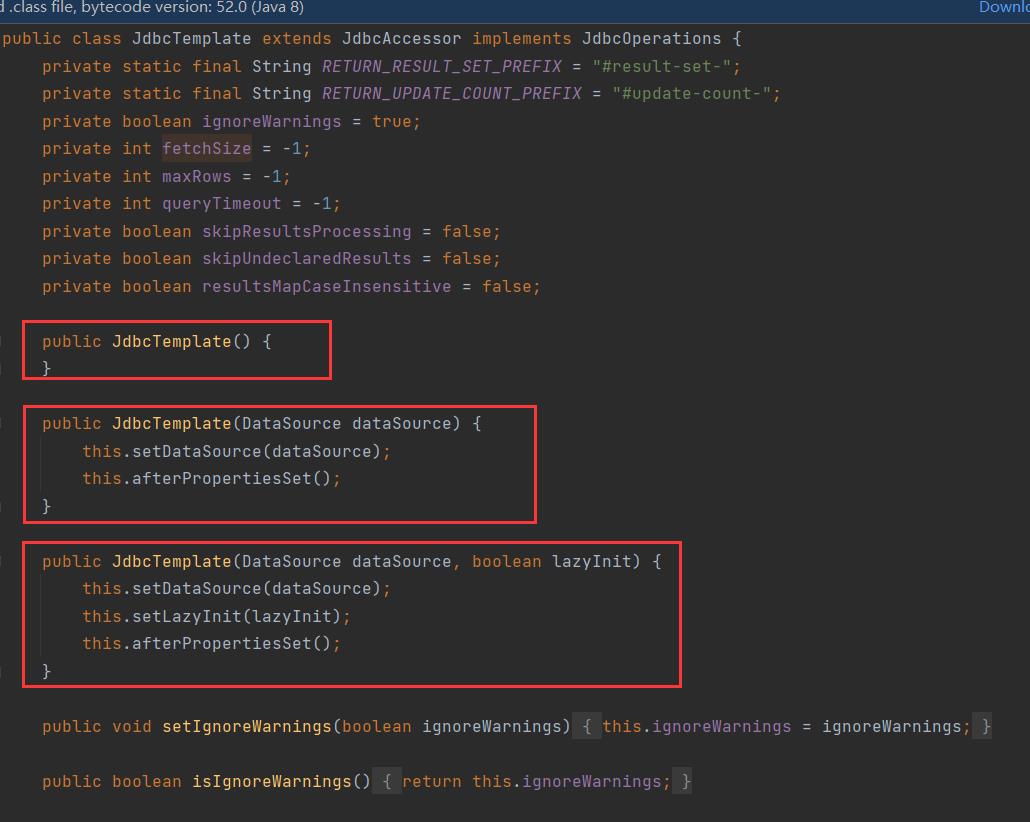
通过源码我们发现除了默认构造函数之外,都需要提供一个数据源。既然有set方法,依据我们之前学过的依赖注入,我们可以在配置文件中配置这些对象。
三、JdbcTemplate 的应用
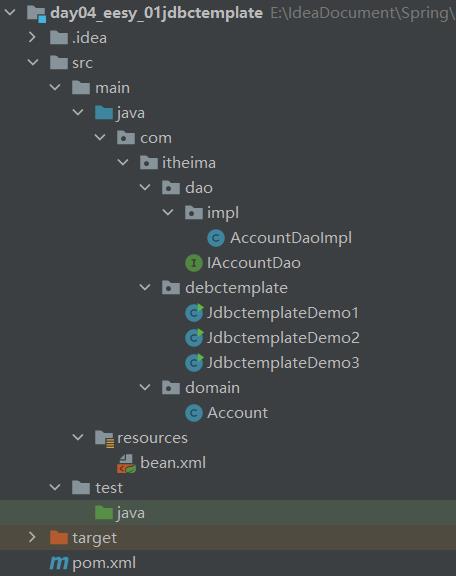
下面我们通过案例演示 JdbcTemplate 的应用,工程目录如下:

3.1 JdbcTemplate 的简单使用
public class JdbctemplateDemo1 {
    public static void main(String[] args) {
        //准备数据源
        DriverManagerDataSource ds = new DriverManagerDataSource();
        ds.setDriverClassName("com.mysql.jdbc.Driver");
        ds.setUrl("jdbc:mysql://localhost:3306/springdb");
        ds.setUsername("root");
        ds.setPassword("000000");


        //1. 创建jdbcTemplate对象
        JdbcTemplate jdbcTemplate = new JdbcTemplate();

        jdbcTemplate.setDataSource(ds);

        //2. 执行操作
        jdbcTemplate.execute("insert into account(name, money) values('ccc',1000)");
    }
}
3.2 JdbcTemplate 的增删改查
public class JdbctemplateDemo2 {
    public static void main(String[] args) {
       //1. 获取容器
        ApplicationContext ac = new ClassPathXmlApplicationContext("bean.xml");
        //2. 获取对象
        JdbcTemplate jt = ac.getBean("jdbcTemplate", JdbcTemplate.class);
        //3. 执行操作
        //增加
        jt.update("insert into account(name, money) values(?, ?)", "eee", 333f);
        //改
        jt.update("update account set name=?, money=? where id=?", "abc", 1234f, 6);
        //删除
        jt.update("delete from account where id = ?",6 );
        //查询所有
        List<Account> accounts = jt.query("select * from account where money > ?", newBeanPropertyRowMapper<Account>(Account.class), 500f);
        for(Account account:accounts){
            System.out.println(account);
        }
        //查询一个
        List<Account> accounts1 = jt.query("select * from account where id = ?", new BeanPropertyRowMapper<Account>(Account.class), 1);
        System.out.println(accounts1.isEmpty()?"没有内容":accounts1.get(0));
        //查询返回一行一列(使用聚合函数,但不加group by 子句)
        Integer count = jt.queryForObject("select count(*) from account where money > ?", Integer.class, 1000f);
        System.out.println(count);
    }
}
3.2 在 Spring 中应用 JdbcTemplate
3.2.1 编写 spring 的配置文件
<?xml version="1.0" encoding="UTF-8"?>
<beans xmlns="http://www.springframework.org/schema/beans"
       xmlns:xsi="http://www.w3.org/2001/XMLSchema-instance"
       xsi:schemaLocation="http://www.springframework.org/schema/beans
        http://www.springframework.org/schema/beans/spring-beans.xsd">

	<!--配置账户的持久层-->
    <bean id="accountDao" class="com.itheima.dao.impl.AccountDaoImpl">
        <property name="jdbcTemplate" ref="jdbcTemplate"></property>
    </bean>

    <!--配置jdbcTemplate-->
    <bean id="jdbcTemplate" class="org.springframework.jdbc.core.JdbcTemplate">
        <property name="dataSource" ref="dataSource"></property>
    </bean>

</beans>
注意: 此时数据源还没有配置
3.2.1 配置数据源
配置数据源的方式有三种,分别是:
- 配置 C3P0 数据源
- 配置 DBCP 数据源
- 配置 Spring 内置数据源
1. 配置 C3P0 数据源
<bean id="dataSource" class="com.mchange.v2.c3p0.ComboPooledDataSource">
	<property name="driverClass" value="com.mysql.jdbc.Driver"></property>
	<property name="jdbcUrl" value="jdbc:mysql://localhost:3306/springdb"></property>
	<property name="user" value="root"></property>
	<property name="password" value="000000"></property>
</bean>
2. 配置 DBCP 数据源
<bean id="dataSource" class="org.apache.commons.dbcp.BasicDataSource">
	<property name="driverClassName" value="com.mysql.jdbc.Driver"></property>
	<property name="url" value="jdbc:mysql://localhost:3306/springdb"></property>
	<property name="username" value="root"></property>
	<property name="password" value="000000"></property>
</bean>
3. 配置 Spring 内置数据源
<bean id="dataSource" class="org.springframework.jdbc.datasource.DriverManagerDataSource">
	<property name="driverClassName" value="com.mysql.jdbc.Driver"></property>
	<property name="url" value="jdbc:mysql://localhost:3306/springdb"></property>
	<property name="username" value="root"></property>
	<property name="password" value="000000"></property>
</bean>
3.2.3 持久层及其实现类
/**
 * 账户持久层接口
 */
public interface IAccountDao {

    /**
     * 根据id查询账户
     */
    Account findAccountById(Integer accountId);

    /**
     * 根据名称查询
     */
    Account findAccountByName(String accountName);

    /**
     * 更新账户
     */
    void updateAccount(Account account);
}
/**
 * 账户的持久层实现类
 */
public class AccountDaoImpl implements IAccountDao {

    private JdbcTemplate jdbcTemplate;

    public void setJdbcTemplate(JdbcTemplate jdbcTemplate) {
        this.jdbcTemplate = jdbcTemplate;
    }

    public Account findAccountById(Integer accountId) {
        List<Account> accounts = jdbcTemplate.query("select * from account where id = ?", new BeanPropertyRowMapper<Account>(Account.class), accountId);
        return accounts.isEmpty()?null:accounts.get(0);
    }

    public Account findAccountByName(String accountName) {
        List<Account> accounts = jdbcTemplate.query("select * from account where name = ?", new BeanPropertyRowMapper<Account>(Account.class), accountName);
        if(accounts.isEmpty()){
            return null;
        }
        if(accounts.size()>1){
            throw new RuntimeException("结果集不唯一");
        }
        return accounts.get(0);
    }

    public void updateAccount(Account account) {
        jdbcTemplate.update("update account set name = ? , money = ? where id = ?", account.getName(), account.getMoney(), account.getId());
    }
}
3.2.4 测试方法
public class JdbctemplateDemo3 {
    public static void main(String[] args) {
       //1. 获取容器
        ApplicationContext ac = new ClassPathXmlApplicationContext("bean.xml");
        //2. 获取对象
        IAccountDao accountDao = ac.getBean("accountDao", IAccountDao.class);
        //3. 执行操作
        Account account = accountDao.findAccountById(1);
        System.out.println(account);
    }
}
测试结果如下:

本文针对 Spring 中的 JdbcTemplate 进行了分析,并实现对数据库的操作。如果大家对文章内容还存在一些疑问,欢迎大家在评论区留言哦~
以上是关于Spring 从入门到精通系列 11—— Spring 中的 JdbcTemplate的主要内容,如果未能解决你的问题,请参考以下文章