MacOS-NSOutlineView使用
Posted MinggeQingchun
tags:
篇首语:本文由小常识网(cha138.com)小编为大家整理,主要介绍了MacOS-NSOutlineView使用相关的知识,希望对你有一定的参考价值。
一、NSOutlineView简述
在macOS开发过程中,当我们需要展示一组列表结构的数据时,自然想到的控件就是NSTableView;但如果显示的数据有层级分区结构时,NSTableView在macOS中并没有像ios中通过section分区的分组功能( sections)
在cocoa中提供了另一个控件NSOutlineView,供满足我们的需求;NSOutlineView它是继承自NSTableView的子类,比 NSTableView 多一个层级,是Mac OS X Application常用的控件之一,与NSTableView相似,NSOutlineView也使用行和列来显示内容,但所不同的是NSOutlineView使用具有层级的数据结构,所以类似多层级树状的视图一般使用这个类来实现。
二、NSOutlineView使用
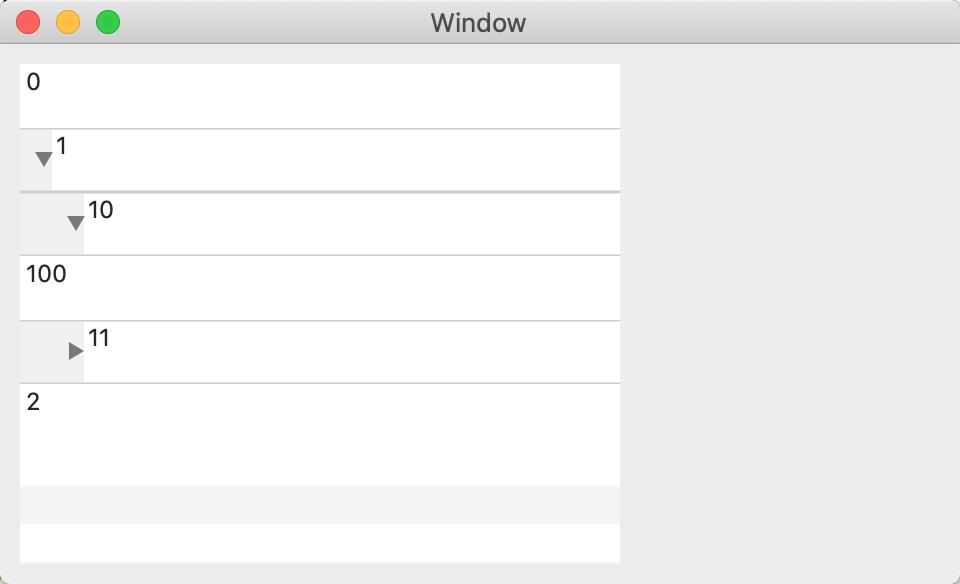
这里示例实现一个简单的NSOutlineView

1、数据准备
@interface OutlineWindowController ()<NSOutlineViewDataSource,NSOutlineViewDelegate>

@property (nonatomic, strong) NSScrollView *scrollView;
@property (nonatomic, strong) NSOutlineView *outlineView;

@property (nonatomic, strong) NSArray *wholeTasks;

@end

@implementation OutlineWindowController

//通过加载xib方式
- (NSString*)windowNibName {
    return @"OutlineWindowController";// this name tells AppKit which nib file to use
}

- (void)windowDidLoad {
    [super windowDidLoad];

    [self initData];
    [self testOutLine];
}

- (void)initData {

    //1级根节点
    TaskModel *model0  = [[TaskModel alloc] init];
    model0.title = @"任务0";
    model0.ID = @"0";

    TaskModel *model1 = [[TaskModel alloc]init];
    model1.title = @"任务1";
    model1.ID = @"1";

    TaskModel *model2 = [[TaskModel alloc]init];
    model2.title = @"任务2";
    model2.ID = @"2";

    //2级节点
    TaskModel *model10 = [[TaskModel alloc]init];
    model10.title = @"任务1-0";
    model10.ID = @"10";

    TaskModel *model11 = [[TaskModel alloc]init];
    model11.title = @"任务1-1";
    model11.ID = @"11";

    //3级节点
    TaskModel *model100 = [[TaskModel alloc]init];
    model100.ID = @"100";
    model100.title = @"任务1-0-0";

    TaskModel *model110 = [[TaskModel alloc]init];
    model110.ID = @"110";
    model110.title = @"任务1-1-0";

    //设置子节点
    self.wholeTasks = @[model0,model1,model2];
    model1.subTaskArray = @[model10, model11];
    model10.subTaskArray = @[model100];
    model11.subTaskArray = @[model110];
}
2、创建视图
NSTableColumn是NSTableView的一列,这里和iPhone(只有一列)不一样可以设置多列
macOS中NStableView需配合NSScrollView使用,要实现NSTableView的滚动效果需要将它承载在一个NSScrollView里
- (void)testOutLine{
    NSTableColumn *tableColumn = [[NSTableColumn alloc] init];
    tableColumn.resizingMask = NSTableColumnAutoresizingMask;

    NSOutlineView *outlineView = [[NSOutlineView alloc] init];
    outlineView.allowsColumnResizing = YES;
    outlineView.headerView = nil;
    outlineView.columnAutoresizingStyle = NSTableViewFirstColumnOnlyAutoresizingStyle;

    outlineView.usesAlternatingRowBackgroundColors = YES;//背景颜色的交替,一行白色,一行灰色。
    [outlineView addTableColumn:tableColumn];

    outlineView.delegate = self;
    outlineView.dataSource = self;

    outlineView.autosaveExpandedItems = YES;

    //macOS中NStableView需配合NSScrollView使用,要实现NSTableView的滚动效果需要将它承载在一个NSScrollView里
    NSScrollView *scrollView = [[NSScrollView alloc] initWithFrame:NSMakeRect(10, 10, 300, 250)];
    scrollView.documentView = outlineView;
    scrollView.hasVerticalScroller = YES;
    scrollView.autohidesScrollers = YES;

    self.scrollView = scrollView;
    self.outlineView = outlineView;

    [self.window.contentView addSubview:self.scrollView];
}
3、实现 datasource protocol
#pragma mark - datasource protocol
// 每一层级节点包含的下一级节点的数量。
- (NSInteger)outlineView:(NSOutlineView *)outlineView numberOfChildrenOfItem:(id)item {
    NSInteger num = 0;
    if (!item) {
        num = self.wholeTasks.count;
        NSLog(@"root num : %ld",(long)num);
    }else{
       TaskModel *model = (TaskModel *)item;
        num = model.subTaskArray.count;
        NSLog(@"%@ - num : %ld",model.ID,(long)num);
    }
    return num;
}

/*
 item 为nil空时表示获取顶级节点模型。
 每一层级节点的模型对象为item时,根据 item 获取子节点模型。
 这个地方用于向自定义的cellView传递数据,如果return item.title,则那边接收到的“self.objectValue”就是item.title。
 */
- (id)outlineView:(NSOutlineView *)outlineView child:(NSInteger)index ofItem:(id)item {
    TaskModel *childModel;
    if (item) {
        TaskModel *model = (TaskModel *)item;
        childModel = model.subTaskArray[index];
    }else{
        childModel = self.wholeTasks[index];
    }

    NSLog(@"index : %ld , item : %@ , childModel : %@",index,item,childModel.ID);
    return childModel;
}

// 节点是否可以 展开/折叠。
- (BOOL)outlineView:(NSOutlineView *)outlineView isItemExpandable:(id)item {
    //count 大于0表示有子节点,需要允许Expandable
    if(!item) {
        return [self.wholeTasks count] > 0 ;
    }else {
        TaskModel *model = (TaskModel *)item;
        return [model.subTaskArray count] > 0;
    }
}
代理方法中的 item 代表该项要使用的 item, 如果为空代表这是 root 节点,返回我们数据源第一层的数据即可
outlineView:child:ofItem: 需要返回该节点的子 item;如果返回了该 item, 程序可能会进入死循环;
outlineView:objectValueForTableColumn:byItem: 对于 view-based 是可选,对于 cell-based 是必须实现。
4、实现 delegate protocol
#pragma mark - delegate protocol
// 是否是组元素
- (BOOL)outlineView:(NSOutlineView *)outlineView isGroupItem:(id)item {
    if (!item) {
        return self.wholeTasks.count;
    }
    TaskModel *model = (TaskModel *)item;
    return model.subTaskArray.count;
}

/*
 view 视图
 和 NSTableView 中的方法 tableView:viewForTableColumn:row: 一样;
 */
- (nullable NSView *)outlineView:(NSOutlineView *)outlineView viewForTableColumn:(nullable NSTableColumn *)tableColumn item:(id)item {
    CustomTableCellView *cell = [CustomTableCellView cellWithTableView:outlineView owner:self];
    NSLog(@"item : %@",item);
    TaskModel *model = (TaskModel *)item;

    cell.titleLabel.stringValue = model.ID;

    return cell;
}

/*
 rowView 视图
 */
- (NSTableRowView *)outlineView:(NSOutlineView *)outlineView rowViewForItem:(id)item {
    CustomTableRowView *rowView = [CustomTableRowView rowViewWithTableView:outlineView];
    rowView.backgroundColor = [NSColor orangeColor];

    return rowView;
}

// 自定义行高
- (CGFloat)outlineView:(NSOutlineView *)outlineView heightOfRowByItem:(id)item {
    return 30;
}

// 选择节点后的通知
- (void)outlineViewSelectionDidChange:(NSNotification *)notification {
    NSLog(@"--");
    NSOutlineView *outlineView = notification.object;
    NSInteger row = [outlineView selectedRow];
    TaskModel *model = (TaskModel *)[outlineView itemAtRow:row];
    NSLog(@"name = %@",model.title);
}
5、其他类的实现
item 的类:TaskModel
@interface TaskModel : NSObject
@property (nonatomic, copy) NSString *title;
@property (nonatomic, copy) NSString *ID;
@property (nonatomic, strong) NSArray *subTaskArray;

@end
自定义 cellView
#import "CustomTableCellView.h"

@implementation CustomTableCellView

static NSString * CustomTableCellID = @"CustomTableCellID";

+ (instancetype)cellWithTableView:(NSTableView *)tableView owner:(id)owner {
    CustomTableCellView *cell = [tableView makeViewWithIdentifier:CustomTableCellID owner:owner];
    if (!cell) {
        cell = [[CustomTableCellView alloc]init];
        cell.identifier = CustomTableCellID;
        [cell setUpViews];
    }
    return cell;
}

- (void)setUpViews {
    //UILabel 在Mac下不存在;Mac 使用NSTextField代替,设置为不可以编辑,不可选中
    NSTextField *titleLabel = [[NSTextField alloc]initWithFrame:NSMakeRect(0, 0, 200, 30)];
    [self addSubview:titleLabel];
    titleLabel.stringValue = @"123";
    titleLabel.editable = NO;
    titleLabel.bordered = NO;
    self.titleLabel = titleLabel;

    //在MacOS 开发中视图本身没有提供背景颜色,边框,圆角等属性。但是可以利用layer属性来控制这些效果,使用这些属性之前必须设置其属性wantsLayer为YES
    self.wantsLayer = YES;
    self.layer.backgroundColor = [NSColor whiteColor].CGColor;
}

- (void)drawRect:(NSRect)dirtyRect {
    [super drawRect:dirtyRect];

    // Drawing code here.
}

@end
自定义 rowView
#import "CustomTableRowView.h"

@implementation CustomTableRowView

static NSString * customTableRowViewID = @"customTableRowViewID";

+ (instancetype)rowViewWithTableView:(NSTableView *)tableView{
    CustomTableRowView *rowView = [tableView makeViewWithIdentifier:customTableRowViewID owner:self];
    if (!rowView) {
        rowView = [[CustomTableRowView alloc]init];
        rowView.identifier = customTableRowViewID;
    }
    return rowView;
}

//自定义 row 背景色
- (void)setBackgroundColor:(NSColor *)backgroundColor {
    super.backgroundColor = [NSColor whiteColor];
//    super.backgroundColor = [NSColor orangeColor];
}

// 自定义 row 被选中的背景色
- (void)drawSelectionInRect:(NSRect)dirtyRect{
    if (self.selectionHighlightStyle != NSTableViewSelectionHighlightStyleNone) {
        [[NSColor lightGrayColor] setFill];

        NSBezierPath *path = [NSBezierPath bezierPathWithRect:NSInsetRect(self.bounds, 0, 0)];
        [path fill];
        [path stroke];
    }
}

- (void)drawRect:(NSRect)dirtyRect {
    [super drawRect:dirtyRect];

    // Drawing code here.
}

@end
以上是关于MacOS-NSOutlineView使用的主要内容,如果未能解决你的问题,请参考以下文章