史上最全Java集合体系ArrayMap以及Set和List详解
Posted Java架构师-大仙
tags:
篇首语:本文由小常识网(cha138.com)小编为大家整理,主要介绍了史上最全Java集合体系ArrayMap以及Set和List详解相关的知识,希望对你有一定的参考价值。
本篇文章主要讲解 Java 中数组相关的概念,即 Array、Map、set、list等,涉及到了一些关于数据结构的内容
一、集合与数组
1. 集合与数组存储数据概述:
集合、数组都是对多个数据进行存储操作的结构,简称Java容器。 说明:此时的存储,主要指的是内存层面的存储,不涉及到持久化的存储(.txt,.jpg,.avi,数据库中)
2. 数组存储的特点:
一旦初始化以后,其长度就确定了。 数组一旦定义好,其元素的类型也就确定了。我们也就只能操作指定类型的数据了。
比如:String[] arr、int[] arr1、Object[] arr2
3. 数组存储的弊端:
- 一旦初始化以后,其长度就不可修改。
- 数组中提供的方法非常限,对于添加、删除、插入数据等操作,非常不便,同时效率不高。
- 获取数组中实际元素的个数的需求,数组没有现成的属性或方法可用
- 数组存储数据的特点:有序、可重复。对于无序、不可重复的需求,不能满足。
4. 集合存储的优点:
解决数组存储数据方面的弊端。
5. 集合的分类
Java集合可分为Collection和Map两种体系
- Collection接口:单列数据,定义了存取一组对象的方法的集合
- List:元素有序、可重复的集合
- Set:元素无序、不可重复的集
- Map接口:双列数据,保存具有映射关系“key-value对”的集合
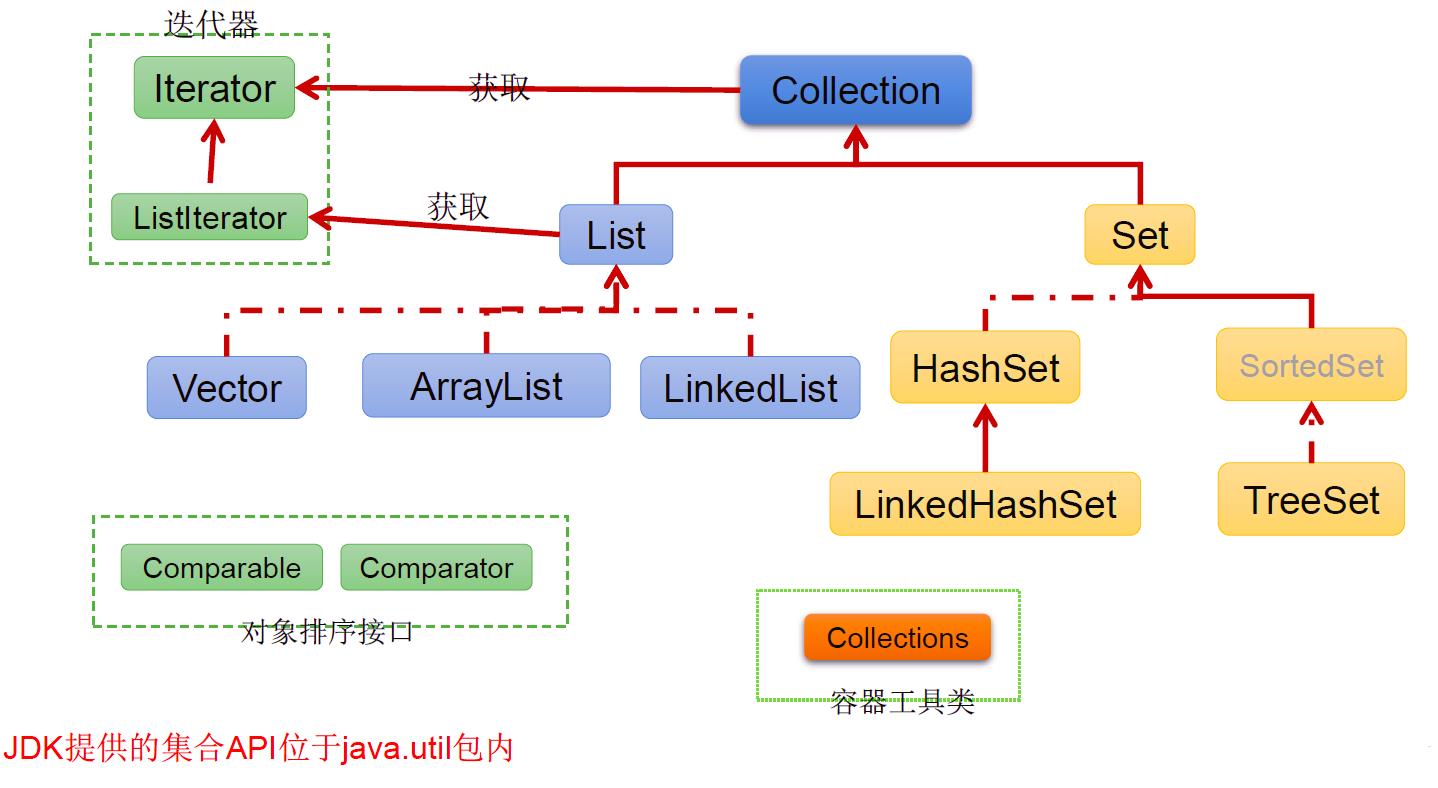
6. 集合的框架结构
|----Collection接口:单列集合,用来存储一个一个的对象
     |----List接口:存储有序的、可重复的数据。  -->“动态”数组
           |----ArrayList:作为List接口的主要实现类,线程不安全的,效率高;底层采用Object[] elementData数组存储
           |----LinkedList:对于频繁的插入删除操作,使用此类效率比ArrayList效率高底层采用双向链表存储
           |----Vector:作为List的古老实现类,线程安全的,效率低;底层采用Object[]数组存储

     |----Set接口:存储无序的、不可重复的数据   -->数学概念上的“集合”
           |----HashSet:作为Set接口主要实现类;线程不安全;可以存null值
           		|----LinkedHashSet:作为HashSet的子类;遍历其内部数据时,可以按照添加顺序遍历;对于频繁的遍历操作,LinkedHashSet效率高于HashSet.
           |----TreeSet:可以按照添加对象的指定属性,进行排序。

|----Map:双列数据,存储key-value对的数据   ---类似于高中的函数:y = f(x)
     |----HashMap:作为Map的主要实现类;线程不安全的,效率高;存储null的key和value
          |----LinkedHashMap:保证在遍历map元素时,可以照添加的顺序实现遍历。
                    原因:在原的HashMap底层结构基础上,添加了一对指针,指向前一个和后一个元素。
                    对于频繁的遍历操作,此类执行效率高于HashMap。
     |----TreeMap:保证照添加的key-value对进行排序,实现排序遍历。此时考虑key的自然排序或定制排序
                      底层使用红黑树
     |----Hashtable:作为古老的实现类;线程安全的,效率低;不能存储null的key和value
          |----Properties:常用来处理配置文件。key和value都是String类型
二、Collection接口
- Collection接口是List、Set和Queue接口的父接口,该接口里定义的方法既可用于操作Set集合,也可用于操作List和 Queue集合。
- JDK不提供此接口的任何直接实现,而是提供更具体的子接口(如:Set和List)实现。
- 在JDK 5.0之前,Java集合会丢失容器中所有对象的数据类型,把所有对象都当成 Object类型处理;从JDK 5.0增加了泛型以后,Java集合可以记住容器中对象的数据类型。
1. 单列集合框架结构
|----Collection接口:单列集合,用来存储一个一个的对象
     |----List接口:存储有序的、可重复的数据。  -->“动态”数组
           |----ArrayList:作为List接口的主要实现类,线程不安全的,效率高;底层采用Object[] elementData数组存储
           |----LinkedList:对于频繁的插入删除操作,使用此类效率比ArrayList效率高底层采用双向链表存储
           |----Vector:作为List的古老实现类,线程安全的,效率低;底层采用Object[]数组存储

     |----Set接口:存储无序的、不可重复的数据   -->数学概念上的“集合”
           |----HashSet:作为Set接口主要实现类;线程不安全;可以存null值
           		|----LinkedHashSet:作为HashSet的子类;遍历其内部数据时,可以按照添加顺序遍历;对于频繁的遍历操作,LinkedHashSet效率高于HashSet.
           |----TreeSet:可以按照添加对象的指定属性,进行排序。
2. Collection接口常用方法:
- 添加
add(Object obj)addAll(Collection coll)
- 获取有效元素个数
int size()
- 清空集合
void clear()
- 是否为空集合
boolean isEmpty()
- 是否包含某个元素
boolean contains(Object obj):是通过元素的equals方法来判断是否是同一个对象boolean containsAll(Collection c):也是调用元素的equals方法来比较的。用两个两个集合的元素逐一比较
- 删除
boolean remove(Object obj):通过元素的equals方法判断是否是要删除的那个元素。只会删除找到的第一个元素boolean removeAll(Collection coll):取当前集合的差集
- 取两个集合的交集
boolean retainAll(Collection c):把交集的结果存在当前的集合中,不影响c
- 集合是否相等
boolean equals(Object obj)
- 转换成对象数组
Object [] toArray()
- 获取集合对象的哈希值
- `hashCode()`
- 遍历
- `iterator()`:返回迭代器对象,用于集合遍历
代码示例:
@Test
public void test1() {
    Collection collection = new ArrayList();
    //1.add(Object e):将元素添加到集合中
    collection.add("ZZ");
    collection.add("AA");
    collection.add("BB");
    collection.add(123);
    collection.add(new Date());
    //2.size():获取添加元素的个数
    System.out.println(collection.size());//5
    //3.addAll(Collection coll1):将coll1集合中的元素添加到当前集合中
    Collection collection1 = new ArrayList();
    collection1.add("CC");
    collection1.add(213);
    collection.addAll(collection1);
    System.out.println(collection.size());//9
    //调用collection1中的toString()方法输出
    System.out.println(collection);//[ZZ, AA, BB, 123, Tue Apr 28 09:22:34 CST 2020, 213, 213]
    //4.clear():清空集合元素
    collection1.clear();
    System.out.println(collection1.size());//0
    System.out.println(collection1);//[]
    //5.isEmpty():判断当前集合是否为空
    System.out.println(collection1.isEmpty());//true
}

@Test
public void test2() {
    Collection coll = new ArrayList();
    coll.add(123);
    coll.add(456);
    coll.add(new Person("Tom", 23));
    coll.add(new Person("Jarry", 34));
    coll.add(false);
    //6.contains(Object obj):判断当前集合中是否包含obj
    //判断时需要调用obj对象所在类的equals()方法
    System.out.println(coll.contains(123));//true
    System.out.println(coll.contains(new Person("Tom", 23)));//true
    System.out.println(coll.contains(new Person("Jarry", 23)));//false
    //7.containsAll(Collection coll1):判断形参coll1中的元素是否都存在当前集合中
    Collection coll1 = Arrays.asList(123, 4566);
    System.out.println(coll.containsAll(coll1));//flase
    //8.remove(Object obj):从当前集合中移除obj元素
    coll.remove(123);
    System.out.println(coll);//[456, Person{name='Tom', age=23}, Person{name='Jarry', age=34}, false]
    //9.removeAll(Collection coll1):差集:从当前集合中和coll1中所有的元素
    Collection coll2 = Arrays.asList(123, 456, false);
    coll.removeAll(coll2);
    System.out.println(coll);//[Person{name='Tom', age=23}, Person{name='Jarry', age=34}]
}

@Test
public void test3() {
    Collection coll = new ArrayList();
    coll.add(123);
    coll.add(456);
    coll.add(new Person("Tom", 23));
    coll.add(new Person("Jarry", 34));
    coll.add(false);
    //10.retainAll(Collection coll1):交集:获取当前集合和coll1集合的交集,并返回给当前集合
    Collection coll1 = Arrays.asList(123, 345, 456);
    boolean b = coll.retainAll(coll1);
    System.out.println(b);//true
    System.out.println(coll);//[123, 456]
    //11.equals(Object obj):返回true需要当前集合和形参集合的元素相同
    Collection coll2 = new ArrayList();
    coll2.add(123);
    coll2.add(456);
    System.out.println(coll.equals(coll2));//true
    //12.hashCode():返回当前对象的哈希值
    System.out.println(coll.hashCode());//5230
    //13.集合--->数组:toArray()
    Object[] array = coll.toArray();
    for (Object obj : array) {
        System.out.println(obj);
    }
    //14.数组--->集合:调用Arrays类的静态方法asList()
    List<int[]> ints = Arrays.asList(new int[]{123, 345});
    System.out.println(ints.size());//1
    List<String> strings = Arrays.asList("AA", "BB", "CC");
    System.out.println(strings);//[AA, BB, CC]
    //15.iteratoriterator():返回Iterator接口的实例,用于遍历集合元素。
}
3. Collection集合与数组间的转换
//集合 --->数组:toArray()
Object[] arr = coll.toArray();
for(int i = 0;i < arr.length;i++){
    System.out.println(arr[i]);
}

//拓展:数组 --->集合:调用Arrays类的静态方法asList(T ... t)
List<String> list = Arrays.asList(new String[]{"AA", "BB", "CC"});
System.out.println(list);

List arr1 = Arrays.asList(new int[]{123, 456});
System.out.println(arr1.size());//1

List arr2 = Arrays.asList(new Integer[]{123, 456});
System.out.println(arr2.size());//2
使用 Collection 集合存储对象,要求对象所属的类满足:
向 Collection 接口的实现类的对象中添加数据 obj 时,要求 obj 所在类要重写
equals()。
三、Iterator接口与foreach循环
1. 遍历Collection的两种方式:
① 使用迭代器Iterator
② foreach循环(或增强for循环)
2. java.utils包下定义的迭代器接口:Iterator
2.1说明:
Iterator对象称为迭代器(设计模式的一种),主要用于遍历 Collection 集合中的元素。 GOF给迭代器模式的定义为:提供一种方法访问一个容器(container)对象中各个元素,而又不需暴露该对象的内部细节。迭代器模式,就是为容器而生。
2.2作用:
遍历集合Collectiton元素
2.3如何获取实例:
coll.iterator() 返回一个迭代器实例
2.4遍历的代码实现:
Iterator iterator = coll.iterator();
//hasNext():判断是否还下一个元素
while(iterator.hasNext()){
    //next():①指针下移 ②将下移以后集合位置上的元素返回
    System.out.println(iterator.next());
}
2.5图示说明:
2.6 iterator中remove()方法的使用:
- 测试Iterator中的
remove() - 如果还未调用
next()或在上一次调用next()方法之后已经调用了remove()方法,再调用 remove 都会报IllegalStateException。 - 内部定义了
remove(),可以在遍历的时候,删除集合中的元素。此方法不同于集合直接调用remove()
代码示例:
@Test
public void test3(){
    Collection coll = new ArrayList();
    coll.add(123);
    coll.add(456);
    coll.add(new Person("Jerry",20));
    coll.add("Tom"
            );
    coll.add(false);

    //删除集合中"Tom"
    Iterator iterator = coll.iterator();
    while (iterator.hasNext()){
        //            iterator.remove();
        Object obj = iterator.next();
        if("Tom".equals(obj)){
            iterator.remove();
            //                iterator.remove();
        }

    }
    //将指针重新放到头部,遍历集合
    iterator = coll.iterator();
    while (iterator.hasNext()){
        System.out.println(iterator.next());
    }
}
3. JDK 5.0新特性–增强for循环:(foreach循环)
3.1 遍历集合举例:
@Test
public void test1(){
    Collection coll = new ArrayList();
    coll.add(123);
    coll.add(456);
    coll.add(new Person("Jerry",20));
    coll.add(new String("Tom"));
    coll.add(false);

    //for(集合元素的类型 局部变量 : 集合对象)

    for(Object obj : coll){
        System.out.println(obj);
    }
}
说明:内部仍然调用了迭代器。
3.2. 遍历数组举例:
@Test
public void test2(){
    int[] arr = new int[]{1,2,3,4,5,6};
    //for(数组元素的类型 局部变量 : 数组对象)
    for(int i : arr){
        System.out.println(i);
    }
}
四、Collection子接口:List接口
1. 存储的数据特点:
存储序有序的、可重复的数据。
- 鉴于Java中数组用来存储数据的局限性,我们通常使用List替代数组
- List集合类中元素有序、且可重复,集合中的每个元素都有其对应的顺序索引。
- List容器中的元素都对应一个整数型的序号记载其在容器中的位置,可以根据序号存取容器中的元素。
- JDK AP中List接口的实现类常用的有:ArrayList、LinkedList和 Vector.
2. 常用方法:
List除了从 Collection集合继承的方法外,List集合里添加了一些根据索引来操作集合元素的方法。
void add(int index, Object ele):在index位置插入ele元素boolean addAll(int index, Collection eles):从index位置开始将eles中的所有元素添加进来Object get(int index):获取指定index位置的元素int indexOf(Object obj):返回obj在集合中首次出现的位置int lastIndexOf(Object obj):返回obj在当前集合中末次出现的位置Object remove(int index):移除指定index位置的元素,并返回此元素Object set(int index, Object ele):设置指定index位置的元素为eleList subList(int fromIndex, int toIndex):返回从fromIndex到toIndex位置的子集合
总结:
- 增:
add(Object obj) - 删:
remove(int index)/remove(Object obj) - 改:
set(int index, Object ele) - 查:
get(int index) - 插:
add(int index, Object ele) - 长度:
size() - 遍历: ① Iterator迭代器方式 ② foreach(增强for循环) ③ 普通的循环
代码示例:
@Test
public void test2(){
    ArrayList list = new ArrayList();
    list.add(123);
    list.add(456);
    list.add("AA");
    list.add(new Person("Tom",12));
    list.add(456);
    //int indexOf(Object obj):返回obj在集合中首次出现的位置。如果不存在,返回-1.
    int index = list.indexOf(4567);
    System.out.println(index);

    //int lastIndexOf(Object obj):返回obj在当前集合中末次出现的位置。如果不存在,返回-1.
    System.out.println(list.lastIndexOf(456));

    //Object remove(int index):移除指定index位置的元素,并返回此元素
    Object obj = list.remove(0);
    System.out.println(obj);
    System.out.println(list);

    //Object set(int index, Object ele):设置指定index位置的元素为ele
    list.set(1,"CC");
    System.out.println(list);

    //List subList(int fromIndex, int toIndex):返回从fromIndex到toIndex位置的左闭右开区间的子集合
    List subList = list.subList(2, 4);
    System.out.println(subList);
    System.out.println(list);
}

@Test
public void test1(){
    ArrayList list = new ArrayList();
    list.add(123);
    list.add(456);
    list.add("AA");
    list.add(new Person("Tom",12));
    list.add(456);

    System.out.println(list);

    //void add(int index, Object ele):在index位置插入ele元素
    list.add(1,"BB");
    System.out.println(list);

    //boolean addAll(int index, Collection eles):从index位置开始将eles中的所有元素添加进来
    List list1 = Arrays.asList(1, 2, 3);
    list.addAll(list1);
    //        list.add(list1);
    System.out.println(list.size());//9

    //Object get(int index):获取指定index位置的元素
    System.out.println(list.get(0));

}
以上是关于史上最全Java集合体系ArrayMap以及Set和List详解的主要内容,如果未能解决你的问题,请参考以下文章

