JDK核心源码深入剖析(synchronized和ConcurrentHashMap)
Posted Java资料站
tags:
篇首语:本文由小常识网(cha138.com)小编为大家整理,主要介绍了JDK核心源码深入剖析(synchronized和ConcurrentHashMap)相关的知识,希望对你有一定的参考价值。
优质文章,第一时间送达
1 同步锁synchronized追本溯源
1.1 synchronized场景回顾
synchronized:是Java中的关键字,是一种同步锁。
syn属于哪种锁分类:
乐观锁、悲观锁(syn)
独享锁(syn)、共享锁
公平锁、非公平锁(syn)
互斥锁(syn)、读写锁
可重入锁(syn)
synchronized JDK1.6锁升级 :无锁 -> 偏向锁 (非锁)-> 轻量级锁 -> 重量级锁(1.6前都是)
多线程特性回顾(面试常问)
原子性:指一个操作或者多个操作,要么全部执行并且执行的过程不会被任何因素打断,要么就都不执行
可见性:是指多个线程访问一个资源时,该资源的状态、值信息等对于其他线程都是可见的。
有序性:指程序中代码的执行顺序 (编译器会重排)
sync的作用域回顾
对象级别:锁new出来的当前对象
 public synchronized void test() {
        //
    }

    public void test() {
        synchronized (this) {

        }
    }
类级别: 锁全局
 public static synchronized void test() {
        //
    }

    public void test() {
        synchronized (xx.class) {

        }
    }
总结
sync可以完整实现以上三个特性来保障线程安全性,cas就无法达到原子性。
这是什么原理呢?
1.2 反汇编寻找锁实现原理
目标
通过javap反汇编看一下synchronized到底是怎么加锁的
public class BTest {
    private static Object object = new Object();

    public synchronized void testMethod() {
        System.out.println("Hello World -synchronized method ");
    }

    public static void main(String[] args) {
        synchronized (object) {
            System.out.println("Hello World -synchronized block ");
        }
    }
}
反汇编后,我们将看到什么?
JDK自带的一个工具:javap ,对字节码进行反汇编:
javap -v -c BTest.class
-v:输出附加信息
-c:对代码进行反汇编
反汇编后
   Last modified 2021-6-4; size 898 bytes
  MD5 checksum 57342c74c29e2a57a799cd2b6b2a9de5
  Compiled from "BTest.java"
public class com.syn.BTest
  minor version: 0
  major version: 52
  flags: ACC_PUBLIC, ACC_SUPER
Constant pool:
   #1 = Methodref          #7.#30         // java/lang/Object."<init>":()V
   #2 = Fieldref           #31.#32        // java/lang/System.out:Ljava/io/PrintStream;
   #3 = String             #33            // Hello World -synchronized method
   #4 = Methodref          #34.#35        // java/io/PrintStream.println:(Ljava/lang/String;)V
   #5 = Fieldref           #8.#36         // com/syn/BTest.object:Ljava/lang/Object;
   #6 = String             #37            // Hello World -synchronized block
   #7 = Class              #38            // java/lang/Object
   #8 = Class              #39            // com/syn/BTest
   #9 = Utf8               object
  #10 = Utf8               Ljava/lang/Object;
  #11 = Utf8               <init>
  #12 = Utf8               ()V
  #13 = Utf8               Code
  #14 = Utf8               LineNumberTable
  #15 = Utf8               LocalVariableTable
  #16 = Utf8               this
  #17 = Utf8               Lcom/syn/BTest;
  #18 = Utf8               testMethod
  #19 = Utf8               main
  #20 = Utf8               ([Ljava/lang/String;)V
  #21 = Utf8               args
  #22 = Utf8               [Ljava/lang/String;
  #23 = Utf8               StackMapTable
  #24 = Class              #22            // "[Ljava/lang/String;"
  #25 = Class              #38            // java/lang/Object
  #26 = Class              #40            // java/lang/Throwable
  #27 = Utf8               <clinit>
  #28 = Utf8               SourceFile
  #29 = Utf8               BTest.java
  #30 = NameAndType        #11:#12        // "<init>":()V
  #31 = Class              #41            // java/lang/System
  #32 = NameAndType        #42:#43        // out:Ljava/io/PrintStream;
  #33 = Utf8               Hello World -synchronized method
  #34 = Class              #44            // java/io/PrintStream
  #35 = NameAndType        #45:#46        // println:(Ljava/lang/String;)V
  #36 = NameAndType        #9:#10         // object:Ljava/lang/Object;
  #37 = Utf8               Hello World -synchronized block
  #38 = Utf8               java/lang/Object
  #39 = Utf8               com/syn/BTest
  #40 = Utf8               java/lang/Throwable
  #41 = Utf8               java/lang/System
  #42 = Utf8               out
  #43 = Utf8               Ljava/io/PrintStream;
  #44 = Utf8               java/io/PrintStream
  #45 = Utf8               println
  #46 = Utf8               (Ljava/lang/String;)V
{
  public com.syn.BTest();
    descriptor: ()V
    flags: ACC_PUBLIC
    Code:
      stack=1, locals=1, args_size=1
         0: aload_0
         1: invokespecial #1                  // Method java/lang/Object."<init>":()V
         4: return
      LineNumberTable:
        line 3: 0
      LocalVariableTable:
        Start  Length  Slot  Name   Signature
            0       5     0  this   Lcom/syn/BTest;

  public synchronized void testMethod();
    descriptor: ()V
    flags: ACC_PUBLIC, ACC_SYNCHRONIZED
    Code:
      stack=2, locals=1, args_size=1
         0: getstatic     #2                  // Field java/lang/System.out:Ljava/io/PrintStream;
         3: ldc           #3                  // String Hello World -synchronized method
         5: invokevirtual #4                  // Method java/io/PrintStream.println:(Ljava/lang/String;)V
         8: return
      LineNumberTable:
        line 7: 0
        line 8: 8
      LocalVariableTable:
        Start  Length  Slot  Name   Signature
            0       9     0  this   Lcom/syn/BTest;

  public static void main(java.lang.String[]);
    descriptor: ([Ljava/lang/String;)V
    flags: ACC_PUBLIC, ACC_STATIC
    Code:
      stack=2, locals=3, args_size=1
         0: getstatic     #5                  // Field object:Ljava/lang/Object;
         3: dup
         4: astore_1
         5: monitorenter
         6: getstatic     #2                  // Field java/lang/System.out:Ljava/io/PrintStream;
         9: ldc           #6                  // String Hello World -synchronized block
        11: invokevirtual #4                  // Method java/io/PrintStream.println:(Ljava/lang/String;)V
        14: aload_1
        15: monitorexit
        16: goto          24
        19: astore_2
        20: aload_1
        21: monitorexit
        22: aload_2
        23: athrow
        24: return
      Exception table:
         from    to  target type
             6    16    19   any
            19    22    19   any
      LineNumberTable:
        line 11: 0
        line 12: 6
        line 13: 14
        line 14: 24
      LocalVariableTable:
        Start  Length  Slot  Name   Signature
            0      25     0  args   [Ljava/lang/String;
      StackMapTable: number_of_entries = 2
        frame_type = 255 /* full_frame */
          offset_delta = 19
          locals = [ class "[Ljava/lang/String;", class java/lang/Object ]
          stack = [ class java/lang/Throwable ]
        frame_type = 250 /* chop */
          offset_delta = 4

  static {};
    descriptor: ()V
    flags: ACC_STATIC
    Code:
      stack=2, locals=0, args_size=0
         0: new           #7                  // class java/lang/Object
         3: dup
         4: invokespecial #1                  // Method java/lang/Object."<init>":()V
         7: putstatic     #5                  // Field object:Ljava/lang/Object;
        10: return
      LineNumberTable:
        line 4: 0
}
解释
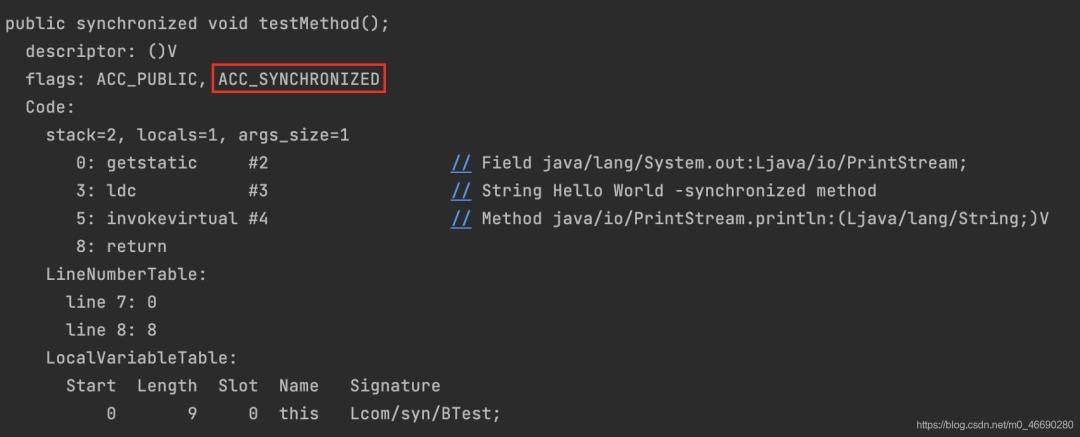
被synchronized修饰的代码块,多了两个指令 monitorenter、monitorexit 即JVM使用monitorenter和monitorexit两个指令实现同步
解释
方法调用时会检查方法的 ACC_SYNCHRONIZED 访问标志是否被设置,如果设置了,执行线程将先获取monitor,获取成功之后才能执行方法体,方法执行完后再释放monitor。也就是jvm会隐式调用monitorenter和 monitorexit。
monitorenter原理
monitorenter首先我们来看一下JVM规范中对于monitorenter的描述
https://docs.oracle.com/javase/specs/jvms/se8/html/jvms-6.html#jvms- 6.5.monitorenter
monitorenter :
Each object is associated with a monitor. A monitor is locked if and only if it
has an owner. The thread that executes monitorenter attempts to gain ownership
of the monitor associated with objectref, as follows:
• If the entry count of the monitor associated with objectref is zero, the
thread enters the monitor and sets its entry count to one. The thread is then
the owner of the monitor.
• If the thread already owns the monitor associated with objectref, it reenters
the monitor, incrementing its entry count.
• If another thread already owns the monitor associated with objectref, the
thread blocks until the monitor’s entry count is zero, then tries again to gain
ownership.
monitorexit:
The thread that executes monitorexit must be the owner of the monitor associated
with the instance referenced by objectref.
The thread decrements the entry count of the monitor associated with objectref.
If as a result the value of the entry count is zero, the thread exits the
monitor and is no longer its owner. Other threads that are blocking to enter the
monitor are allowed to attempt to do so.
————————————————
版权声明:本文为CSDN博主「Ybb_studyRecord」的原创文章,遵循CC 4.0 BY-SA版权协议,转载请附上原文出处链接及本声明。
原文链接:https://blog.csdn.net/m0_46690280/article/details/117553508
翻译如下:
monitorenter
每一个对象都会和一个监视器monitor关联。
监视器被占用时会被锁住,其他线程无法来获取该monitor。当JVM执行某个线程的某个方法内部的monitorenter时,它会尝试去获取当前对象对应 的monitor的所
有权。其过程如下:
若monior的进入数为0,线程可以进入monitor,并将monitor的进入数置为1。当前线程成为monitor的owner(所有者)
若线程已拥有monitor的所有权,允许它重入monitor,则进入monitor的进入数加1
若其他线程已经占有monitor的所有权,那么当前尝试获取monitor的所有权的线程会被阻塞,直到monitor的进入数变为0,才能重新尝试获取monitor的所有权。
monitorexit
能执行monitorexit指令的线程一定是拥有当前对象的monitor的所有权的线程。
执行monitorexit时会将monitor的进入数减1。当monitor的进入数减为0时,当前线程退出monitor,不再拥有monitor的所有权,此时其他被这个monitor阻塞的线程可以尝试去获取这个monitor的所有权 monitorexit释放锁。monitorexit插入在方法结束处和异常处,JVM保证每个monitorenter必须有对应的monitorexit。
简单的理解,monitor就是jvm底层的c++代码中的一个对象ObjectMonitor。
这个对象里有个计数器,来记录当前对象锁有没有人用,用了多少次。以及一些队列,存放调度一些需要这把锁的线程。
关于monitor在c++里的结构,我们下文再详细说。
总结:
1、synchronized是靠ObjectMonitor来控制锁的
2、需要这把锁的线程在monitor的队列里被各种安排
3、拿到锁的线程被monitor标记,计数加加,释放锁,需要将计数器减减操作
1.3 Monitor详解
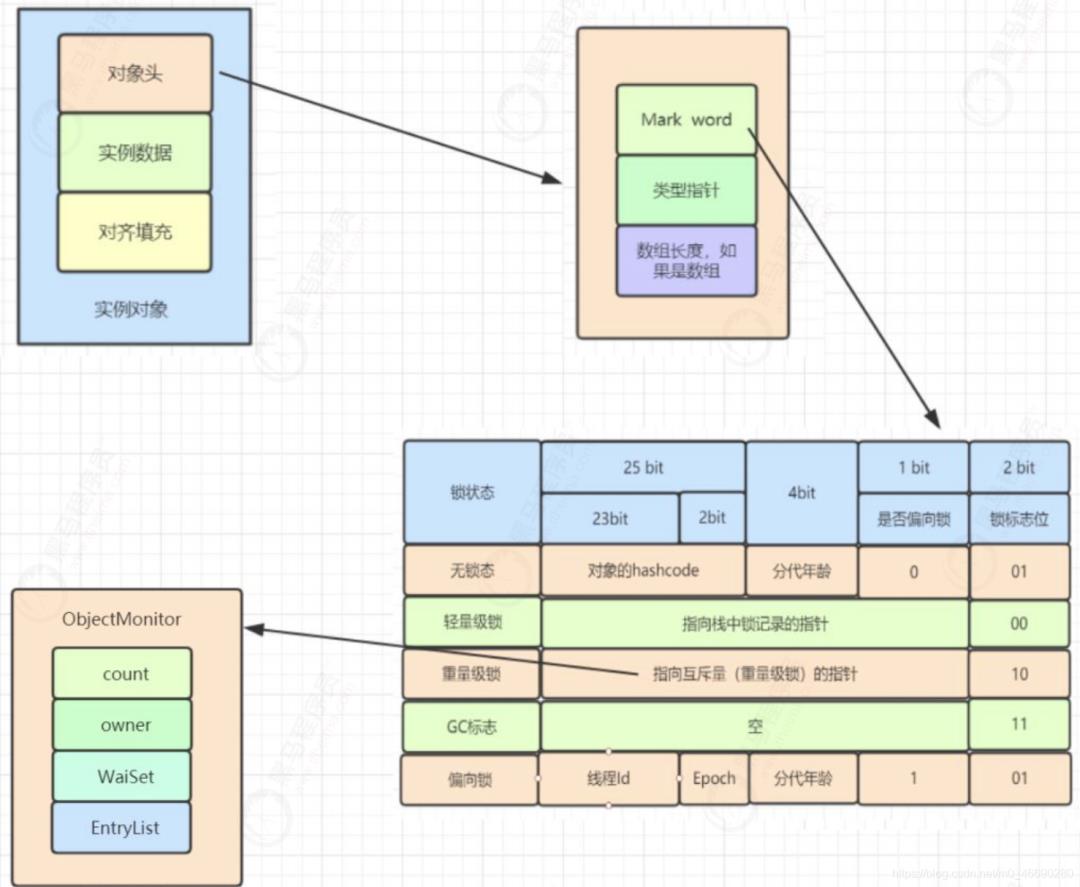
1.3.1 Monitor是什么
目标:通过JVM虚拟机源码分析synchronized监视器Monitor到底是什么
在HotSpot虚拟机中,monitor监视器是由ObjectMonitor实现的。
构造器代码src/share/vm/runtime/objectMonitor.hpp
//构造器
ObjectMonitor() {
_header = NULL;
_count = 0;
_waiters = 0,
_recursions = 0; // 递归;线程的重入次数,典型的System.out.println
_object = NULL; //  对应synchronized (object)对应里面的object
_owner = NULL; // 标识拥有该monitor的线程
_WaitSet = NULL; // 因为调用object.wait()方法而被阻塞的线程会被放在该队列中
_WaitSetLock = 0 ;
_Responsible = NULL;
_succ = NULL;
_cxq = NULL; // 竞争队列,所有请求锁的线程首先会被放在这个队列中
FreeNext = NULL;
_EntryList = NULL; // 阻塞;第二轮竞争锁仍然没有抢到的线程(偏向/可重入)
_SpinFreq = 0;
_SpinClock = 0;
OwnerIsThread = 0;
}
线程对锁的获取和释放就是在这几个队列之间转来转去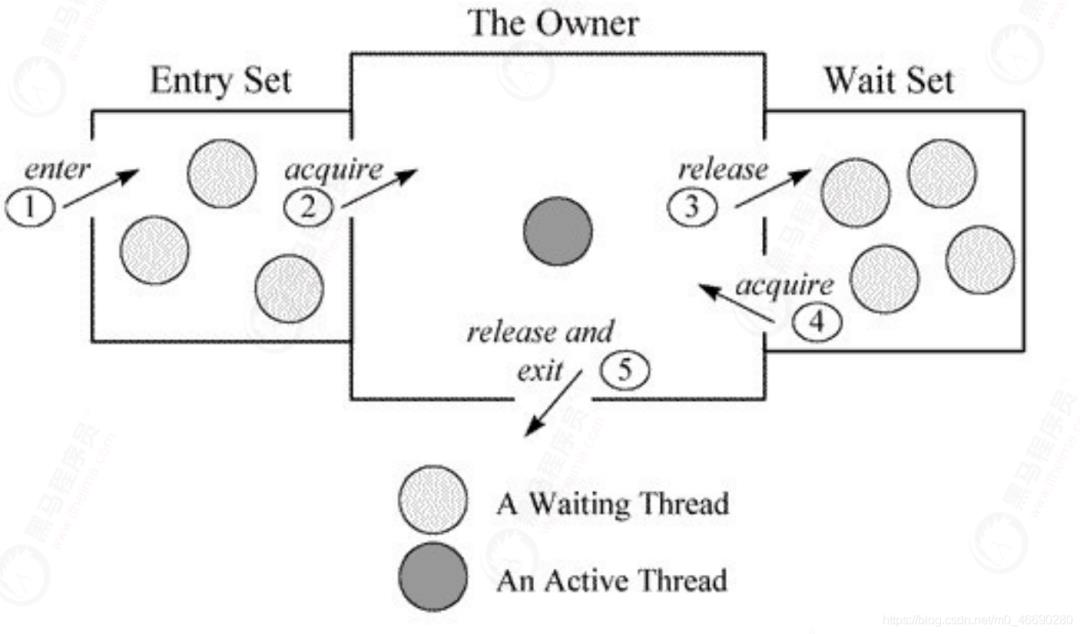
整个monitor运行的机制过程简述如下:
1、如果monitor对象的_owner为空,那么将_owner设置为当前线程,当_recursions设置为1;
2、_owner非空的情况下,如果_owner是当前线程,那么是重入操作,将_recursions的值+1;
3、如果_owner不是当前线程,先通过多次自旋尝试获取锁(自旋次数是轻量级锁膨胀时设置的),获取失败后,将当前Thread插入_cxq队列并调用本地park()方法挂起。
4、只有获取到锁的线程执行wait()方法时,线程会被插入到_waitSet中。等待notify()或notifyAll()方法或是根据不同的策略,判断是进入_cxq队列还是_entryList中。
5、当_owner线程执行monitorexit命令后,并且_entryList为空、_cxq不为空时,会将cxq中的数据移动到_entryList中。
所以,_cxq队列为等待竞争锁的队列,_entryList为竞争锁的线程队列。很多地方也会将_cxq队列也写作ContentionList。
1.3.2 Monitor竞争
目标:接下来,就是我们一开始所看到的monitorenter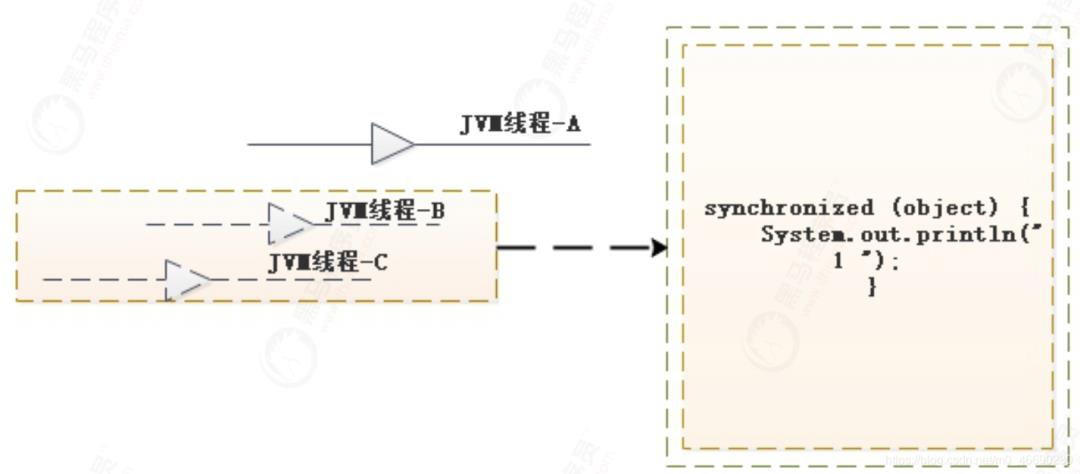
1)c++代码的流程图
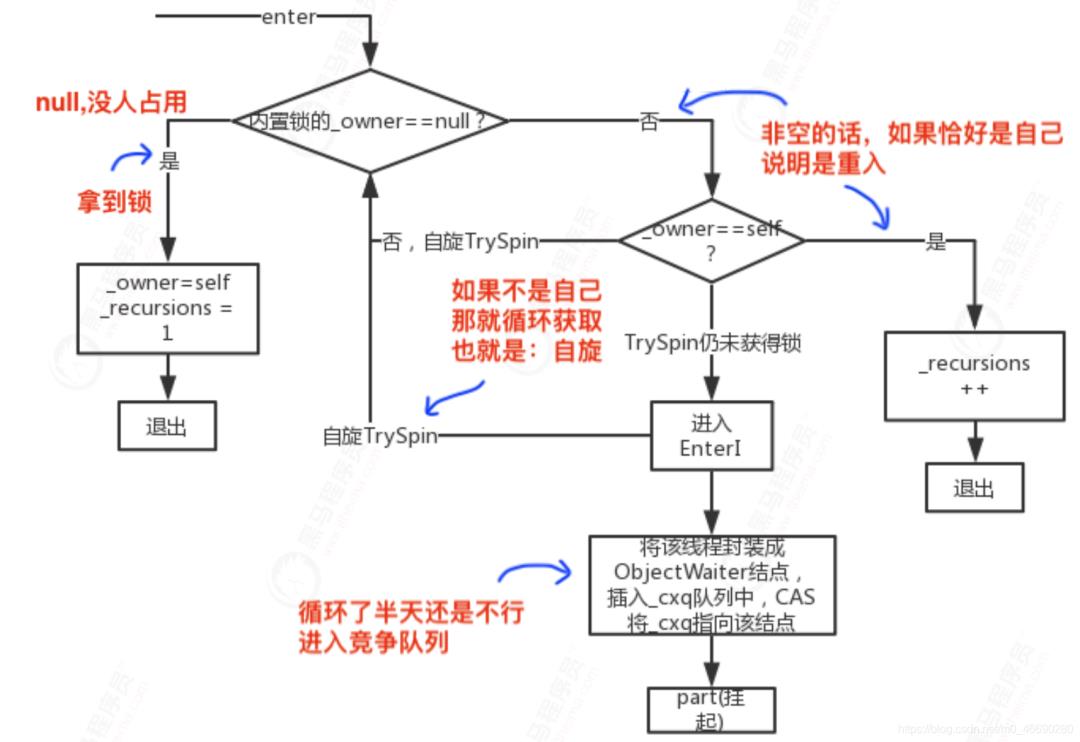
sync进入的时候,先通过CAS尝试把monitor的owner字段设置为当前线程。
如果owner是null,自然设置成功,拿到锁
如果owner不是null,说明当前有线程占用,判断下owner是不是自己
如果是自己,说明是2次拿锁,重入次数++,拿到锁
如果不是自己,说明是别人占着,自旋
自旋达到一定程度后,进入cxq队列,等待
2)源码
monitorenter指令执行位置:
JVM源码:src/share/vm/interpreter/interpreterRuntime.cpp
JVM函数入口:InterpreterRuntime::monitorenter
最终调用:src/share/vm/runtime/objectMonitor.cpp中的 ObjectMonitor::enter
一句话总结:自旋拿锁、拿不到等待(竞争队列)
1.3.3 Monitor释放
目标:第二个指令,monitorexit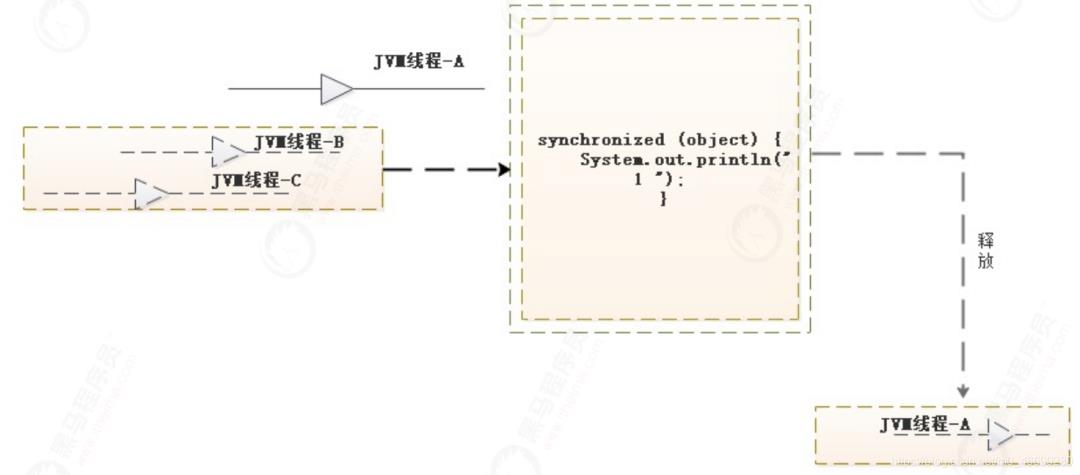
1)流程图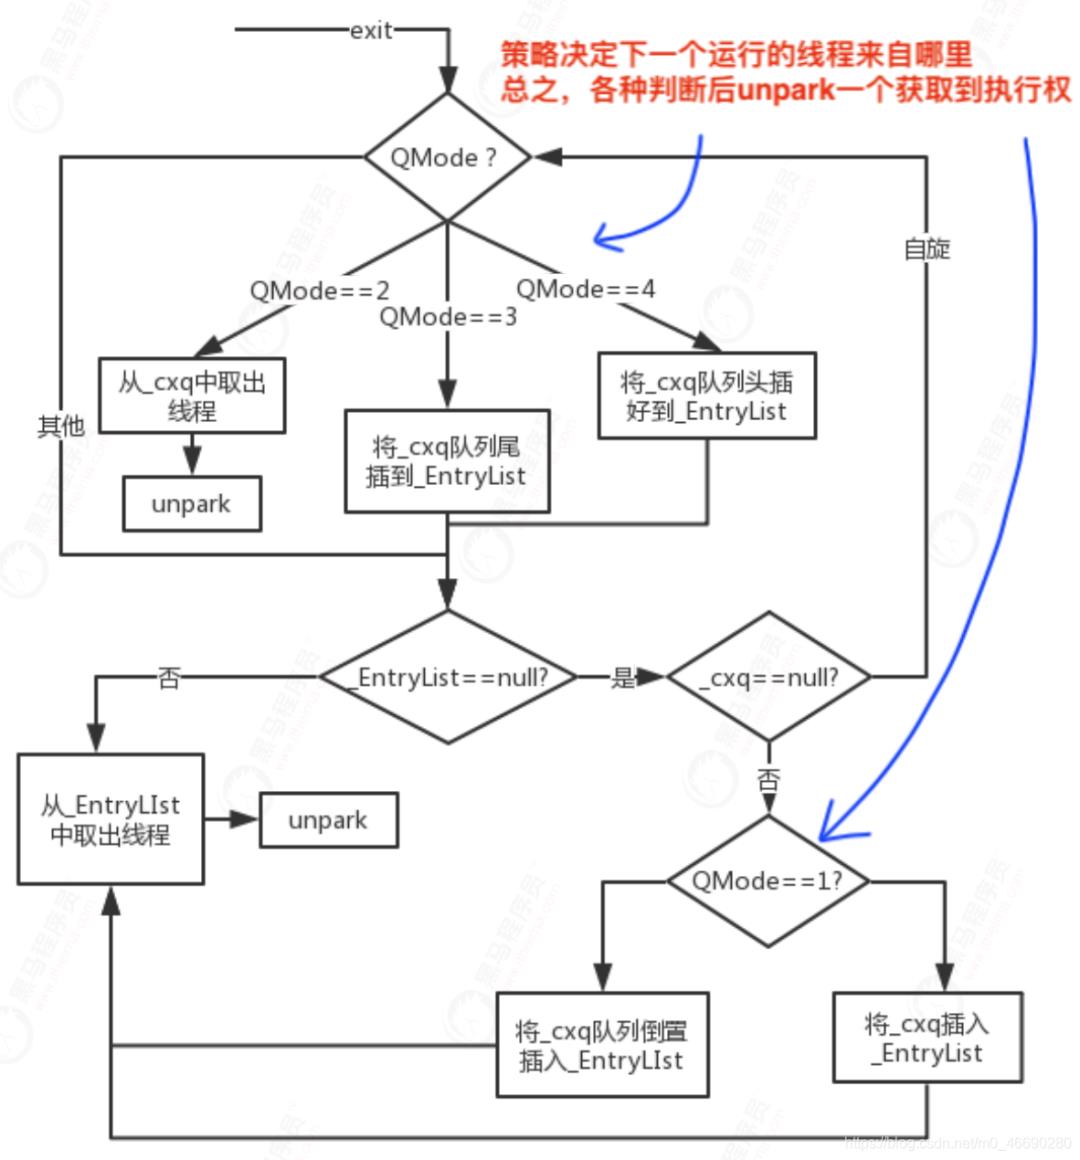
2)源码 (c++源码,了解)
执行monitorexit指令位置:
代码文件:src/share/vm/runtime/objectMonitor.cpp
调用函数:ObjectMonitor::exit
一句话总结:释放后,根据mode的策略,从cxq或者entry队列中取出线程来唤醒,执行。
2 并发容器线程安全应对之道
2.1 并发容器总体概述
ConcurrentHashMap概念:
ConcurrentHashMap是J.U.C包里面提供的一个线程安全的HashMap, 在并发编程中使用的频率(Spring)比较高。
数据结构如下
数组+链表+红黑树+锁(synchronized+cas)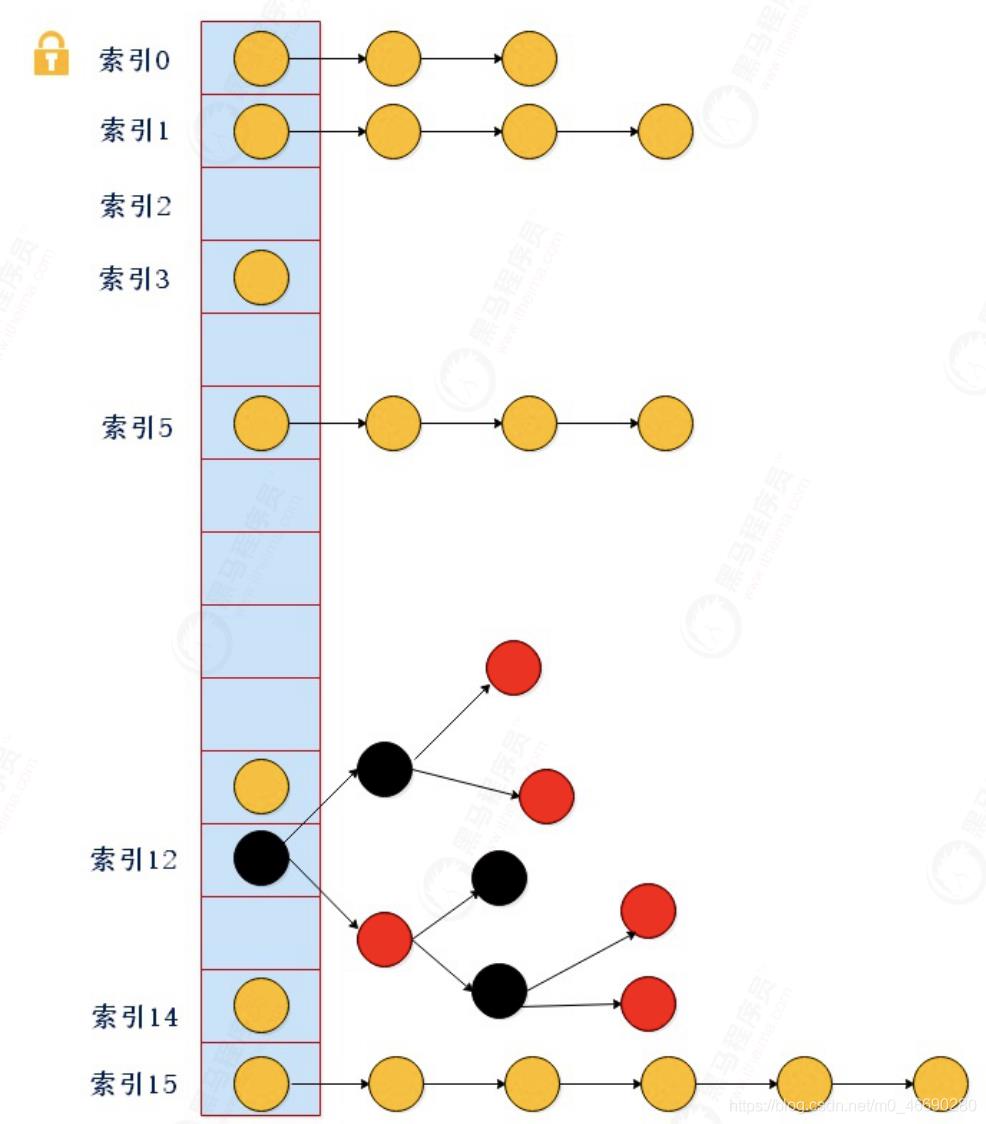
总结:
1、数据结构和hashmap一模一样,唯一的区别就是concurrenthashmap在put、删除、修改、递增、扩容和数据迁移的时候都加锁了(syn or cas)
2、加锁只是锁住一个元素,区别于HashTable(整个表,idea可以查看源码来验证)
2.2 并发容器数据结构与继承
简单认识下ConcurrentHashMap继承关系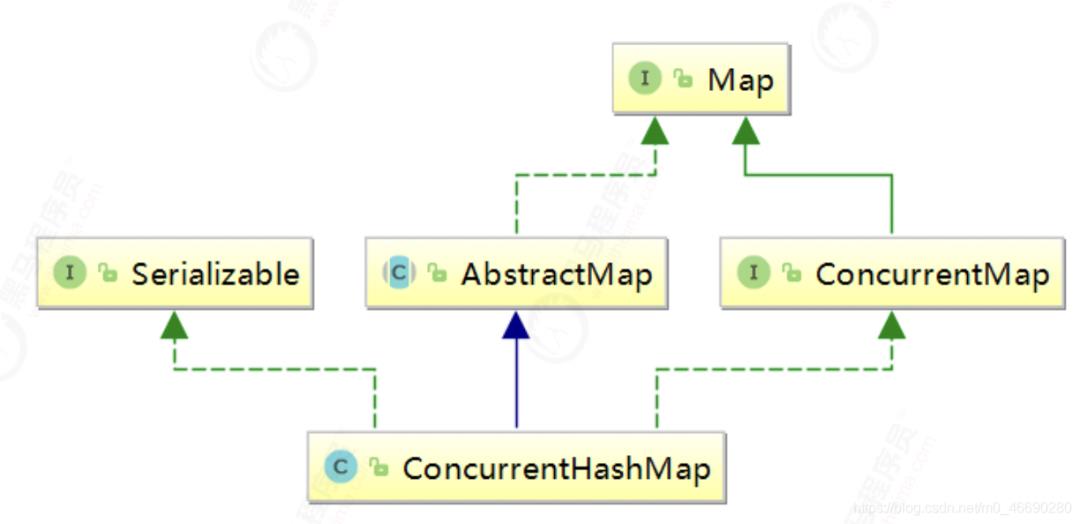
总结
ConcurrentHashMap:实现Serializable表示支持序列化
继承AbstractMap(实现map接口),实现了一些基本操作
实现ConcurrentMap接口,封装了map的基本操作
2.3 并发容器源码深度剖析
public static void main(String[] args) {
        ConcurrentHashMap<Integer, Integer> m = new ConcurrentHashMap<Integer, Integer>();
        for (int i = 0; i < 16; i++) {

            if (i == 0) {
                m.put(i, i);//正常新增(演示)
            } else if (i == 11) {

                m.put(i, i);//扩容(演示)

            } else if (i == 10) {
                m.put(27, 27);
                m.put(43, 43);
            } else if (i == 9) {


            } else {
                m.put(i, i);//正常新增
            }
        }

        m.get(8);
        System.out.println(m);
    }
2.3.1 并发容器成员变量
目标:认识下ConcurrentHashMap成员变量,先有个印象,方便后续源码分析
private static final int MAXIMUM_CAPACITY = 1 << 30; //table最大容量:
2^30=1073741824
private static final int DEFAULT_CAPACITY = 16; //默认容量,必须是2的幂数
static final int MAX_ARRAY_SIZE = Integer.MAX_VALUE - 8; 数组的建议最大值
private static final int DEFAULT_CONCURRENCY_LEVEL = 16; //并发级别,遗留下来的,为兼容以前的版本
static final int TREEIFY_THRESHOLD = 8;// 链表转红黑树阀值,> 8 链表转换为红黑树
static final int UNTREEIFY_THRESHOLD = 6;// 树转链表阀值
static final int MIN_TREEIFY_CAPACITY = 64;// 转化为红黑树的表的最小容量
private static final int MIN_TRANSFER_STRIDE = 16;// 每次进行转移的最小值
2.3.2 并发容器构造器
目标:
先认识下ConcurrentHashMap的5个构造器,看下在构造中(第一步)做了哪些事情
1、ConcurrentHashMap()型构造函数
public ConcurrentHashMap() { }
总结:该构造函数用于创建一个带有默认初始容量 (16)、负载因子 (0.75) 的空映射
2、ConcurrentHashMap(int)型构造函数
private static final int MAXIMUM_CAPACITY = 1 << 30

   public ConcurrentHashMap(int initialCapacity) {
        if (initialCapacity < 0) // 初始容量小于0,抛出异常
            throw new IllegalArgumentException();
        int cap = ((initialCapacity >= (MAXIMUM_CAPACITY >>> 1)) ?
                   MAXIMUM_CAPACITY :
                   tableSizeFor(initialCapacity + (initialCapacity >>> 1) + 1));
        // 初始化
        this.sizeCtl = cap;
    }
3、ConcurrentHashMap(Map<? extends K, ? extends V>)型构造函数
 public ConcurrentHashMap(Map<? extends K, ? extends V> m) {
        this.sizeCtl = DEFAULT_CAPACITY;
        putAll(m);
    }
总结:该构造函数用于构造一个与给定映射具有相同映射关系的新映射。
4、ConcurrentHashMap(int, float)型构造函数
   public ConcurrentHashMap(int initialCapacity, float loadFactor) {
        this(initialCapacity, loadFactor, 1);
    }
总结:该构造函数用于创建一个带有指定初始容量、加载因子 新的空映射。
5、ConcurrentHashMap(int, float, int)型构造函数
  public ConcurrentHashMap(int initialCapacity,
                             float loadFactor, int concurrencyLevel) {
        if (!(loadFactor > 0.0f) || initialCapacity < 0 || concurrencyLevel <= 0)
            throw new IllegalArgumentException();
        if (initialCapacity < concurrencyLevel)   // Use at least as many bins
            initialCapacity = concurrencyLevel;   // as estimated threads
        long size = (long)(1.0 + (long)initialCapacity / loadFactor);
        int cap = (size >= (long)MAXIMUM_CAPACITY) ?
            MAXIMUM_CAPACITY : tableSizeFor((int)size);
        this.sizeCtl = cap;
    }
总结:该构造函数用于创建一个带有指定初始容量、加载因子和并发级别的新的空映射
扩展:和HashMap完全一样?错!我们来看一个实例
1)代码实例
 public static void main(String[] args) {
        HashMap m = new HashMap(15, 0.5f);
        ConcurrentHashMap cm = new ConcurrentHashMap(15, 0.5f);
//debug here
        System.out.println("before put");
        m.put(1, 1);
        cm.put(1, 1);
//and here
        System.out.println("after put");
        System.out.println(ClassLayout.parseInstance(cm).toPrintable());

    }
2)调试,put之前
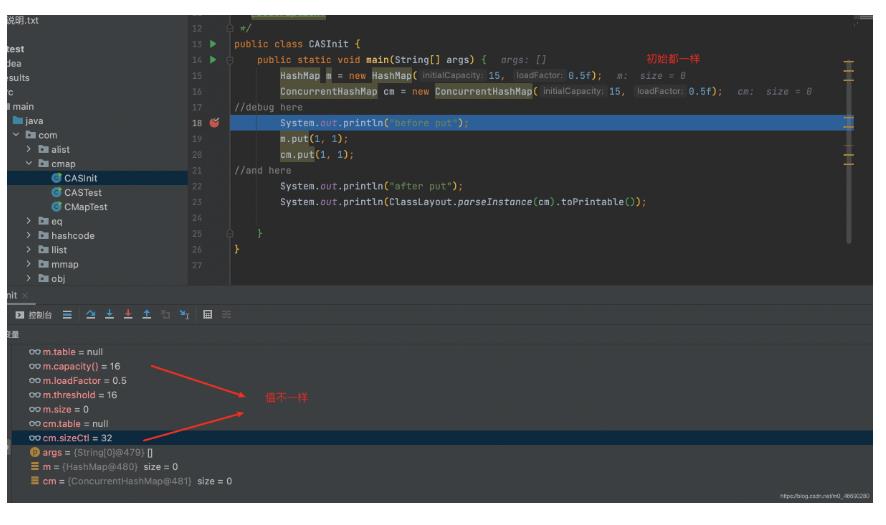
3)继续,debug到第二步试试,put之后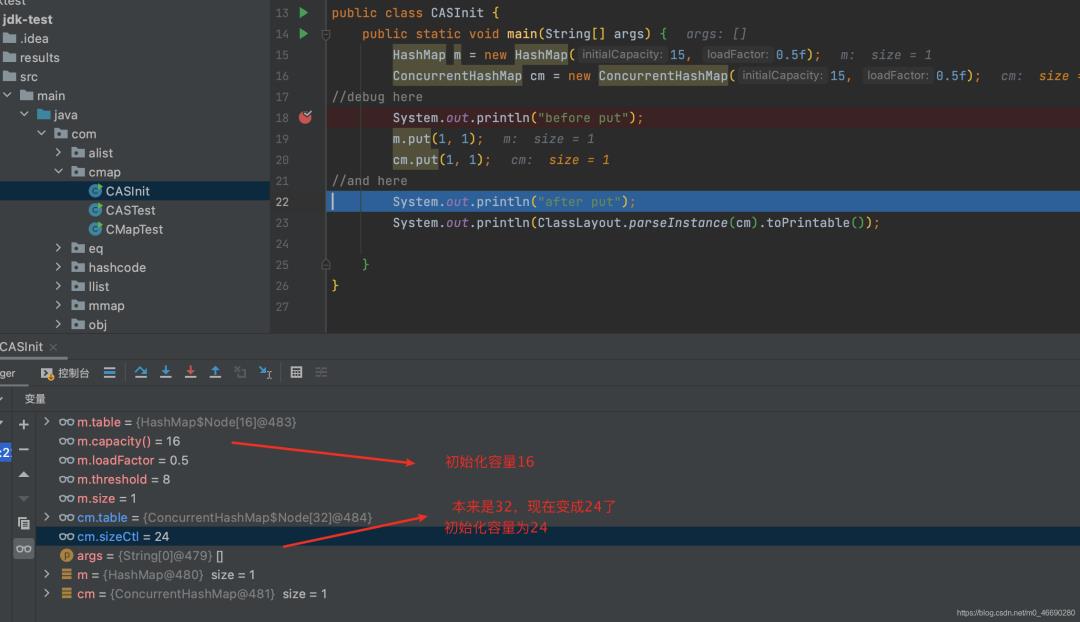
容量并不是我们之前认为的16,而是32
而sizeCtl,我们理解,应该类比于hashMap中的threshold,它应该等于 32*0.5=16才对
可是最终为24
4)原理剖析
先说结论:方法调用的都是tableSizeFor,只不过,Cmap所计算的参数不一样,注意回顾上面的构造函数
  public ConcurrentHashMap(int initialCapacity,
                             float loadFactor, int concurrencyLevel) {
        if (!(loadFactor > 0.0f) || initialCapacity < 0 || concurrencyLevel <= 0)
            throw new IllegalArgumentException();
        if (initialCapacity < concurrencyLevel)   // Use at least as many bins
            initialCapacity = concurrencyLevel;   // as estimated threads
            //initial = 15, size = 31
        long size = (long)(1.0 + (long)initialCapacity / loadFactor);
        //所以tableSizeFor做满1运算前,并不是15本身,而是size,也就是31
        //运算后,cap=32 , 不是16
        int cap = (size >= (long)MAXIMUM_CAPACITY) ?
            MAXIMUM_CAPACITY : tableSizeFor((int)size);
        this.sizeCtl = cap;
    }
那么它啥时候变成24的呢?
  //开始之初,table为null,在put时,会触发table的初始化,也就是以下方法
//从put方法的入口可以追踪到
  private final Node<K,V>[] initTable() {
        Node<K,V>[] tab; int sc;
        while ((tab = table) == null || tab.length == 0) {
        //sc = 原来的sizeCtl也就是 32
            if ((sc = sizeCtl) < 0)
                Thread.yield(); // lost initialization race; just spin
            else if (U.compareAndSwapInt(this, SIZECTL, sc, -1)) {
                try {
                    if ((tab = table) == null || tab.length == 0) {
                        int n = (sc > 0) ? sc : DEFAULT_CAPACITY;
                        @SuppressWarnings("unchecked")
                        //创建node数组,长度为n,也就是32
                        Node<K,V>[] nt = (Node<K,V>[])new Node<?,?>[n];
                        //创建完复制给table,初始化完成,也就是我们看到的32长度的数组
                        table = tab = nt;
                        // n >>> 2 ,相当于n除以4是8, 32-8=24
                        //实际效果相当于,n* 3/4 , 也就是 n*0.75 , 你指定的0.5在这里 没什么用!
                        sc = n - (n >>> 2);
                    }
                } finally {
                //在finally中将它赋给了sizeCtl,也就是我们最终看到的24
                    sizeCtl = sc;
                }
                break;
            }
        }
        return tab;
    }
那么sizeCtl起不到threshold的作用,它是干嘛的呢?
其实它的作用远远比hashmap中的thredhold大的多:
/**
 * Table initialization and resizing control. When negative, the
 * table is being initialized or resized: -1 for initialization,
 * else -(1 + the number of active resizing threads). Otherwise,
 * when table is null, holds the initial table size to use upon
 * creation, or 0 for default. After initialization, holds the
 * next element count value upon which to resize the table.
*/
private transient volatile int sizeCtl;
翻译过来就是这样子:(官方就这么规定的,记住它!)
默认为0,用来控制table的初始化和扩容操作
-1 代表table正在初始化
-N 表示有N-1个线程正在进行扩容操作
其余情况:
如果table未初始化,表示table需要初始化的大小。
如果table初始化完成,表示table的容量,默认是table大小的0.75倍
而修改它的方法也比较多,initTable只是其中的一个:
initTable()
addCount()
tryPresize()
transfer()
helpTransfer()
2.3.3 put方法
1、ConcurrentHashMap增加的逻辑是什么
2、ConcurrentHashMap是如何保证线程安全的
基础回顾:关于compareAndSwapInt(CAS)
一定要理解CAS的原理,Cmap的精髓就在于cas和sync保障了线程安全,下文的源码分析马上要用到它
(U.compareAndSwapInt(this, SIZECTL, sc, -1))
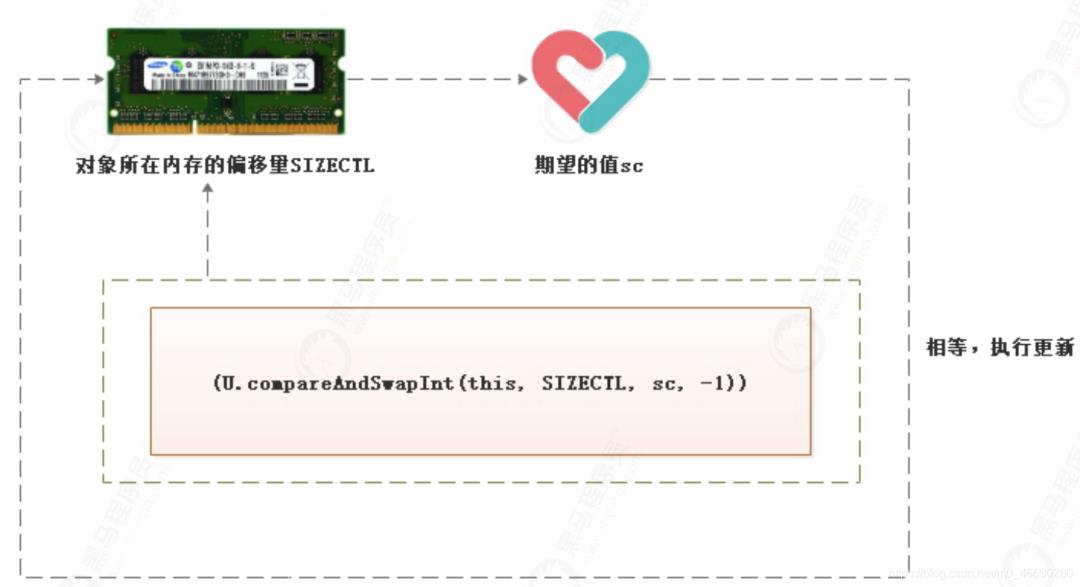
解释:
此方法是Java的native方法,并不由Java语言实现。
方法的作用是,读取传入对象this在内存中偏移量为SIZECTL位置的值与期望值sc作比较。
相等就把-1值赋值给SIZECTL位置的值。方法返回true。
不相等,就取消赋值,方法返回false。
一般配合循环重试操作,被for或while所包裹
 static final int HASH_BITS = 0x7fffffff; // usable bits of normal node hash

    public static void main(String[] args) {
        ConcurrentHashMap<Integer, Integer> m = new ConcurrentHashMap<Integer, Integer>();
        for (int i = 0; i < 16; i++) {

            if (i == 0) {
                m.put(i, i);//正常新增(演示)
            } else if (i == 11) {

                m.put(i, i);//扩容(演示)

            } else if (i == 10) {
                m.put(27, 27);
                m.put(43, 43);
            } else if (i == 9) {


            } else {
                m.put(i, i);//正常新增
            }
        }

        m.get(8);
        System.out.println(m);
    }

    //哈希冲突
    static void testHashCode() {
        System.out.println((16 - 1) & spread(new Integer(27).hashCode()));
        System.out.println((16 - 1) & spread(new Integer(43).hashCode()));
        System.out.println((16 - 1) & spread(new Integer(11).hashCode()));
    }

    static final int spread(int h) {
        return (h ^ (h >>> 16)) & HASH_BITS;
    }
2)增加过程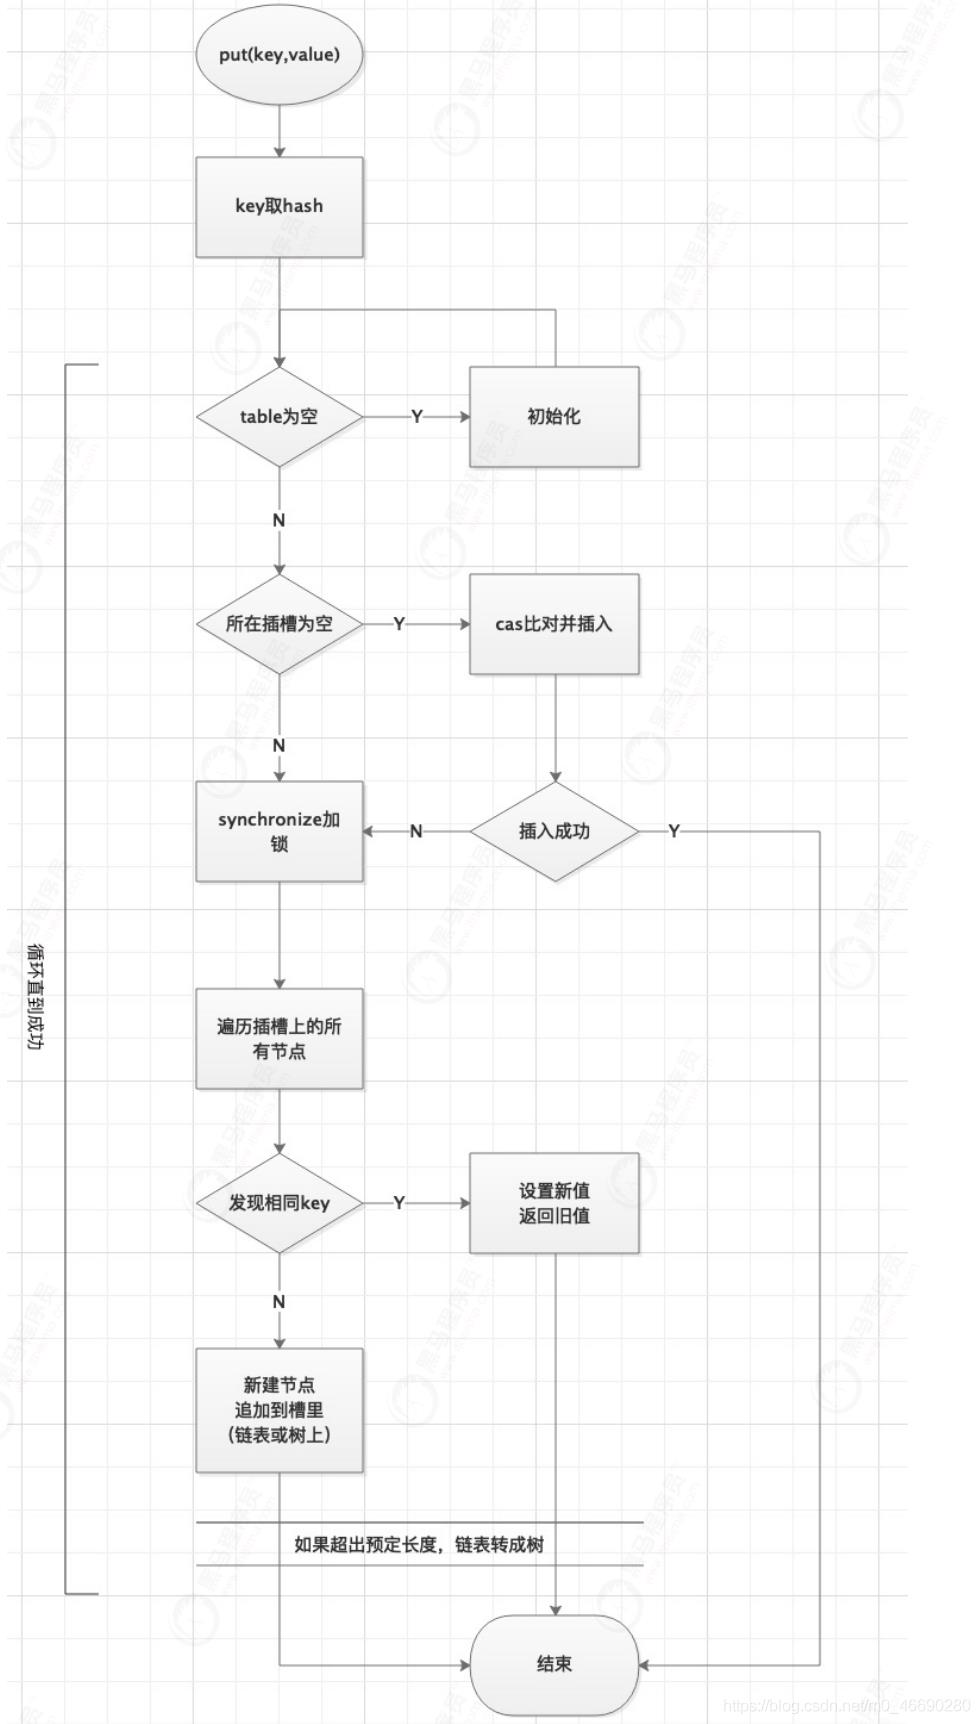
final V putVal(K key, V value, boolean onlyIfAbsent) {
        if (key == null || value == null) throw new NullPointerException();
        int hash = spread(key.hashCode()); //key取hash扰动
        int binCount = 0;
        for (Node<K,V>[] tab = table;;) { //循环直到成功
            Node<K,V> f; int n, i, fh;
            if (tab == null || (n = tab.length) == 0)
                tab = initTable(); //表为空的话,初始化表,下面会详细介绍
                //寻址,找到头结点f
            else if ((f = tabAt(tab, i = (n - 1) & hash)) == null) {
            //cas在这里!!!
            //插槽为空,cas插入元素
            //比较是否为null,如果null才会设置并break,否则到else
                if (casTabAt(tab, i, null,
                             new Node<K,V>(hash, key, value, null)))
           //插入成功,break终止即可,如果不成功,会进入下一轮for
                    break;                   // no lock when adding to empty bin
            }
            //helpTransfer() 扩容。下小节详细讲,一个个来……
            else if ((fh = f.hash) == MOVED)
                tab = helpTransfer(tab, f);
            else {
                V oldVal = null;
                //synchronized 在这里!!!
                //插槽不为空,说明被别的线程put抢占了槽
                //那就加锁,锁的是当前插槽上的头节点f(类似分段锁)
                synchronized (f) {
                    if (tabAt(tab, i) == f) {
                        if (fh >= 0) {
                            binCount = 1;
                            //沿着当前插槽的Node链往后找
                            for (Node<K,V> e = f;; ++binCount) {
                                K ek;
                                //如果找到相同key,说明之前put过
                                if (e.hash == hash &&
                                    ((ek = e.key) == key ||
                                     (ek != null && key.equals(ek)))) {
                                    oldVal = e.val;
                                    //abset参数来决定要不要覆 盖,默认是覆盖
                                    if (!onlyIfAbsent)
                                        e.val = value;
                                    break;
                                }
                                Node<K,V> pred = e;
                                //否则,新key,新Node插入到最后
                                if ((e = e.next) == null) {
                                    pred.next = new Node<K,V>(hash, key,
                                                              value, null);
                                    break;
                                }
                            }
                        }
                        //如果是红黑树,说明已经转化过,按树的规则放入Node
                        else if (f instanceof TreeBin) {
                            Node<K,V> p;
                            binCount = 2;
                            if ((p = ((TreeBin<K,V>)f).putTreeVal(hash, key,
                                                           value)) != null) {
                                oldVal = p.val;
                                if (!onlyIfAbsent)
                                    p.val = value;
                            }
                        }
                    }
                }
                if (binCount != 0) {
                //如果节点数达到临界值,链表转成树
                    if (binCount >= TREEIFY_THRESHOLD)
                        treeifyBin(tab, i);
                    if (oldVal != null)
                        return oldVal;
                    break;
                }
            }
        }
        addCount(1L, binCount); //统计size
        return null;
    }

     //compareAndSetObject,比较并插入,典型CAS操作
     static final <K,V> boolean casTabAt(Node<K,V>[] tab, int i,
                                        Node<K,V> c, Node<K,V> v) {
        return U.compareAndSwapObject(tab, ((long)i << ASHIFT) + ABASE, c, v);
    }
3)初始化表方法
//注意点:先以单线程看业务流程,再类比多个线程操作下的并发是如何处理的?
 private final Node<K,V>[] initTable() {
        Node<K,V>[] tab; int sc;
        while ((tab = table) == null || tab.length == 0) { //自旋
        //第1个线程这个if不成立,会进入下面,设置为-1
        //第2个线程来的时候if成立,注意理解多线程在跑。
            if ((sc = sizeCtl) < 0) //注意回顾上面的值,小于0表示正在初始化,或扩容
                Thread.yield(); //有线程在操作,将当前线程yield让出时间片。唤醒后进入下 一轮while
                // lost initialization race; just spin
                //CAS操作来设置SIZECTL为-1,如果设置成功,表示当前线程获得初始化的资格
                //传入对象 & 内存地址 & 期望值 & 将修改的值
            else if (U.compareAndSwapInt(this, SIZECTL, sc, -1)) {
                try {//table是null,还没初始化
                    if ((tab = table) == null || tab.length == 0) {//默认容量16
                        int n = (sc > 0) ? sc : DEFAULT_CAPACITY;
                        @SuppressWarnings("unchecked")
                        Node<K,V>[] nt = (Node<K,V>[])new Node<?,?>[n];
                        //初始化 table //给table赋值,注意这个table是volatile的,会被其他线程及时看 到!
                        //一旦其他线程看到不是null,走while循环发现table不等于空就 return了
                        table = tab = nt;
                        sc = n - (n >>> 2); //计算下次扩容的阈值,容量的0.75,和你指 定的factor无关
                    }
                } finally {
                    sizeCtl = sc;
                }
                break;
            }
        }
        return tab;
    }
多线程下initTable的交互流程: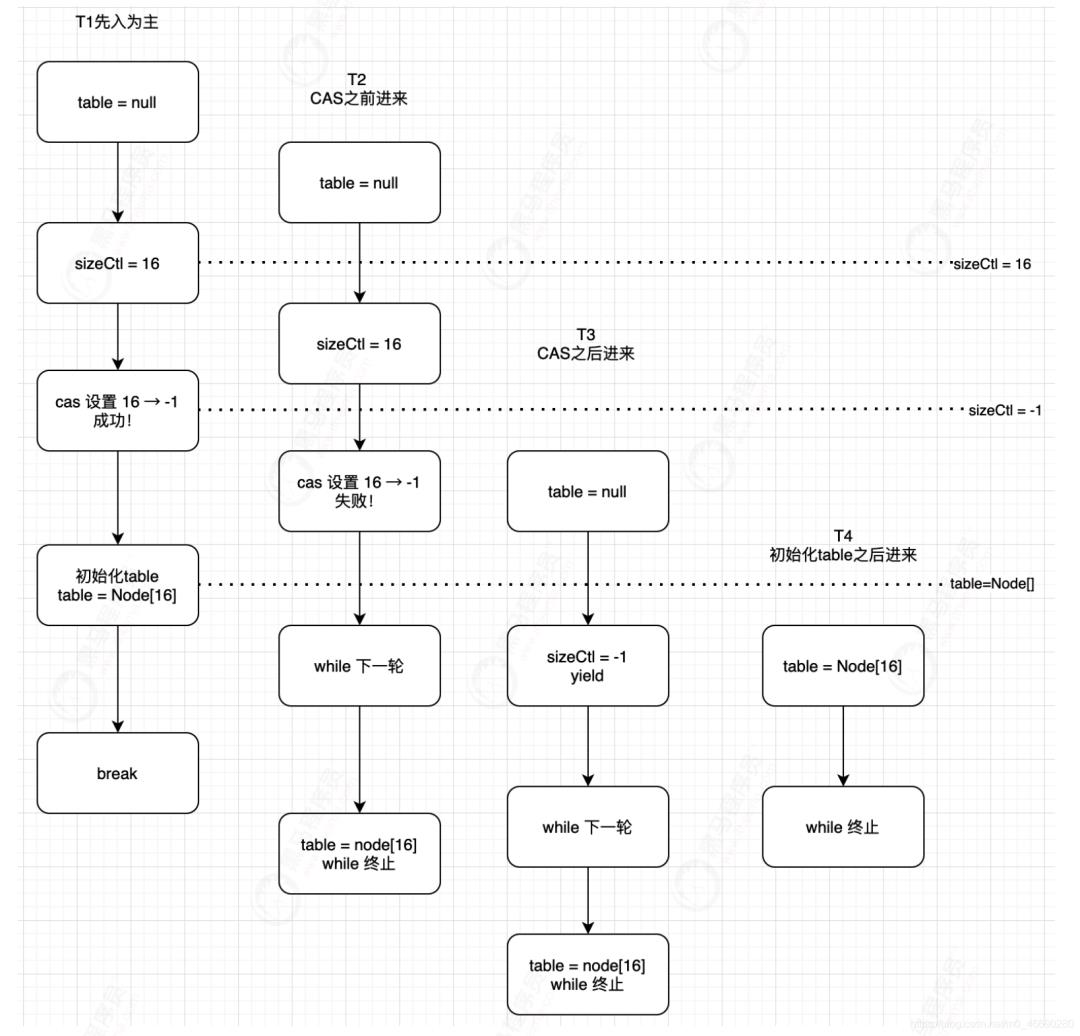
判断顺序为先看 table=null 再看 sizeCtl = -1
T1来得早,按部就班进行
T2 - T4 在不同时间点进入,行动不一样,有的是被cas挡住,有的被table非null挡住
1线程正常执行
2线程进来看到tablenull,自己回去尝试设置-1,结果失败了,循环进入yield等待返回
3线程看到tablenull ,sc=-1,yield等待返回
4线程拿到结果返回
2.3.4 扩容
1、图解+断点分析查看ConcurrentHashMap是如何扩容的
2、图解+断点分析查看ConcurrentHashMap是如何迁移数据的
测试代码
  public static void main(String[] args) {

        ConcurrentHashMap<Integer, Integer> m = new ConcurrentHashMap<Integer, Integer>();
        for (int i = 0; i < 16; i++) {

            if (i == 0) {
                m.put(i, i);//正常新增(演示)
            } else if (i == 11) {

                m.put(i, i);//扩容(演示)

            } else if (i == 10) {
                m.put(27, 27);
                m.put(43, 43);
            } else if (i == 9) {


            } else {
                m.put(i, i);//正常新增
            }
        }

        m.get(8);
        System.out.println(m);
    }
入口:
//如果正在扩容,上去帮忙 * tab = 旧数组, f=头结点,如果正在扩容,它是一个ForwardNode类型
 final Node<K,V>[] helpTransfer(Node<K,V>[] tab, Node<K,V> f) {
        Node<K,V>[] nextTab; int sc;
        if (tab != null && (f instanceof ForwardingNode) &&
            (nextTab = ((ForwardingNode<K,V>)f).nextTable) != null) {
            int rs = resizeStamp(tab.length);
            // sizeCtl < 0 (说明还在扩容中)
            while (nextTab == nextTable && table == tab &&
                   (sc = sizeCtl) < 0) {
                   //一堆条件判断,不去管它
                if ((sc >>> RESIZE_STAMP_SHIFT) != rs || sc == rs + 1 ||
                    sc == rs + MAX_RESIZERS || transferIndex <= 0)
                    break;
                    // cas将 sizeCtl + 1, (表示增加了一个线程帮助其扩容)
                if (U.compareAndSwapInt(this, SIZECTL, sc, sc + 1)) {
                // 找到了,核心在这里!这个内部藏着扩容的具体操作
                    transfer(tab, nextTab);
                    break;
                }
            }
            return nextTab;
        }
        return table;
    }
核心源码
 private final void transfer(Node<K,V>[] tab, Node<K,V>[] nextTab) {
        int n = tab.length, stride;
        // 将 length / 8 然后除以 CPU核心数。如果得到的结果小于 16,那么就使用 16。
        // 如果桶较少的话,默认一个 CPU(一个线程)处理 16 个桶
        if ((stride = (NCPU > 1) ? (n >>> 3) / NCPU : n) < MIN_TRANSFER_STRIDE)
            stride = MIN_TRANSFER_STRIDE; // subdivide range // 最小16
        if (nextTab == null) {            // initiating // 新的 table 尚未初始化
            try {
                @SuppressWarnings("unchecked")
                // 扩容 2 倍
                Node<K,V>[] nt = (Node<K,V>[])new Node<?,?>[n << 1];
                // 赋值给新table
                nextTab = nt;
            } catch (Throwable ex) {      // try to cope with OOME
                sizeCtl = Integer.MAX_VALUE;
                return;
            }
            // 更新成员变量
            // transferIndex表示没迁移的桶里最大索引的值,这个会被多个线程瓜分走越来越小。
            // 一开始这个值是旧tab的尾部:也就是 n
            // 瓜分时,从大索引往后分,也就是顺序是 : 15 14 13 12 ....0

            nextTable = nextTab;
            transferIndex = n; // tag_0
        }
        // 新 tab 的 length
        int nextn = nextTab.length;
        // 创建一个 fwd 节点,用于标记。当别的线程发现这个槽位中是 fwd 类型的节点,则跳过这个节 点。
        ForwardingNode<K,V> fwd = new ForwardingNode<K,V>(nextTab);
        boolean advance = true; //临时变量,表示要不要移动槽
        boolean finishing = false; // to ensure sweep before committing nextTab  //临时变量,表示当前槽有没有迁移完
        for (int i = 0, bound = 0;;) {
        //每次for遍历一个桶来迁移,也就是旧table里的一个 元素
            Node<K,V> f; int fh;
            while (advance) {
            //这里的while是配合tag_3的cas做自旋,只有它可能会触发多次循环, 其他俩都是循环1次结束
//while比较乱:可以打断点进来调试查看每次的经过
// 第一次for的时候进 tag_3 确定bound和i,也就是给当前线程分配了 bound ~ i 之间的桶
// 以后每次--i,只要不大于bound,都进 tag_1,也就是啥都不干
// 最后一次,等于bound的时候,说明分配给当前线程的桶被它for完了,退出

                int nextIndex, nextBound;
                if (--i >= bound || finishing)// tag_1
                //如果i比bound还大,或者当前i下的链表没移动完,--i推动一格
                    advance = false;
                else if ((nextIndex = transferIndex) <= 0) {// tag_2
                //如果transferIndex <=0 说明已迁移完成,没有桶需要处理了,退出
                    i = -1;
                    advance = false;
                }
                else if (U.compareAndSwapInt
                         (this, TRANSFERINDEX, nextIndex,
                          nextBound = (nextIndex > stride ?
                                       nextIndex - stride : 0))) {// tag_3
                                       // 第一次for的时候会走进这里,确定当前线程负责的桶的范围,同时cas更新transferIndex
// 也就是,多个线程第一次都会访问到这里,通过cas来分一部分桶,cas防止并发下重复分配
// 注意,来这里之前,经过了tag_2的赋值:
// 所以这里在cas前 nextIndex = transferIndex = 16
// cas后, transferIndex = nextBound = (nextIndex - stride) = 0
// 注意,这里不一定是0,只不过旧长度16被一个线程全拿走了,剩下了0个
// 也就是说,transfer是本次分配后,还剩下的桶里最大的索引,别的线程还会继续分

                    bound = nextBound; // 最小下标0(旧数组)
                    i = nextIndex - 1; //最大下标15(旧数组)
                    advance = false;
                }
            }
            // 判断i的范围,不在可移动插槽的索引范围内,说明全部迁移完了!
            if (i < 0 || i >= n || i + n >= nextn) {
                int sc;
                // 如果完成了扩容
                if (finishing) {
                    nextTable = null; // 释放
                    table = nextTab; // 更新 table
                    sizeCtl = (n << 1) - (n >>> 1); // 更新阈值
                    return;// 结束方法。
                }
                // 如果没完成,尝试使用cas减少sizeCtl,也就是扩容的线程数,同时更新标记 finishing为true
                if (U.compareAndSwapInt(this, SIZECTL, sc = sizeCtl, sc - 1)) { /
                    if ((sc - 2) != resizeStamp(n) << RESIZE_STAMP_SHIFT)
                        return;
                    finishing = advance = true;
                    i = n; // recheck before commit
                }
            }
            //下面才是真正迁移数据的操作!!!
            else if ((f = tabAt(tab, i)) == null)
            // 获取老 tab i 下标位置的变量,如果是 null,就使用 fwd 占位。
            // cas成功,advance为true,下次for里while会做--i移动一个下标
                advance = casTabAt(tab, i, null, fwd);
            else if ((fh = f.hash) == MOVED)// 如果不是 null 且 hash 值是 MOVED
                advance = true; // already processed // 说明别的线程已经处理过了,移动一个下标
            else {
            // 到这里,说明这个位置有实际值了,且不是占位符,那就需要我们迁数据了。
// 对这个节点上锁。防止别的线程 putVal 的时候向链表插入数据

                synchronized (f) {
                // 判断 i 下标处的桶节点是否和 f 相同 ,确保没有被别的线程动过
                    if (tabAt(tab, i) == f) {
                        Node<K,V> ln, hn;// 定义 low, height 高位桶,低位桶
                        // 如果 f 的 hash 值大于 0 属于常规hash,开始拆分高低链表 // 参考静态变量:MOVED -1、TREEBIN -2、RESERVED -3、HASH_BITS > 0
                        if (fh >= 0) {
                        // 和老长度进行与运算,由于 Map 的长度都是 2 的次方(16就是 10000 这类的数字)
// 那么取与 n 只有 2 种结果,一种是 0,一种是n
// 如果是结果是0 ,拆分后,Doug Lea 将其放在低位链表,反之放在 高位链表
// 这里和HashMap的算法不一样了!

                            int runBit = fh & n;
                            Node<K,V> lastRun = f;
                            // 遍历这个桶,注意,这地方有个讨巧的操作!往下看 ↓ (可以借助下 面的图来同步说明)
                            for (Node<K,V> p = f.next; p != null; p = p.next) {
                            // 沿着链往下走,挨个取与
                                int b = p.hash & n;
                                // 如果和上次循环的值相等,那不动(当然第一次的话就是和头节点 比较)
                                if (b != runBit) {
                                //如果不相等的话,就切换值
                                    runBit = b;// 0遍。
                                    lastRun = p;// 这个 lastRun 保证后面的节点与自己的 取于值相同,避免后面没
                                }
                            }
                            //思考一下,经过上一轮遍历完,发生了什么?
                            // runBit 要么是0 要么是1 ,
                            // lastRun 指向了最后一次切换的那个节点,它后面再没发生或切换
                            // 也就意味着,lastRun后面所有的节点和它都具备相同的runBit值
                            // 想想,可以做什么???
                            // 对!在lastRun处直接切断!带着后面的尾巴,直接当做拆分后的高 位,或者低位链表
                            // 这样就不需要和hashMap一样挨个断开指针,再挨个接一遍到新链,一 锅端就行了
                            if (runBit == 0) { // 如果最后的 runBit 是 0 ,直接当低位链表
                                ln = lastRun;
                                hn = null;
                            }
                            else {
                                hn = lastRun; // 如果最后的 runBit 是 1, 直接当高位链表
                                ln = null;
                            }
                            // 那么lastRun前面剩下的那些呢?
                            // 再遍历一遍就是了,注意,是从头结点f遍历到lastRun,后面的不需 要操心了
                            for (Node<K,V> p = f; p != lastRun; p = p.next) {
                                int ph = p.hash; K pk = p.key; V pv = p.val;
                                if ((ph & n) == 0)
                                // 如果与运算结果是 0,那么放低位链 表,注意是头插
                                    ln = new Node<K,V>(ph, pk, pv, ln);// 参数里的ln 是next,头插!
                                else // 1 则放高位
                                    hn = new Node<K,V>(ph, pk, pv, hn);
                            }
                            // 这里往下就类似 hashMap
                            // 设置低位链表放在新链表的 i
                            setTabAt(nextTab, i, ln);
                            // 设置高位链表,在原有长度上加 n
                            setTabAt(nextTab, i + n, hn);
                            // 将旧的链表设置成占位符,表示迁移完了!
                            setTabAt(tab, i, fwd);
                            // 继续向后推进
                            advance = true;
                        }
                        // 如果是红黑树
                        else if (f instanceof TreeBin) {
                            TreeBin<K,V> t = (TreeBin<K,V>)f;
                            TreeNode<K,V> lo = null, loTail = null;
                            TreeNode<K,V> hi = null, hiTail = null;
                            int lc = 0, hc = 0;
                            // 遍历
                            for (Node<K,V> e = t.first; e != null; e = e.next) {
                                int h = e.hash;
                                TreeNode<K,V> p = new TreeNode<K,V>
                                    (h, e.key, e.val, null, null);
                                    // 和链表相同的判断,与运算 == 0 的放在低位
                                if ((h & n) == 0) {
                                    if ((p.prev = loTail) == null)
                                        lo = p;
                                    else
                                        loTail.next = p;
                                    loTail = p;
                                    ++lc;
                                }// 不是 0 的放在高位
                                else {
                                    if ((p.prev = hiTail) == null)
                                        hi = p;
                                    else
                                        hiTail.next = p;
                                    hiTail = p;
                                    ++hc;
                                }
                            }
                            // 如果树的节点数小于等于 6,那么转成链表,反之,创建一个新的树
                            ln = (lc <= UNTREEIFY_THRESHOLD) ? untreeify(lo) :
                                (hc != 0) ? new TreeBin<K,V>(lo) : t;
                            hn = (hc <= UNTREEIFY_THRESHOLD) ? untreeify(hi) :
                                (lc != 0) ? new TreeBin<K,V>(hi) : t;
                                // 低位树
                            setTabAt(nextTab, i, ln);
                            // 高位树
                            setTabAt(nextTab, i + n, hn);
                            // 旧的设置成占位符
                            setTabAt(tab, i, fwd);
                            // 继续向后推进
                            advance = true;
                        }
                    }
                }
            }
        }
    }
总结
1、关于多线程协同
原来:128,扩容后256
难道使用单线程去完成所有数据的迁移工作?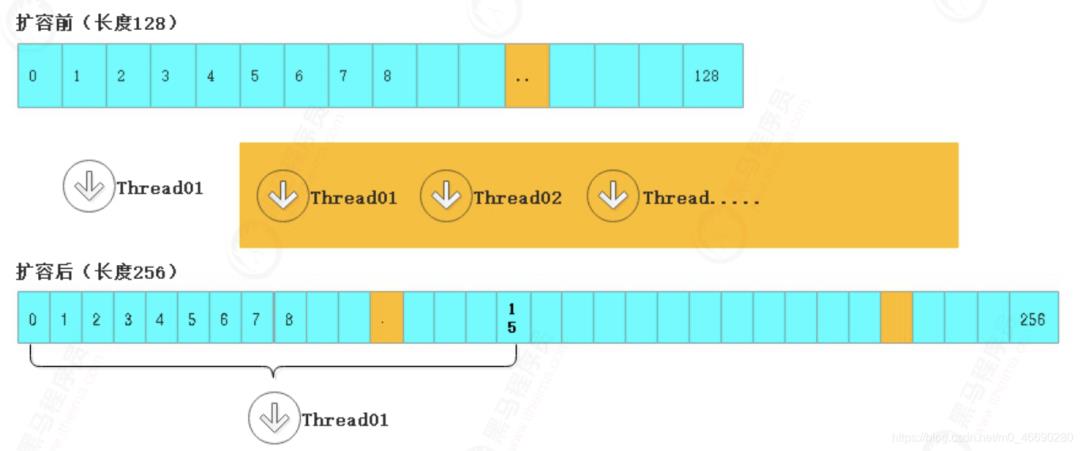
既然使用多线程进行迁移,如果保证数据不能乱?
将数组分段(桶),每个线程负责至少16个桶(stride),8个线程就可以并行工作了
至于谁分哪些桶,从高索引到低索引,通过cas一起减transferIndex的值来实现,避免重复切分切一段,低索引叫bound,高索引叫i,遍历迁移就是了
2、关于数据迁移(一个讨巧的小操作)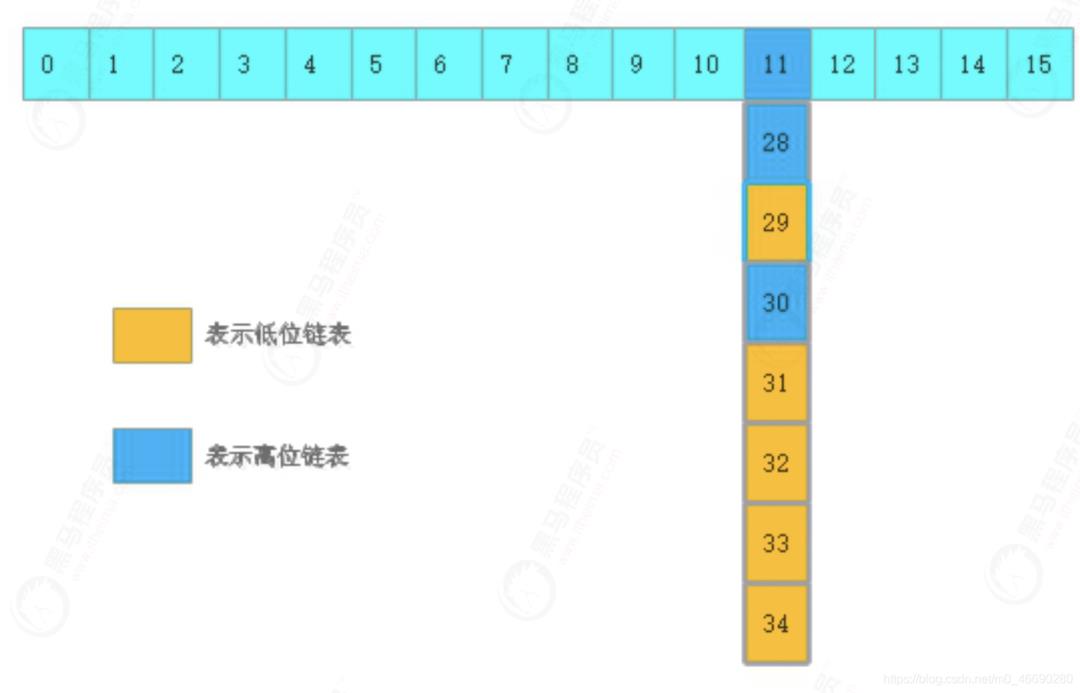
第一次,从11往后遍历,最后 runBit=0, lastRun指向31节点
从31处切断,后面的一窝端直接当低位链表,不需要再挨个动他们
第二次,再遍历11 - 30 , 根据情况头插到高位和低位新链表上
3、线程安全性
1、多个线程通过cas操作防止重复操作。
2、节点引用的地方使用volatile保持了线程修改时对其他线程及时可见
3、迁移的时候对插槽加sync锁,保障安全性
2.3.5 get方法
1、ConcurrentHashMap查询是否加锁,如何保证线程安全
2、在查询的时候遇到扩容怎么办
ConcurrentHashMap查询流程图如下
多线程下,所谓get的不安全因素,就是最怕读到脏数据
get的时候取到了数据,其实其他线程已经把它改掉了,就是所谓的可见性问题。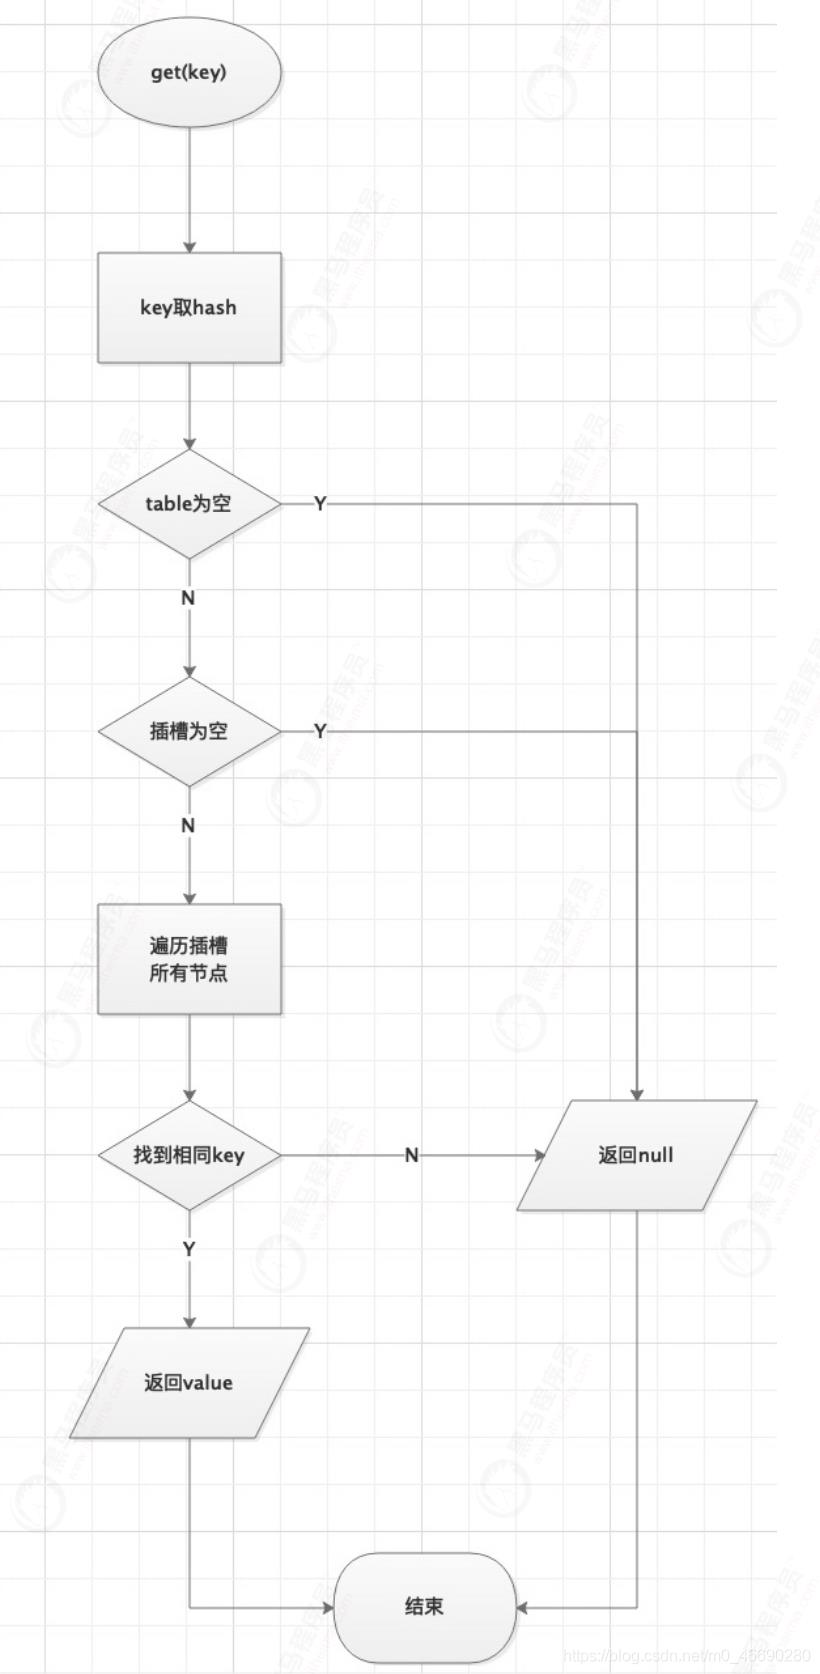
get方法源码如下
//get操作无锁
//因为Node的val和next是用volatile修饰的
//多线程环境下线程A修改结点的val或者新增节点的时候是对线程B可见的
public V get(Object key) {
        Node<K,V>[] tab; Node<K,V> e, p; int n, eh; K ek;
        //key取hash
        int h = spread(key.hashCode());
        //1.判断table是不是空的,2.当前桶上是不是空的
        //如果为空,返回null
        if ((tab = table) != null && (n = tab.length) > 0 &&
            (e = tabAt(tab, (n - 1) & h)) != null) {
            //找到对应hash槽的第一个node,如果key相等,返回value
            if ((eh = e.hash) == h) {
                if ((ek = e.key) == key || (ek != null && key.equals(ek)))
                    return e.val;
            }
            else if (eh < 0)
            //hash值为负值表示正在扩容,这个时候查的是ForwardingNode的find方法来定位到 nextTable新表中
                return (p = e.find(h, key)) != null ? p.val : null;
            while ((e = e.next) != null) {//既不是首节点也不是ForwardingNode,那就往下 遍历
                if (e.hash == h &&
                    ((ek = e.key) == key || (ek != null && key.equals(ek))))
                    return e.val;
            }
        }
        //遍历完还没找到,返回null
        return null;
    }
思考:
get没有加锁,在进行查询的时候是如何保证读取不到脏数据呢?
猜想一下?
是在内部类Node类的val上加了volatile?
 static class Node<K,V> implements Map.Entry<K,V> {
        final int hash;
        final K key;
        volatile V val;
        volatile Node<K,V> next;

        Node(int hash, K key, V val, Node<K,V> next) {
            this.hash = hash;
            this.key = key;
            this.val = val;
            this.next = next;
        }
2、是在成员变量数组table上加了volatile?
transient volatile Node<K,V>[] table;
结论:get通过Node内部类volatile关键字来保证可见性、有序性
总结
计算hash值,定位到该table索引位置,如果是首节点符合就返回
如果遇到扩容的时候,会调用标志正在扩容节点ForwardingNode的find方法,查找该节点,匹配就返回
以上都不符合的话,就往下遍历节点,匹配就返回,否则最后就返回null
get不加锁,是因为Node的成员val和指针next是用volatile修饰的
在1.8中ConcurrentHashMap的get操作全程不需要加锁,这也是它比其他并发集合比如hashtable安全效率高的原因之一
题外话
Cmap里用到了大量的CAS
CAS(Compare and Swap), 比较并交换,它是一个乐观锁
比较的什么?替换的什么?
比较当前工作内存的值和主内存的值,如相同则修改,否则继续比较;直到内存和工作内存中的值一致为止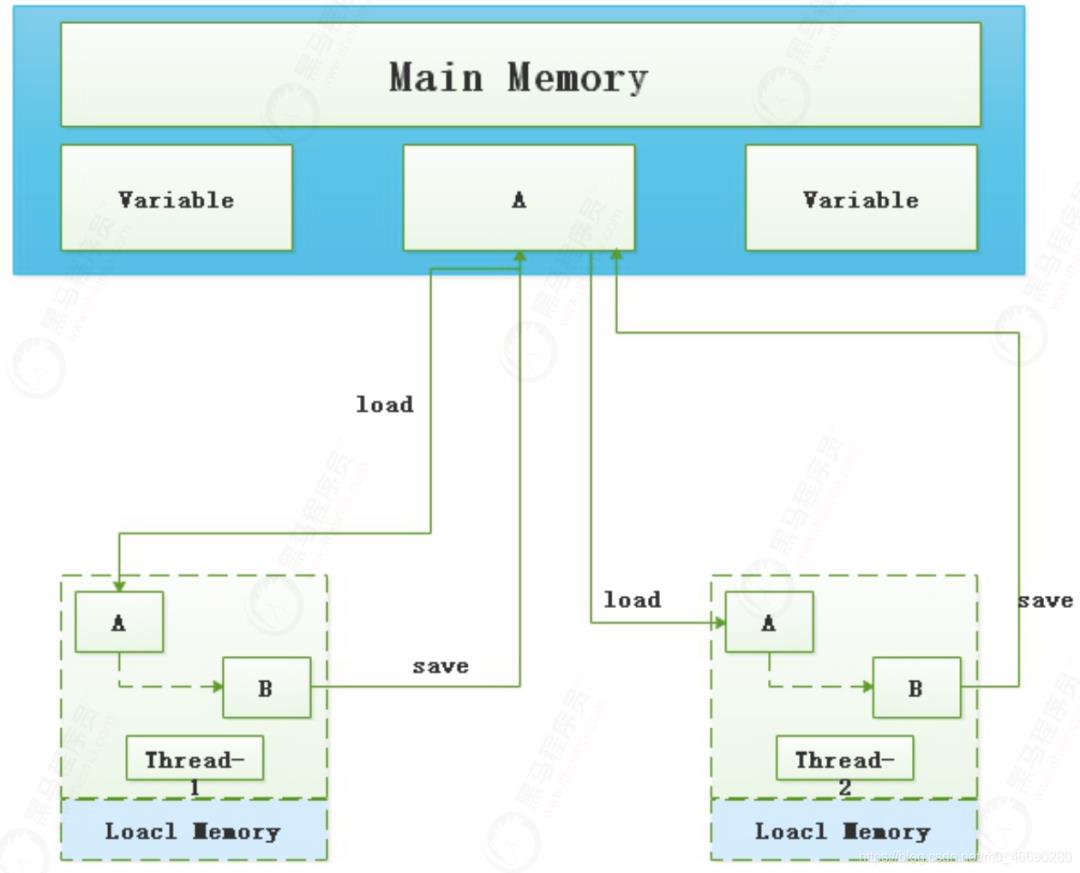
解释
这是因为我们执行第一个的时候,期望值(主存)和原本值是满足的,因此修改成功,
第二次后,主内存的值已经修改成了B,不满足期望值,因此返回了false,本次写入失败
cas有什么缺点?如何解决
缺点一
缺点:
最大缺点就是ABA问题
ABA:如果一个值原来是A,变成了B,又变成了A,那么使用CAS进行检查时会发现它的值没有发生变化,但 是实际上却变化了
解决方案:
1、使用版本号。在变量前面追加上版本号,每次变量更新的时候把版本号加一,那么A-B-A 就会变成 1A-2B-3A
2、从Java1.5开始JDK的atomic包里提供了一个类AtomicStampedReference来解决ABA问题
这个类的compareAndSet方法作用是首先检查当前引用是否等于预期引用,并且当前标志是否等于预期标 志,如果全部相等,则更新
缺点二
不停自旋(循环)会给CPU带来更大的开销
版权声明:本文为博主原创文章,遵循 CC 4.0 BY-SA 版权协议,转载请附上原文出处链接和本声明。
本文链接:
https://blog.csdn.net/m0_46690280/article/details/117553508
以上是关于JDK核心源码深入剖析(synchronized和ConcurrentHashMap)的主要内容,如果未能解决你的问题,请参考以下文章