View绘制流程一:布局是如何添加到界面上的
Posted <天各一方>
tags:
篇首语:本文由小常识网(cha138.com)小编为大家整理,主要介绍了View绘制流程一:布局是如何添加到界面上的相关的知识,希望对你有一定的参考价值。
当我们打开一个App,便会看到一个个精美的页面,作为开发者的我们,有没有想过这些页面是如何添加到我们的界面上的?本片文章主要解决以下几个问题,如果你对以下问题都有明确的答案,可以不必浪费时间了。
- 什么是DecorView,与我们编写的布局文件的关系。
- DecorView何时被创建,如何被加载进布局。
- 什么是ViewRootImpl,与DecorView的关系
- DecorView如何实现与ViewRootImpl的关联
- View的绘制流程在何时被触发
- 为什么常说子线程不能更新UI
先放一张我总结的View绘制流程函数调用栈:
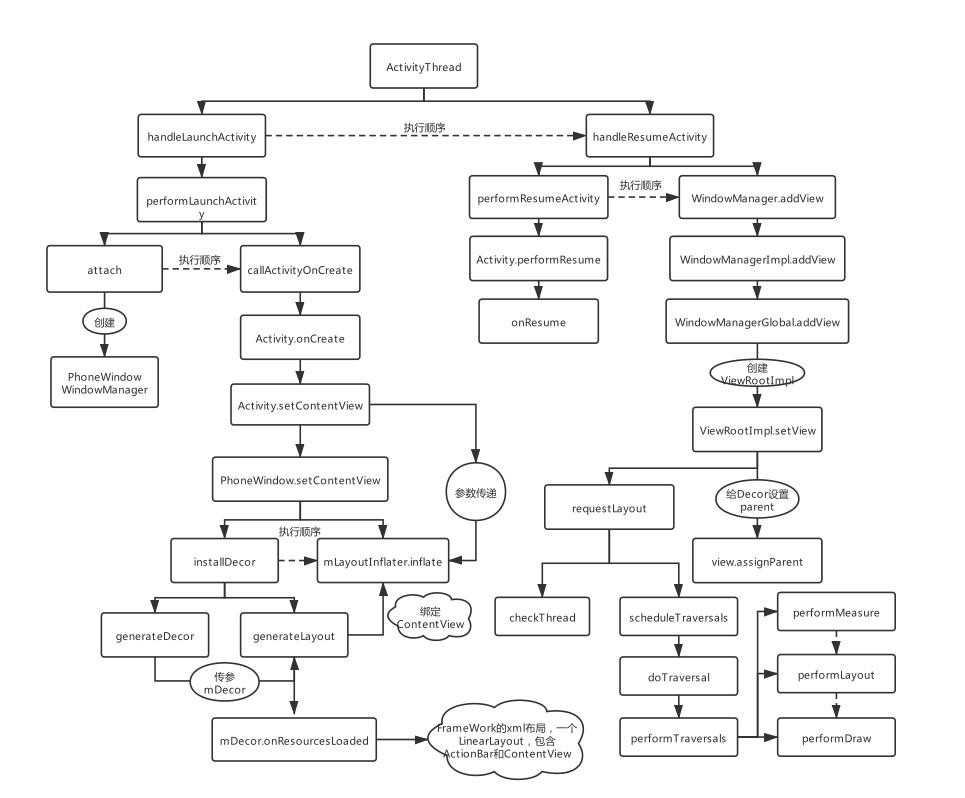
为了不放过一丝细节,我将View是如何走到绘制的流程中的每个方法进行了梳理,画出来的函数调用情况也着实令我一惊,下面我将具体讲解这幅图。
1.切入点:setContentView
这个方法想必大家不陌生,我们在Activity的onCreate方法中,调用这个方法,传入我们写好的布局,就会在我们的页面中显示,所以,在毫无头绪的情况下,这个方法是我们分析的切入点。
setContentView:
public void setContentView(@LayoutRes int layoutResID) {
    getWindow().setContentView(layoutResID);
    initWindowDecorActionBar();
}
我们可以看出,这个方法调用流程是getWindow().setContentView(),getWindow()是什么?
public Window getWindow() {
    return mWindow;
}
返回了mwindow,mwindow是一个Window,而Window是一个抽象类,只有一个具体实现类,那就是PhoneWindow,于是,我们就找到了PhoneWindow中setContentView的实现:
@Override
public void setContentView(int layoutResID) {
    // Note: FEATURE_CONTENT_TRANSITIONS may be set in the process of installing the window
    // decor, when theme attributes and the like are crystalized. Do not check the feature
    // before this happens.
    if (mContentParent == null) {
        installDecor();
    } else if (!hasFeature(FEATURE_CONTENT_TRANSITIONS)) {
        mContentParent.removeAllViews();
    }

    if (hasFeature(FEATURE_CONTENT_TRANSITIONS)) {
        final Scene newScene = Scene.getSceneForLayout(mContentParent, layoutResID,
                getContext());
        transitionTo(newScene);
    } else {
        mLayoutInflater.inflate(layoutResID, mContentParent);
    }
    mContentParent.requestApplyInsets();
    final Callback cb = getCallback();
    if (cb != null && !isDestroyed()) {
        cb.onContentChanged();
    }
    mContentParentExplicitlySet = true;
}
很明显,这里判断mContentParent为null,就进入了installDecor()这个方法,看这个方法的名字,就知道DecorView在此处创建:
private void installDecor() {
    mForceDecorInstall = false;
    if (mDecor == null) {
        // 重点1
        mDecor = generateDecor(-1);
        mDecor.setDescendantFocusability(ViewGroup.FOCUS_AFTER_DESCENDANTS);
        mDecor.setIsRootNamespace(true);
        if (!mInvalidatePanelMenuPosted && mInvalidatePanelMenuFeatures != 0) {
            mDecor.postOnAnimation(mInvalidatePanelMenuRunnable);
        }
    } else {
        mDecor.setWindow(this);
    }
    if (mContentParent == null) {
        // 重点2
        mContentParent = generateLayout(mDecor);

        // Set up decor part of UI to ignore fitsSystemWindows if appropriate.
        mDecor.makeFrameworkOptionalFitsSystemWindows();

        final DecorContentParent decorContentParent = (DecorContentParent) mDecor.findViewById(
                R.id.decor_content_parent);

        if (decorContentParent != null) {
            mDecorContentParent = decorContentParent;
            mDecorContentParent.setWindowCallback(getCallback());
            if (mDecorContentParent.getTitle() == null) {
                mDecorContentParent.setWindowTitle(mTitle);
            }

            final int localFeatures = getLocalFeatures();
            for (int i = 0; i < FEATURE_MAX; i++) {
                if ((localFeatures & (1 << i)) != 0) {
                    mDecorContentParent.initFeature(i);
                }
            }

            mDecorContentParent.setUiOptions(mUiOptions);

            if ((mResourcesSetFlags & FLAG_RESOURCE_SET_ICON) != 0 ||
                    (mIconRes != 0 && !mDecorContentParent.hasIcon())) {
                mDecorContentParent.setIcon(mIconRes);
            } else if ((mResourcesSetFlags & FLAG_RESOURCE_SET_ICON) == 0 &&
                    mIconRes == 0 && !mDecorContentParent.hasIcon()) {
                mDecorContentParent.setIcon(
                        getContext().getPackageManager().getDefaultActivityIcon());
                mResourcesSetFlags |= FLAG_RESOURCE_SET_ICON_FALLBACK;
            }
            if ((mResourcesSetFlags & FLAG_RESOURCE_SET_LOGO) != 0 ||
                    (mLogoRes != 0 && !mDecorContentParent.hasLogo())) {
                mDecorContentParent.setLogo(mLogoRes);
            }

            // Invalidate if the panel menu hasn't been created before this.
            // Panel menu invalidation is deferred avoiding application onCreateOptionsMenu
            // being called in the middle of onCreate or similar.
            // A pending invalidation will typically be resolved before the posted message
            // would run normally in order to satisfy instance state restoration.
            PanelFeatureState st = getPanelState(FEATURE_OPTIONS_PANEL, false);
            if (!isDestroyed() && (st == null || st.menu == null) && !mIsStartingWindow) {
                invalidatePanelMenu(FEATURE_ACTION_BAR);
            }
        } else {
            mTitleView = findViewById(R.id.title);
            if (mTitleView != null) {
                if ((getLocalFeatures() & (1 << FEATURE_NO_TITLE)) != 0) {
                    final View titleContainer = findViewById(R.id.title_container);
                    if (titleContainer != null) {
                        titleContainer.setVisibility(View.GONE);
                    } else {
                        mTitleView.setVisibility(View.GONE);
                    }
                    mContentParent.setForeground(null);
                } else {
                    mTitleView.setText(mTitle);
                }
            }
        }

        if (mDecor.getBackground() == null && mBackgroundFallbackDrawable != null) {
            mDecor.setBackgroundFallback(mBackgroundFallbackDrawable);
        }

        // Only inflate or create a new TransitionManager if the caller hasn't
        // already set a custom one.
        if (hasFeature(FEATURE_ACTIVITY_TRANSITIONS)) {
            if (mTransitionManager == null) {
                final int transitionRes = getWindowStyle().getResourceId(
                        R.styleable.Window_windowContentTransitionManager,
                        0);
                if (transitionRes != 0) {
                    final TransitionInflater inflater = TransitionInflater.from(getContext());
                    mTransitionManager = inflater.inflateTransitionManager(transitionRes,
                            mContentParent);
                } else {
                    mTransitionManager = new TransitionManager();
                }
            }

            mEnterTransition = getTransition(mEnterTransition, null,
                    R.styleable.Window_windowEnterTransition);
            mReturnTransition = getTransition(mReturnTransition, USE_DEFAULT_TRANSITION,
                    R.styleable.Window_windowReturnTransition);
            mExitTransition = getTransition(mExitTransition, null,
                    R.styleable.Window_windowExitTransition);
            mReenterTransition = getTransition(mReenterTransition, USE_DEFAULT_TRANSITION,
                    R.styleable.Window_windowReenterTransition);
            mSharedElementEnterTransition = getTransition(mSharedElementEnterTransition, null,
                    R.styleable.Window_windowSharedElementEnterTransition);
            mSharedElementReturnTransition = getTransition(mSharedElementReturnTransition,
                    USE_DEFAULT_TRANSITION,
                    R.styleable.Window_windowSharedElementReturnTransition);
            mSharedElementExitTransition = getTransition(mSharedElementExitTransition, null,
                    R.styleable.Window_windowSharedElementExitTransition);
            mSharedElementReenterTransition = getTransition(mSharedElementReenterTransition,
                    USE_DEFAULT_TRANSITION,
                    R.styleable.Window_windowSharedElementReenterTransition);
            if (mAllowEnterTransitionOverlap == null) {
                mAllowEnterTransitionOverlap = getWindowStyle().getBoolean(
                        R.styleable.Window_windowAllowEnterTransitionOverlap, true);
            }
            if (mAllowReturnTransitionOverlap == null) {
                mAllowReturnTransitionOverlap = getWindowStyle().getBoolean(
                        R.styleable.Window_windowAllowReturnTransitionOverlap, true);
            }
            if (mBackgroundFadeDurationMillis < 0) {
                mBackgroundFadeDurationMillis = getWindowStyle().getInteger(
                        R.styleable.Window_windowTransitionBackgroundFadeDuration,
                        DEFAULT_BACKGROUND_FADE_DURATION_MS);
            }
            if (mSharedElementsUseOverlay == null) {
                mSharedElementsUseOverlay = getWindowStyle().getBoolean(
                        R.styleable.Window_windowSharedElementsUseOverlay, true);
            }
        }
    }
}
在重点1,生成一个DecorView:
protected DecorView generateDecor(int featureId) {
    // System process doesn't have application context and in that case we need to directly use
    // the context we have. Otherwise we want the application context, so we don't cling to the
    // activity.
    Context context;
    if (mUseDecorContext) {
        Context applicationContext = getContext().getApplicationContext();
        if (applicationContext == null) {
            context = getContext();
        } else {
            context = new DecorContext(applicationContext, this);
            if (mTheme != -1) {
                context.setTheme(mTheme);
            }
        }
    } else {
        context = getContext();
    }
    return new DecorView(context, featureId, this, getAttributes());
}
DecorView继承自FrameLayout,创建完DecorView之后,就调用了generateLayout(mDecor),去生成布局:
protected ViewGroup generateLayout(DecorView decor) {

	......
    // Inflate the window decor.

    int layoutResource;
    int features = getLocalFeatures();

    ......
    // 加载布局
    mDecor.onResourcesLoaded(mLayoutInflater, layoutResource);

    ViewGroup contentParent = (ViewGroup)findViewById(ID_android_CONTENT);
    if (contentParent == null) {
        throw new RuntimeException("Window couldn't find content container view");
    }

    ......

    return contentParent;
}
这段代码很清晰了,mDecor.onResourcesLoaded(mLayoutInflater, layoutResource)使用Inflater去加载layoutResource,这个资源放在framework下,是一个LinearLayout布局的文件,其中包含ActionBar和ContentView,这个ContentView的id是@android:id/content,也是FrameLayout布局,在这段代码中也是通过findViewById绑定了这个View作为contentParent使用。
installDecor()方法介绍完之后,接着便有这样一行代码mLayoutInflater.inflate(layoutResID, mContentParent),第一个参数就是我们传入的自己的布局文件,也是我们最初在调用setContentView时传入的布局,mContentParent不用我多说,就是刚刚DecorView中的Content,这样,DecorView就作为我们的根布局,加载进了我们的界面,同时还加载了我们自己编写的精美的界面。一切都顺理成章,只剩两个问题,PhoneWindow从何而来?打开App怎么就回调了setContentView方法?
2.PhoneWindow从何而来
PhoneWindow从何而来不着急,当务之急是先找到setContentView是如何被回调的,否则以上的分析都是镜中月、水中花。setContentView是在我们回调onCreate不久之后就被调用了,所以找到onCreate方法在哪里被调用就好。对Android有一定了解的同学都知道,Android中有一个很重要的类是ActivityThread,这个类可以说是管理着Android中四大组件的生命周期,Activity中onCreate方法,一定是在这个类里被回调。前面我写过一篇针对Activity的文章,里面有提到Activity的启动流程,谈及Activity中生命周期函数被调用的流程。
具体流程就不再这里分析了,我们直接看handleLaunchActivity方法,这个方法就是启动Activity时回调的:
@Override
public Activity handleLaunchActivity(ActivityClientRecord r,
        PendingTransactionActions pendingActions, Intent customIntent) {
    // If we are getting ready to gc after going to the background, well
    // we are back active so skip it.
    unscheduleGcIdler();
    mSomeActivitiesChanged = true;

    if (r.profilerInfo != null) {
        mProfiler.setProfiler(r.profilerInfo);
        mProfiler.startProfiling();
    }

    // Make sure we are running with the most recent config.
    handleConfigurationChanged(null, null);

    if (localLOGV) Slog.v(
        TAG, "Handling launch of " + r);

    // Initialize before creating the activity
    if (!ThreadedRenderer.sRendererDisabled
            && (r.activityInfo.flags & ActivityInfo.FLAG_HARDWARE_ACCELERATED) != 0) {
        HardwareRenderer.preload();
    }
    WindowManagerGlobal.initialize();

    // Hint the GraphicsEnvironment that an activity is launching on the process.
    GraphicsEnvironment.hintActivityLaunch();

    final Activity a = performLaunchActivity(r, customIntent);

    if (a != null) {
        r.createdConfig = new Configuration(mConfiguration);
        reportSizeConfigurations(r);
        if (!r.activity.mFinished && pendingActions != null) {
            pendingActions.setOldState(r.state);
            pendingActions.setRestoreInstanceState(true);
            pendingActions.setCallOnPostCreate(true);
        }
    } else {
        // If there was an error, for any reason, tell the activity manager to stop us.
        try {
            ActivityTaskManager.getService()
                    .finishActivity(r.token, Activity.RESULT_CANCELED, null,
                            Activity.DONT_FINISH_TASK_WITH_ACTIVITY);
        } catch (RemoteException ex) {
            throw ex.rethrowFromSystemServer();
        }
    }

    return a;
}
performLaunchActivity:
private Activity performLaunchActivity(ActivityClientRecord r, Intent customIntent) {
    ActivityInfo aInfo = r.activityInfo;
    if (r.packageInfo == null) {
        r.packageInfo = getPackageInfo(aInfo.applicationInfo, r.compatInfo,
                Context.CONTEXT_INCLUDE_CODE);
    }

    ComponentName component = r.intent.getComponent();
    if (component == null) {
        component = r.intent.resolveActivity(
            mInitialApplication.getPackageManager());
        r.intent.setComponent(component);
    }

    if (r.activityInfo.targetActivity != null) {
        component = new ComponentName(r.activityInfo.packageName,
                r.activityInfo.targetActivity);
    }

    ContextImpl appContext = createBaseContextForActivity(r);
    Activity activity = null;
    try {
        java.lang.ClassLoader cl = appContext.getClassLoader();
        activity = mInstrumentation.newActivity(
                cl, component.getClassName(), r.以上是关于View绘制流程一:布局是如何添加到界面上的的主要内容,如果未能解决你的问题,请参考以下文章