企业架构之LNMP
Posted ღ᭄小艾ヅ࿐
tags:
篇首语:本文由小常识网(cha138.com)小编为大家整理,主要介绍了企业架构之LNMP相关的知识,希望对你有一定的参考价值。
目录:
一、编译安装mysql
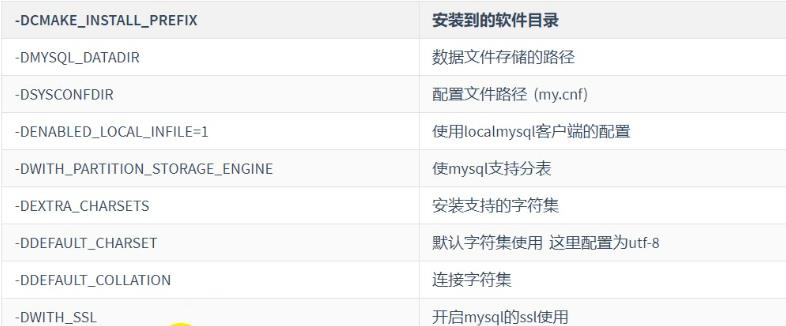
- 编译参数的说明:
- 初始化参数说明:
1.脚本实现安装及其初始化:
#!/bin/bash
#源码编译安装MySQL
mysql_install() {
	#1、创建用户
`id mysql` &>/dev/null
[ $? -ne 0 ] && useradd -s /sbin/nologin -M mysql
#2、解决依赖
yum install -y cmake
yum install -y ncurses-devel
#3、编译安装
cd /root/soft
tar zxvf mysql-5.6.33.tar.gz
cd mysql-5.6.33
cmake \\
-DCMAKE_INSTALL_PREFIX=/usr/local/mysql \\
-DMYSQL_DATADIR=/usr/local/mysql/data \\
-DSYSCONFDIR=/etc \\
-DENABLED_LOCAL_INFILE=1 \\
-DWITH_PARTITION_STORAGE_ENGINE=1 \\
-DEXTRA_CHARSETS=all \\
-DDEFAULT_CHARSET=utf8mb4 \\
-DDEFAULT_COLLATION=utf8mb4_general_ci \\
-DWITH_SSL=bundled
make && make install
#配置文件
rm -rf /etc/my.cnf
cp /usr/local/mysql/support-files/my-default.cnf /etc/my.cnf
#授权并初始化数据库
chown -R mysql:mysql /usr/local/mysql
/usr/local/mysql/scripts/mysql_install_db --basedir=/usr/local/mysql --datadir=/usr/local/mysql/data --user=mysql
#配置服务、自启动和环境变量
cp /usr/local/mysql/support-files/mysql.server /etc/init.d/mysqld
service mysqld start
chkconfig --add mysqld
echo 'PATH=/usr/local/mysql/bin:$PATH' >> /etc/profile
#删除匿名用户
#设置root域名的密码
rpm -qa|grep expect
if [ $? -ne 0 ];then
   yum -y install expect
fi
#导入环境变量PATH
export PATH=/usr/local/mysql/bin:$PATH
#初始化root密码 删除匿名用户
echo '#!/usr/bin/expect
set timeout 60
spawn mysql_secure_installation
expect {
"enter for none" { send "\\r"; exp_continue}
"Y/n" { send "Y\\r" ; exp_continue}
"password" { send "123456\\r"; exp_continue}
"Cleaning up" { send "\\r"}
}
interact ' > mysql_secure_installation.exp
chmod +x mysql_secure_installation.exp
./mysql_secure_installation.exp
}
#脚本开始时间
start_time=`date +%s`
#执行的脚本代码
mysql_install
#脚本结束时间
end_time=`date +%s`
#脚本执行花费时间
const_time=$((end_time-start_time))
echo 'Take time is: '$const_time's'
二、nginx的相关介绍
- 常见用法:
1).web服务器软件httpd http协议
2).代理服务器 反向代理
3).负载均衡功能
- nginx架构的特点:
1.高可靠:稳定性 master进程 管理调度请求分发到哪一个worker=>worked进程 响应请求 一master多worker
2.热部署:①.平滑升级②.可以快速重载配置
3.高并发:可以同时响应更多的请求 事件 epoll模型 几万
4.响应快:尤其在处理静态文件上,响应速度很快 sendfile
5.低消耗:cpu和内存 1w个请求 内存2-3M
6.分布式支持:反向代理 七层负载均衡
1.nginx源码编译安装:
- 编译参数说明:
- 脚本安装nginx:
#!/bin/bash
#编译安装Nginx
nginx_install(){
#创建软件运行用户
`id www` &>>/dev/null
if [ $? -ne 0 ];then
   useradd -s/sbin/nologin -M www
fi
#安装依赖
yum -y install pcre-devel zlib-devel openssl-devel
#编译安装
cd /root/soft
tar xvf nginx-1.14.2.tar.gz
cd nginx-1.14.2
./configure --prefix=/usr/local/nginx --user=www --group=www --with-http_ssl_module --with-http_stub_status_module --with-http_realip_module && make && make install
}
#脚本开始时间
start_time=`date +%s`
#执行的脚本代码
nginx_install
#脚本结束时间
end_time=`date +%s`
#脚本执行花费时间
const_time=$((end_time-start_time))
echo 'Take time is: '$const_time's'
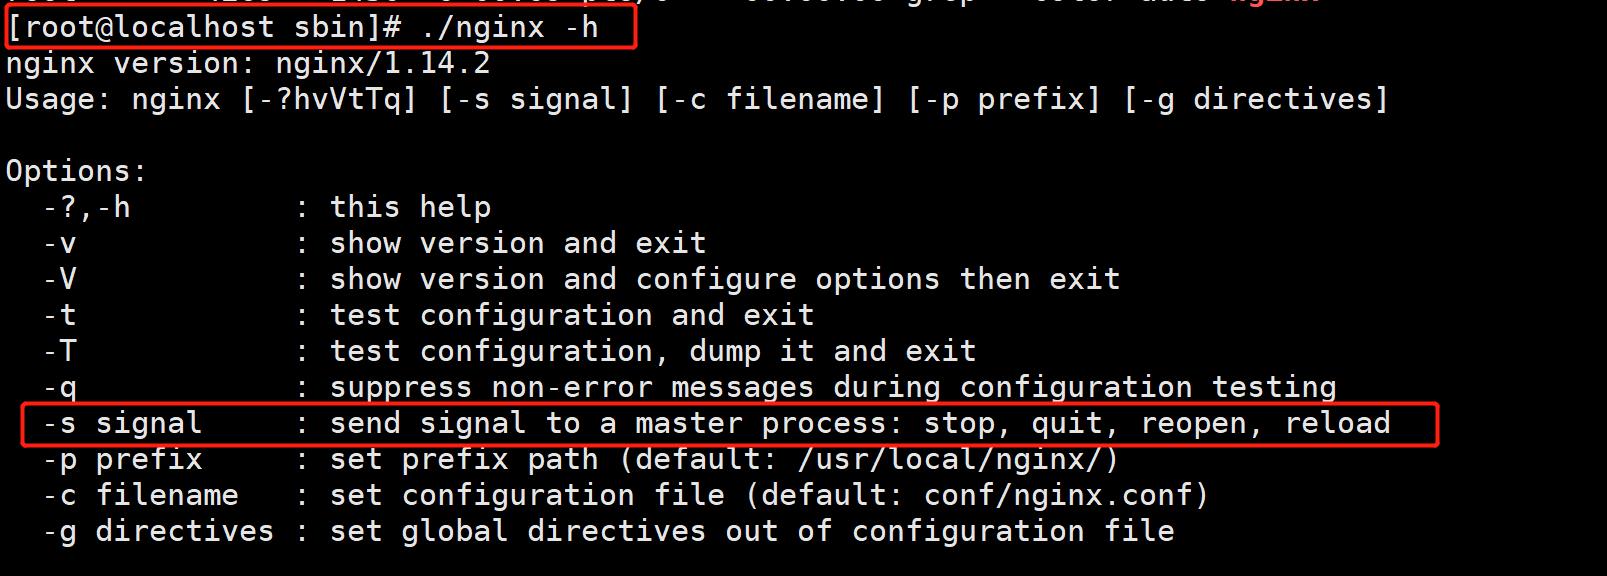
2.nginx二进制执行文件的操作参数:
- 常用参数“
-s: 发送信号给主进程:stop强制退出,quit优雅的退出 reopen重开日志 reload重载配置
3.nginx服务脚本配置:
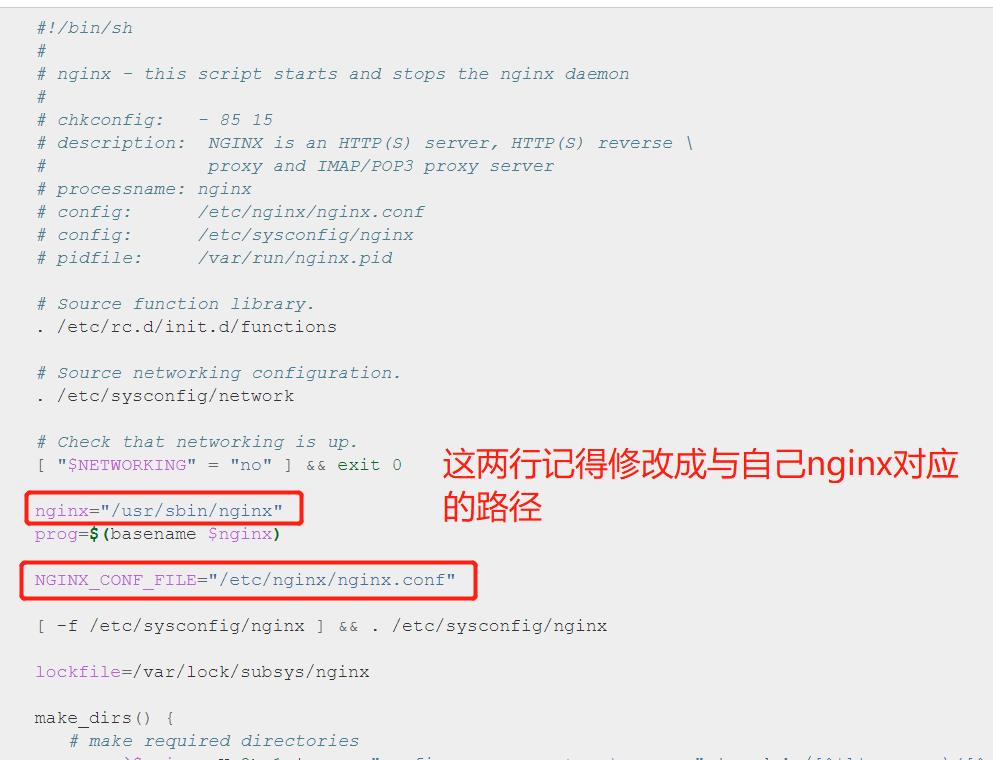
- nginx编译包里默认没有服务启动脚本模板,可以通过社区获得
https://www.nginx.com/resources/wiki/start/topics/examples/redhatnginxinit/
- 将这个文件写到/etc/init.d下,然后添加可执行权限即可
- 添加开机自启动
1).服务脚本测试:
本人用上面的文档测试一下,并没有成功,不知道为啥哈!所以我自己写了一个脚本就可以用啦!代码附上(这个代码可以添加开机自启动功能)
#!/bin/bash
# chkconfig: - 85 15
# description: nginx is a World Wide Web server. It is used to serve
lin=/usr/local/nginx/sbin/nginx
start(){
        $lin
}
stop(){
        `$lin -s quit`
}
restart(){
        stop
        start
}
reload(){
        `$lin -s reload`
}
configtest(){
        `$lin -t`
}
#调用执行
case "$1" in
  start)
    start;;
  stop)
    stop;;
  restart)
    restart;;
  reload)
   reload;;
  configtest)
   configtest;;
  *)
   echo '错误的参数';;
esac
三、php
1.介绍:
- PHP(外文名:PHP: Hypertext Preprocessor,中文名:“超文本预处理器”)是一种通用开源脚本语言。语法吸收了C语言、Java和Perl的特点,利于学习,使用广泛,主要适用于Web开发领域。PHP 独特的语法混合了C、Java、Perl以及PHP自创的语法。它可以比CGI或者Perl更快速地执行动态网页。用PHP做出的动态页面与其他的编程语言相比,PHP是将程序嵌入到HTML(标准通用标记语言下的一个应用)文档中去执行,执行效率比完全生成HTML标记的CGI要高许多;PHP还可以执行编译后代码,编译可以达到加密和优化代码运行,使代码运行更快。
- PHP-FPM(FastCGI Process Manager:FastCGI进程管理器 ) ==对于PHP 5.3.3之前的php来说,是一个补丁包 ,旨在将FastCGI进程管理整合进PHP包中。 相对Spawn-FCGI,PHP-FPM在CPU和内存方面的控制都更胜一筹,而且前者很容易崩溃,必须用crontab定时进行监控,而PHP-FPM则没有这种烦恼。PHP5.3.3已经集成php-fpm了,不再是第三方的包了。PHP-FPM提供了更好的PHP进程管理方式,可以有效控制内存和进程、可以平滑重载PHP配置,比spawn-fcgi具有更多优点,所以被PHP官方收录了。 在./configure的时候带 –enable-fpm参数即可开启PHP-FPM。
2.脚本安装php:
代码奉上:
#!/bin/bash
php_install(){
#php编译安装
#和nginx使用相同的用户,如果没有就创建
`id www` &> /dev/null
[ $? -ne 0 ] && useradd -s /sbin/nologin -M www
#解决依赖
yum -y install libxml2-devel libjpeg-devel libpng-devel freetype-devel curl-devel openssl-devel
#解压
tar xvf php-7.2.12.tar.gz
cd php-7.2.12
#编译安装php
./configure --prefix=/usr/local/php --with-config-file-path=/usr/local/php/etc --enable-fpm --with-fpm-user=www --with-fpm-group=www --with-mysqli=mysqlnd --with-pdo-mysql=mysqlnd --with-iconv-dir --with-freetype-dir --with-jpeg-dir --with-png-dir --with-zlib --with-libxml-dir --enable-xml --disable-rpath --enable-bcmath --enable-shmop --enable-sysvsem --enable-inline-optimization --with-curl --enable-mbregex --enable-mbstring --enable-ftp --with-gd --with-openssl --with-mhash --enable-pcntl --enable-sockets --with-xmlrpc --with-libzip --enable-soap --without-pear --with-gettext --disable-fileinfo --enable-maintainer-zts && make && make install
#配置文件初始化
cp php.ini-development /usr/local/php/etc/php.ini
#php-fpm服务配置文件
cp /usr/local/php/etc/php-fpm.conf.default /usr/local/php/etc/php-fpm.conf
#php-fpm服务子配置文件
cp /usr/local/php/etc/php-fpm.d/www.conf.default /usr/local/php/etc/php-fpm.d/www.conf
#配置服务及其环境变量
cp /root/soft/php-7.2.12/sapi/fpm/init.d.php-fpm /etc/init.d/php-fpm
chmod +x /etc/init.d/php-fpm
service php-fpm start
chkconfig --add php-fpm
echo 'PATH=/usr/local/php/bin:$PATH' >> /etc/profile
}
#脚本开始时间
start_time=`date +%s`
#执行的脚本代码
php_install
#脚本结束时间
end_time=`date +%s`
#脚本执行花费时间
const_time=$((end_time-start_time))
echo 'Take time is: '$const_time's'
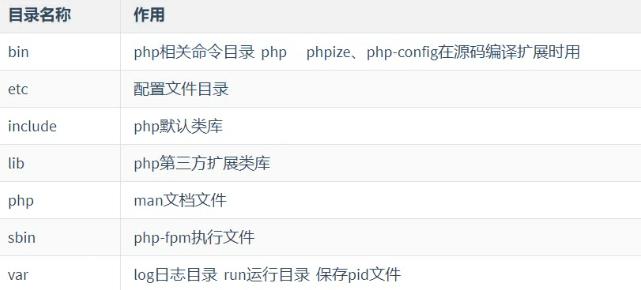
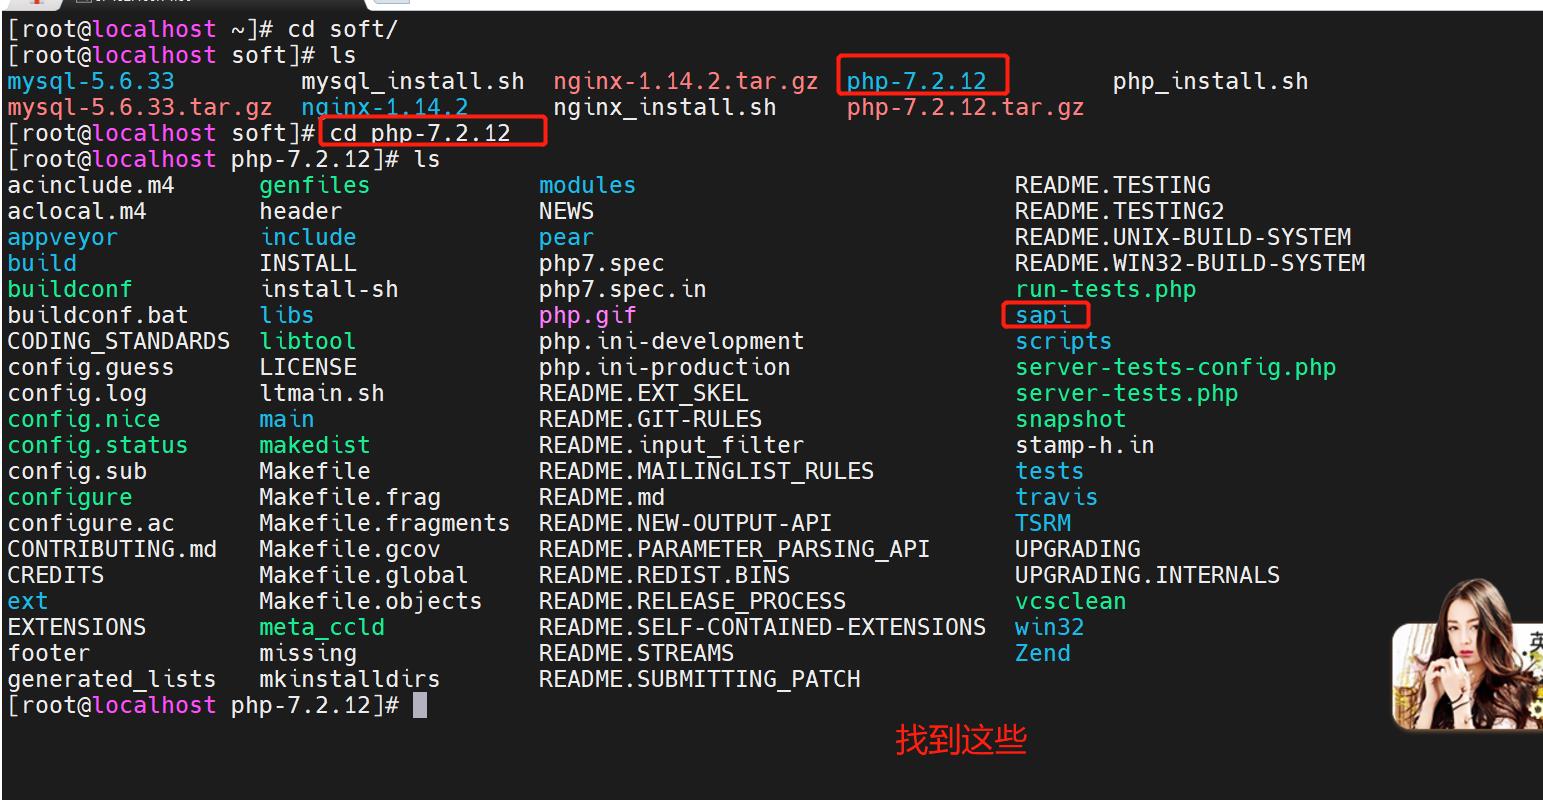
3.php目录介绍和配置文件初始化:
4.php_fpm服务配置开机启动:
- 然后用chkconfig --add php-fpm添加开机自启动
- chkconfig php-fpm on
5.nginx+php-fpm配置:
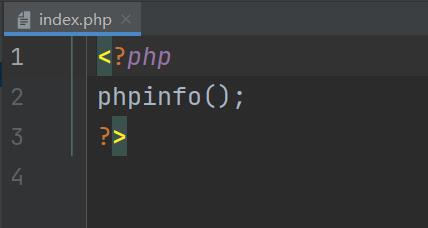
- 第一步:编写测试文件
然后进入网站,我的是192.168.74.30/index.php
进去之后,它下载了Index.php这个文件
当我打开下载的文件后,它把原始的内容返回来了
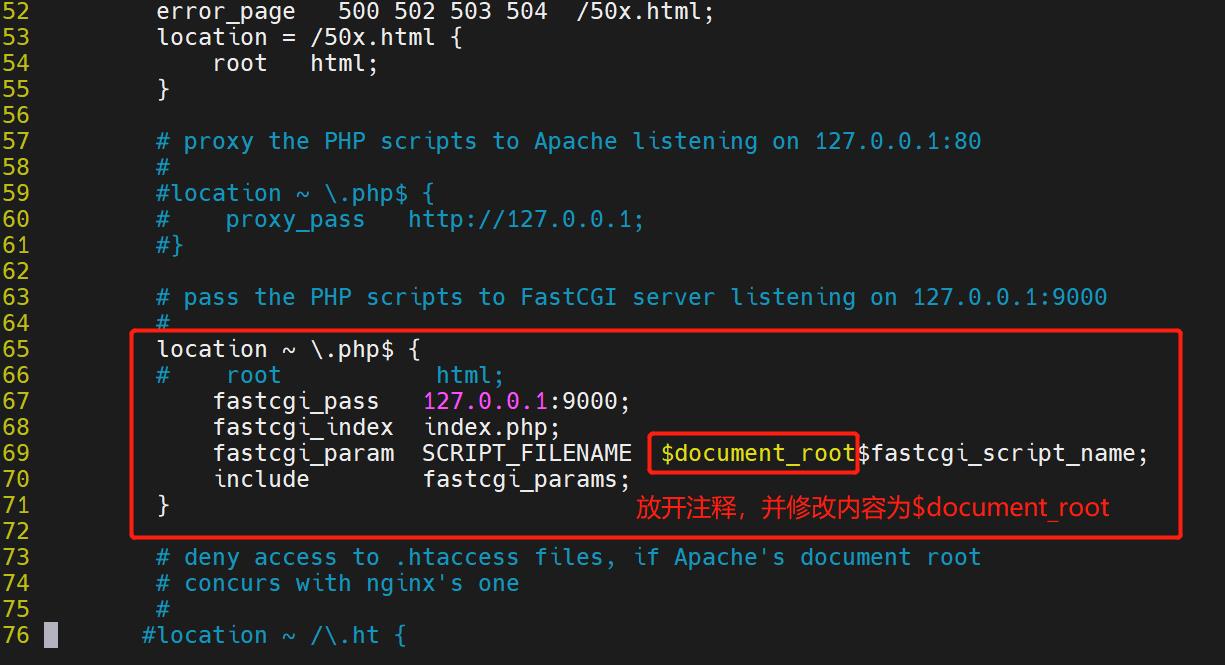
这说明它并不能解析,所以我们得在nginx中进行配置- 第二步:在nginx.conf中配置(我的在/usr/local/nginx/conf/nginx.conf)
修改配置文件,告知nginx如果接收到.php结尾的请求,交由给php-fpm进行处理- 找到这块,然后放开注释
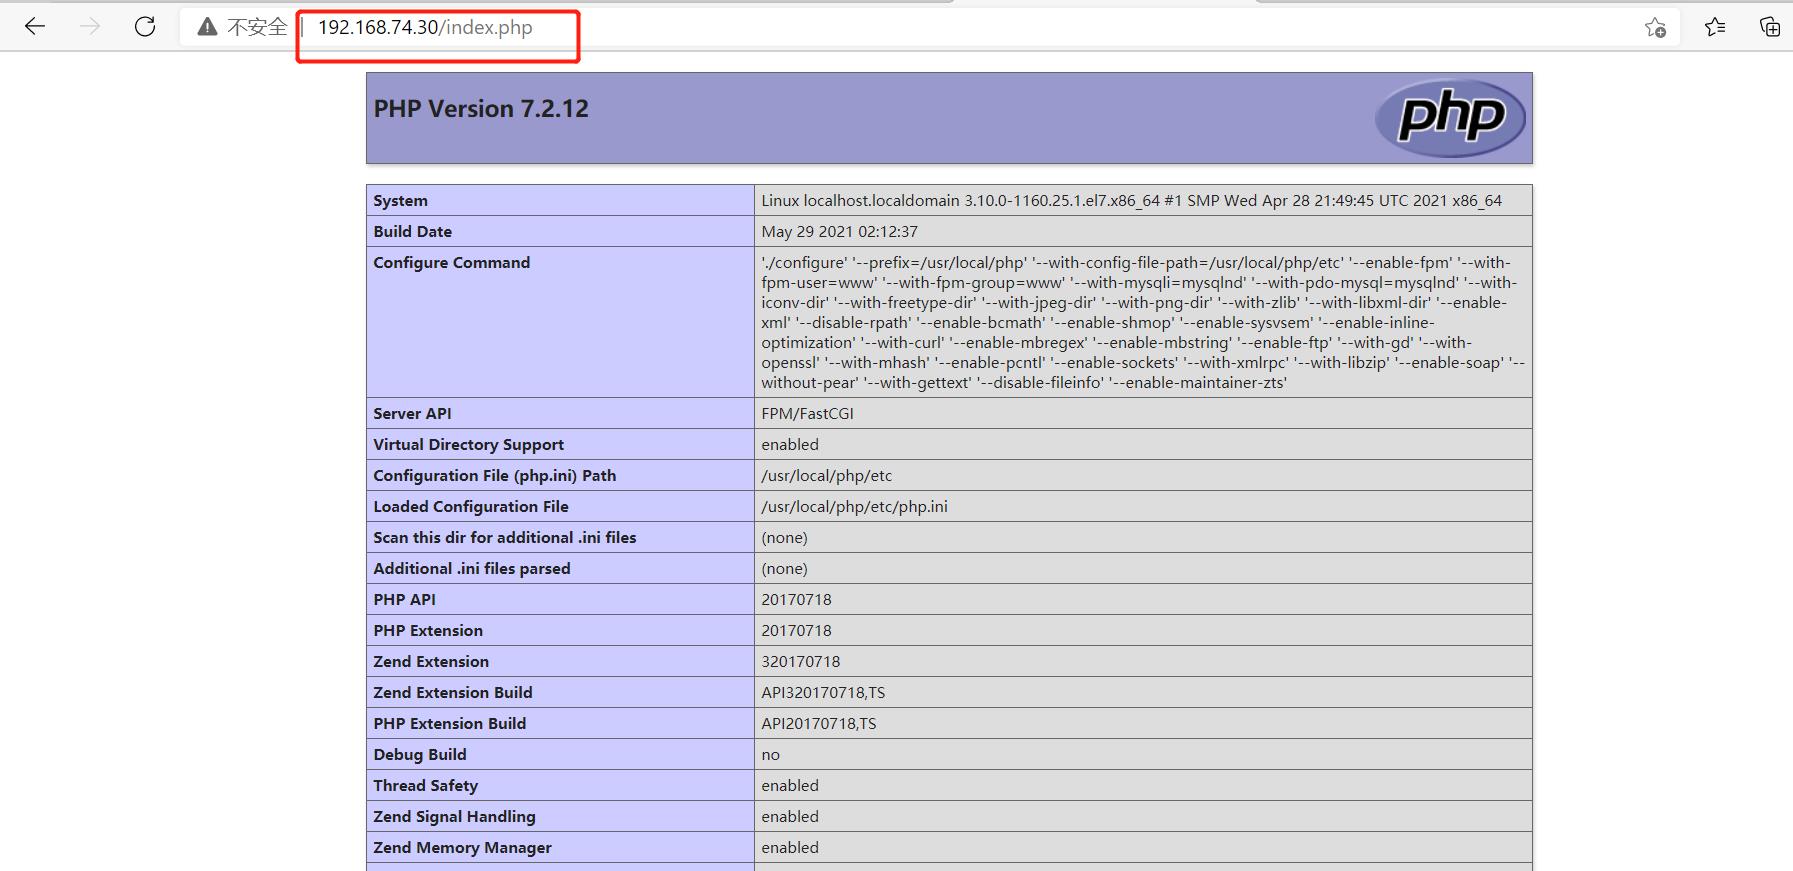
- 配置好之后,我们再访问一下192.168.74.30/index.php
就不一样了,就不会下载文件了,这样就成功交给php处理,然后显示在nginx上了
以上是关于企业架构之LNMP的主要内容,如果未能解决你的问题,请参考以下文章
