还在发愁吗?第一个用idea搭建SSM的Login小案例出现404资源无法访问错误怎么办?看这里,一招教你永久解决!
Posted 四原色
tags:
篇首语:本文由小常识网(cha138.com)小编为大家整理,主要介绍了还在发愁吗?第一个用idea搭建SSM的Login小案例出现404资源无法访问错误怎么办?看这里,一招教你永久解决!相关的知识,希望对你有一定的参考价值。
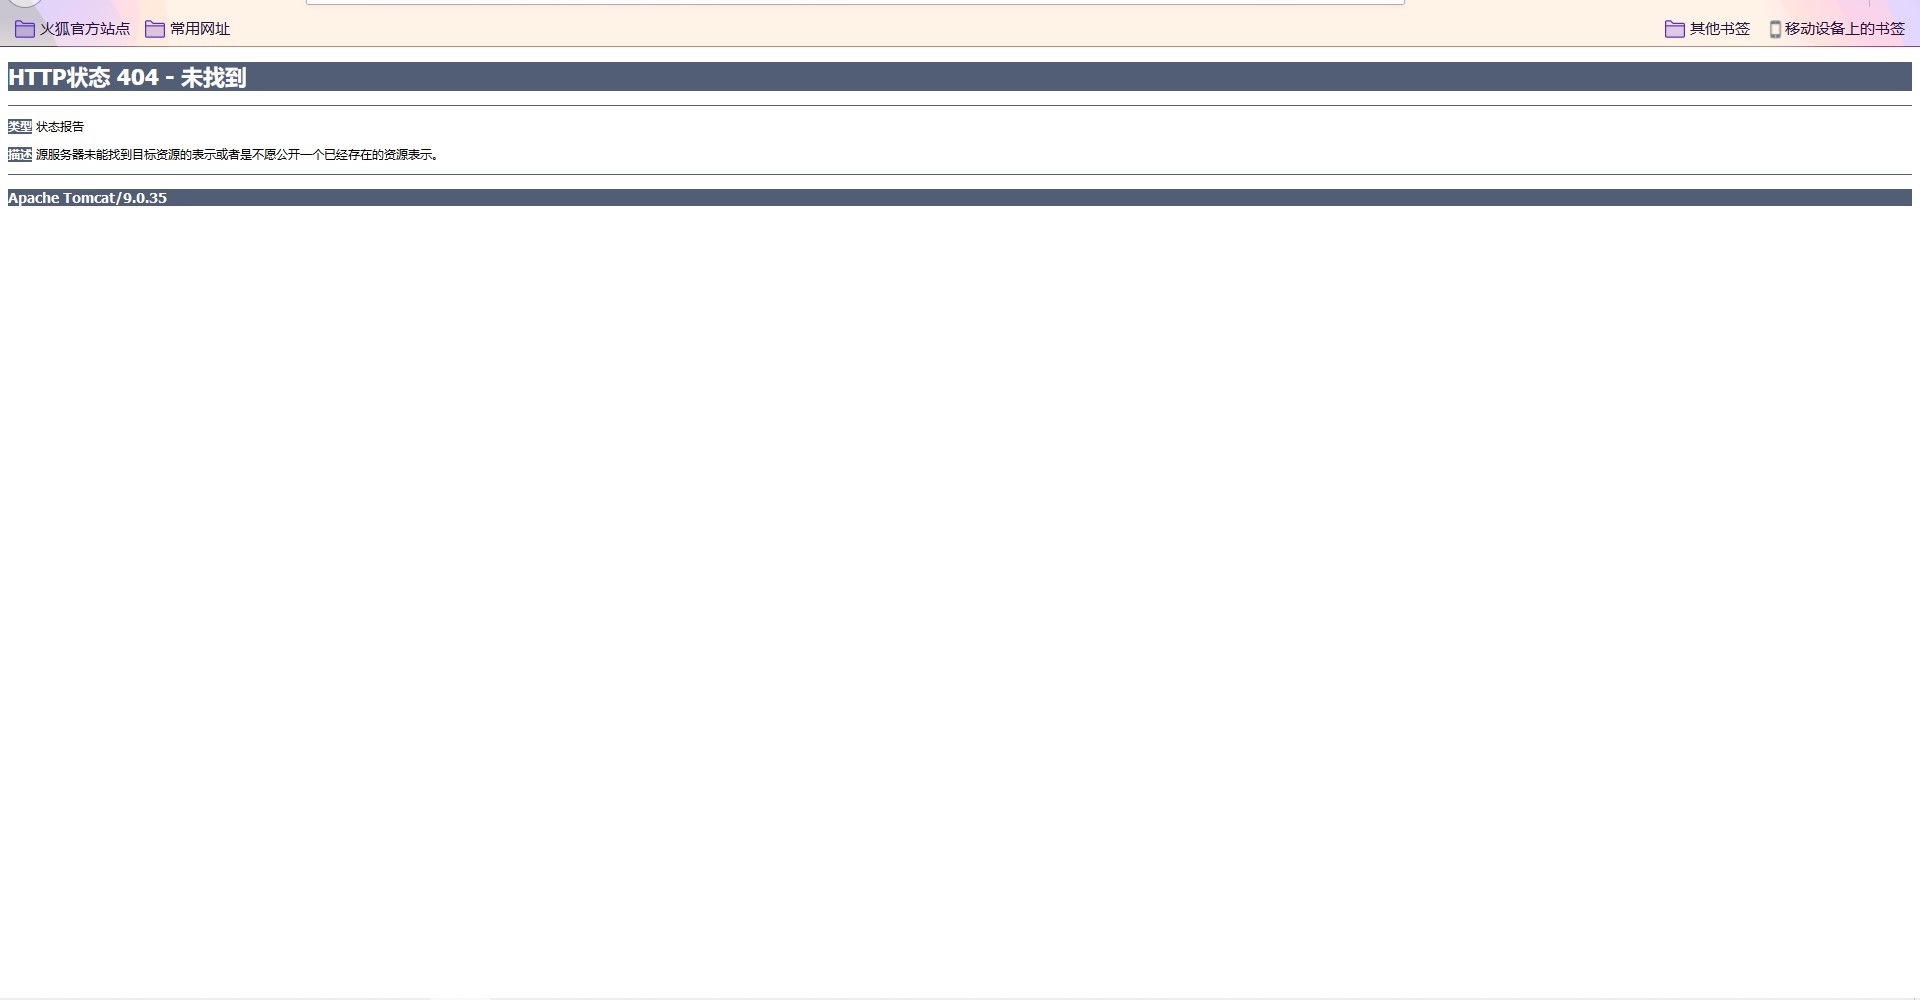
HTTP状态 404 - 未找到
目录
前言
这里我为了熟悉SSM框架,在学习完SpringMVC后开始上手一个比较好练手的login项目,于是随便写了点代码然后运行tomcat后发现了这个资源404错误,我猜测肯定是路径的问题,后来在网上找了很多解决方法,发现都不太适应我的项目(有大佬已经总结了好多404相关的原因,比较具体看这里→:springmvc不进入Controller导致404),然后又去了解了一下tomcat,思考了几天,开始从项目结构下手,后来问题得到了解决,具体可以看我接下来的介绍:
1 问题描述
类型 状态报告
描述 源服务器未能找到目标资源的表示或者是不愿公开一个已经存在的资源表示。
Apache Tomcat/9.0.35
注意:这是一个典型的资源路径与类路径不匹配的问题
2 项目部署
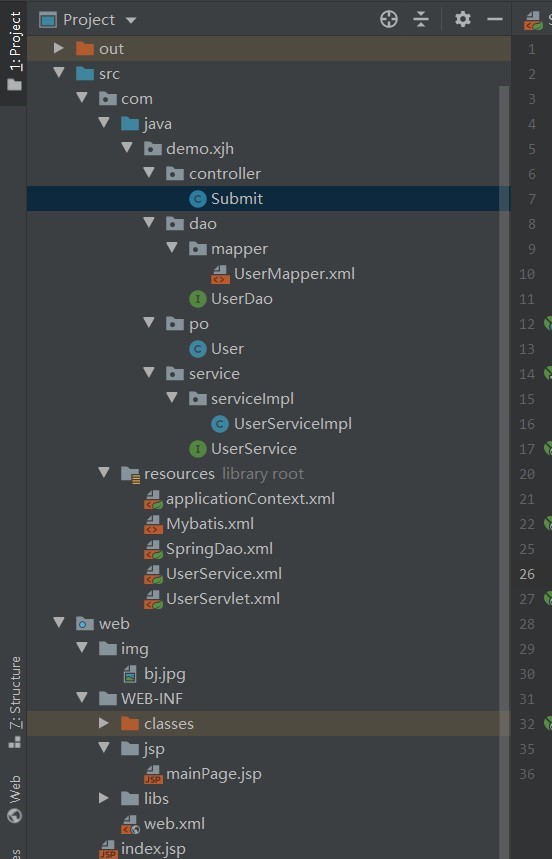
2.1 项目结构
1.定义pojo包下的User类,然后是dao层以及数据库映射文件UserMapper.xml的配置,接下来就是service层的配置,最后就是controller层。
2.接下来我们开始配置resources资源,需要配置的有:
applicationContext.xml
Mybatis.xml
springDao.xml
UserService.xml
UserServlet.xml
3.另外,需要在web/WEB-INF目录下配置web.xml,然后编写一个简单的主页index.jsp,这个主页取决于自己的需求,当然我这里只是练练手所以简简单单写了一点,具体往下看。
2.2 开源代码
需要代码查看链接去下载:https://download.csdn.net/download/qq_44140450/18815923
我这里直接上配置文件,其他java类暂时省略,请谅解,如果需要可以直接查看上面的链接下载。
2.2.1 在applicationContext.xml引入SpringMvc配置文件以及dao层和sevice层的配置文件。
<?xml version="1.0" encoding="UTF-8"?>
<beans xmlns="http://www.springframework.org/schema/beans"
       xmlns:xsi="http://www.w3.org/2001/XMLSchema-instance"
       xmlns:context="http://www.springframework.org/schema/context"
       xsi:schemaLocation="http://www.springframework.org/schema/beans
            http://www.springframework.org/schema/beans/spring-beans.xsd http://www.springframework.org/schema/context
http://www.springframework.org/schema/context/spring-context.xsd">

    <import resource="classpath:UserServlet.xml"/>
    <import resource="classpath:SpringDao.xml"/>
    <import resource="classpath:UserService.xml"/>

</beans>
2.2.2 在SpringDao.xml中配置数据源、SqlSessionFactory以及UserMapper对应得dao和mybatis工厂。
<?xml version="1.0" encoding="UTF-8"?>
<beans xmlns="http://www.springframework.org/schema/beans"
       xmlns:xsi="http://www.w3.org/2001/XMLSchema-instance"
       xsi:schemaLocation="http://www.springframework.org/schema/beans
            http://www.springframework.org/schema/beans/spring-beans.xsd">
    <!--配置数据源-->
    <bean id="dataSource" class="com.alibaba.druid.pool.DruidDataSource" init-method="init" destroy-method="close">
        <property name="driverClassName" value="com.mysql.jdbc.Driver"/>
        <property name="url" value="jdbc:mysql://localhost:3306/testdata?characterEncoding=UTF8"/>
        <property name="username" value="root"/>
        <property name="password" value=""/>
        <property name="initialSize" value="1"/>
        <property name="minIdle" value="1"/>
        <property name="loginTimeout" value="100"/>
        <property name="maxActive" value="20"/>
    </bean>

    <!--配置SqlSessionFactory-->
    <bean id="sqlSessionFactory" class="org.mybatis.spring.SqlSessionFactoryBean">
        <property name="dataSource" ref="dataSource"/>
        <property name="configLocation" value="classpath:Mybatis.xml"/>
    </bean>

    <!--配置映射文件Mapper对于的dao和mybatis工厂-->
    <bean class="org.mybatis.spring.mapper.MapperScannerConfigurer">
        <property name="sqlSessionFactoryBeanName" value="sqlSessionFactory"/>
        <property name="basePackage" value="demo.xjh.dao"/>
    </bean>
</beans>
2.2.3 配置UserService.xml,扫描对应的service包。
<?xml version="1.0" encoding="UTF-8"?>
<beans xmlns="http://www.springframework.org/schema/beans"
       xmlns:xsi="http://www.w3.org/2001/XMLSchema-instance"
       xmlns:context="http://www.springframework.org/schema/context"
       xmlns:tx="http://www.springframework.org/schema/tx"
       xsi:schemaLocation="http://www.springframework.org/schema/beans
            http://www.springframework.org/schema/beans/spring-beans.xsd
            http://www.springframework.org/schema/context
             http://www.springframework.org/schema/context/spring-context.xsd
             http://www.springframework.org/schema/tx
              http://www.springframework.org/schema/cache/spring-tx.xsd">
    <context:component-scan base-package="demo.xjh.service.serviceImpl"/>

    <bean id="userServiceImpl" class="demo.xjh.service.serviceImpl.UserServiceImpl">
        <property name="userDao" ref="userDao"/>
    </bean>

    <bean name="transactionManager" class="org.springframework.jdbc.datasource.DataSourceTransactionManager">
        <property name="dataSource" ref="dataSource"/>
    </bean>
</beans>
2.2.4 配置SpringMVC配置文件UserServlet.xml
<?xml version="1.0" encoding="UTF-8"?>
<beans xmlns="http://www.springframework.org/schema/beans"
       xmlns:xsi="http://www.w3.org/2001/XMLSchema-instance"
       xmlns:mvc="http://www.springframework.org/schema/mvc"
       xmlns:context="http://www.springframework.org/schema/context"
       xsi:schemaLocation="http://www.springframework.org/schema/beans
            http://www.springframework.org/schema/beans/spring-beans.xsd
            http://www.springframework.org/schema/mvc
            http://www.springframework.org/schema/mvc/spring-mvc.xsd
            http://www.springframework.org/schema/context
            http://www.springframework.org/schema/context/spring-context.xsd">
    <!--扫描controller对应的包-->
    <context:component-scan base-package="demo.xjh.controller"/>

    <!--开启注解驱动,用于简易开发配置-->
    <!--在使用resources时必须开启注解驱动,否则resources元素会阻拦任意控制器被调用-->
    <mvc:annotation-driven/>

    <mvc:default-servlet-handler/>

    <bean class="org.springframework.web.servlet.view.InternalResourceViewResolver">
        <property name="viewClass" value="org.springframework.web.servlet.view.JstlView"/>
        <property name="prefix" value="/WEB-INF/jsp/"/>
        <property name="suffix" value=".jsp"/>
    </bean>

</beans>
2.2.5 Mybatis.xml
<?xml version="1.0" encoding="UTF-8"?>
<!DOCTYPE configuration
        PUBLIC "-//mybatis.org//DTD Config 3.0//EN"
        "http://mybatis.org/dtd/mybatis-3-config.dtd">
<configuration>
    <typeAliases>
        <package name="demo.xjh.po.User"/>
    </typeAliases>
    <mappers>
        <!--映射文件的位置-->
        <mapper resource="demo/xjh/dao/mapper/UserMapper.xml"/>
    </mappers>
</configuration>
2.2.6 在web.xml部署dispatcherServlet,并指定init-param加载元素为applicatiionContext.xml。
<?xml version="1.0" encoding="UTF-8"?>
<web-app xmlns="http://xmlns.jcp.org/xml/ns/javaee"
         xmlns:xsi="http://www.w3.org/2001/XMLSchema-instance"
         xsi:schemaLocation="http://xmlns.jcp.org/xml/ns/javaee http://xmlns.jcp.org/xml/ns/javaee/web-app_4_0.xsd"
         version="4.0">
    <servlet>
        <servlet-name>dispatcherServlet</servlet-name>
        <servlet-class>org.springframework.web.servlet.DispatcherServlet</servlet-class>
        <init-param>
            <param-name>contextConfigLocation</param-name>
            <param-value>classpath:applicationContext.xml</param-value>
        </init-param>
        <load-on-startup>1</load-on-startup>
    </servlet>
    <servlet-mapping>
        <servlet-name>dispatcherServlet</servlet-name>
        <url-pattern>/</url-pattern>
    </servlet-mapping>
</web-app>
2.2.7 index.jsp,包含一个登录表单对表单元素进行简要的布局与渲染,让结构稍微合理一点。
<%@ page contentType="text/html;charset=UTF-8" language="java" %>
<html>
<head>
  <meta charset="UTF-8">
  <meta http-equiv="X-UA-Compatible" content="IE=edge">
  <meta name="viewport" content="width=device-width, initial-scale=1.0">
  <title>登录</title>
  <style>
    body {
      margin: 0;
      padding: 0;
      font-family: sans-serif;
      /* background: rgba(92, 48, 212, 0.911); */
      background: url(${pageContext.request.contextPath}/img/bj.jpg) no-repeat;
      /*background: #43376e;*/
      background-size: 100% 100%;
      /*background-color: #fff;*/
      background-attachment: fixed;
    }

    .box {
      position: absolute;
      top: 50%;
      left: 80%;
      transform: translate(-50%, -50%);
      width: 450px;
      /* height: 650px; */
      padding: 40px;
      background: rgba(46, 41, 82, 0.39);
      box-sizing: border-box;
      box-shadow: 0 15px 20px rgba(0, 0, 0, .8);
    }

    /* 设置box类中的h2标签属性 */
    .box h2 {
      margin: 0 0 50px;
      padding: 0;
      font-size: 48px;
      color: #fff;
      text-align: center;
    }

    /* 设置box类中的inputBox类为相对定位 */
    .box .inputBox {
      position: relative;
      width: 350px;
      height: 125px;
    }

    /* 设置box类中的inputBox类中的input标签属性 */
    .box .inputBox input {
      text-align: center;
      /* 宽度和父亲容器一致 */
      width: 100%;
      border-radius: 0px 0px 28px 28px;
      /* 上下内边距为10px 左右内边距为0px */
      padding: 10px 0 5px;

      /* 字体大小22px */
      font-size: 30px;
      letter-spacing: 1px;
      color: #fff;
      margin-bottom: 30px;
      border: none;
      border-bottom: 2px solid #fff;
      outline: none;
      background: transparent;
      transition: all 0.3s;
    }
    .box .inputBox input:hover {
      box-shadow: 0 10px 5px #a3c6c5;
    }
    /* 设置box类中inputBox类中的label标签 */
    .box .inputBox label {
      font-size: 30px;
      position: absolute;
      top: 0;
      left: 0;
      padding: 10px 0;
      color: #fff;
      pointer-events: none;

      /* 设置label标签的过渡动画时间为0.8秒 */
      transition: .8s;
    }

    .box .inputBox input:focus~label {
      /* Username提示向上移动20px 并且缩小字体 修改颜色 */
      top: -25px;
      left: 0;
      font-size: 22px;
      /* color:rgb(225, 240, 137); */
      color: hsl(251, 62%, 34%);
    }

    /* 监听input内容有效 保持label元素的属性 */
    .box .inputBox input:valid~label {
      top: -25px;
      left: 0;
      font-size: 22px;
      color: hsl(251, 62%, 34%);
    }

    /* 选择box类中type为submit的input标签 */
    .box input[type="submit"] {
      font-size: 30px;
      border: none;
      outline: none;
      color: #fff;
      background: #ee6d6d;
      padding: 10px 20px;
      cursor: pointer;
      border-radius: 48px;
      /* 相对定位 享对于其父亲box类*/
      position: relative;

      /* 实现按钮水平居中 */
      /* 从父亲的左边宽度50%处开始 */
      left: 50%;
      top: 70%;
      /* 把元素沿着横向(x轴)移动自身宽度的50% */
      transform: translate(-50%);
      transition: all 0.3s;
    }
    .box input[type="submit"]:hover {
      transform: scale(1.1) translate(-45%);
      box-shadow: 0 0 12px #ee6d6d;
    }

    .point {
      position: absolute;
      top: 10%;
      left: 90%;

      color: #fff;
    }

    .dotted {
      top: 227px;
      left: 193px;
      width: 8px;
      height: 8px;
      background-color: #5000e4;
      border-radius: 50%;
    }

    .point div[class^="pulse"] {
      border-radius: 50%;
      position: absolute;
      top: 50%;
      left: 50%;
      transform: translate(-50%, -50%);
      width: 8px;
      height: 8px;
      box-shadow: 0 0 12px #8a02fa;
      animation: purse 1.2s linear infinite;
    }

    @keyframes purse {
      0% {}

      70% {
        width: 40px;
        height: 40px;
        opacity: 1;
      }

      100% {
        box-shadow: 0 0 12px hsl(286, 89%, 40%);
        width: 70px;
        height: 70px;
        opacity: 0;
      }
    }

    .point div.pulse2 {
      animation-delay: 0.4s;
    }

    .point div.pulse3 {
      animation-delay: 0.8s;
    }
    .box a {
      position: relative;
      display: block;
      left: 0;
      margin-top: 40px;
      text-align: right;
      color: #fff;
      font-size: 18px;
      transition: all 0.5s;
      text-decoration: none;
    }

    .box a:hover {
      transform: translateX(-2%) scale(1.1);
    }
  </style>
</head>
<body>
<div class="box">
  <h2>Login</h2>
  <form action="${pageContext.request.contextPath}/submit/login" method="post">
    <div class="point">
      <div class="dotted"></div>
      <div class="pulse1"></div>
      <div class="pulse2"></div>
      <div class="pulse3"></div>
    </div>
    <div class="inputBox">
      <input type="text" name="ACCOUNT" autocomplete="off" required="required">
      <label>填写账号</label>
    </div>
    <div class="inputBox">
      <input type="password" name="PASSWORD" autocomplete="off" required="required">
      <label>填写密码</label>
    </div>
    <input type="submit" name="" value="登        录">
  </form>
  <a href="${pageContext.request.contextPath}/submit/register">没有账号?去登录</a>
</div>
</body>
</html>
3 解决过程:
解决问题的思路是正确匹配类路径与访问路径。
3.1 进入项目结构
这里有两种方式:
(1)直接点击右上角的项目图标,看图:

(2)进入左上角的File菜单选择Project Structure:

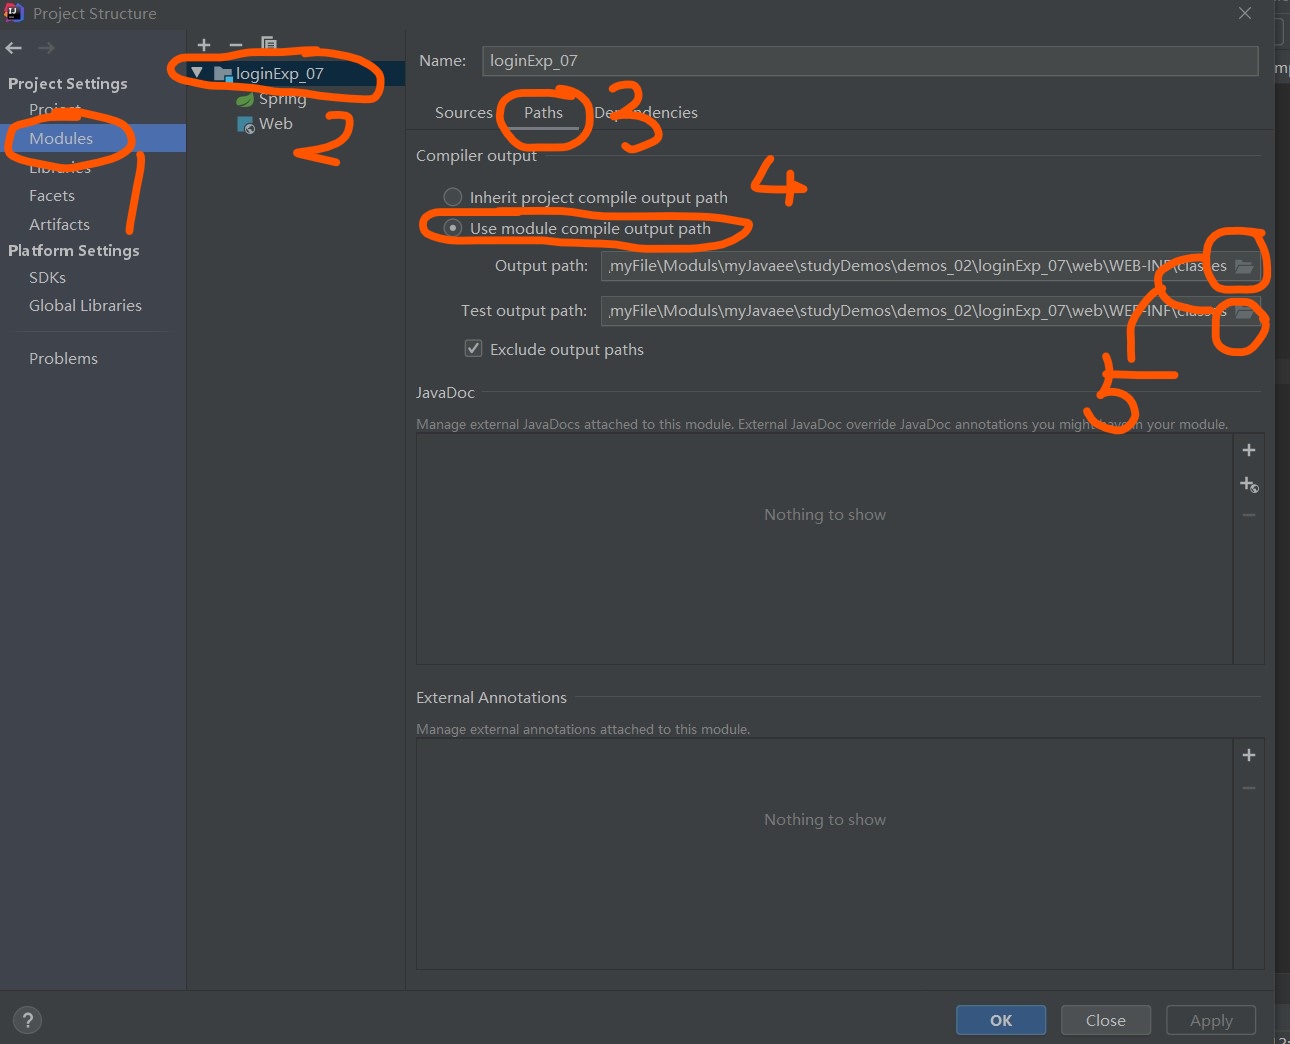
3.2 选择自定义模块输出路径
进入模块选择自定义路径,我们分五步介绍:
(1)进入项目结构(Project Structure)找打Modules;
(2)单击项目loginExp_07;
(3)选择Paths;
(4)我们自定义Compoler output路径:
(5)选择之前创建项目时在web/WEB-INF/下建好的classes目录,作为类输出目录。
(6)以上步骤完成后点击Apply。
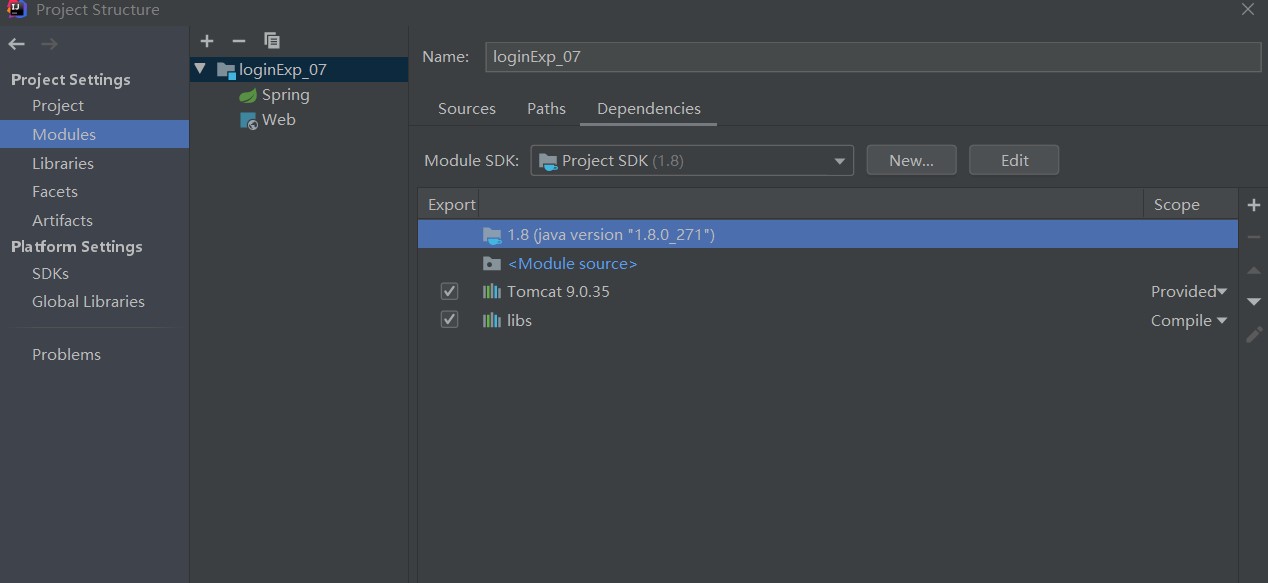
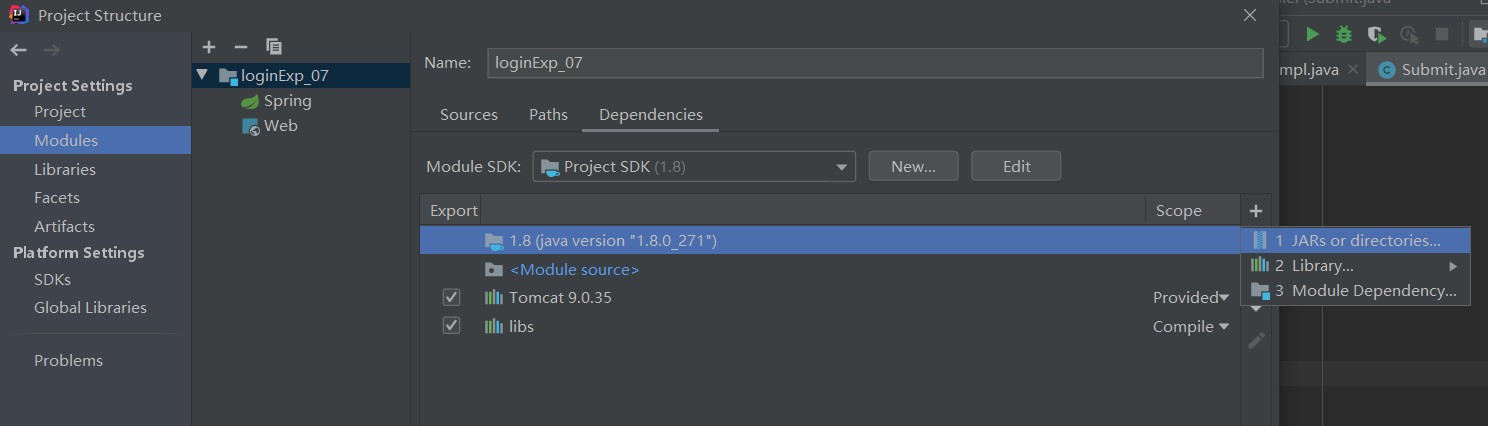
3.3 添加资源目录到项目依赖
1.进入依赖选项,单击项目loginExp_07,选中Dependencies,开始导入资源到项目:
2. 选着右边的+号,弹出对话框后选中第一个选项“JARs or directories...”:
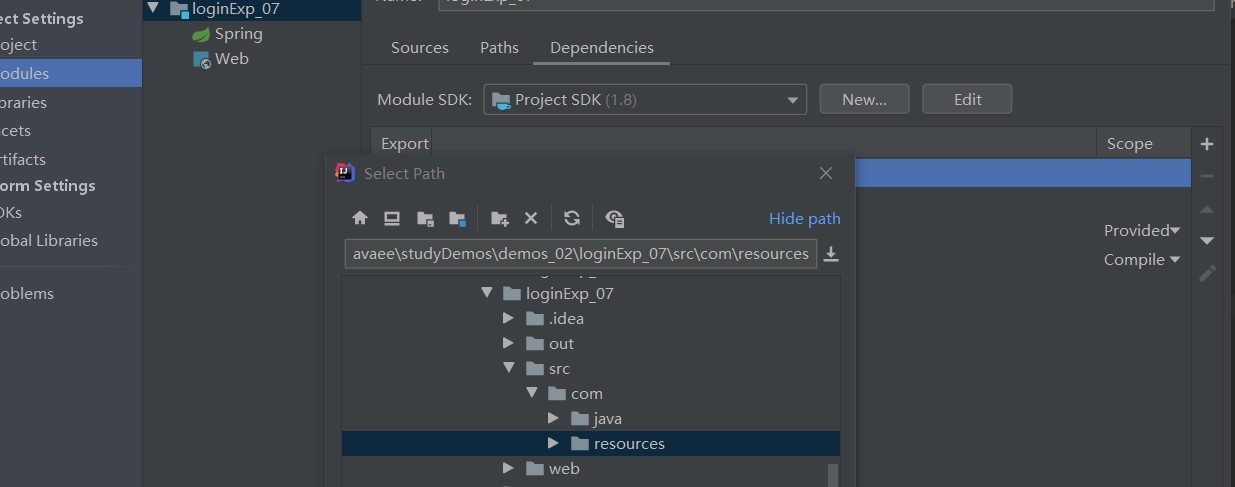
3.此时,选择我们项目下的resources目录:
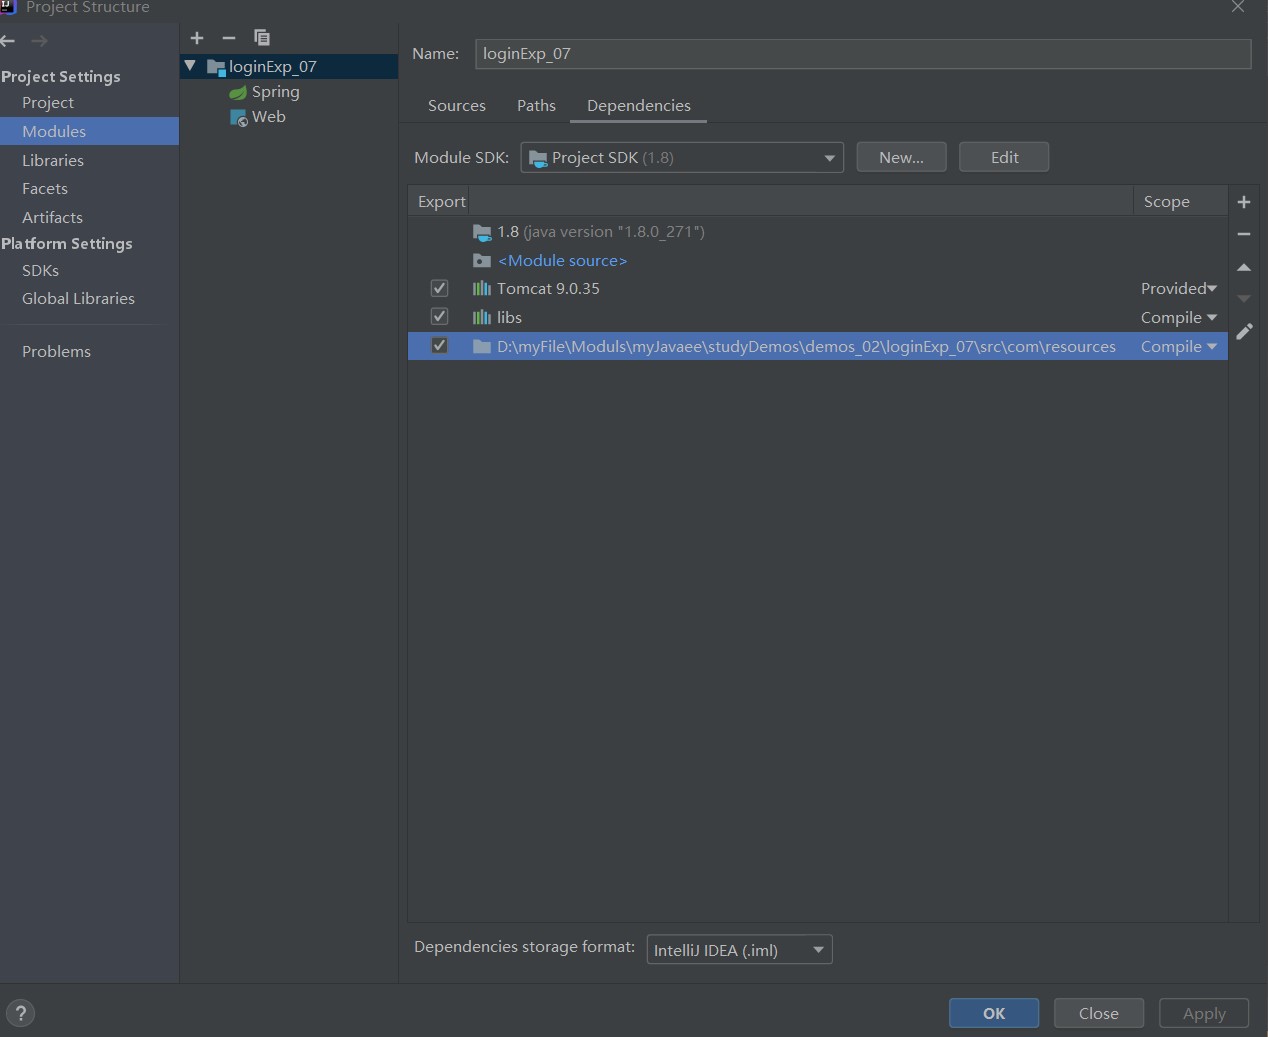
4.弹出对话框后选择Classes,点击ok:

5.这样我们可以看到Dependencies目录下出现了新的项,然后apply,这样我们就添加成功了:
3.4 添加导入项目的资源到outPutLayou
在完成了3.3 添加资源目录到项目依赖后,进行以下操作。
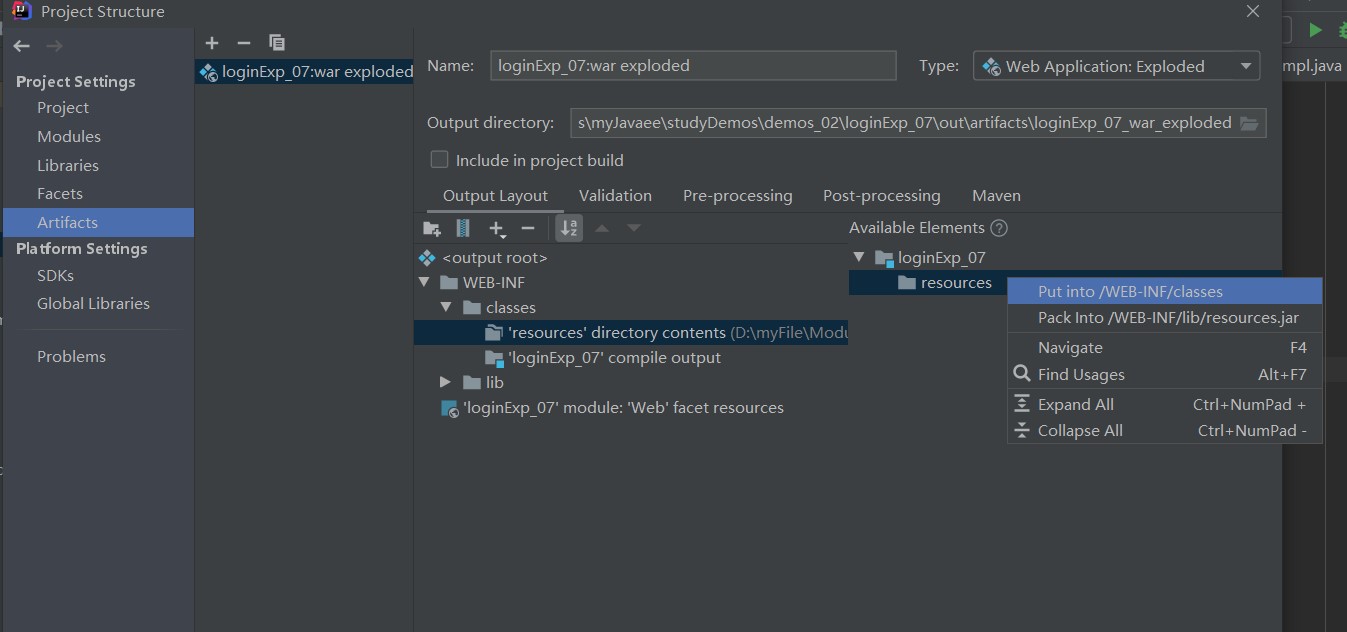
1.首先在项目结构中找到Artifacts,找到我们的<output root>发现带有波浪线,说明结构有问题,缺少内容。我们点击右边的Available Elements选中LoginExp_07:

2.选中LoginExp_07后,右击鼠标弹出对话框后选择Put into /WEB_INF/classes,这里的classes为我们之前3.3节自定义的字节码输出路径,目的就是将导入到依赖的资源与类路径进行匹配,解决最终的无法通过路径访问资源的问题。
3.5 检查结果
运行tomcat服务器,发现成功进入了index.jsp,并且在提交表单后跳转成功:

4.最后总结
404资源无法访问的问题除了一部分原因是因为语法错误等,大部分是由于资源路径与类路径不匹配的问题,也就是说没有正确匹配路径,我们需要指定class输出路径和resources,然后将他们进行匹配和关联,而默认的class输出路径与resources路径会因为默认配置环境而冲突(对于部分情况来讲确实会出现此类问题),直接导致资源无法访问。所有我们直接绕开idea的默认配置主动进行配置,直接掌控资源路径与类路径,这样问题就永久解决了。
以上是关于还在发愁吗?第一个用idea搭建SSM的Login小案例出现404资源无法访问错误怎么办?看这里,一招教你永久解决!的主要内容,如果未能解决你的问题,请参考以下文章