备战Django之小案例(增删图书)
Posted 嘴巴嘟嘟
tags:
篇首语:本文由小常识网(cha138.com)小编为大家整理,主要介绍了备战Django之小案例(增删图书)相关的知识,希望对你有一定的参考价值。
使用原生sql语句来实现一个增删操作
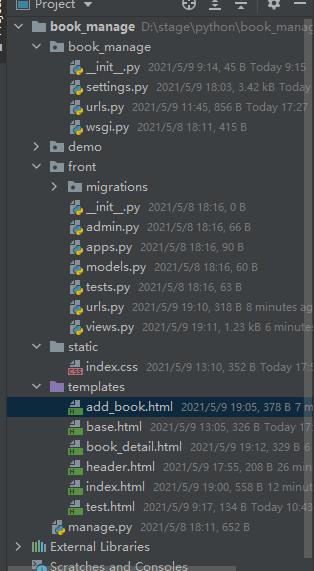
文件项目目录结构

先来看主路由配置
urlpatterns = [
    path('book/', include(('front.urls', 'front'), namespace='front')),
]
__init__.py
import  pymysql
pymysql.install_as_MySQLdb()
setting.py

Django配置连接数据库:
在操作数据库之前,首先先要连接数据库。这里我们以配置MySQL为例来讲解。Django连接数据库,不需要单独的创建一个连接对象。只需要在settings.py文件中做好数据库相关的配置就可以了。示例代码如下:
DATABASES = {
    'default': {
        # 数据库引擎(是mysql还是oracle等)
        'ENGINE': 'django.db.backends.mysql',
        # 数据库的名字
        'NAME': 'dfz',
        # 连接mysql数据库的用户名
        'USER': 'root',
        # 连接mysql数据库的密码
        'PASSWORD': 'root',
        # mysql数据库的主机地址
        'HOST': '127.0.0.1',
        # mysql数据库的端口号
        'PORT': '3306',
    }
}
front中的路由
urlpatterns = [
    path('', views.index, name="index"),
    path('add_book/', views.add_book, name="add_book"),
    path('book_detail/<int:book_id>/', views.book_detail, name="book_detail"),
    path('book_delete/', views.book_delete, name="book_delete"),
]
base.html
<!DOCTYPE html>
<html lang="en">
<head>
    <meta charset="UTF-8">
    <title>Title</title>
    {% load static %}
    <link rel="stylesheet" href="{% static  'index.css' %}">
</head>
<body>
<div class="center">
    {% include 'header.html' %}
    {% block centos %}
    {% endblock %}
</div>
</body>
</html>
header.html
    <nav class="nav">
        <ul >
            <li><a href="{% url 'front:index' %}">首页</a></li>
            <li><a href="{% url 'front:add_book' %}">发布图书</a></li>
        </ul>
    </nav>
index.html
{% extends 'base.html' %}
{% block centos %}
    <table>
        <thead>
        <tr>
            <th>序号</th>
            <th>书名</th>
            <th>作者</th>
        </tr>
        </thead>
        <tbody>

        {% for book in books %}
            <tr>
                <td>{{ forloop.counter }}</td>
                <td><a href="{% url 'front:book_detail' book_id=book.0  %}">{{ book.1 }}</a></td>
                <td>{{ book.2 }}</td>
            </tr>
        {% endfor %}

        </tbody>
    </table>
{% endblock %}
add_book.html
{% extends 'index.html' %}
{% block centos %}
    <form action="{% url 'front:add_book' %}" method="post">
        <lable>
            书名:<input type="text" name="name" placeholder="请输入书名">
            作者:<input type="text" name="author" placeholder="作者">
        </lable>
     <input type="submit" value="提交">
    </form>
{% endblock %}
book_detail.html
{% extends 'index.html' %}
{% block centos %}
    <p>书名:{{ book.1 }}</p>
    <p>作者:{{ book.2 }}</p>
    <form action="{% url 'front:book_delete' %}" method="post">
        <input type="hidden" name="book_id" value="{{ book.0 }}">
        <input type="submit" value="删除按钮">
    </form>
{% endblock %}
views.py
from django.shortcuts import render, redirect, reverse
from django.db import connection


# Create your views here.

def get_corsor():
    return connection.cursor()


def index(request):
    cursor = get_corsor()
    cursor.execute("select * from book")
    books = cursor.fetchall()
    return render(request, 'index.html', context={"books": books})


def add_book(request):
    if request.method == 'GET':
        return render(request, 'add_book.html')
    else:
        name = request.POST.get("name")
        author = request.POST.get("author")
        cursor = get_corsor()
        cursor.execute("insert into book(id,name,author) values(null,'%s','%s')" % (name, author))
        return redirect(reverse('front:index'))


def book_detail(request, book_id):
    cursor = get_corsor()
    cursor.execute("select * from book where id=%s" % book_id)
    book = cursor.fetchone()
    return render(request, 'book_detail.html', context={"book": book})


def book_delete(request):
    print(1)
    cursor = get_corsor()
    book_id = request.POST.get("book_id")
    print(book_id)
    cursor.execute("delete from  book where id=%s" % book_id)
    return redirect(reverse('front:index'))
成功代码


在Django中使用原生sql语句操作其实就是使用python db api的接口来操作。如果你的mysql驱动使用的是pymysql,那么你就是使用pymysql来操作的,只不过Django将数据库连接的这一部分封装好了,我们只要在settings.py中配置好了数据库连接信息后直接使用Django封装好的接口就可以操作了。示例代码如下:
使用django封装好的connection对象,会自动读取settings.py中数据库的配置信息
from django.db import connection
# 获取游标对象
cursor = connection.cursor()
# 拿到游标对象后执行sql语句
cursor.execute("select * from book")
# 获取所有的数据
rows = cursor.fetchall()
# 遍历查询到的数据
for row in rows:
    print(row)
以上的execute以及fetchall方法都是Python DB API规范中定义好的。任何使用Python来操作MySQL的驱动程序都应该遵循这个规范。所以不管是使用pymysql或者是mysqlclient或者是mysqldb,他们的接口都是一样的。更多规范请参考:https://www.python.org/dev/peps/pep-0249/。
以上是关于备战Django之小案例(增删图书)的主要内容,如果未能解决你的问题,请参考以下文章