Logstash 使用小结
Posted youngxuebo
tags:
篇首语:本文由小常识网(cha138.com)小编为大家整理,主要介绍了Logstash 使用小结相关的知识,希望对你有一定的参考价值。
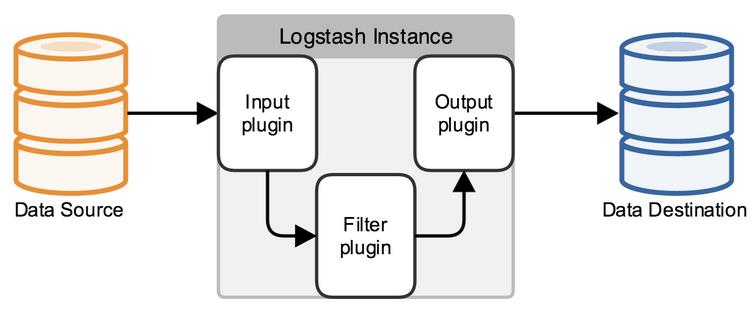
logstash是一个数据分析软件,主要目的是分析log日志。整一套软件可以当作一个MVC模型,logstash是controller层,Elasticsearch是一个model层,kibana是view层。
首先将数据传给logstash,它将数据进行过滤和格式化(转成JSON格式),然后传给Elasticsearch进行存储、建搜索的索引,kibana提供前端的页面再进行搜索和图表可视化,它是调用Elasticsearch的接口返回的数据进行可视化。logstash和Elasticsearch是用Java写的,kibana使用node.js框架。
1)启动和使用logstash
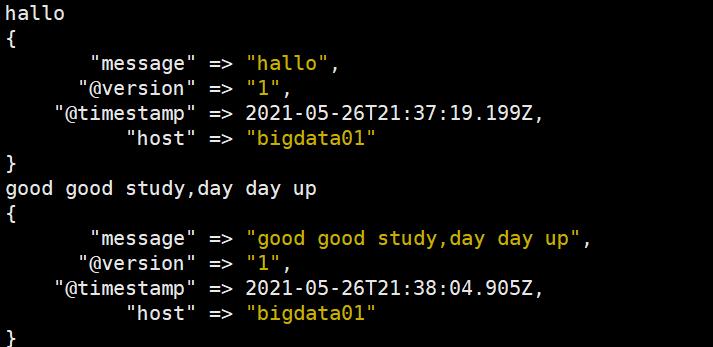
[root@bigdata01 bin]$ ./logstash -e 'input{stdin{}}output{stdout{codec=>rubydebug}}'
启动完成后,输入hallo,以及good good study,day day up。
2)Logstash conf 配置
2.1 input配置
读取文件(File)
1、在 jobconf 目录创建 vi simpleinput_file.conf 文件,输入
input {
    file {
        path => ["/opt/module/logstash-6.6.2/jobdata/message_info"]
        type => "system"
        start_position => "beginning"
	}
}
output{stdout{codec=>rubydebug}}
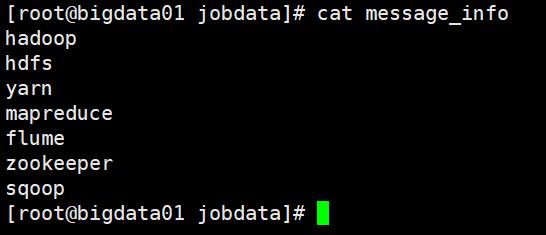
2、查看message_info 内容为:
3、启动
启动命令:
[root@bigdata01 jobconf]# ../bin/logstash -f simpleinput_file.conf
[root@bigdata01 jobconf]# ../bin/logstash -f simpleinput_file.conf
Sending Logstash logs to /opt/module/logstash-6.6.2/logs which is now configured via log4j2.properties
[2021-05-26T18:06:27,277][WARN ][logstash.config.source.multilocal] Ignoring the 'pipelines.yml' file because modules or command line options are specified
[2021-05-26T18:06:27,301][INFO ][logstash.runner          ] Starting Logstash {"logstash.version"=>"6.6.2"}
[2021-05-26T18:06:36,460][INFO ][logstash.pipeline        ] Starting pipeline {:pipeline_id=>"main", "pipeline.workers"=>1, "pipeline.batch.size"=>125, "pipeline.batch.delay"=>50}
[2021-05-26T18:06:36,879][INFO ][logstash.inputs.file     ] No sincedb_path set, generating one based on the "path" setting {:sincedb_path=>"/opt/module/logstash-6.6.2/data/plugins/inputs/file/.sincedb_bc33e75b09f20ee15b0dd99cb33842e5", :path=>["/opt/module/logstash-6.6.2/jobdata/message_info"]}
[2021-05-26T18:06:36,952][INFO ][logstash.pipeline        ] Pipeline started successfully {:pipeline_id=>"main", :thread=>"#<Thread:0x5fb8b7b3 run>"}
[2021-05-26T18:06:37,042][INFO ][logstash.agent           ] Pipelines running {:count=>1, :running_pipelines=>[:main], :non_running_pipelines=>[]}
[2021-05-26T18:06:37,092][INFO ][filewatch.observingtail  ] START, creating Discoverer, Watch with file and sincedb collections
[2021-05-26T18:06:37,509][INFO ][logstash.agent           ] Successfully started Logstash API endpoint {:port=>9600}
{
          "type" => "system",
          "path" => "/opt/module/logstash-6.6.2/jobdata/message_info",
       "message" => "hadoop",
    "@timestamp" => 2021-05-26T22:06:37.937Z,
      "@version" => "1",
          "host" => "bigdata01"
}
{
          "type" => "system",
          "path" => "/opt/module/logstash-6.6.2/jobdata/message_info",
       "message" => "hdfs",
    "@timestamp" => 2021-05-26T22:06:37.970Z,
      "@version" => "1",
          "host" => "bigdata01"
}
{
          "type" => "system",
          "path" => "/opt/module/logstash-6.6.2/jobdata/message_info",
       "message" => "yarn",
    "@timestamp" => 2021-05-26T22:06:37.970Z,
      "@version" => "1",
          "host" => "bigdata01"
}
{
          "type" => "system",
          "path" => "/opt/module/logstash-6.6.2/jobdata/message_info",
       "message" => "mapreduce",
    "@timestamp" => 2021-05-26T22:06:37.971Z,
      "@version" => "1",
          "host" => "bigdata01"
}
{
          "type" => "system",
          "path" => "/opt/module/logstash-6.6.2/jobdata/message_info",
       "message" => "flume",
    "@timestamp" => 2021-05-26T22:06:37.971Z,
      "@version" => "1",
          "host" => "bigdata01"
}
{
          "type" => "system",
          "path" => "/opt/module/logstash-6.6.2/jobdata/message_info",
       "message" => "zookeeper",
    "@timestamp" => 2021-05-26T22:06:37.971Z,
      "@version" => "1",
          "host" => "bigdata01"
}
{
          "type" => "system",
          "path" => "/opt/module/logstash-6.6.2/jobdata/message_info",
       "message" => "sqoop",
    "@timestamp" => 2021-05-26T22:06:37.971Z,
      "@version" => "1",
          "host" => "bigdata01"
}
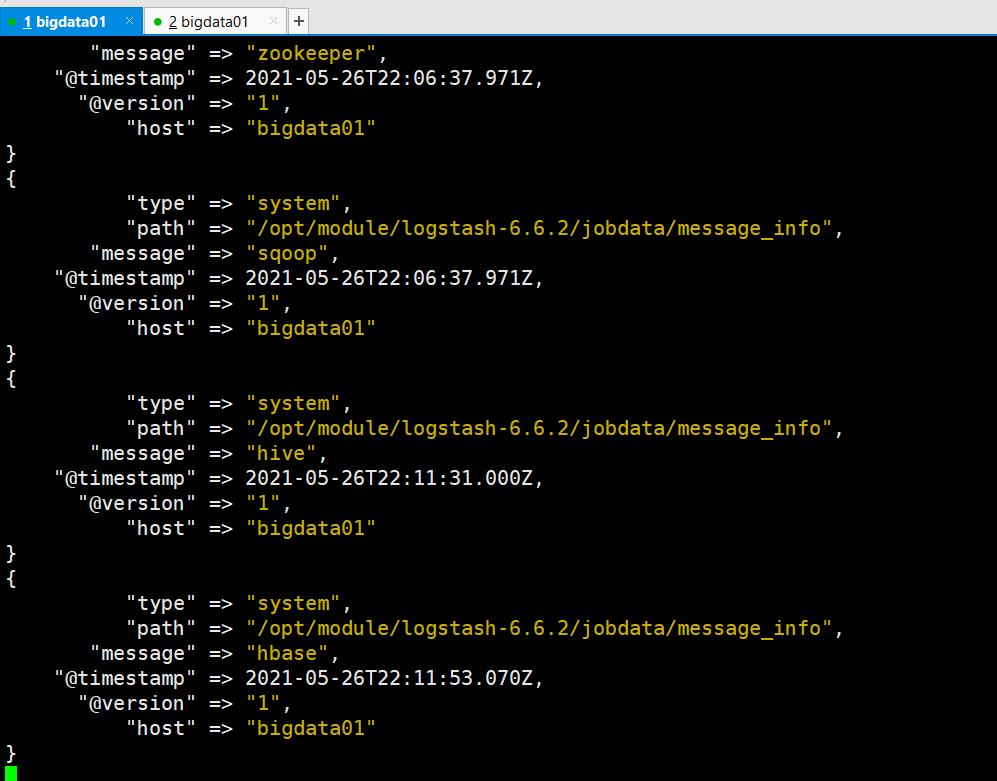
重开客户端测试命令:
[root@bigdata01 jobdata]# echo 'hive' >> message_info
[root@bigdata01 jobdata]# echo 'hbase' >> message_info
启动那台客户端监听到如下内容:
有一些比较有用的配置项,可以用来指定 FileWatch 库的行为:
discover_interval
logstash 每隔多久去检查一次被监听的 path 下是否有新文件。默认值是 15 秒。
exclude
不想被监听的文件可以排除出去,这里跟 path 一样支持 glob 展开。
close_older
一个已经监听中的文件,如果超过这个值的时间内没有更新内容,就关闭监听它的文件句柄。默认是 3600 秒,即一小时。
ignore_older
在每次检查文件列表的时候,如果一个文件的最后修改时间超过这个值,就忽略这个文件。默认是 86400 秒,即一天。
sincedb_path
如果你不想用默认的 $HOME/.sincedb(Windows 平台上在 C:\\Windows\\System32\\config\\systemprofile.sincedb),可以通过这个配置定义 sincedb 文件到其他位置。
sincedb_write_interval
logstash 每隔多久写一次 sincedb 文件,默认是 15 秒。
stat_interval
logstash 每隔多久检查一次被监听文件状态(是否有更新),默认是 1 秒。
start_position
logstash 从什么位置开始读取文件数据,默认是结束位置,也就是说 logstash 进程会以类似 tail -F 的形式运行。如果你是要导入原有数据,把这个设定改成 “beginning”,logstash 进程就从头开始读取,类似 less +F 的形式运行。
codec配置(File)
可对数据源进行解析,如解析 json 串
input {
    stdin {
        add_field => {"key" => "value"}
        codec => "json"
        type => "std"
    }
}
output{stdout{codec=>rubydebug}}
2.2 filter配置
Grok插件
input {
    stdin {
        type => "std"
    }
}
filter {
  grok {
    match=>{"message"=> "%{IP:client} %{WORD:method} %{URIPATHPARAM:request} %{NUMBER:bytes} %{NUMBER:duration}" }
  }
}
output{stdout{codec=>rubydebug}}
GeoIP 地址查询归类
input {
    stdin {
        type => "std"
    }
}
filter {
    geoip {
        source => "message"
    }
}
output{stdout{codec=>rubydebug}}
2.3 output配置
保存成文件(File)
input {
    stdin {
        type => "std"
    }
}
output {
    file {
        path => "./logstash-6.6.2/jobdata/%{+yyyy}/%{+MM}/%{+dd}/%{host}.log"
        codec => line { format => "custom format: %{message}"}
    }
}
服务器间传输文件(File)
接收日志服务器配置:
input {
  tcp {
	mode => "server"
	port => 9600
	ssl_enable => false
  }
}
filter {
    json {
        source => "message"
    }
}
output {
    file {
        path => "./logstash-6.6.2/jobdata/%{+YYYY-MM-dd}-%{servip}-%{filename}"
        codec => line { format => "%{message}"}
    }
}
发送日志服务器配置:
input{
    file {
        path => ["./logstash-6.6.2/jobdata/send.log"]
        type => "ecolog"
        start_position => "beginning"
    }
}
filter {
    if [type] =~ /^ecolog/ {
        ruby {
            code => "file_name = event.get('path').split('/')[-1]
					 event.set('file_name',file_name)
					 event.set('servip','接收方ip')"
        }
        mutate {
            rename => {"file_name" => "filename"}
        }
    }
}
output {
	tcp {
        host  => "接收方ip"
        port  => 9600
        codec => json_lines
    }
}
写入ES:
input {
    stdin {
        type => "log2es"
    }
}
output {
    elasticsearch {
        hosts => ["192.168.119.122:9200"]
        index => "logstash-%{type}-%{+YYYY.MM.dd}"
        document_type => "%{type}"
        sniffing => true
        template_overwrite => true
    }
}
sniffing : 寻找其他es节点
template_overwrite: 是否覆盖
实例:将错误日志写入es。
input {
    file {
        path => ["./logstash-6.6.2/jobdata/run_error.log"]
        type => "error"
        start_position => "beginning"
}

}
output {
    elasticsearch {
        hosts => ["192.168.119.122:9200"]
        index => "logstash-%{type}-%{+YYYY.MM.dd}"
        document_type => "%{type}"
        sniffing => true
        template_overwrite => true
    }
}
以上是关于Logstash 使用小结的主要内容,如果未能解决你的问题,请参考以下文章