部署flask+gunicorn+nginx 项目
Posted Z素颜
tags:
篇首语:本文由小常识网(cha138.com)小编为大家整理,主要介绍了部署flask+gunicorn+nginx 项目相关的知识,希望对你有一定的参考价值。
一、部署步骤:
拷贝flask项目文件到Linux:
xshell 下使用"rz " 命令拷贝文件到当前目录,覆盖可以使用 "rz -f"
验证拷贝过来的flask项目是否能正常执行,主要python版本,例如:
python3 /home/zengsuyan/FQA/homepage.py
安装gunicorn :
a.pip install gunicorn
在flask的项目的目录下启动:gunicorn -w 3 -b 127.0.0.0:5000 homepage:app
# homepage指的是homepage.py文件,app指的是flask应用的名字:
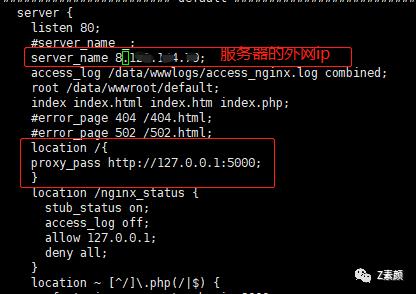
配置nginx 反向代理:(nginx安装在/usr/local/nginx/sbin/目录)
a.配置如图:/usr/local/nginx/conf/nginx.conf

b.启动nginx :
/usr/local/nginx/sbin/nginx -s reload
二、部署过程遇到的问题
执行flask 项目,出现链接数据库超时,排查可能原因:
a.查看端口占用情况:netstat -nltp | grep 3306
b.防火墙是否关闭:sudo systemctl status firewalld
d.数据库服务器是否有白名单限制:有做白名单需要在白名单增加本服务器ip
nginx启动报错:nginx: [emerg] unknown directive "stub_status" in /usr/local/nginx/conf/nginx.conf:75,解决:
安装时候命令如下:
1)./configure --prefix=/usr/local/nginx --with-http_stub_status_module --with-http_ssl_module
2).make
3).makeinstall
执行gunicorn命令提示-bash: gunicorn: command not found
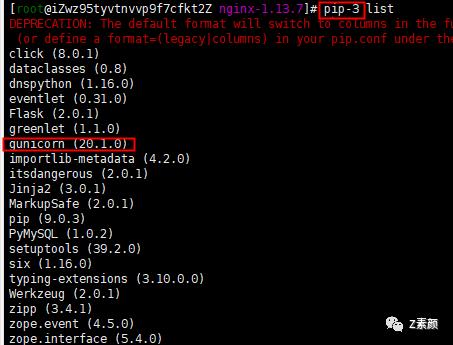
a.检测 是否安装成功:pip list

b.查看gunicorn 目录:#find / -name gunicorn
c.添加环境变量:如上图,如果不存在就重新安装gunicorn,如果存在就添加环境变量
1).编辑环境变量 #vi /etc/profile:
增加export PATH=/usr/local/lib/python3.6/site-packages
2).变量生效 #source /etc/profile
以上是关于部署flask+gunicorn+nginx 项目的主要内容,如果未能解决你的问题,请参考以下文章