iOS 14 UICollectionViewCell 相关
Posted 夏天然后
tags:
篇首语:本文由小常识网(cha138.com)小编为大家整理,主要介绍了iOS 14 UICollectionViewCell 相关相关的知识,希望对你有一定的参考价值。
前言: Apple 为ios14 引入了新的API—UICollectionViewListCell 下面进行简单介绍
UICollectionViewListCell需要配合iOS13中推出的UICollectionViewCompositionalLayout、DiffableDataSource等搭配使用
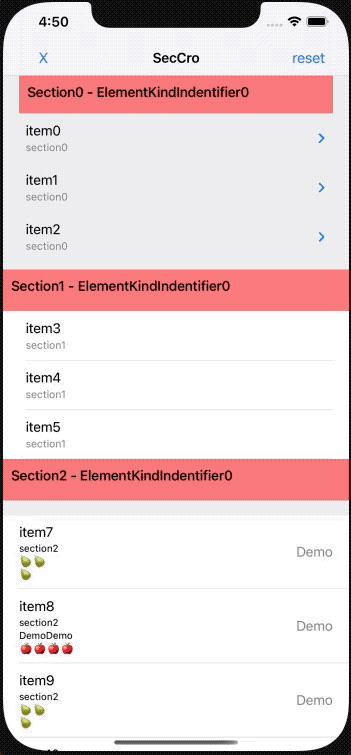
这次的更新是使用UICollectionViewListCell,可在UICollectionView中实现UITableView样式的UI布局, 过去麻烦的自定义展开收起操作,现在只需要对数据源进行操作.
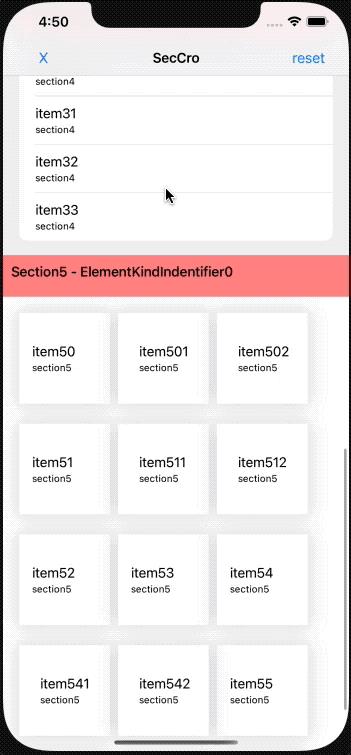
看下效果, 如下图


1. 创建视图
首先先来创建UICollectionView,与之前没有不同,唯一不同点就是collectionViewLayout,下面使用了UICollectionViewCompositionalLayout中的list配置样式。
Example Code
lazy var collectionView: UICollectionView = { [weak self] in

	// 配置布局样式,样式有5种,可自行查看`UICollectionLayoutListConfiguration.Appearance`
	var listConfiguration = UICollectionLayoutListConfiguration(appearance: .insetGrouped)

	// 配置布局
	let layout = UICollectionViewCompositionalLayout.list(using: listConfiguration)

	let collectionView = UICollectionView(frame: CGRect(x: 0, y: 0, width: UIScreen.main.bounds.width, height: UIScreen.main.bounds.height), collectionViewLayout: layout)
	collectionView.backgroundColor = .white
	collectionView.delegate = self
	return collectionView
}()
2. 配置UICollectionViewDiffableDataSource
iOS13 中引入了NSDiffableDataSource,UITableView和UICollectionView都有各自的实现对象,可对数据实现局部刷新的数据源对象。
定义:
class UICollectionViewDiffableDataSource<SectionIdentifierType, ItemIdentifierType> : NSObject, UICollectionViewDataSource where SectionIdentifierType : Hashable, ItemIdentifierType : Hashable
SectionIdentifierType和ItemIdentifierType都必须具有唯一标识,从而确保了数据的唯一性。
Example Code:
lazy var diffDataSource: UICollectionViewDiffableDataSource<String, String> = {
    /// 配置数据源之前需要注册Cell
	let cellRegist = UICollectionView.CellRegistration<UICollectionViewListCell, String> { [weak self] (cell, indexPath, item) in
		guard let self = self else {return}
		// 对默认的cell进行有限的配置
		// 通过contentConfiguration配置cell的显示内容
	    var config = cell.defaultContentConfiguration()
		config.text = "item\\(item)"
		config.secondaryText = "section\\(indexPath.section)"
		config.textProperties.adjustsFontSizeToFitWidth = true
        config.secondaryTextProperties.numberOfLines = 0
        cell.contentConfiguration = config
	}
    // 这里定义了SectionIdentifierType为String类型,ItemIdentifierType为String类型
	let dataSource = UICollectionViewDiffableDataSource<String, String>(collectionView: collectionView) { (collectionView, indexPath, item) -> UICollectionViewCell? in
        return collectionView.dequeueConfiguredReusableCell(using: cellRegist, for: indexPath, item: item)
	}
	return dataSource
}()
还需要配合NSDiffableDataSourceSnapshot(数据源快照对象)使用,可以把它看作是数据源的缓冲层
lazy var snapShot: NSDiffableDataSourceSnapshot<String, String> = {
    var snapShot = NSDiffableDataSourceSnapshot<String, String>()
    // 这里添加3个Section,SectionIdentify为String
    snapShot.appendSections(["Section1", "Section2", "Section3"])
    // 分别向3个Section里添加item,ItemIdentifier为String
    snapShot.appendItems(["0", "1", "2"], toSection: "Section1")
    snapShot.appendItems(["3", "4", "5"], toSection: "Section2")
    snapShot.appendItems(["7", "8", "9", "10"], toSection: "Section3")

    return snapShot
}()
之后使用apply更新数据源,无需我们计算发生变化的indexPath,dataSource会自动与snapshot进行比对,计算出差异,即可对UI进行更新,不必手动调用reloadData或reloadSection
diffDataSource.apply(snapShot, animatingDifferences: true, completion: nil)
对比一下以往的写法,每次改变dataSource需要调用reload方法更新UI:
func numberOfSections(in collectionView: UICollectionView) -> Int {
	return 10
}

func collectionView(_ collectionView: UICollectionView, numberOfItemsInSection section: Int) -> Int {
	return 10
}

func collectionView(_ collectionView: UICollectionView, cellForItemAt indexPath: IndexPath) -> UICollectionViewCell {
	return UICollectionViewCell()
}
3. 添加手势
UICollectionViewListCell可以像UITableView中一样,添加左右滑动手势,以响应不同的操作需求,但它不是对单个listCell的操作,而是当成整个列表的一项配置,需要在 UICollectionViewLayoutList Configuration中配置。配置代码如下:
/// 左滑手势
listConfiguration.leadingSwipeActionsConfigurationProvider = .some({ [weak self] (indexPath) -> UISwipeActionsConfiguration? in
    guard let self = self else {return nil}
    return UISwipeActionsConfiguration(actions: [UIContextualAction(style: .destructive, title: "Add", handler: { (contextualAction, view, complete) in
        if let listCell = self.collectionView.cellForItem(at: indexPath) as? UICollectionViewListCell {
            let sectionIndentifier = self.snapShot.sectionIdentifiers[indexPath.section]
            var sectionSnapShop = self.diffDataSource.snapshot(for: sectionIndentifier)
            let items = sectionSnapShop.visibleItems
            if items.count > 0 {

                /// 简单添加数据
                sectionSnapShop.insert([items[indexPath.row] + "Add\\(Int(arc4random()) % 99999999)"], after: items[indexPath.row])

                self.diffDataSource.apply(sectionSnapShop, to: sectionIndentifier, animatingDifferences: true) {
                    complete(true)
                }
            }
        }
    })])
})

/// 右滑手势
listConfiguration.trailingSwipeActionsConfigurationProvider = .some({ [weak self] (indexPath) -> UISwipeActionsConfiguration? in
    guard let self = self else {return nil}
    return UISwipeActionsConfiguration(actions: [UIContextualAction(style: .destructive, title: "Delete", handler: { (contextualAction, view, complete) in

        if let listCell = self.collectionView.cellForItem(at: indexPath) as? UICollectionViewListCell {
            let sectionIndetifier = self.snapShot.sectionIdentifiers[indexPath.section]
            var sectionSnapShot = self.diffDataSource.snapshot(for: sectionIndetifier)
            let items = sectionSnapShot.visibleItems
            if items.count > 0 {
                let item = items[indexPath.row]
                let alertCro = UIAlertController(title: "message", message: "Are you sure to Delete【item\\(item)】", preferredStyle: .alert)
                alertCro.addAction(UIAlertAction(title: "cancel", style: .cancel, handler: { (action) in
                    complete(false)
                }))
                alertCro.addAction(UIAlertAction(title: "confirm", style: .default, handler: { (action) in
                                                                                              					  /// 删除指定数据
                    sectionSnapShot.delete([item])
                    self.diffDataSource.apply(sectionSnapShot, to: sectionIndetifier, animatingDifferences: true) {
                        complete(true)
                    }
                }))
                self.present(alertCro, animated: true, completion: nil)
            }
        }

    })])
})
4. 添加头部/尾部 NSCollectionLayoutBoundarySupplementaryItem
对Section添加头部、尾部视图,在新API中并没有特别区分了,被归为了一个通用的视图,我们只需要对想要添加的View进行注册,然后再指定位置就可以了。
/** 在dataSource中注册视图,相当于之前UICollecetionViewReusableView的概念 **/
/// 注册、配置
let suppleRegist = UICollectionView.SupplementaryRegistration(elementKind: "CustomIdentifier0") { (reusableView, elementKind, indexPath) in

    for subView in reusableView.subviews {
        subView.removeFromSuperview()
    }

    let titleLabel = UILabel()
    titleLabel.text = "Section\\(indexPath.section) - \\(elementKind)"
    titleLabel.font = UIFont.systemFont(ofSize: 17, weight: .medium)
    titleLabel.sizeToFit()
    titleLabel.frame.origin = CGPoint(x: 10, y: 10)

    reusableView.backgroundColor = UIColor(red: 1, green: 0, blue: 0, alpha: 0.5)
    reusableView.addSubview(titleLabel)
}

dataSource.supplementaryViewProvider = .some({ (collectionView, elementKind, indexPath) -> UICollectionReusableView? in
    return collectionView.dequeueConfiguredReusableSupplementary(using: suppleRegist, for: indexPath)
})
为指定section添加刚刚注册的boundarySupplementaryItems
layoutSize用于确定视图的SizeelementKind用于指定已注册的视图aligment用于确定布局位置
let section = NSCollectionLayoutSection(group: group)
// 控制section的滚动模式
section.orthogonalScrollingBehavior = .groupPagingCentered
section.boundarySupplementaryItems = [NSCollectionLayoutBoundarySupplementaryItem(layoutSize: NSCollectionLayoutSize(widthDimension: .fractionalWidth(1), heightDimension: .fractionalWidth(0.12)), elementKind: "CustomIdentifier0" alignment: .top)]
5. UICollectionViewCompositionalLayout 简单介绍
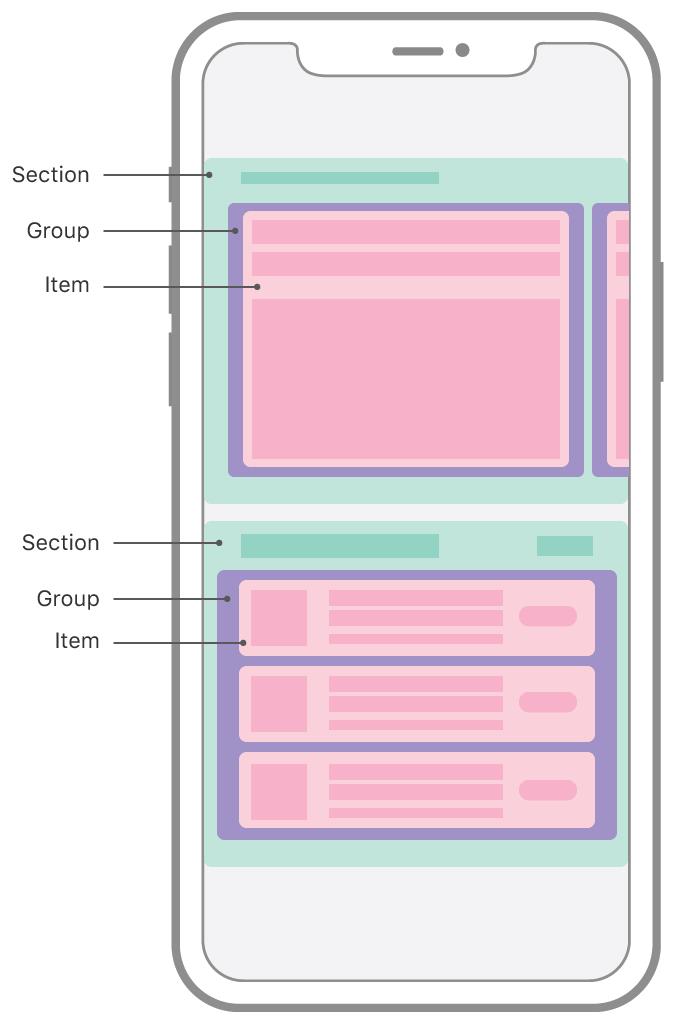
UICollectionViewCompositionalLayout(可译作合成布局),这是苹果在iOS13中引入的一种新的布局对象,可以让开发者自行对UICollectionView的布局进行各种组合,这个布局与以往的布局相比(Section与Item),多加了一个Group。UICollectionViewCompositionalLayout.lsit()内部已对相关配置进行封装,无需再自行配置,当然,如果样式复杂,还可以进行自定义配置。 引用下图所示,多个item组成一个Group,多个Group组成一个Section,多个Section则组成CompositionalLayout。上面的布局,就是由6个Section组合而成的。

6. NSCollectionLayoutDimension
用于描述以父视图为基准的比例大小
// 基于父视图的宽度得出进行比例值
open class func fractionalWidth(_ fractionalWidth: CGFloat) -> Self

// 基于父视图的高度得出进行比例值
open class func fractionalHeight(_ fractionalHeight: CGFloat) -> Self

// 绝对值
open class func absolute(_ absoluteDimension: CGFloat) -> Self

// 估计值
open class func estimated(_ estimatedDimension: CGFloat) -> Self
Example Code
// itemSize,取Group宽度的0.3倍,Group高度的0.3倍
let itemSize = NSCollectionLayoutSize(widthDimension: .fractionalWidth(0.3), heightDimension: .fractionalWidth(0.3))
// 通过itemSize创建一个item
let item = NSCollectionLayoutItem(layoutSize: itemSize)

// groupSize,取Section宽度的1倍,Section高度的0.32倍
let groupSize = NSCollectionLayoutSize(widthDimension: .fractionalWidth(1), heightDimension: .fractionalWidth(0.32))
// 通过groupSize来初始化一个水平布局的group,内部item为上述item
let group = NSCollectionLayoutGroup.horizontal(layoutSize: groupSize, subitems: [item])

// 创建section
let section = NSCollectionLayoutSection(group: group)
/// 为该section设置滚动方式,具体可自行尝试各种样式
section.orthogonalScrollingBehavior = .none

// 最后生成一个layout
let composionalLayout = UICollectionViewCompositionalLayout(section: section)
NSCollectionLayoutItem:用来描述Item的大小
NSCollectionLayoutSection:描述Section的大小
NSCollectionLayoutGroup:描述Group的大小
他们的布局大小,由NSCollectionLayoutDimension决定。
7. 总结
- 本次
UICollectionViewCompositionalLayout组合自由度极高,经过尝试,原本一些需要多个自定义View+UITableView或者需要UITableView嵌套UICollectoinView的布局,都可由一个UICollectionView替代实现了, 以满足不同场景的需求. 👍 - iOS14上更新的
UICollectionViewListCell,是对iOS13上UICollectionView的新Api(DiffableDataSource、UICollectionViewCompositionalLayout)进行封装,所以需要先对iOS13的Api进行熟悉,才能更好的使用,未提及的部分请查阅资料
8. 文章参照
https://developer.apple.com/documentation/uikit/views_and_controls/collection_views/implementing_modern_collection_views
https://devstreaming-cdn.apple.com/videos/wwdc/2019/220xl4hxzzr7b19/220/220_advances_in_ui_data_sources.pdf?dl=1
以上是关于iOS 14 UICollectionViewCell 相关的主要内容,如果未能解决你的问题,请参考以下文章