Arduino智能闹钟设计(8x8矩阵键盘+LCD显示)
Posted 村头陈师傅
tags:
篇首语:本文由小常识网(cha138.com)小编为大家整理,主要介绍了Arduino智能闹钟设计(8x8矩阵键盘+LCD显示)相关的知识,希望对你有一定的参考价值。

Arduino智能闹钟设计(8x8矩阵键盘+LCD显示+蜂鸣器歌曲)
作者:STCode(公众号同名)
1.效果描述:
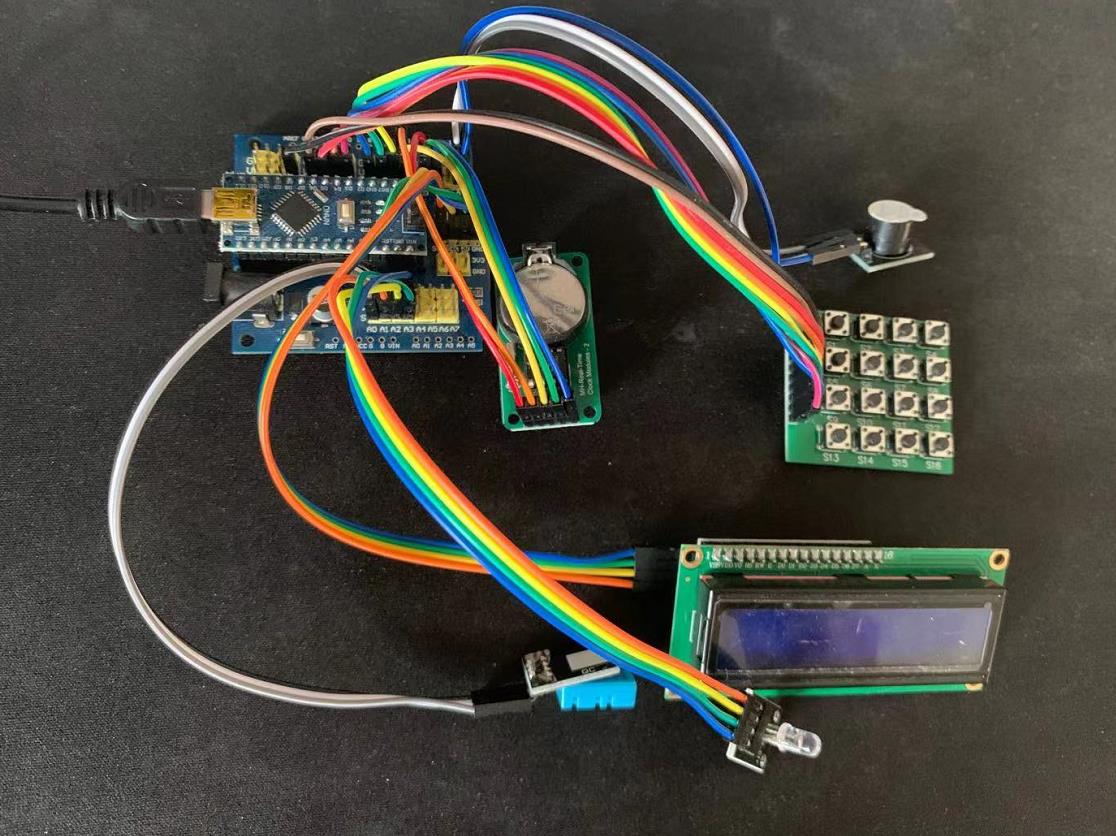
本设计基于Arduino Nano控制器,主要功能为定时闹钟和环境温湿度显示,使用者可以通过8x8矩阵键盘设置闹钟的时钟和分钟,可以开启和关闭闹钟,闹钟的铃声由蜂鸣器发出,设置的铃声为欢乐颂歌曲,在播放歌曲的同时RGB灯也会根据节奏闪烁。设备可通过矩阵键盘按钮查看当前环境的温湿度,设备的信息均通过一块lcd1602液晶显示屏显示,是一个非常值得尝试的小创意。
Arduino智能闹钟设计(8x8矩阵键盘+LCD显示+蜂鸣器歌曲)
2.使用元器件
1)Arduino Nano控制器
2)8x8矩阵键盘
3)DHT11温湿度传感器
4)IIC lcd1602液晶显示屏
5)蜂鸣器
6)DS1302时钟模块
7)共阴RGB灯
8)控制器扩展板一块
9)杜邦线若干
3.电路连接

4.源代码
#include <DHT.h>                     //定义<DHT.h>头文件
#include <Keypad.h>   //矩阵键盘头文件
#include <DS1302.h>   //DS1302头文件
#include <Wire.h>     //Wire头文件
#include <LiquidCrystal_I2C.h> //引用I2C通讯的LCD1602库

#define DHTPIN A0                     //湿度传感器OUT接A0号口
#define DHTTYPE DHT11                //定义DHT11传感器
DHT dht(DHTPIN,DHTTYPE);             //定义湿度传感器OUT与A0号口连接并且读取温湿度传感器的数值
const byte ROWS = 4; //四行
const byte COLS = 4; //四列
//定义键盘上的按键标识
char hexaKeys[ROWS][COLS] = {        //按键值
  {'1','2','3','A'},
  {'4','5','6','B'},
  {'7','8','9','C'},
  {'*','0','#','D'}
};
byte rowPins[ROWS] = {5, 6, 7, 8}; //连接到行扫描的输入输出端口
byte colPins[COLS] = {9, 10, 11, 12}; //连接到列扫描的输入输出端口

//定义Keypad类的实例
Keypad customKeypad = Keypad( makeKeymap(hexaKeys), rowPins, colPins, ROWS, COLS);

DS1302 rtc(2,3,4); //对应DS1302的RST,DAT,CLK
LiquidCrystal_I2C lcd(0x27,16,2);//设置LCD1602设备地址,一般为0x3F、0x20、0x27,可以查看硬件手册
char buf1[50];  //定义字符1
char buf2[50];  //定义字符2
int alarm_hour = 0;           //闹钟时钟变量
int alarm_min = 0;            //闹钟分钟变量
bool adjust_alarm_flag = 0;   //调节闹钟标志位
bool alarm_flag = 0;           //使能闹钟标志位
bool led_flag = 0;             //led状态标志位
int r_led = A1;                 //RGB灯引脚
int g_led = A2;
int b_led = A3;
int length;                    //定义音乐数组长度
int tonepin=0;                 //蜂鸣器接0号口(需要在程序下载进去之后再接0号)
bool play_song_flag = 0;       //使能歌曲播放标志位
#define NTC0 -1                 //C调各频率
#define NTC1 262
#define NTC2 294
#define NTC3 330
#define NTC4 350
#define NTC5 393
#define NTC6 441
#define NTC7 495
#define NTCL5 196

#define HALF 0.5            //节拍
#define QUARTER 0.25
#define EIGHTH 0.25
#define SIXTEENTH 0.625
int tune[]=                  //音频数组
{
  NTC3,NTC3,NTC4,NTC5,
  NTC5,NTC4,NTC3,NTC2,
  NTC1,NTC1,NTC2,NTC3,
  NTC3,NTC2,NTC2,
  NTC3,NTC3,NTC4,NTC5,
  NTC5,NTC4,NTC3,NTC2,
  NTC1,NTC1,NTC2,NTC3,
  NTC2,NTC1,NTC1,
  NTC2,NTC2,NTC3,NTC1,
  NTC2,NTC3,NTC4,NTC3,NTC1,
  NTC2,NTC3,NTC4,NTC3,NTC2,
  NTC1,NTC2,NTCL5,NTC3,
  NTC3,NTC3,NTC4,NTC5,
  NTC5,NTC4,NTC3,NTC2,
  NTC1,NTC1,NTC2,NTC3,
  NTC2,NTC1,NTC1
};
float durt[]=                //节拍数组
{
  1,1,1,1,
  1,1,1,1,
  1,1,1,1,
  1+0.5,0.5,1+1,
  1,1,1,1,
  1,1,1,1,
  1,1,1,1,
  1+0.5,0.5,1+1,
  1,1,1,1,
  1,0.5,0.5,1,1,
  1,0.5,0.5,1,1,
  1,1,1,1,
  1,1,1,1,
  1,1,1,1,
  1,1,1,1,
  1+0.5,0.5,1+1,
};
void initRTCTime(void)//初始化RTC时钟
{
  rtc.writeProtect(false);   //关闭写保护
  rtc.halt(false);           //清除时钟停止标志
  Time tt(2021, 5, 25, 2, 5, 30, 3); //创建时间对象,参数3为星期数据,周日为1,周一为2以此类推
  rtc.time(tt);//向DS1302设置时间数据
}

void printTime()//打印时间数据
{
  Time tim = rtc.time(); //从DS1302获取时间数据
  //snprintf(buf1, sizeof(buf1), "%04d-%02d-%02d",tim.yr, tim.mon, tim.date);   //字符1为年月日数据
  snprintf(buf2, sizeof(buf2), "%02d:%02d:%02d",tim.hr, tim.min, tim.sec);    //字符2为时分秒数据
  //Serial.println(buf1);   //串口打印数据
  //Serial.println(buf2);
  if ((tim.hr == alarm_hour) && (tim.min == alarm_min) && (tim.sec == 0) && alarm_flag == 1)   //判断是否放歌
  {
    tim.sec = 1;
    play_song();      //放歌
  }
}


void setup()
{
  //Serial.begin(9600);
  dht.begin();                   //湿度传感器初始化
  lcd.init();           // 初始化LCD
  lcd.backlight();      //设置LCD背景等亮
  initRTCTime();
  //新模块上电需要设置一次当前时间,
  //下载完成后需屏蔽此函数再次下载,否则每次上电都会初始化时间数据
  pinMode(r_led,OUTPUT);
  pinMode(g_led,OUTPUT);
  pinMode(b_led,OUTPUT);
  pinMode(tonepin,OUTPUT);
  digitalWrite(r_led,1);
  digitalWrite(g_led,1);
  digitalWrite(b_led,1);
  length=sizeof(tune)/sizeof(tune[0]);     //计算音频数组长度
}

void loop()
{

  printTime();    //打印时间子函数
  lcd_display();  //lcd显示子函数
}

void play_song()       //放歌函数
{

  for(int x=0;x<length;x++)
  {
  if(play_song_flag == 1)
  {
    play_song_flag = 0;
    noTone(tonepin);
    digitalWrite(r_led,1);     //RGB灯闪烁
    digitalWrite(g_led,1);
    digitalWrite(b_led,1);
    lcd.setCursor(0,0);
    lcd.print("               ");
    break;
  }
    tone(tonepin,tune[x]);
    digitalWrite(r_led,random(0,2));
    digitalWrite(g_led,random(0,2));
    digitalWrite(b_led,random(0,2));
  for(int i = 0;i < 30*durt[x];i++)
  {
    contral_song();
    delay(1);
  }

    noTone(tonepin);
  }
    digitalWrite(r_led,1);
    digitalWrite(g_led,1);
    digitalWrite(b_led,1);
    lcd.setCursor(0,0);
    lcd.print("               ");
}

void print_temp_humi()                 //输出温湿度函数
{
  float HH = dht.readHumidity();
  float TT = dht.readTemperature();
  lcd.setCursor(0,1);
  lcd.print("                ");
  lcd.setCursor(0,1);
  lcd.print("T:");
  lcd.setCursor(2,1);
  lcd.print(TT);
  lcd.setCursor(7,1);
  lcd.print("C");
  lcd.setCursor(9,1);
  lcd.print("H:");
  lcd.setCursor(11,1);
  lcd.print(HH);
}

void lcd_display()               //lcd显示函数
{
      //lcd.setCursor(0,0);  //设置显示位置
    //lcd.print(buf1);     //输出字符
    lcd.setCursor(0,0);
    lcd.print(buf2);
    char customKey = customKeypad.getKey();

    if (customKey)
    {
      //Serial.println(customKey);
    if(customKey == '1')
    {
    adjust_alarm_flag = 1;
    }
    if(customKey == '4')
    {
    adjust_alarm_flag = 0;
    }
    if(adjust_alarm_flag == 1)
    {

    switch(customKey)
    {
      case '2':alarm_hour++;break;
      case '5':alarm_hour--;break;
      case '3':alarm_min++;break;
      case '6':alarm_min--;break;
      defalt:break;
    }
    alarm_hour = constrain(alarm_hour,0,24);
    alarm_min = constrain(alarm_min,0,60);
    lcd.setCursor(0,1);
    lcd.print("                ");
    lcd.setCursor(0,1);
    lcd.print(alarm_hour / 10);
    lcd.setCursor(1,1);
    lcd.print(alarm_hour % 10);
    lcd.setCursor(2,1);
    lcd.print(":");
    lcd.setCursor(3,1);
    lcd.print(alarm_min / 10);
    lcd.setCursor(4,1);
    lcd.print(alarm_min % 10);
    }

    if(customKey == 'A')
    {
    alarm_flag = 1;
    lcd.setCursor(5,1);
    lcd.print("                ");
    lcd.setCursor(7,1);
    lcd.print("Clock On ");
    }

    else if(customKey == 'B')
    {
    alarm_flag = 0;
    lcd.setCursor(5,1);
    lcd.print("                ");
    lcd.setCursor(7,1);
    lcd.print("Clock Off");
    }
    else if(customKey == 'D')
    {
    print_temp_humi();
    }
    }

}

 void contral_song()             //控制歌曲子函数
{
  lcd.setCursor(0,0);
  lcd.print("Clock rang");
  char customKey = customKeypad.getKey();
  if(customKey != NULL)
  {
    play_song_flag = 1;
  }
}
更多创意作品及源码获取欢迎关注公众号:STCode
以上是关于Arduino智能闹钟设计(8x8矩阵键盘+LCD显示)的主要内容,如果未能解决你的问题,请参考以下文章