python自动化自动化测试平台开发:2.flask技术讲解上
Posted new nm个对象
tags:
篇首语:本文由小常识网(cha138.com)小编为大家整理,主要介绍了python自动化自动化测试平台开发:2.flask技术讲解上相关的知识,希望对你有一定的参考价值。
三.后端开发框架选择+

本次主要讲解flask框架
1.flask框架简介

flask框架是一款非常受欢迎的python web框架,它非常的灵活小巧。
2 flask框架的基本使用
from flask import Flask

# 传入__name__初始化一个Flask实例
app = Flask(__name__)


# 装饰器,将当前路由映射到指定函数
@app.route('/')
def hello_world():
    return 'hello world'


if __name__ == '__main__':
    app.run()
运行结果如下:


3.指定参数来启动flask
from flask import Flask

# 传入__name__初始化一个Flask实例
app = Flask(__name__)


# 装饰器,将当前路由映射到指定函数
@app.route('/')
def hello_world():
    return 'hello world'


if __name__ == '__main__':
    app.run(debug=True,host="0.0.0.0",port=5055)
    # 说明
    # debug=True,表示使用调试模式启动flask,这种模式下代码更新后不需要重新启动flask,系统会自动刷新。且当代码有问题时,会在终端输出异常信息
    # host="0.0.0.0",这种方式可以让其他电脑访问flask服务
    # port=5055,指定端口为5055
4.flask的配置与配置文件
flask项目的配置都是以app.config对象来进行配置的。
在Flask项目中,有四种方式进行项目的配置。
4.1 直接硬编码
app = Flask(__name__)
app.config['DEBUG'] = True # 设置项目以debug模式运行
这种方式不灵活,复用性太低
4.2 通过update()方式
因为app.config本质上是一个dict,使用可以使用update()来进行配置
app = Flask(__name__)

app.config.update(
    DEBUG=True,
    SECRET_KEY='....'
)
4.3.通过from_object()方法
如果项目的配置项特别多,那么我们可以把所有的配置项都放在一个模块中,然后通过加载模块的方式进行配置,假设有一个settings.py模块,专门用来存储配置项的,此你可以通过app.config.from_object()方法进行加载,并且该方法既可以接收模块的的字符串名称,也可以模块对象本身。
有两种形式:
# 1. 通过模块字符串
app.config.from_object('settings')
# 2. 通过模块对象
import settings
app.config.from_object(settings)
使用这种方式,添加配置文件后,将配置项都放入该文件中,其他文件直接引用该配置文件中的配置项,提高了代码的复用性、降低了耦合度,同时,在配置文件中修改了配置项时,其他代码中均不需要修改,从而提高了代码的灵活性。
例如:新建config.py文件,添加一些配置项如下:
# 设置Debug模式为True
DEBUG = True

# 指定HOST
HOST = '127.0.0.1'
在flask文件中导入:
from flask import Flask
import config

app = Flask(__name__)


# 装饰器,将当前路由映射到指定函数
@app.route('/')
def hello_world():
    return 'hello world'

if __name__ == '__main__':
    app.config.from_object(config)
    app.run()
再运行,也能开启Debug模式。
也可以通过字符串形式导入:
if __name__ == '__main__':
    app.config.from_object('config')
    app.run()
此时不需要再导入config模块。
4.4.通过from_pyfile()方法
app.config.from_pyfile()方法传入一个文件名,通常是以.py结尾的文件,但也不限于只使用.py后缀的文件。
通过导入Python文件的形式导入配置文件:
if __name__ == '__main__':
    app.config.from_pyfile('config.py')
    app.run()
from_pyfile()方法有一个silent参数,设置为True时,如果配置文件不存在也不会报错;
不仅支持Python格式的配置文件,也支持.ini等格式。
5.flask实现url与函数的映射
5.1实现基本映射
flask中使用@app.route('/')来实现函数与url之间的映射,app.route()中传入指定的url。
from flask import Flask

# 传入__name__初始化一个Flask实例
app = Flask(__name__)

app.config.update(
    DEBUG=True,
)

# 装饰器,将当前路由映射到指定函数。当我们访问http://127.0.0.1:5055/app时,就会自动映射到hello_world()函数中。我们一般将这种函数称为视图函数
@app.route('/app')
def hello_world():
    return 'hello app'

if __name__ == '__main__':
    app.run(host="0.0.0.0",port=5055)
5.2 实现函数中使用url的参数
视图函数中可以获取到url中的参数。
from flask import Flask

# 传入__name__初始化一个Flask实例
app = Flask(__name__)

app.config.update(
    DEBUG=True,
)
# 装饰器,将当前路由映射到指定函数,id为url中的可变参数
@app.route('/app/<id>')
def hello_world(id):
    return f'hello app{id}'

if __name__ == '__main__':
    app.run(host="0.0.0.0",port=5055)
效果如下:

说明:
- 如果要在url中设置可变参数,必须以
<变量名称>的方式在app.route中设置路由 - 视图函数中需要传入对应变量作为参数。
- 可以指定变量的数据类型,格式为
<类型:变量名>,常见的限制类型有:string(接受任何没有斜杠/的字符串,为flask中的默认格式),int(整数类型),float(浮点型),path(与string类似,但可以接受斜杠/),uuid(uuid类型的字符串),any(可以同时指定多种路径)
from flask import Flask

# 传入__name__初始化一个Flask实例
app = Flask(__name__)

app.config.update(
    DEBUG=True,
)

# 装饰器,将当前路由映射到指定函数,id为url中的可变参数
@app.route('/app/<int:id>')
def hello_world(id):
    return f'hello app{id}'

if __name__ == '__main__':
    app.run(host="0.0.0.0",port=5055)
运行效果如下:


6.指定url的HTTP请求方式
app.route()中可以使用参数methods来指定使用的HTTP连接方式
from flask import Flask
from flask import request

# 传入__name__初始化一个Flask实例
app = Flask(__name__)

app.config.update(
    DEBUG=True,
)

# 使用methods来指定HTTP方式,默认为GET
@app.route('/app',methods=['POST'])
def hello_world():
    return 'hello app'

if __name__ == '__main__':
    app.run(debug=True,host="0.0.0.0",port=5055)
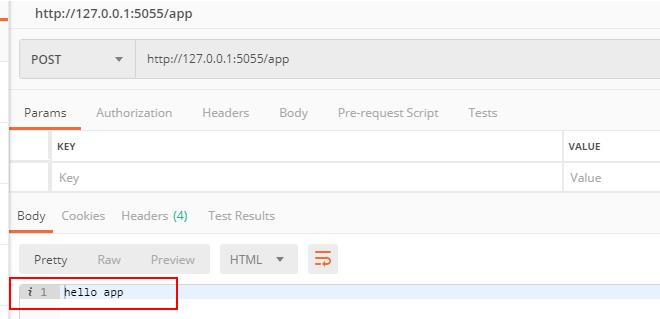
使用postman来访问效果如下:

7.使用url_for获取视图函数的映射路径
可以使用url_for(视图函数名称,函数参数1,函数参数2,…)来获取对应视图函数的url地址
from flask import Flask, url_for

# 传入__name__初始化一个Flask实例
app = Flask(__name__)

app.config.update(
    DEBUG=True,
)

@app.route('/app/<id>')
def hello_world(id):
    return f'hello app{id}'

@app.route('/url_for')
def test_url_for():
    s = url_for('hello_world',id=3) # 根据视图函数获取对应的url
    return s

if __name__ == '__main__':
    app.run(debug=True,host="0.0.0.0",port=5055)
运行后效果如下:

8.页面重定向
页面重定向就是当我们访问一个页面时,自动跳转到另一个页面。一般分为两种重定向:
第一种:永久重定向。比如某个网站地址变为了另一个地址,则当我们访问这个网站时,会自动跳转到新的地址。例如输入www.jingdong.com的时候,会被重定向到www.jd.com,因为jingdong.com这个网址已经被废弃了,被改成jd.com,所以这种情况下应该用永久重定向。
第二种:临时重定向。比如某个页面需要登录权限,当你未登陆时访问,则会自动跳转到登录页面
from flask import Flask, url_for, redirect

# 传入__name__初始化一个Flask实例
app = Flask(__name__)

app.config.update(
    DEBUG=True,
)

@app.route('/app')
def hello_world():
    return 'hello app'

@app.route('/redict')
def test_redict():
    return redirect('/app') # 重定向到‘/app’页面

if __name__ == '__main__':
    app.run(debug=True,host="0.0.0.0",port=5055)
说明:redirect(url地址,code=xxx),第一个参数为需要重定向的目标url,第二个参数code用来指定返回码,默认为302
9.函数的返回值 - 响应(Response)
视图函数中可以返回以下类型的值:
- Response对象。
- 字符串
Flask是根据返回的字符串类型重新创建一个werkzeug.wrappers.Response对象,Response将该字符串作为主体,状态码为200,MIME类型为text/html,然后返回该Response对象。 - 元组
传入元组的格式是(response,status,headers),response为一个字符串,status值是状态码,headers是响应头。
如果不是以上三种类型,Flask会通过Response.force_type(rv,request.environ)转换为一个请求对象。
之前在函数中返回的都是字符串,现进行返回列表的测试:
from flask import Flask,url_for,request,redirect

app = Flask(__name__)

@app.route('/about')
def about():
    return ['123']

if __name__ == '__main__':
    app.run(debug=True)
访问http://127.0.0.1:5000/about,会报错:

提示返回的类型只能是string、dict、tuple、Response instance或WSGI callable,其他类型会报错,现换成字典测试:
from flask import Flask,url_for,request,redirect

app = Flask(__name__)

@app.route('/about')
def about():
    return {'name':'Corley'}

if __name__ == '__main__':
    app.run(debug=True)
显示:

也可以返回元组,是元组时,只返回元组的第一个元素;
在一般情况下,返回元组的用法是return '关于我们',200,即return '字符串',状态码。
返回Response测试:
from flask import Flask,url_for,request,redirect,Response

app = Flask(__name__)

@app.route('/about')
def about():
    return Response('关于我们')

if __name__ == '__main__':
    app.run(debug=True)
显示:

可以看到,给Response传入字符串参数后,返回内容和字符串是类似的;
Response('关于我们')相当于Response('关于我们',status=200,mimetype='text/html')。
Response的用法是Response('字符串',状态码,mimetype='')
也可以用make_response()方法创建Response对象并返回,这个方法可以设置额外的数据,比如设置cookie、header等信息,测试如下:
from flask import Flask,url_for,request,redirect,Response,make_response

app = Flask(__name__)


@app.route('/about')
def about():
    return make_response('关于我们')

if __name__ == '__main__':
    app.run(debug=True)
效果与前者是一样的。
10.获取url的请求数据
视图函数中可以使用flask.request获取url中的请求数据
from flask import Flask, request

# 传入__name__初始化一个Flask实例
app = Flask(__name__)

app.config.update(
    DEBUG=True,
)

@app.route('/app')
def hello_world():
    request_data = dict(request.args) # request.args来获取get请求中的数据
    return request_data

@app.route('/redict' ,methods=['POST'])
def test_redict():
    request_data = dict(request.json) # 使用request.json来获取post请求中的json数据;使用request.form来获取post请求中的form数据
    return request_data

if __name__ == '__main__':
    app.run(debug=True,host="0.0.0.0",port=5055)
11.Flask-Restful的概念和使用
11.1 Restful API规范
Restful API是用于在前端与后台进行通信的一套规范,使用这个规范可以让前后端开发变得更加简单。
(1)协议
需要采用http或者是采用https协议。
(2)数据传输格式
数据之间传输的格式应该使用json形式
(4)HTTP请求方法
| 方法 | 含义 | 举例 |
|---|---|---|
| GET | 从服务器上获取资源 | /users/获取所有用户 |
| … | … | /user/id/根据id获取一个用户 |
| POST | 在服务器上新创建一个资源 | /user/新建一个用户 |
| PUT | 在服务器上更新资源(客户端提供所有改变后的数据) | /user/id/更新某个id的用户的信息(需要提供用户的所有信息) |
| PATCH | 在服务器上更新资源(客户端只提供需要改变的属性) | /user/id/更新某个id的用户信息(只需要提供需要改变的信息) |
| DELETE | 从服务器上删除资源 | /user/id/删除一个用户 |
| 状态码 | 描述 | 含义 |
|---|---|---|
| 200 | OK | 服务器成功响应客户端的请求 |
| 400 | INVALID REQUEST | 用户发出的请求有错误,服务器没有进行新建或修改数据的操作 |
| 401 | Unauthorized | 用户没有权限访问这个请求 |
| 403 | Forbidden | 因为某些原因禁止访问这个请求 |
| 404 | NOT FOUND | 用户发送的请求的url不存在 |
| 406 | NOT Acceptable | 用户请求不被服务器接收(比如服务器期望客户端发送某个字段,但是没有发送) |
| 500 | Internal server error | 服务器内部错误,比如出现了bug |
12 Flask-Restful插件的基本使用
12.1 基本概念
Flask-Restful是Flask中专门用来实现Restful API的插件,使用它可以快速集成Restful API功能。
在普通的网站中,这个插件显得有些鸡肋,因为在普通的网页开发中,是需要去渲染HTML代码的,而Flask-Restful在每个请求中都返回json格式的数据。但是在前后端分离的项目中,Flask-Restful是flask非常好用的一个插件。
2.安装
使用pip install flask-restful命令安装。
3.基本使用
from flask import Flask, request
from flask_restful import Api , Resource

# 传入__name__初始化一个Flask实例
app = Flask(__name__)

app.config.update(
    DEBUG=True,
)
api = Api(app)

# 视图类需要集成Resource
class IndexView(Resource):

    # get表示get请求
    def get(self):
        return {'username': 'Corley'}

    # post表示post请求
    def post(self):
        return {'info': 'Login Successfully!!'}

# 使用api.add_resource()添加路由
api.add_resource(IndexView, '/', endpoint='index')


if __name__ == '__main__':
    app.run(debug=True,host="0.0.0.0",port=5055)
运行效果如下:


说明:
- 使用Flask-Restful自定义视图类需要继承Resource基类,使用post,get方法来指定HTTP请求类型
- api.add_resource()来实现视图类与url的映射。第一个参数为视图类对象;第二个参数为url;第三个参数为可选对象,相当于给视图类自定义一个别名,用于url_for()反向获取url,如果不指定则默认为视图类名称的小写字符串
13. Restful获取请求中的参数
在flask_restful中与之前一样,也是使用request.args来获取get请求中的参数,使用request.json来获取post请求中的json数据参数,使用request.form来获取post请求中的form数据
from flask import Flask, request
from flask_restful import Api , Resource

# 传入__name__初始化一个Flask实例
app = Flask(__name__)

app.config.update(
    DEBUG=True,
)
api = Api(app)

# 视图类需要集成Resource
class IndexView(Resource):

    # get表示get请求
    def get(self):
        return {'args': request.args}

    # post表示post请求
    def post(self):
        return {'args': request.json}

# 使用api.add_resource()添加路由
api.add_resource(IndexView, '/', endpoint='index')


if __name__ == '__main__':
    app.run(debug=True,host="0.0.0.0",port=5055)
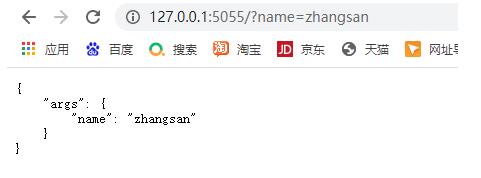
运行后结果如下:


14.Flask-Restful对请求中的数据进行校验
Flask-Restful插件提供了类似WTForms来验证提交的数据是否合法的包,即reqparse。
RequestParser对象的add_argument()方法可以指定字段的名字、数据类型等,常见的参数有:
- default
默认值,如果参数没有值,那么将使用这个参数指定的值。 - required
是否必须。
默认为False;如果设置为True,则必须提交这个参数。 - type
参数的数据类型,如果指定,那么将使用指定的数据类型来强制转换提交得到的值。 - choices
选项,提交上来的值只有满足选项中的值才符合验证通过,否则验证不通过。 - help
错误信息,如果验证失败后,将会使用help参数指定的值作为错误信息。 - trim
是否要去掉前后的空格。
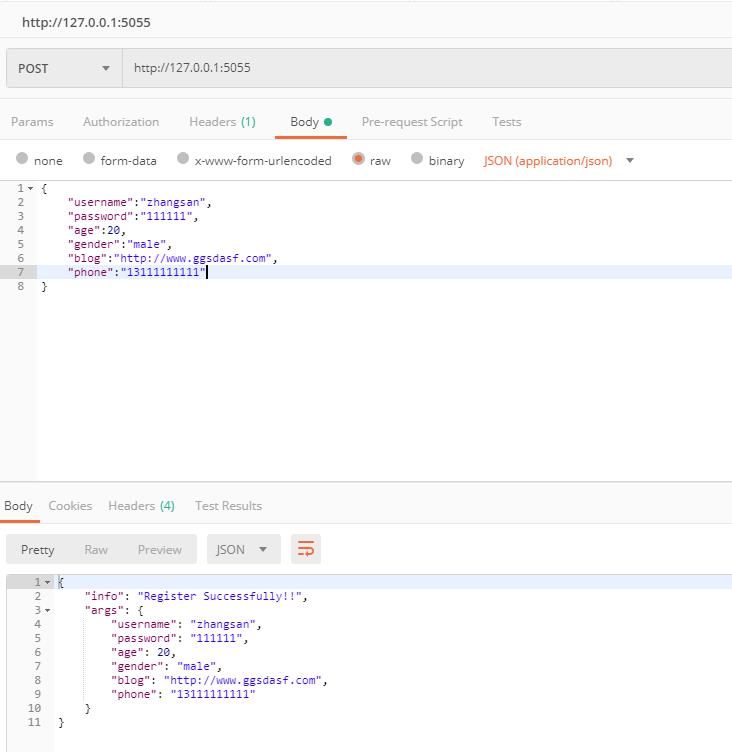
练习如下:
from flask import Flask, request
from flask_restful import Api , Resource, reqparse, inputs

# 传入__name__初始化一个Flask实例
app = Flask(__name__)

app.config.update(
    DEBUG=True,
)
api = Api(app)

# 视图类需要集成Resource
class IndexView(Resource):

    # get表示get请求
    def get(self):
        return {'args': request.args}

    # post表示post请求
    def post(self):
        parse = reqparse.RequestParser()
        parse.add_argument('username', type=str, help='用户名验证错误', required=True)
        parse.add_argument('password', type=str, help='密码验证错误', trim=True)
        parse.add_argument('age', type=int, help='年龄错误')
        parse.add_argument('gender', type=str, help='性别错误', choices=['male', 'female', 'secret'], default='secret')
        parse.add_argument('blog', type=inputs.url, help='博客地址错误')
        parse.add_argument('phone', type=inputs.regex(r'1[35789]\\d{9}'), help='电话号码错误')

        args = parse.parse_args()
        return {'info': 'Register Successfully!!', 'args': args}

# 使用api.add_resource()添加路由
api.add_resource(IndexView, '/', endpoint='index')


if __name__ == '__main__':
    app.run(debug=True,host="0.0.0.0",port=5055)
显示:

15. Flask-Restful高级使用
1.自定义输出格式模板
flask_restful可以设置一个返回数据的json模板,只需要将数据传入到这个模板中就可以返回特定模式的数据
这需要导入flask_restful.marshal_with装饰器,在视图类中定义一个字典来指定需要返回的字段,以及该字段的数据类型。
测试如下:
from flask import Flask, request
from flask_restful import Api , Resource, reqparse, inputs,fields,marshal_with

# 传入__name__初始化一个Flask实例
app = Flask(__name__)

app.config.update(
    DEBUG=True,
)
api = Api(app)

class IndexView(Resource):

    # 定义一个数据返回的模板,使用flask_restful.fields来指定数据的类型
    template_data = {
        'name': fields.String,  # 指定为一个字符串
        'age': fields.Integer,  # 指定为一个整数
        'vip': fields.Boolean  # 指定为一个布尔值
    }

    @marshal_with(template_data) # 将数据模板传入到装饰器中
    def get(self):
        return {'name': "zhangsan", "age":18}

# 使用api.add_resource()添加路由
api.add_resource(IndexView, '/', endpoint='index')

if __name__ == '__main__':
    app.run(debug=True,host="0.0.0.0",port以上是关于python自动化自动化测试平台开发:2.flask技术讲解上的主要内容,如果未能解决你的问题,请参考以下文章