精通springcloud:将RestTemplate与服务发现结合使用
Posted jinggege795
tags:
篇首语:本文由小常识网(cha138.com)小编为大家整理,主要介绍了精通springcloud:将RestTemplate与服务发现结合使用相关的知识,希望对你有一定的参考价值。
将RestTemplate与服务发现结合使用
实际上,与服务发现的集成是Ribbon客户端的默认行为。细心的读者可能还记得,我们可以通过设置ribbon.eureka. enabled属性为false禁用Eureka作为客户端均衡器的功能。在本节示例中开发人员将看到,服务发现的存在简化了对于服务之间通信的SpringCloud组件的配置任务。
本示例的系统架构与前一个示例相同。要查看当前练习的源代码,必须切换到ribbon_ with_ discovery 分支
ttp://github.com/piomin/shown here-spring-cloud-comm/tree/ribbon_ with. _discovery) 。在这里,开发人员将看到的第一件 事是新模块,即discovery-service (发现服务)。本书第4章“服务发现”详细讨论了与Eureka 相关的几乎所有方面,因而启动它时不应该有任何问题。我们需要运行一个具有真正基本设置的独立Eureka服务器,它在默认端口8761上可用。
与前面的示例相比,我们应该删除与Ribbon客户端严格相关的所有配置和注解。取而代之的是,Eureka 发现客户端必须使用@EnableDiscoveryClient启用,并且必须在applicationyml文件中提供Eureka服务器地址。现在,order-service 的main类看起来应该如下所示。
@SpringBootApplication
@EnableDiscoveryClient
public class OrderApplication {
QLoadBalanced
@Bean
RestTemplate restTemplate() (
return new RestTemplate() ;
public static void main (Stringl] args)1
new
SpringApplicationBuilder (OrderApplication.class) .web(true) .run (args);
}
//...
}
以下是当前的配置文件。可以使用spring, application.name属性来设置服务的名称。
spring:
application:
name: order-service
server:
port: ${PORT:8090}
eureka:
client:
serviceUrl:
defaultZone: $(EUREKA URL:http://localhost:8761/eureka/}
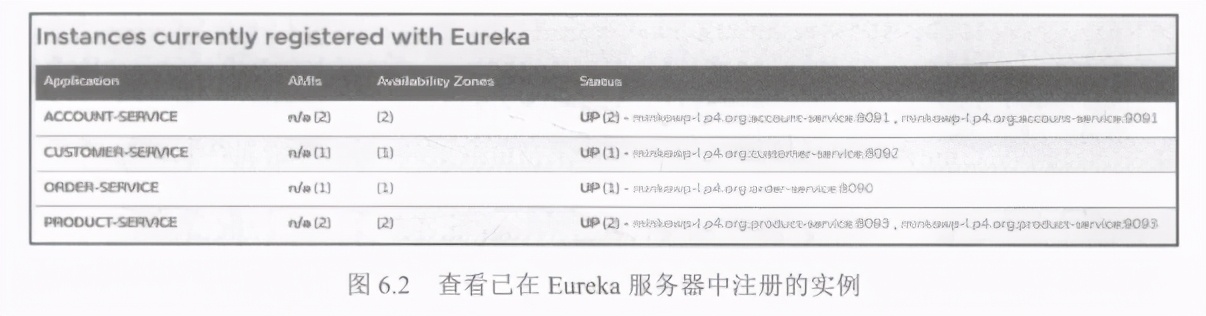
这里的设置和以前是一样的。我们还启动了所有的微服务。但是,这一次account-service服务和product-service服务的实例数将乘以2。启动每个服务的第二个实例时,可以使用-DPORT或-Dserver.port参数覆盖默认服务器端口,如java -jar -DPORT-9093product- srvice-1.0-SNAPSHOTjar.所有实例都已在Eureka 服务器中注册,这可以使用其UI仪表板轻松查看,如图6.2所示。
这是本书第一次看到负载均衡的实际示例。默认情况下,Ribbon 客户端将在微服务的所有已注册实例之间平均分配流量。该算法称为轮询调度(Round Robin)。实际上,这意味着客户端会记住它转发的最后一个请求的位置,然后将当前请求发送到该行中的下一个服务。这个方法可能会被本书第7章所介绍的其他规则覆盖。通过在ribbon.listOfServers中设置以逗号分隔的服务地址列表,也可以为没有服务发现机制的前一个示例配置负载平衡,如
ribon.listOfServers-localhost:8093,localhost:9093. 回到本示例应用程序,order-service 服务发送的请求将在account-service服务和product-service 服务的两个实例之间进行负载均衡。这和customer- service服务是相似的,只不过后者是在account-service服务的两个实例之间分配流量。如果开发人员已经启动了如图6.2所示的Eureka仪表板上的所有服务实例,并将一些测试请 求发送到order-service服务,则肯定会看到以下日志。在该日志中,我们以加粗形式突出显示了某些片段,它们是Ribbon客户端显示的为目标服务找到的地址列表。
DynamicServerListLoadBalancer for client account-service initialized :
DynamicServerListLoadBalancer: (NFLoadBalancer :name-account-service,
current list of Servers- [minkowp-1.p4 . org:8091, minkowp-1.p4. org : 9091] ,
Load balancer stats=Zone stats: {defaultzone= [Zone :defaultzone; Instance
count:2; Active connections count: 0; Circuit breaker tripped count: 0;
Active connections per server: 0.0; ]
},Server stats: [ [Server :minkowp-l.p4.org:8091; Zone:defaultZone; Total
Requests:0; Successive connection failure:0; Total blackout seconds:0;
Last connection made:Thu Jan 01 01:00:00 CET 1970; First connection made:
Thu Jan 0101:00:00 CET 1970; Active Connections:0; total failure
count"in last (1000) msecs:0; average resp time:0.0; 90 percentile
resp time:0.0; 95 percentile resp time:0.0; min resp time:0.0: max
resp time:0.0; stddev resp time:0.0], [Server :minkowp-l.p4.org:9091;
Zone :defaultZone; Total Requests:0; Successive connection failure:0;
Total blackout seconds:0; Last connection made:Thu Jan 01 01:00:00 CET
1970; First connection made: Thu Jan 01 01 :00:00 CET 1970; Active
Connections:0; total failure count in last (1000) msecs:0; average
resp time:0.0; 90 percentile resp time:0.0; 95 percentile resp time:0.0;
min resp time:0.0; max resp time:0.0; stddev resp time:0.0]] }
ServerList:org.springframework.cloud.netflix.ribbon. eureka.
Doma inExt ractingServerList@3e878e67
使用Feign客户端
RestTemplate是一个Spring组件,专门用于与Spring Cloud和微服务进行交互。但是,Netflix开发了自己的工具,充当Web服务客户端,用于在独立REST服务之间提供现成可用的通信。其中的Feign客户端通常与带有@LoadBalanced注解的RestTemplate作用相同,但是工作方式更加从容。它是一个Java到HTTP客户端绑定器,通过将注解处理为模板化请求来工作。使用Open Feign 客户端时,开发人员只需创建一个接口并对其进行注解。它与Ribbon和Eureka集成,提供负载均衡的HTTP客户端,从服务发现中获取所有必需的网络地址。Spring Cloud增加了对Spring MVC注解的支持,并使用了与SpringWeb相同的HTTP消息转换器。
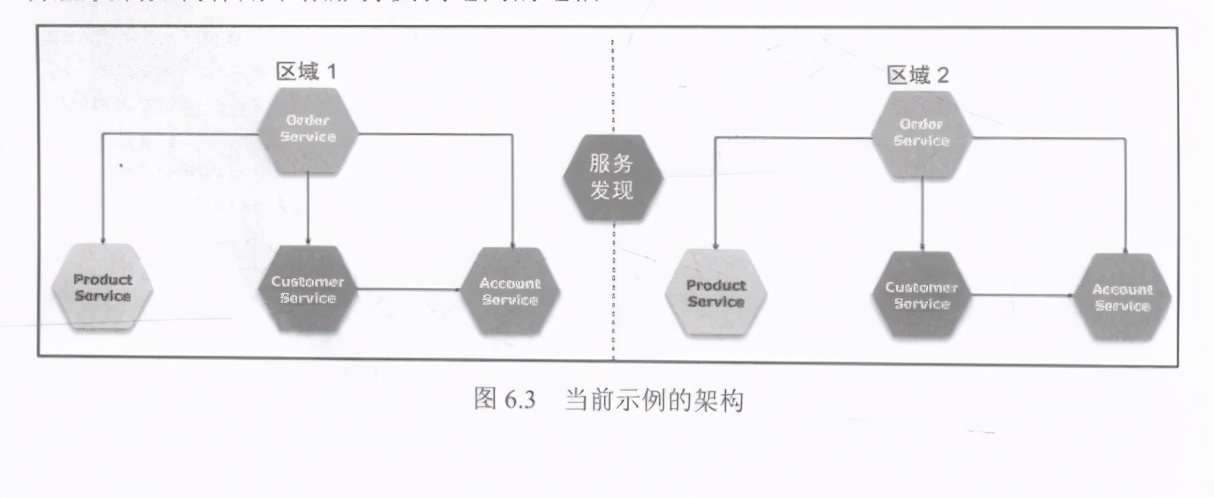
对不同区域的支持
现在回到上一个示例,我们将对它提出--些更改,以使其系统架构变得稍微复杂一些。如图6.3所示是当前架构的示意图。可以看到,微服务之间的通信模型仍然相同,但现在我们将对每个微服务启动两个实例并将它们分成两个不同的区域。在本书第4章“服务发现"中讨论使用Eureka的服务发现时,已经详细介绍了分区机制,所以我们假定开发人员已经熟悉该内容。本练习的主要目的不仅是演示如何使用Feign客户端,还将说明分区机制如何作用于微服务实例之间的通信。
为应用程序启用Feign
要在项目中包含Feign,开发人员必须添加
spring-cloud-starter-feign工件的依赖项或添加Spring Cloud Netlix (版本至少需要为1.4.0)的spring-cloud-starter-openfeign.
<dependency>
<groupId>org.springframework .cloud</groupId>
<artifactId>spring-cloud- starter-feign</artifactId>
</dependency>
下一步是通过使用@EnableFeignClients注解main类或配置类来为应用程序启用Feign.此注解将导致搜索应用程序中实现的所有客户端。开发人员还可以通过设置client或basePackages 注解属性来减少使用的客户端数量,如@EnableFeignClients (clients={AccountCietas,rodut.lass)。以下是order- service服务的应用程序的main类。
@SpringBootApplication
@EnableDiscoveryClient
@EnableFeignClients
public class OrderApplication {
public static void main(String[] args) (
new
SpringApplicationBuilder (OrderApplication.class) . web(true) . run(args) ;
}
@Bean
OrderRepository repository() {
return new OrderRepository();
}
}
1.构建Feign接口
有一种提供组件的方法只需要创建带有一-些注解的接口即可,这也是SpringFramework的标准。对于Feign,接口必须使用@FeignClient(name .")进行注解。它有一个必需的属性名称,如果启用了服务发现,则该属性名称对应于调用的微服务名称。否则,它与url属性--起使用,在url中可以设置具体的网络地址。
在这里,@FeignClient 并不是需要使用的唯一注解。 在我们的客户端界面中,每个方法都通过使用@RequestMapping标记它来与特定的HTTP API 端点相关联,当然也可以使用更具体的注解,如@GetMapping、 @PotMapping 或@PutMapping,如本示例源代码片段中所示。
@FeignClient (name = "account-service")
public interface AccountClient
@PutMapping (" /wi thdraw/ {accountId}/ { amount }")
Account withdraw (OPathVariable ("accountId") Long id,
@Pathvariable ("amount") int amount) ;
}
@FeignClient (name = "customer- service")
public interface CustomerClient {
@GetMapping("/withAccounts/ (customerId}")
Customer findByIdWi thAccounts (@PathVariable ("customerId") Long
customerId) ;
}
@FeignClient (name - "product -service")
public interface ProductClient {
@PostMapping("/ids")
List<Product> findByIds (List<Long> ids);
}
这些组件可以注入控制器bean,因为它们也是Spring Beans。然后,开发人员只需要调用其方法。以下是order-service服务中REST控制器的当前实现。
@Autowired
OrderRepository repository;
@AutowiredAccountClient accountCl ient;
@Autowired
Customercl ient customerC1 ient;
CAutowired
ProductClient productClient;
EPos tMapping
public Order prepare (@RequestBody Order order) {
int price = 0;
List<Product> products
productClient. findByIds (order .getProductIds()) ;
Customer cus tomer =
Cus tomerClient. findByIdWi thAccounts (order . getCustomerId());
for (Product product : products)
price += product.getPrice() ;
final int priceDiscounted = priceDiscount (price, customer);
Optional <Account> account = cus tomer . getAccounts() .stream() . filter(a ->
(a.getBalance() > priceDiscounted)) 。findFirst();
if (account.isPresent()) {
order. setAccountId (account.get() .getId0);
order. setStatus (Orderstatus . ACCEPTED) ;
order .setPrice (priceDiscounted) ;
} else {
order.setStatus (OrderStatus . REJECTED) ;
return repository. add (order) ;
2.启动微服务
我们已经更改了application.yml 中所有微服务的配置。现在,有两个不同的配置文件,第一个用于将应用程序分配给zone1, 第二个用于zone2。 开发人员可以查看feign_with_ _discovery 分支的版本(ttps://github.com/piomi/shown here -spring- cloud-comm/tree/feign_ with. _discovery)。 然后,使用mvn clean install命令构建整个项目。应该使用java -jar-spring. profiles active-zone[n]命令启动应用程序,其中,[n]是区域的编号。
因为必须启动许多实例来执行该测试,所以通过设置-Xmx参数( 如-Xmx128m)来考虑对堆大小的限制是值得的。以下是其中一个微服务的当前配置设置。
spring:
application:
name: account- service
---
spring:
profiles:. zone1
eureka:
instance:
metadataMap :
zone: zone 1
client:
serviceurl :
defaultZone: http://1oca1host:8761/eureka/pre ferSame ZoneEureka: true
server:
port: ${PORT:8091 }
spring:
profiles: zone2
eureka :
instance :
metadataMap:
zone: zone2
client :
serviceUrl :
defaultZone: http://localhost:8761/eureka/
preferSame ZoneEureka: true
server:
port: ${PORT:9091}
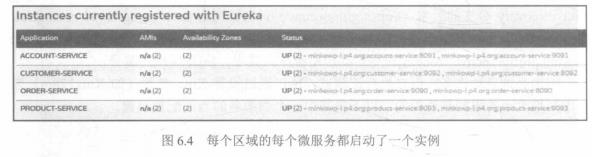
我们将为每个区域的每个微服务启动一个实例。因此,会有9个正在运行的SpringBoot应用程序(包括服务发现服务器),如图6.4所示。
如果将测试请求发送到在zonel (t:/ocahost:8090)中运行的order-service服务实例,则所有流量将转发到该区域中的其他服务,而对于zone2 (ttp://ocalhost:9090) 也是一样的。以下以粗体突出显示的是Ribbon客户端打印的在当前区域中注册的目标服务的已找到地址的列表片段。
DynamicSe rverListLoadBalancer for client product-service initialized:
DynamicServerListLoadBalancer: {NFLoadBalancer : name -product - service,current
list of Servers= [minkowp-1.p4. org:8093], Load balancer stats=Zone stats:
{ zone1= [Zone:zone1; Instance count:1; Active connections count: 0; Ci rcuit
breaker tripped count: 0: Active connections per server:0.0;]...
总结
因为文章包含的内容实在是太多了,就不给大家做过多的介绍了,需要这份文档来学习的小伙伴,可以转发此文关注小编。
扫码来获取就可以了!

以上是关于精通springcloud:将RestTemplate与服务发现结合使用的主要内容,如果未能解决你的问题,请参考以下文章