『Python开发实战菜鸟教程』实战篇:爬虫快速入门——统计分析CSDN与博客园博客阅读数据
Posted 小宋是呢
tags:
篇首语:本文由小常识网(cha138.com)小编为大家整理,主要介绍了『Python开发实战菜鸟教程』实战篇:爬虫快速入门——统计分析CSDN与博客园博客阅读数据相关的知识,希望对你有一定的参考价值。

文章目录
0x01:引子
这是一个网络爬虫快速入门实战教程,笔者希望读者能跟着这个博客进行实操,从而掌握网络爬虫的原理与基本操作。部分内容参考自:http://c.biancheng.net/view/2011.html
代码开源地址:https://github.com/xiaosongshine/simple_spider_py3
这个博客以下内容:
- 了解网络爬虫;
- 了解网页;
- 使用 requests 库抓取网站数据;
- 使用 Beautiful Soup 解析网页;
- 手把手实战操作统计分析CSDN与博客园博客阅读数据
首先介绍一下网络爬虫是什么,可以用来做什么?
百度百科对网络爬虫介绍如下:
网络爬虫,是一种按照一定的规则,自动地抓取万维网信息的程序或者脚本。另外一些不常使用的名字还有蚂蚁、自动索引、模拟程序或者蠕虫。
可以看出,爬虫就是一个程序或者说是脚本,本质就是一个代码。代码的内容是编程人员设计的一个特定规则,代码执行的结果就是可以自动从万维网(互联网)抓取信息。

网络爬虫的原理如上图所示,可能有些名词读者还不了解,不用怕,后面内容会有详细说明介绍。举个实际例子来说明一下网络爬虫用法:
比如想收集我的女神刘亦菲照片,一般的操作就会是从百度搜索刘亦菲的照片,然后一张张从网页上下载下来:

手动下载会比较费时费力,其实这是就可以用Python编写网络爬虫(代码)来实现从这个网页里自动(规则)的下载图片(从互联网获取数据)。
小宋说:上面是简单介绍了下网络爬虫的一个简单用法,其实网络爬虫的功能十分强大。可以爬取照片、视频、音乐与文本等,但这些只是很基本的用法,基于上述功能其实可以实现更多应用。随着大数据与人工智能的发展,数据的重要性越来越大。计算机视觉与语言模型的迅速发展离不开大规模的数据,而好多数据都是在互联网上,需要使用网络爬虫进行筛选抓取。
这里简单探讨一下网络爬虫的合法性
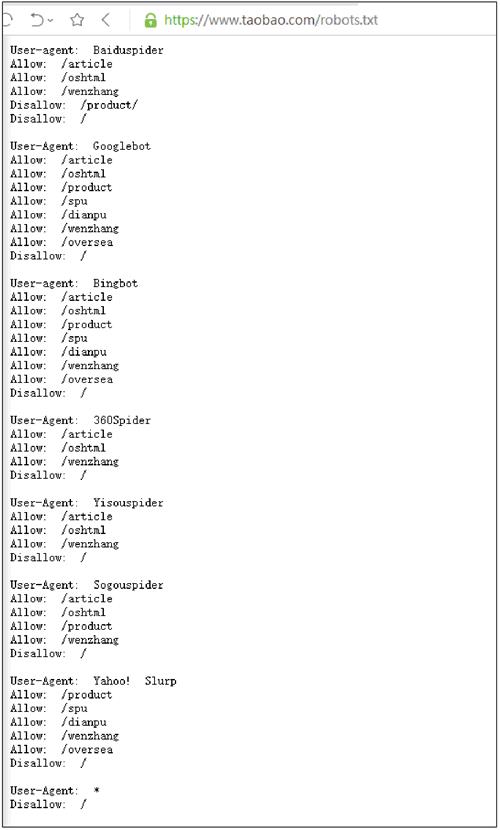
几乎每一个网站都有一个名为 robots.txt 的文档,当然也有部分网站没有设定 robots.txt。对于没有设定 robots.txt 的网站可以通过网络爬虫获取没有口令加密的数据,也就是该网站所有页面数据都可以爬取。如果网站有 robots.txt 文档,就要判断是否有禁止访客获取的数据。
以淘宝网为例,在浏览器中访问 https://www.taobao.com/robots.txt,如下图所示。

淘宝网允许部分爬虫访问它的部分路径,而对于没有得到允许的用户,则全部禁止爬取,代码如下:
User-Agent:*
Disallow:/
这一句代码的意思是除前面指定的爬虫外,不允许其他爬虫爬取任何数据。
正式进入爬虫实战前,需要我们了解下网页结构
网页一般由三部分组成,分别是 html(超文本标记语言)、CSS(层叠样式表)和 JScript(活动脚本语言)。
HTML
HTML 是整个网页的结构,相当于整个网站的框架。带“<”、“>”符号的都是属于 HTML 的标签,并且标签都是成对出现的。
常见的标签如下:
<html>..</html> 表示标记中间的元素是网页
<body>..</body> 表示用户可见的内容
<div>..</div> 表示框架
<p>..</p> 表示段落
<li>..</li>表示列表
<img>..</img>表示图片
<h1>..</h1>表示标题
<a href="">..</a>表示超链接
CSS
CSS 表示样式,图 1 中第 13 行<style type="text/css">表示下面引用一个 CSS,在 CSS 中定义了外观。
JScript
JScript 表示功能。交互的内容和各种特效都在 JScript 中,JScript 描述了网站中的各种功能。
如果用人体来比喻,HTML 是人的骨架,并且定义了人的嘴巴、眼睛、耳朵等要长在哪里。CSS 是人的外观细节,如嘴巴长什么样子,眼睛是双眼皮还是单眼皮,是大眼睛还是小眼睛,皮肤是黑色的还是白色的等。JScript 表示人的技能,例如跳舞、唱歌或者演奏乐器等。
写一个简单的 HTML
通过编写和修改 HTML,可以更好地理解 HTML。首先打开一个记事本,然后输入下面的内容:
<html>
<head>
    <title> Python 3 爬虫与数据清洗入门与实战</title>
</head>
<body>
    <div>
        <p>Python 3爬虫与数据清洗入门与实战</p>
    </div>
    <div>
        <ul>
            <li><a href="http://c.biancheng.net">爬虫</a></li>
            <li>数据清洗</li>
        </ul>
    </div>
</body>
输入代码后,保存记事本,然后修改文件名和后缀名为"HTML.html";
运行该文件后的效果,如下图所示。

这段代码只是用到了 HTML,读者可以自行修改代码中的中文,然后观察其变化。
通过上述内容,我们了解了网络爬虫的基本原理与用途,同时也对网页结构也有了认识。下面让我们进入实战操作部分,通过统计分析博客园与CSDN博客阅读数据,来快速掌握网络爬虫。
0x02:实操
安装依赖
实战操作部分基于Python语言,Python3版本,还有用到requests与Beautiful Soup库,分别用于请求网络连接与解析网页数据。
由于Beautiful Soup 目前已经被移植到 bs4 库中,也就是说在导入 Beautiful Soup 时需要先安装 bs4 库。安装好 bs4 库以后,还需安装 lxml 库。如果我们不安装 lxml 库,就会使用 Python 默认的解析器。尽管 Beautiful Soup 既支持 Python 标准库中的 HTML 解析器又支持一些第三方解析器,但是 lxml 库具有功能更加强大、速度更快的特点,因此笔者推荐安装 lxml 库。
所以第一步,先安装这些用到的库,在命令行执行:
pip install requests
pip install bs4
pip install lxml
爬虫的基本原理
网页请求的过程分为两个环节:
- Request (请求):每一个展示在用户面前的网页都必须经过这一步,也就是向服务器发送访问请求。
- Response(响应):服务器在接收到用户的请求后,会验证请求的有效性,然后向用户(客户端)发送响应的内容,客户端接收服务器响应的内容,将内容展示出来,就是我们所熟悉的网页请求,如下图所示。

网页请求的方式也分为两种:
- GET:最常见的方式,一般用于获取或者查询资源信息,也是大多数网站使用的方式,响应速度快。
- POST:相比 GET 方式,多了以表单形式上传参数的功能,因此除查询信息外,还可以修改信息。
所以,在写爬虫前要先确定向谁发送请求,用什么方式发送。
由于这次博客是一个简单入门教程,仅使用GET来实现对统计分析CSDN与博客园博客阅读数据,复杂的POST方式先不介绍,将在下篇中详细介绍。
统计分析CSDN博客阅读数据
首先我们通过操作如何统计CSDN数据来学习网络爬虫基本操作。
使用 GET 方式抓取数据
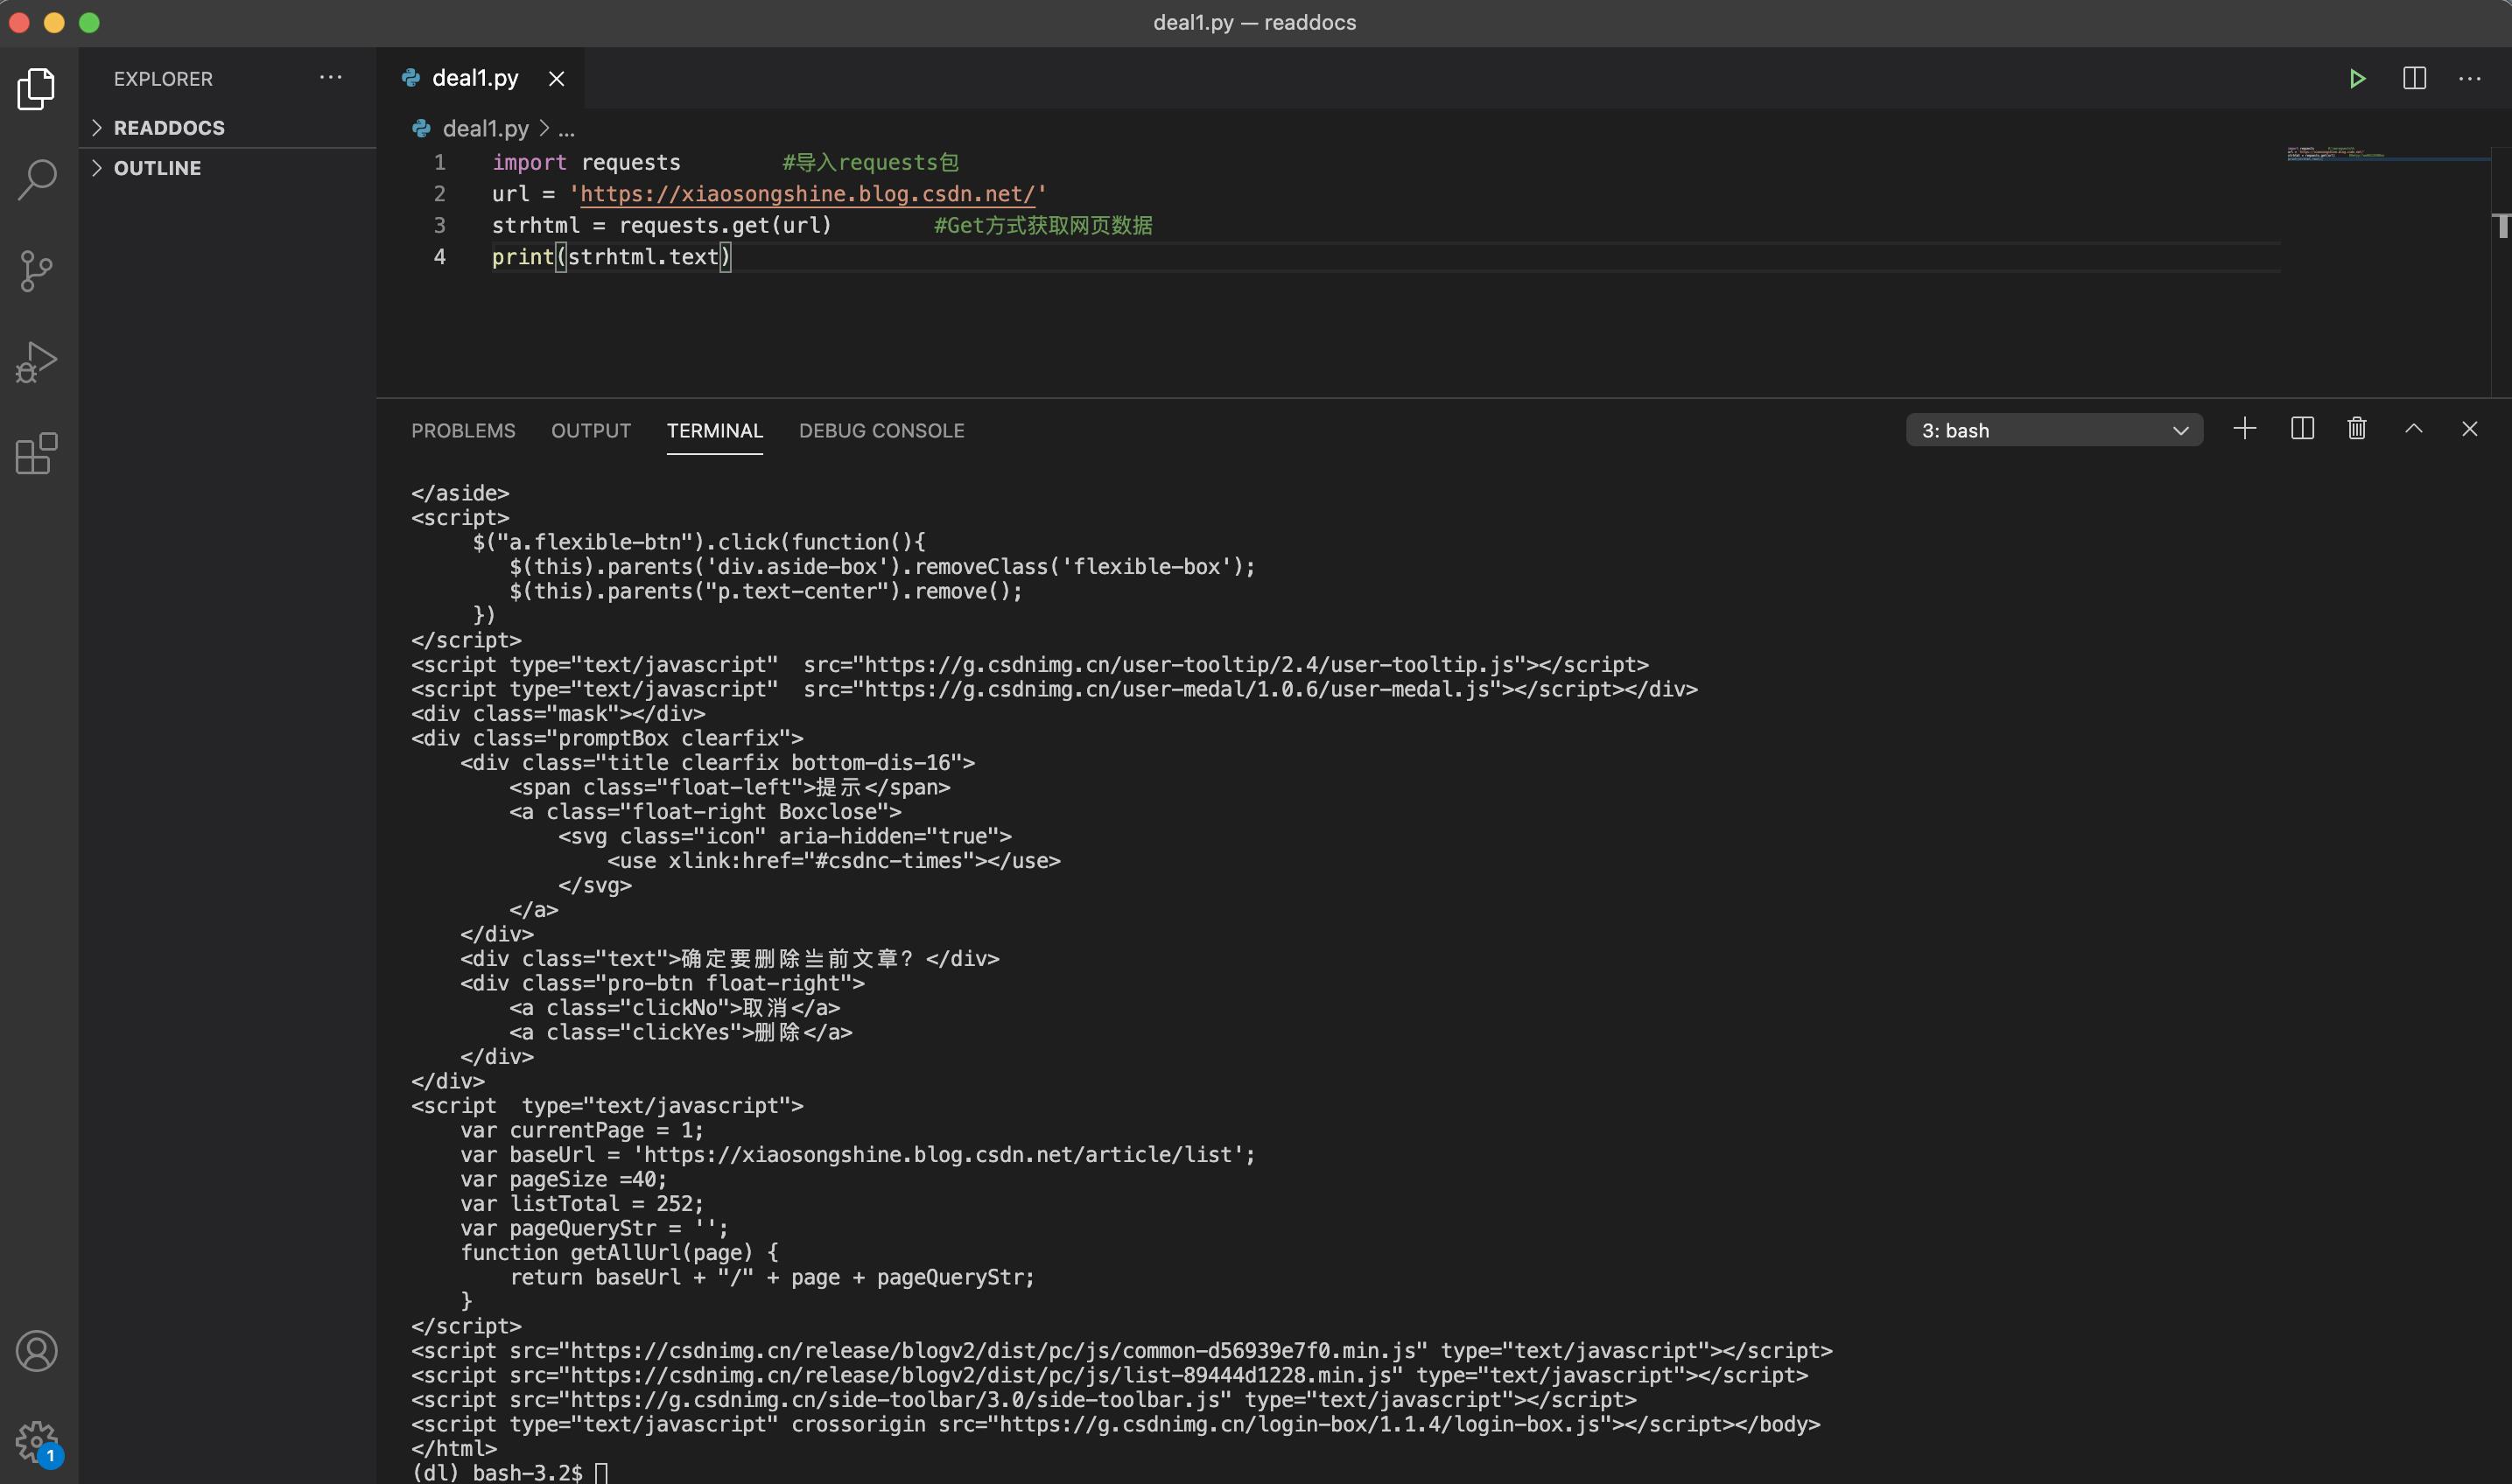
首先演示如何使用GET进行网络访问,编写如下Python代码:
import requests        #导入requests包
url = 'https://xiaosongshine.blog.csdn.net/'
strhtml = requests.get(url)        #Get方式获取网页数据
print(strhtml.text)
运行结果如下所示:

已经可以正确获取笔者主页数据:https://xiaosongshine.blog.csdn.net/
加载库使用的语句是 import+库的名字。在上述过程中,加载 requests 库的语句是:import requests。
用 GET 方式获取数据需要调用 requests 库中的 get 方法,使用方法是在 requests 后输入英文点号,如下所示:
requests.get
将获取到的数据存到 strhtml 变量中,代码如下:
strhtml = request.get(url)
这个时候 strhtml 是一个 URL 对象,它代表整个网页,但此时只需要网页中的源码,下面的语句表示网页源码:
strhtml.text
使用 Beautiful Soup 解析网页
通过 requests 库已经可以抓到网页源码,接下来要从源码中找到并提取数据。

输入下面的代码,即可开启 Beautiful Soup 之旅,对第一篇博客阅读量进行抓取:
import requests        #导入requests包
from bs4 import BeautifulSoup
url = 'https://xiaosongshine.blog.csdn.net/'
strhtml=requests.get(url)
soup=BeautifulSoup(strhtml.text,'lxml')
data = soup.select('#articleMeList-blog > div.article-list > div:nth-child(1) > div.info-box.d-flex.align-content-center > p > span:nth-child(2)')
print(data)
代码运行结果下示:
[<span class="read-num"><img alt="" src="https://csdnimg.cn/release/blogv2/dist/pc/img/readCountWhite.png"/>105</span>]可以看出,已经获取到对应的第一篇阅读量105(这个数字会随着阅读数量增加,以实际为准)。
Beautiful Soup 库能够轻松解析网页信息,它被集成在 bs4 库中,需要时可以从 bs4 库中调用。其表达语句如下:
from bs4 import BeautifulSoup
首先,HTML 文档将被转换成 Unicode 编码格式,然后 Beautiful Soup 选择最合适的解析器来解析这段文档,此处指定 lxml 解析器进行解析。解析后便将复杂的 HTML 文档转换成树形结构,并且每个节点都是 Python 对象。这里将解析后的文档存储到新建的变量 soup 中,代码如下:
soup=BeautifulSoup(strhtml.text,'lxml')
接下来用 select(选择器)定位数据,定位数据时需要使用浏览器的开发者模式,将鼠标光标停留在对应的数据位置并右击,然后在快捷菜单中选择“检查”命令,如下图所示:

随后在浏览器右侧会弹出开发者界面,右侧高亮的代码对应着左侧高亮的数据文本。右击右侧高亮数据,在弹出的快捷菜单中选择“Copy”➔“Copy Selector”命令,便可以自动复制路径。

将路径粘贴在文档中,代码如下:
#articleMeList-blog > div.article-list > div:nth-child(1) > div.info-box.d-flex.align-content-center > p > span:nth-child(2)
这里的div:nth-child(1)其实对应的就是第一篇文章,如果想获取当前页面所有文章阅读量, 可以将 div:nth-child(1)中冒号(包含冒号)后面的部分删掉,代码如下:
#articleMeList-blog > div.article-list > div > div.info-box.d-flex.align-content-center > p > span:nth-child(2)
使用 soup.select 引用这个路径,代码如下:
data = soup.select('#articleMeList-blog > div.article-list > div > div.info-box.d-flex.align-content-center > p > span:nth-child(2)')
为了方便查看,我们可以遍历输出data,整体代码如下:.text就可以获取到元素中的文本,但是注意是字符串类型的。
import requests        #导入requests包
from bs4 import BeautifulSoup
url = 'https://xiaosongshine.blog.csdn.net/'
strhtml=requests.get(url)
soup=BeautifulSoup(strhtml.text,'lxml')
data = soup.select('#articleMeList-blog > div.article-list > div > div.info-box.d-flex.align-content-center > p > span:nth-child(2)')
for d in data:
    print(d,d.text,type(d.text))
输出为:
<span class="read-num"><img alt="" src="https://csdnimg.cn/release/blogv2/dist/pc/img/readCountWhite.png"/>105</span> 105 <class 'str'>
<span class="read-num"><img alt="" src="https://csdnimg.cn/release/blogv2/dist/pc/img/readCountWhite.png"/>977</span> 977 <class 'str'>
<span class="read-num"><img alt="" src="https://csdnimg.cn/release/blogv2/dist/pc/img/readCountWhite.png"/>5425</span> 5425 <class 'str'>
<span class="read-num"><img alt="" src="https://csdnimg.cn/release/blogv2/dist/pc/img/readCountWhite.png"/>4093</span> 4093 <class 'str'>
<span class="read-num"><img alt="" src="https://csdnimg.cn/release/blogv2/dist/pc/img/readCountWhite.png"/>539</span> 539 <class 'str'>
<span class="read-num"><img alt="" src="https://csdnimg.cn/release/blogv2/dist/pc/img/readCountWhite.png"/>170</span> 170 <class 'str'>
<span class="read-num"><img alt="" src="https://csdnimg.cn/release/blogv2/dist/pc/img/readCountWhite.png"/>510</span> 510 <class 'str'>
<span class="read-num"><img alt="" src="https://csdnimg.cn/release/blogv2/dist/pc/img/readCountWhite.png"/>695</span> 695 <class 'str'>
<span class="read-num"><img alt="" src="https://csdnimg.cn/release/blogv2/dist/pc/img/readCountWhite.png"/>1202</span> 1202 <class 'str'>
<span class="read-num"><img alt="" src="https://csdnimg.cn/release/blogv2/dist/pc/img/readCountWhite.png"/>969</span> 969 <class 'str'>
<span class="read-num"><img alt="" src="https://csdnimg.cn/release/blogv2/dist/pc/img/readCountWhite.png"/>3126</span> 3126 <class 'str'>
<span class="read-num"><img alt="" src="https://csdnimg.cn/release/blogv2/dist/pc/img/readCountWhite.png"/>2779</span> 2779 <class 'str'>
<span class="read-num"><img alt="" src="https://csdnimg.cn/release/blogv2/dist/pc/img/readCountWhite.png"/>7191</span> 7191 <class 'str'>
<span class="read-num"><img alt="" src="https://csdnimg.cn/release/blogv2/dist/pc/img/readCountWhite.png"/>27578</span> 27578 <class 'str'>
<span class="read-num"><img alt="" src="https://csdnimg.cn/release/blogv2/dist/pc/img/readCountWhite.png"/>2167</span> 2167 <class 'str'>
<span class="read-num"><img alt="" src="https://csdnimg.cn/release/blogv2/dist/pc/img/readCountWhite.png"/>7046</span> 7046 <class 'str'>
<span class="read-num"><img alt="" src="https://csdnimg.cn/release/blogv2/dist/pc/img/readCountWhite.png"/>40308</span> 40308 <class 'str'>
<span class="read-num"><img alt="" src="https://csdnimg.cn/release/blogv2/dist/pc/img/readCountWhite.png"/>13571</span> 13571 <class 'str'>
<span class="read-num"><img alt="" src="https://csdnimg.cn/release/blogv2/dist/pc/img/readCountWhite.png"/>10535</span> 10535 <class 'str'>
<span class="read-num"><img alt="" src="https://csdnimg.cn/release/blogv2/dist/pc/img/readCountWhite.png"/>6367</span> 6367 <class 'str'>
<span class="read-num"><img alt="" src="https://csdnimg.cn/release/blogv2/dist/pc/img/readCountWhite.png"/>1820</span> 1820 <class 'str'>
<span class="read-num"><img alt="" src="https://csdnimg.cn/release/blogv2/dist/pc/img/readCountWhite.png"/>1947</span> 1947 <class 'str'>
<span class="read-num"><img alt="" src="https://csdnimg.cn/release/blogv2/dist/pc/img/readCountWhite.png"/>5054</span> 5054 <class 'str'>
<span class="read-num"><img alt="" src="https://csdnimg.cn/release/blogv2/dist/pc/img/readCountWhite.png"/>3046</span> 3046 <class 'str'>
<span class="read-num"><img alt="" src="https://csdnimg.cn/release/blogv2/dist/pc/img/readCountWhite.png"/>6491</span> 6491 <class 'str'>
<span class="read-num"><img alt="" src="https://csdnimg.cn/release/blogv2/dist/pc/img/readCountWhite.png"/>3103</span> 3103 <class 'str'>
<span class="read-num"><img alt="" src="https://csdnimg.cn/release/blogv2/dist/pc/img/readCountWhite.png"/>13892</span> 13892 <class 'str'>
<span class="read-num"><img alt="" src="https://csdnimg.cn/release/blogv2/dist/pc/img/readCountWhite.png"/>14816</span> 14816 <class 'str'>
<span class="read-num"><img alt="" src="https://csdnimg.cn/release/blogv2/dist/pc/img/readCountWhite.png"/>342</span> 342 <class 'str'>
<span class="read-num"><img alt="" src="https://csdnimg.cn/release/blogv2/dist/pc/img/readCountWhite.png"/>5276</span> 5276 <class 'str'>
<span class="read-num"><img alt="" src="https://csdnimg.cn/release/blogv2/dist/pc/img/readCountWhite.png"/>13097</span> 13097 <class 'str'>
<span class="read-num"><img alt="" src="https://csdnimg.cn/release/blogv2/dist/pc/img/readCountWhite.png"/>64</span> 64 <class 'str'>
<span class="read-num"><img alt="" src="https://csdnimg.cn/release/blogv2/dist/pc/img/readCountWhite.png"/>65</span> 65 <class 'str'>
<span class="read-num"><img alt="" src="https://csdnimg.cn/release/blogv2/dist/pc/img/readCountWhite.png"/>246</span> 246 <class 'str'>
<span class="read-num"><img alt="" src="https://csdnimg.cn/release/blogv2/dist/pc/img/readCountWhite.png"/>446</span> 446 <class 'str'>
<span class="read-num"><img alt="" src="https://csdnimg.cn/release/blogv2/dist/pc/img/readCountWhite.png"/>128</span> 128 <class 'str'>
<span class="read-num"><img alt="" src="https://csdnimg.cn/release/blogv2/dist/pc/img/readCountWhite.png"/>30</span> 30 <class 'str'>
<span class="read-num"><img alt="" src="https://csdnimg.cn/release/blogv2/dist/pc/img/readCountWhite.png"/>207</span> 207 <class 'str'>
<span class="read-num"><img alt="" src="https://csdnimg.cn/release/blogv2/dist/pc/img/readCountWhite.png"/>355</span> 355 <class 'str'>
<span class="read-num"><img alt="" src="https://csdnimg.cn/release/blogv2/dist/pc/img/readCountWhite.png"/>19</span> 19 <class 'str'>
其实通过上述代码我们已经可以获得第一页的阅读量,下面只需对所有页面进行一个统计即可。
为了获得分页信息的url,可以通过点击最下方的页面导航栏获取:

可以看出,页面1的url为:https://xiaosongshine.blog.csdn.net/article/list/1
后面的数字1代表第一页。笔者尝试用selecter来获取页数,如下:
data = soup.select('#Paging_04204215338304449 > ul > li.ui-pager')输出为空,不知道是不是哪里被限制了,欢迎了解的小伙伴们评论区指出。
统计CSDN博客数据
可以看出,博主文章总的页数为7,这里笔者直接设置总页数为7,做个循环来获取所有博客阅读量,整体代码如下:
import requests        #导入requests包
from bs4 import BeautifulSoup
read_all = 0
for i in range(7):

    url = 'https://blog.csdn.net/xiaosongshine/article/list/%d'%(i+1)
    strhtml=requests.get(url)
    soup=BeautifulSoup(strhtml.text,'lxml')
    data = soup.select('#articleMeList-blog > div.article-list > div > div.info-box.d-flex.align-content-center > p > span:nth-child(2)')
    ##Paging_04204215338304449 > ul > li.ui-pager
    for d in data:
        #print(d,d.text,type(d.text))
        read_all += eval(d.text)

print(read_all)输出为:710036(这个数字会随着阅读数量增加,以实际为准)
如果想统计你自己的阅读量,更换url并且设置页数即可。
统计博客园博客阅读量
方法与统计CSDN类似,获取当前页面的阅读量,再对所有页面求和。
统计当前页面阅读量代码:
import requests        #导入requests包
from bs4 import BeautifulSoup

url = 'https://www.cnblogs.com/xiaosongshine'
strhtml=requests.get(url)
soup=BeautifulSoup(strhtml.text,'lxml')
data = soup.select('#mainContent > div > div > div.postDesc > span.post-view-count')

for d in data:
    print(d,d.text[3:-1],type(d.text))
输出:
<span class="post-view-count" data-post-id="11615639">阅读(16603)</span> 16603 <class 'str'>
<span class="post-view-count" data-post-id="11394918">阅读(880)</span> 880 <class 'str'>
<span class="post-view-count" data-post-id="11362228">阅读(3217)</span> 3217 <class 'str'>
<span class="post-view-count" data-post-id="11346550">阅读(2812)</span> 2812 <class 'str'>
<span class="post-view-count" data-post-id="11303187">阅读(1599)</span> 1599 <class 'str'>
<span class="post-view-count" data-post-id="10929934">阅读(3386)</span> 3386 <class 'str'>
<span class="post-view-count" data-post-id="10926391">阅读(803)</span> 803 <class 'str'>
<span class="post-view-count" data-post-id="10880094">阅读(3527)</span> 3527 <class 'str'>
<span class="post-view-count" data-post-id="10874644">阅读(12612)</span> 12612 <class 'str'>
<span class="post-view-count" data-post-id="10858829">阅读(245)</span> 245 <class 'str'>
<span class="post-view-count" data-post-id="10858690">阅读(824)</span> 824 <class 'str'>
<span class="post-view-count" data-post-id="10841818">阅读(3043)</span> 3043 <class 'str'>
<span class="post-view-count" data-post-id="10831931">阅读(20058)</span> 20058 <class 'str'>
<span class="post-view-count" data-post-id="10765958">阅读(3905)</span> 3905 <class 'str'>
<span class="post-view-count" data-post-id="10750908">阅读(4254)</span> 4254 <class 'str'>
<span class="post-view-count" data-post-id="10740050">阅读(2854)</span> 2854 <class 'str'>
<span class="post-view-count" data-post-id="10739257">阅读(1759)</span> 1759 <class 'str'>
<span class="post-view-count" data-post-id="10644401">阅读(1729)</span> 1729 <class 'str'>
<span class="post-view-count" data-post-id="10618638">阅读(2585)</span> 2585 <class 'str'>
<span class="post-view-count" data-post-id="10615575">阅读(1861)</span> 1861 <class 'str'>
<span class="post-view-count" data-post-id="11652871">阅读(1704)</span> 1704 <class 'str'>
<span class="post-view-count" data-post-id="11651856">阅读(2301)</span> 2301 <class 'str'>
<span class="post-view-count" data-post-id="11635312">阅读(3648)</span> 3648 <class 'str'>
<span class="post-view-count" data-post-id="11620816">阅读(671)</span> 671 <class 'str'>
<span class="post-view-count" data-post-id="11615639">阅读(16603)</span> 16603 <class 'str'>
<span class="post-view-count" data-post-id="11394918">阅读(880)</span> 880 <class 'str'>
<span class="post-view-count" data-post-id="11362228">阅读(3217)</span> 3217 <class 'str'>
<span class="post-view-count" data-post-id="11359003">阅读(2209)</span> 2209 <class 'str'>
<span class="post-view-count" data-post-id="11356047">阅读(696)</span> 696 <class 'str'>
<span class="post-view-count" data-post-id="11346550">阅读(2812)</span> 2812 <class 'str'>
获取页数:
import requests        #导入requests包
from bs4 import BeautifulSoup


url = "https://www.cnblogs.com/xiaosongshine/default.html?page=2"
#页面为第一页时,无法显示总页数,所以选择访问第二页

htxt = requests.get(url)

soup=BeautifulSoup(htxt.text,'lxml')

data = soup.select("#homepage_top_pager > div > a")

for d in data:
    print(d)

MN = len(data)-2
#减去前一页与后一页标签
统计博客园阅读量完整代码:
import requests        #导入requests包
from bs4 import BeautifulSoup


url = "https://www.cnblogs.com/xiaosongshine/default.html?page=2"
#页面为第一页时,无法显示总页数,所以选择访问第二页

htxt = requests.get(url)

soup=BeautifulSoup(htxt.text,'lxml')

data = soup.select("#homepage_top_pager > div > a")

for d in data:
    print(d)

MN = len(data)-2
#减去前一页与后一页标签
read_all = 0
for i in range(MN):
    url = "https://www.cnblogs.com/xiaosongshine/default.html?page=%d"%(i+1)
    strhtml=requests.get(url)
    soup=BeautifulSoup(strhtml.text,'lxml')
    data = soup.select('#mainContent > div > div > div.postDesc > span.post-view-count')

    for d in data:
        #print(d,d.text[3:-1],type(d.text))
        read_all += eval(d.text[3:-1])

print(read_all)
输出:
<a href="https://www.cnblogs.com/xiaosongshine/default.html?page=1">上一页</a>
<a href="https://www.cnblogs.com/xiaosongshine/default.html?page=1">1</a>
<a href="https://www.cnblogs.com/xiaosongshine/default.html?page=3">3</a>
<a href="https://www.cnblogs.com/xiaosongshine/default.html?page=4">4</a>
<a href="https://www.cnblogs.com/xiaosongshine/default.html?page=5">5</a>
<a href="https://www.cnblogs.com/xiaosongshine/default.html?page=3">下一页</a>
217599
简单感慨下,CSDN阅读量72w+,博客园21W+,知乎63W+,腾讯云社区15W+,总阅读量180W+,离200W越来越近了,继续努力。。
0x03:后记
这是网络爬虫扫盲入门的第一篇内容,写的较为简单,后面的内容会不断加深变难,内容将会涉及到如何使用POST实现模拟登陆以及如何抓取保存复杂数据文本等。
希望可爱又爱学的读者能和我一起坚持下去。代码开源地址:https://github.com/xiaosongshine/simple_spider_py3
最后布置一个课后作业,这个博客演示了如何统计总阅读量,希望读者也能统计一下点赞和评论的数目与内容,有问题欢迎及时和我交流互动呀。
这个博客对你有用的话欢迎收藏转发,也麻烦可爱又爱学的你能赏个赞,菜小宋更博不易,在这里谢过啦。
如果你想学习更多开发技巧与AI算法,欢迎搜索关注笔者公众号“简明AI”,和爱学习讨论的小伙伴一起交流学习。
以上是关于『Python开发实战菜鸟教程』实战篇:爬虫快速入门——统计分析CSDN与博客园博客阅读数据的主要内容,如果未能解决你的问题,请参考以下文章