Springboot
Posted xue_yun_xiang
tags:
篇首语:本文由小常识网(cha138.com)小编为大家整理,主要介绍了Springboot相关的知识,希望对你有一定的参考价值。
一、概述
Spring Boot是基于Spring框架开发的全新框架,其设计目的是简化新Spring应用的初始化搭建和开发过程。
Spring Boot 只是 对springFramework 框架封装, 简化了开发(spring 整合 spring mvc ,mybatis 还有其他第三方的插件)
Spring Boot整合了许多框架和第三方库配置,几乎可以达到“开箱即用”。
开箱即用:几乎0配置,可以不做任何的配置,只需引入依赖,就可以使用
约定优于配置:Spring Boot配置很多默认规则,不需要bean.xml 进行配置,装配
消灭了 bean.xml
优点:
- 可快速构建独立的Spring应用
- 直接嵌入Tomcat、Jetty和Undertow服务器(无需部署WAR文件)
- 提供依赖启动器简化构建配置- 极大程度的自动化配置Spring和第三方库
- 提供生产就绪功能
- 极少的代码生成和XML配置
二、Springboot和SpringMVC区别
Spring 框架就像一个家族,有众多衍生产品例如 boot、security、jpa等等。但他们的基础都是Spring 的ioc和 aop,ioc 提供了依赖注入的容器, aop解决了面向横切面的编程,然后在此两者的基础上实现了其他延伸产品的高级功能。
Spring MVC提供了一种轻度耦合的方式来开发web应用。它是Spring的一个模块,是一个web框架。通过Dispatcher Servlet, ModelAndView 和 View Resolver,开发web应用变得很容易。解决的问题领域是网站应用程序或者服务开发——URL路由、Session、模板引擎、静态Web资源等等。
Spring Boot实现了自动配置,降低了项目搭建的复杂度。它主要是为了解决使用Spring框架需要进行大量的配置太麻烦的问题,所以它并不是用来替代Spring的解决方案,而是和Spring框架紧密结合用于提升Spring开发者体验的工具。同时它集成了大量常用的第三方库配置(例如Jackson, JDBC, Mongo, Redis, Mail等等),Spring Boot应用中这些第三方库几乎可以零配置的开箱即用(out-of-the-box)。
Spring Boot只是承载者,辅助你简化项目搭建过程的。如果承载的是WEB项目,使用Spring MVC作为MVC框架,那么工作流程和你上面描述的是完全一样的,因为这部分工作是Spring MVC做的而不是Spring Boot。
对使用者来说,换用Spring Boot以后,项目初始化方法变了,配置文件变了,另外就是不需要单独安装Tomcat这类容器服务器了,maven打出jar包直接跑起来就是个网站,但你最核心的业务逻辑实现与业务流程实现没有任何变化。
三、springboot 搭建
1、创建java maven 功能
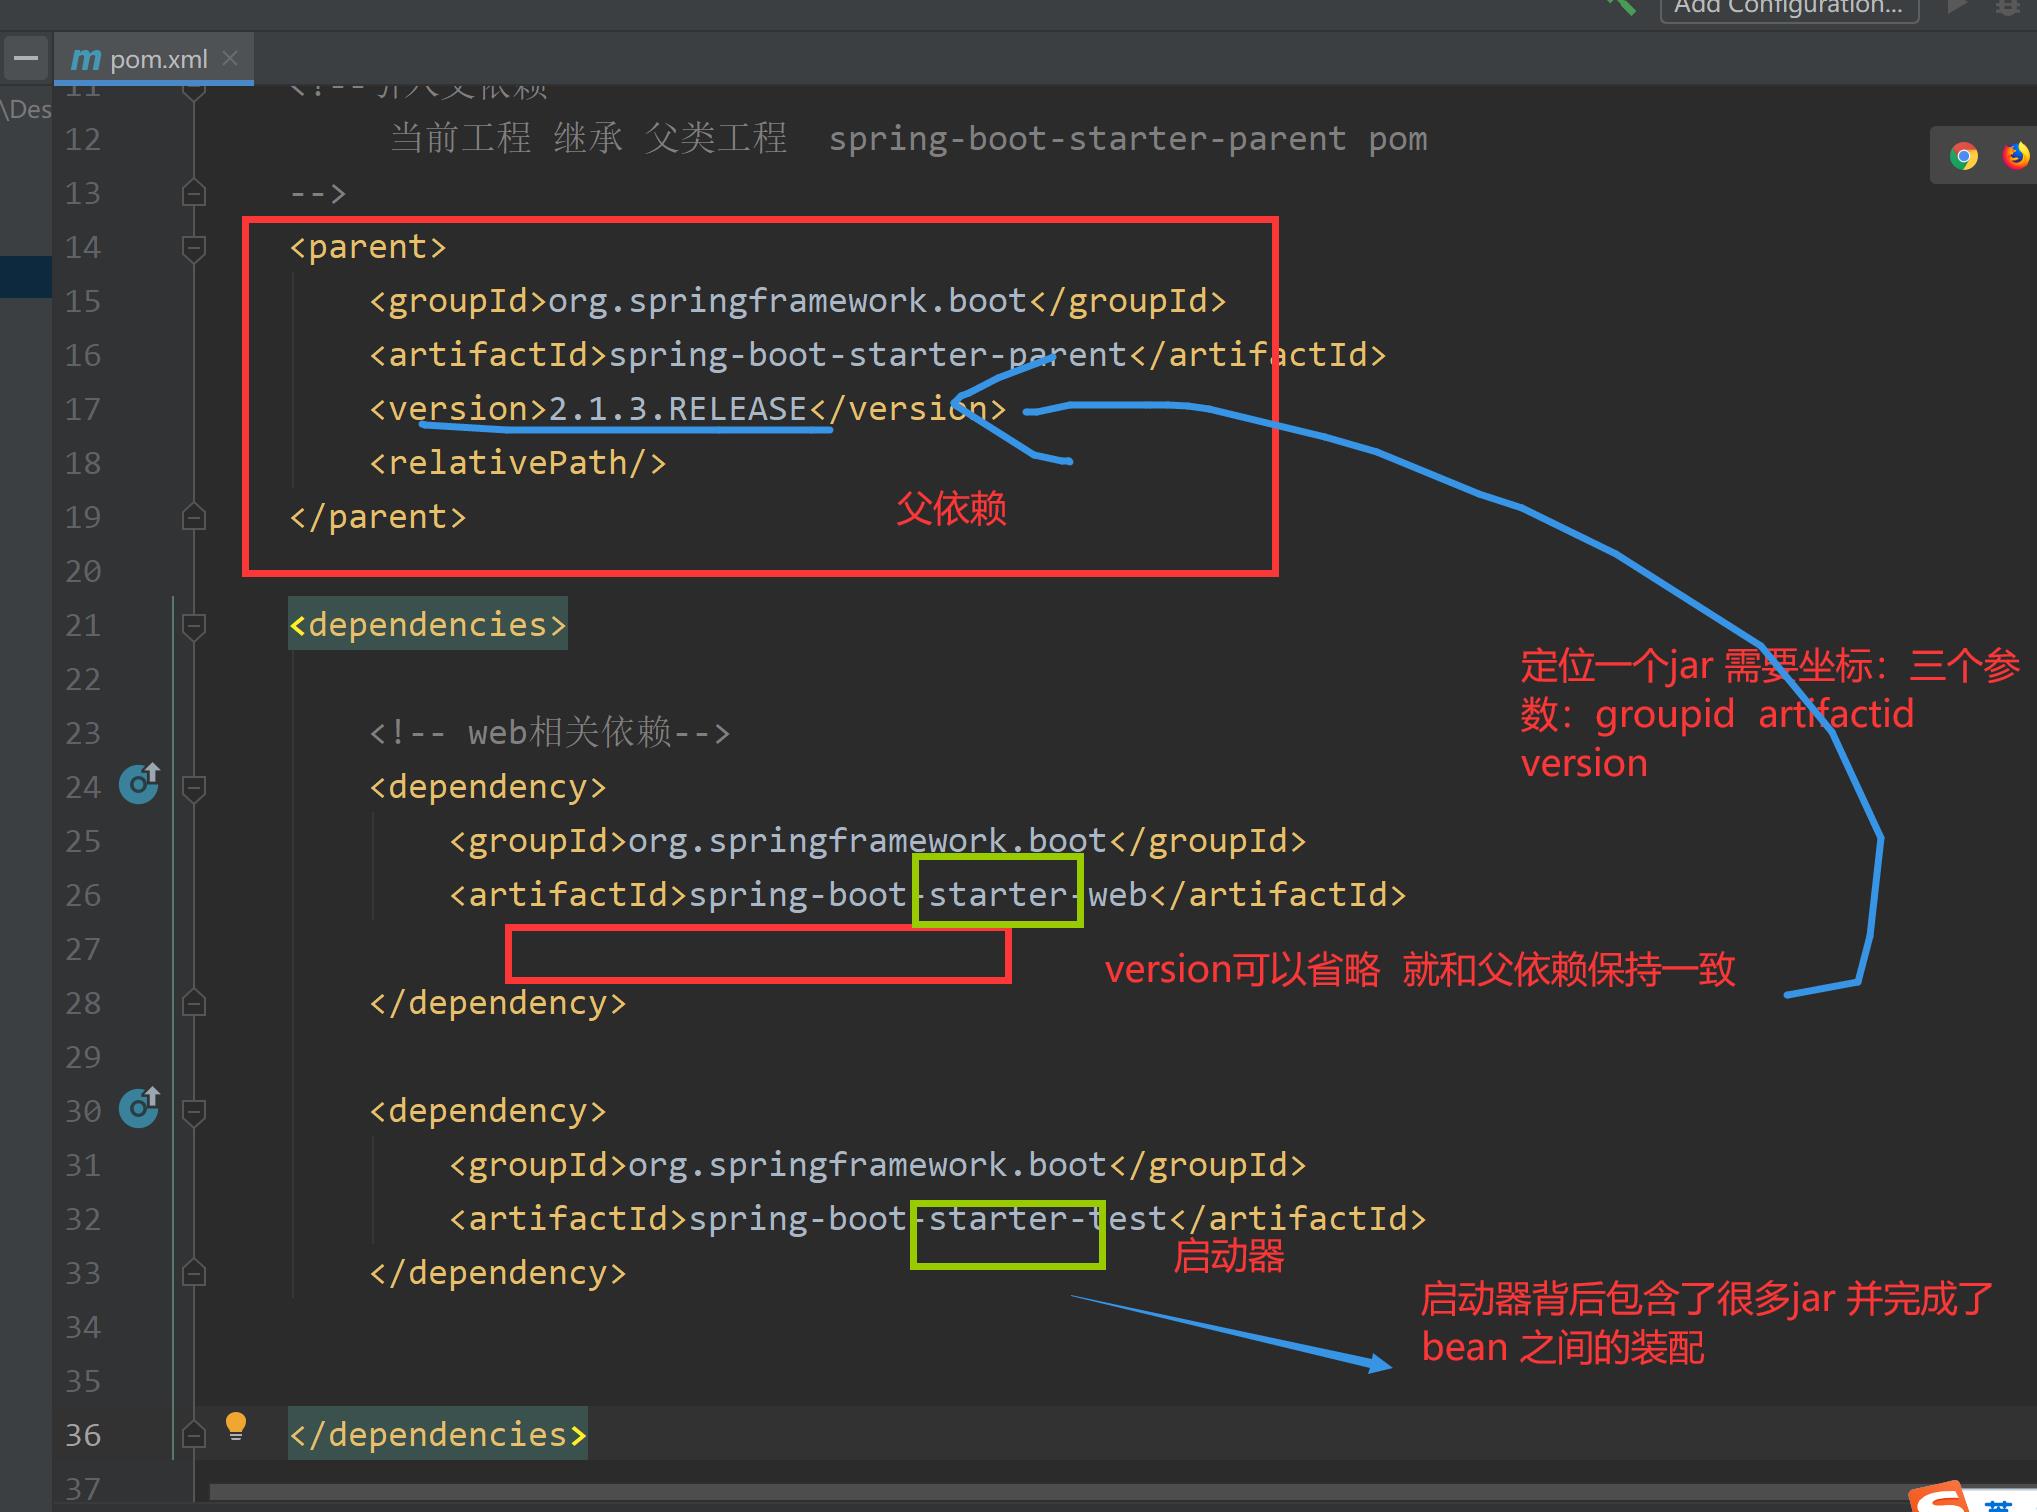
  <!--引入父依赖
         当前工程 继承 父类工程  spring-boot-starter-parent pom
    -->
    <parent>
        <groupId>org.springframework.boot</groupId>
        <artifactId>spring-boot-starter-parent</artifactId>
        <version>2.1.3.RELEASE</version>
        <relativePath/>
    </parent>

    <dependencies>

        <!-- web相关依赖-->
        <dependency>
            <groupId>org.springframework.boot</groupId>
            <artifactId>spring-boot-starter-web</artifactId>

        </dependency>

        <dependency>
            <groupId>org.springframework.boot</groupId>
            <artifactId>spring-boot-starter-test</artifactId>
        </dependency>


    </dependencies>
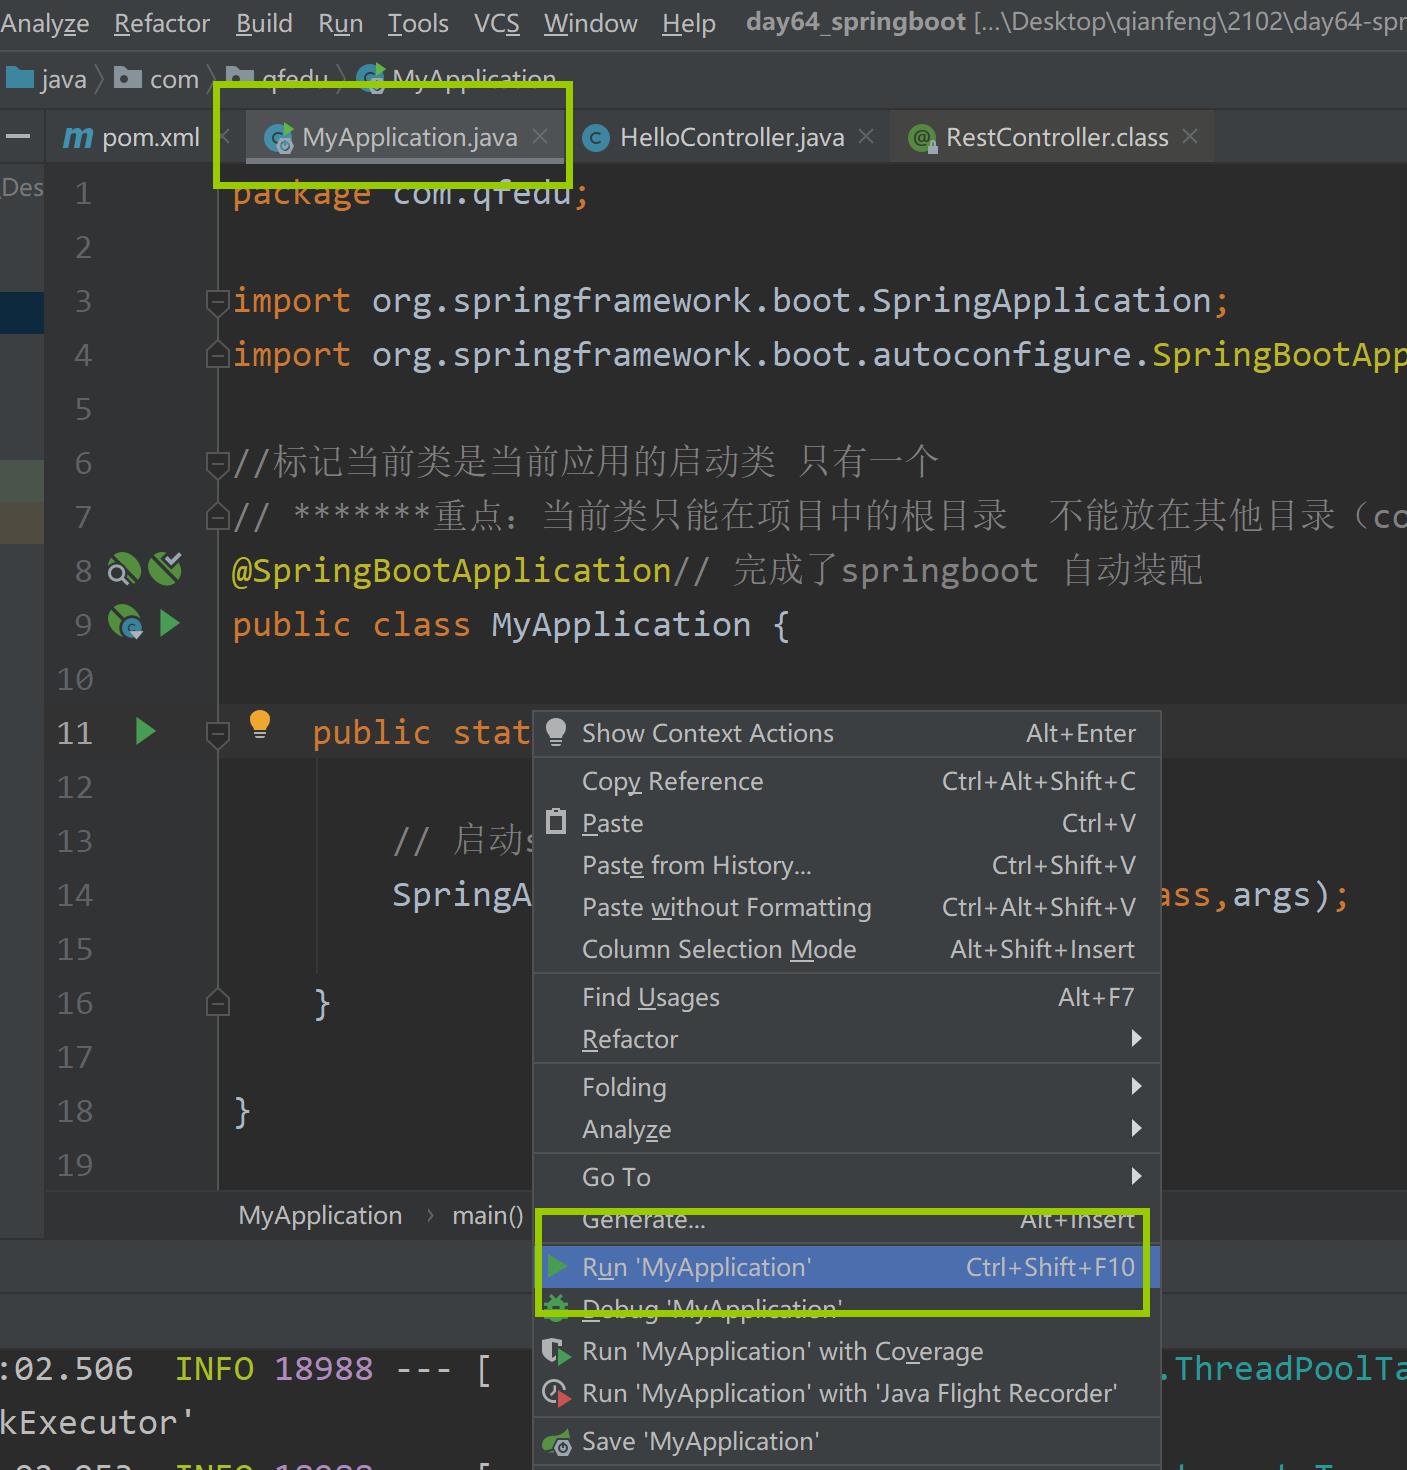
2、创建启动类
import org.springframework.boot.SpringApplication;
import org.springframework.boot.autoconfigure.SpringBootApplication;

//标记当前类是当前应用的启动类 只有一个
// *******重点:当前类只能在项目中的根目录  不能放在其他目录(controller,service)中
@SpringBootApplication// 完成了springboot 自动装配
public class MyApplication {

    public static void main(String[] args) {

        // 启动springboot 应用
        SpringApplication.run(MyApplication.class,args);

    }

}
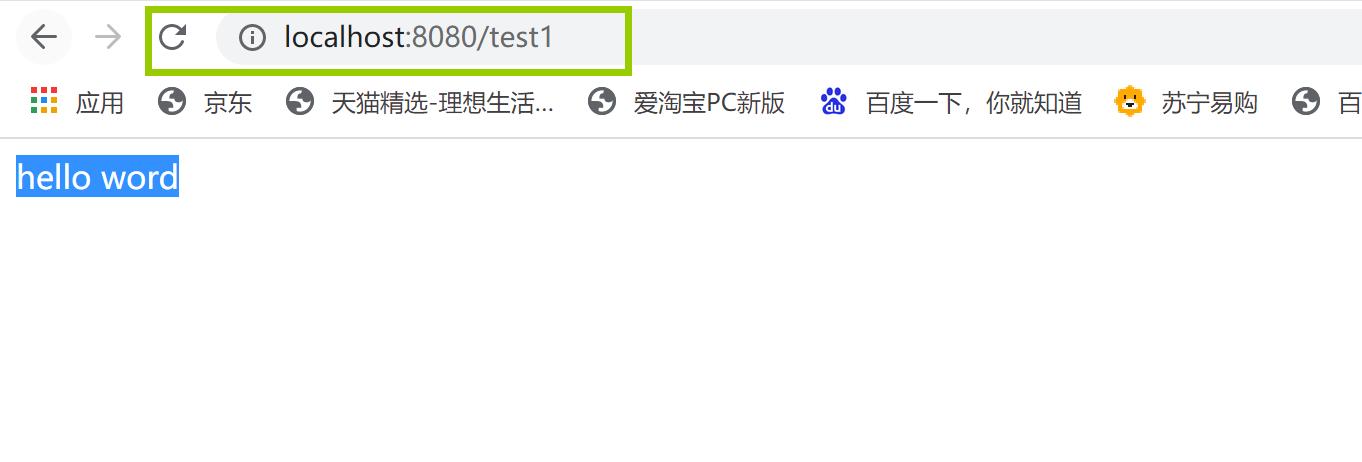
3、创建控制器
/**
 * 第一个springboot 控制类
 */
@RestController// 等价于 @Controller +@ResponseBody
public class HelloController {

    @RequestMapping("/test1")
    public String test1(){

        return "hello word";
    }
}
4、启动
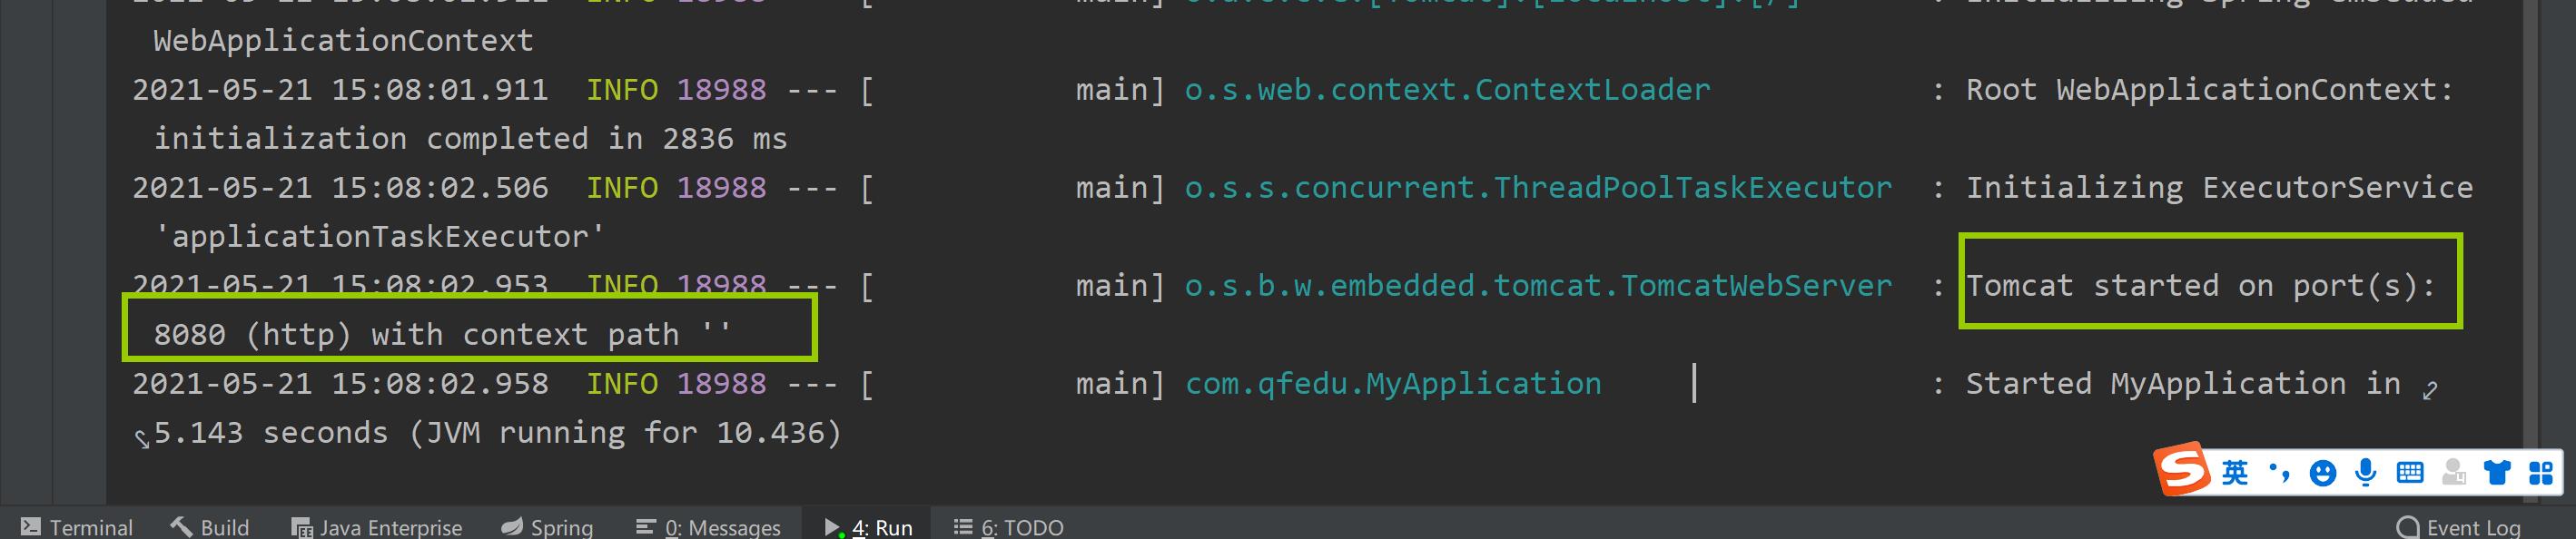
5、测试
四、springboot 配置文件
1、在resources 下创建 application.properties (名字一定不要错)
# 注释
# 配置tomcat 端口号
server.port=8088
2、springboot 配置文件 在 resources:
- application.properties
server.port=8088
# key=value
- application.yaml application.yml
yaml 文件也是一种配置文件,功能和application.properties一样,更加简洁(超json 格式)
application.properties 文件优先级高于application.yaml
application.properties
# 注释
# 配置tomcat 端口号
#server.port=8088


student.id=100
student.name=xiaoming
student.age=19
#配置 集合属性  属性之间以 ,分割
student.hobby=pingpang,basketball,football

#配置  map 属性
student.course.math=99
student.course.english=100
application.yml / application.yaml
什么是ymal?
- YAML文件格式是Spring Boot支持的一种JSON超集文件格式。
- 相较于传统的Properties配置文件,YAML文件以数据为核心,是一种更为直观且容易被电脑识别的数据序列化格式。
- application.yaml文件的工作原理和application.properties一样。
基本语法:key:(空格)value
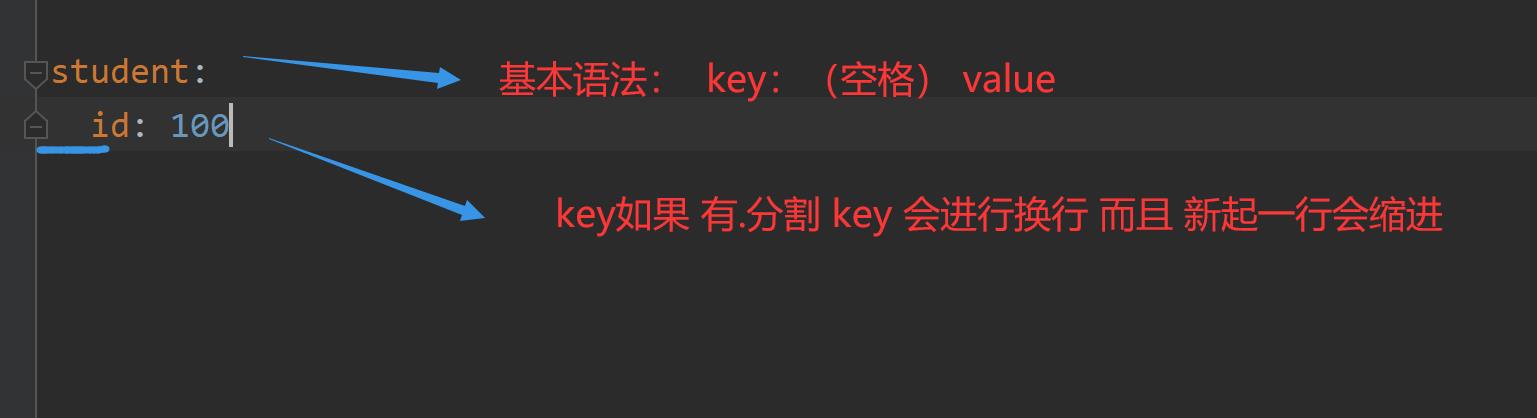
server:
port: 8090
# 等价于 application.properties 中 student.id
student:
id: 100
name: xiaoming
age: 18
# # 使用 yaml 另一种方式配置 集合 map
hobby:
- pingpang
- basketball
- football
course:
math: 99
english: 100
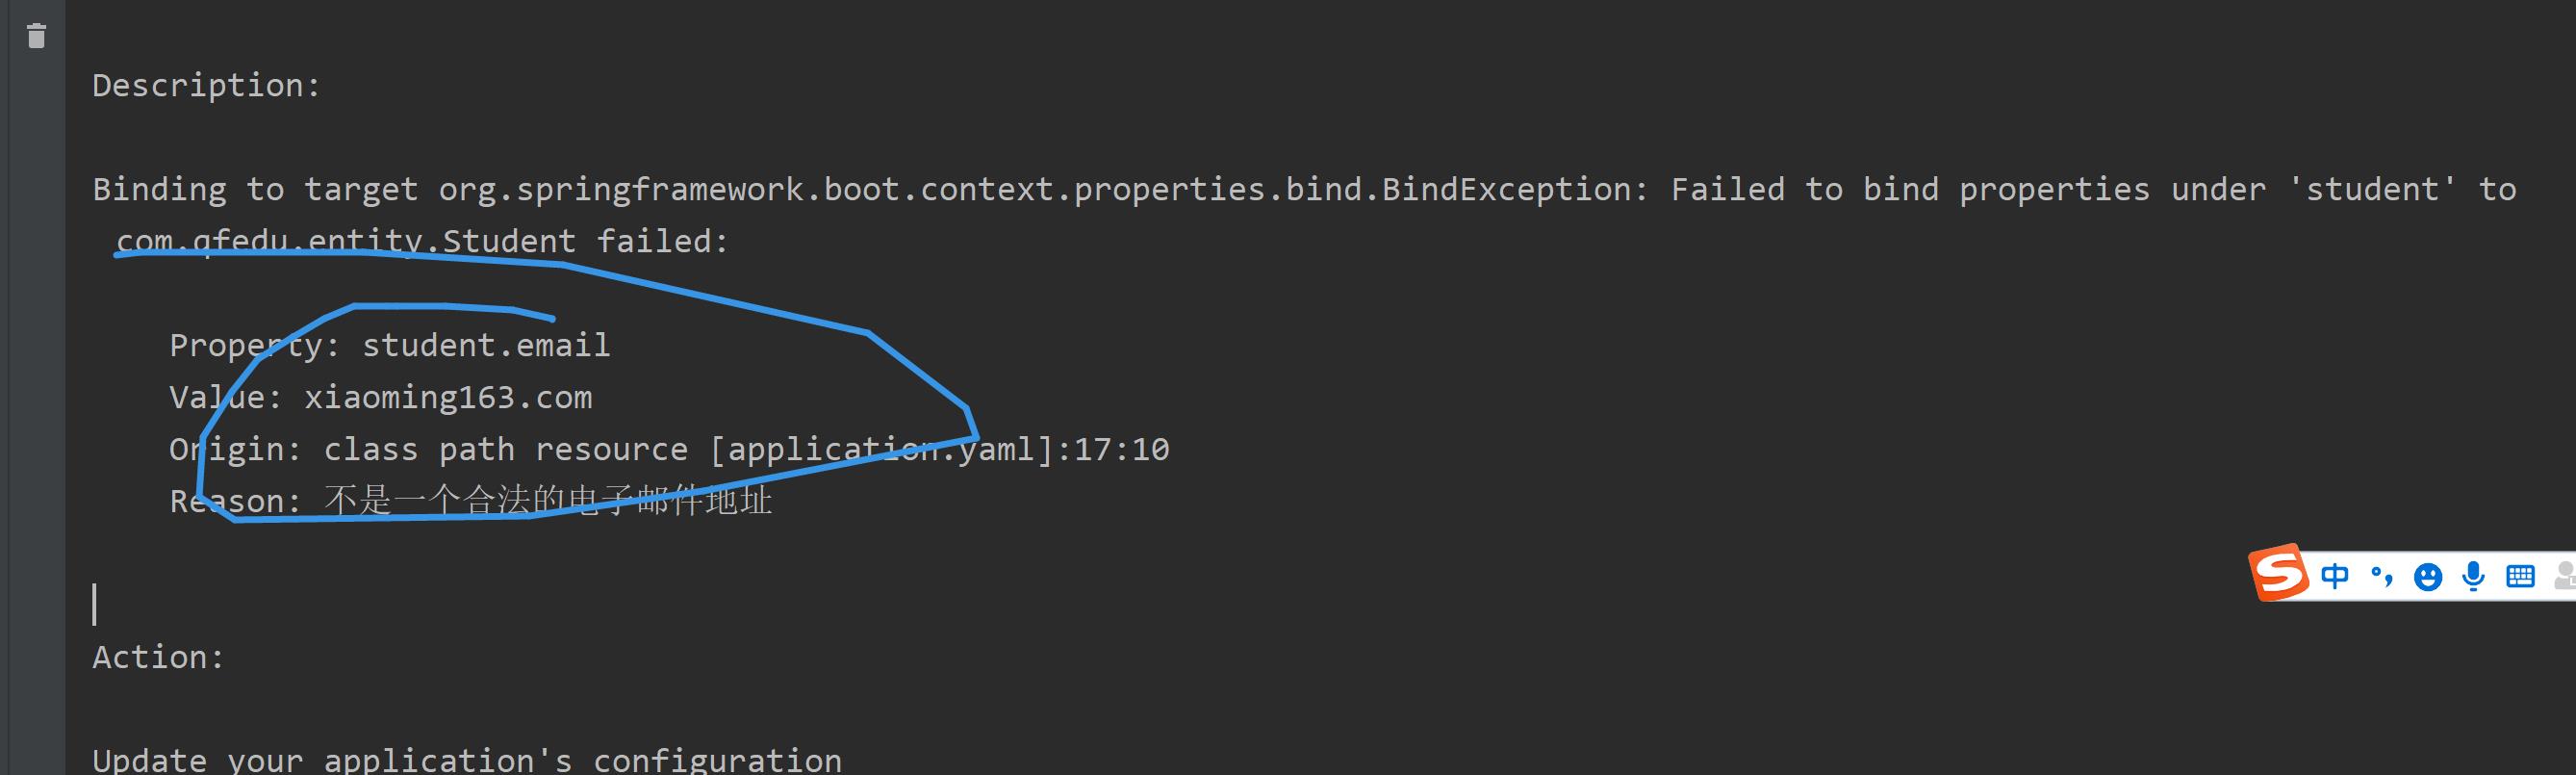
email: xiaoming163.com
# 使用 yaml 配置 集合 map
# hobby: [pingpang,basketball,football]
# course: {math: 99,english: 100}
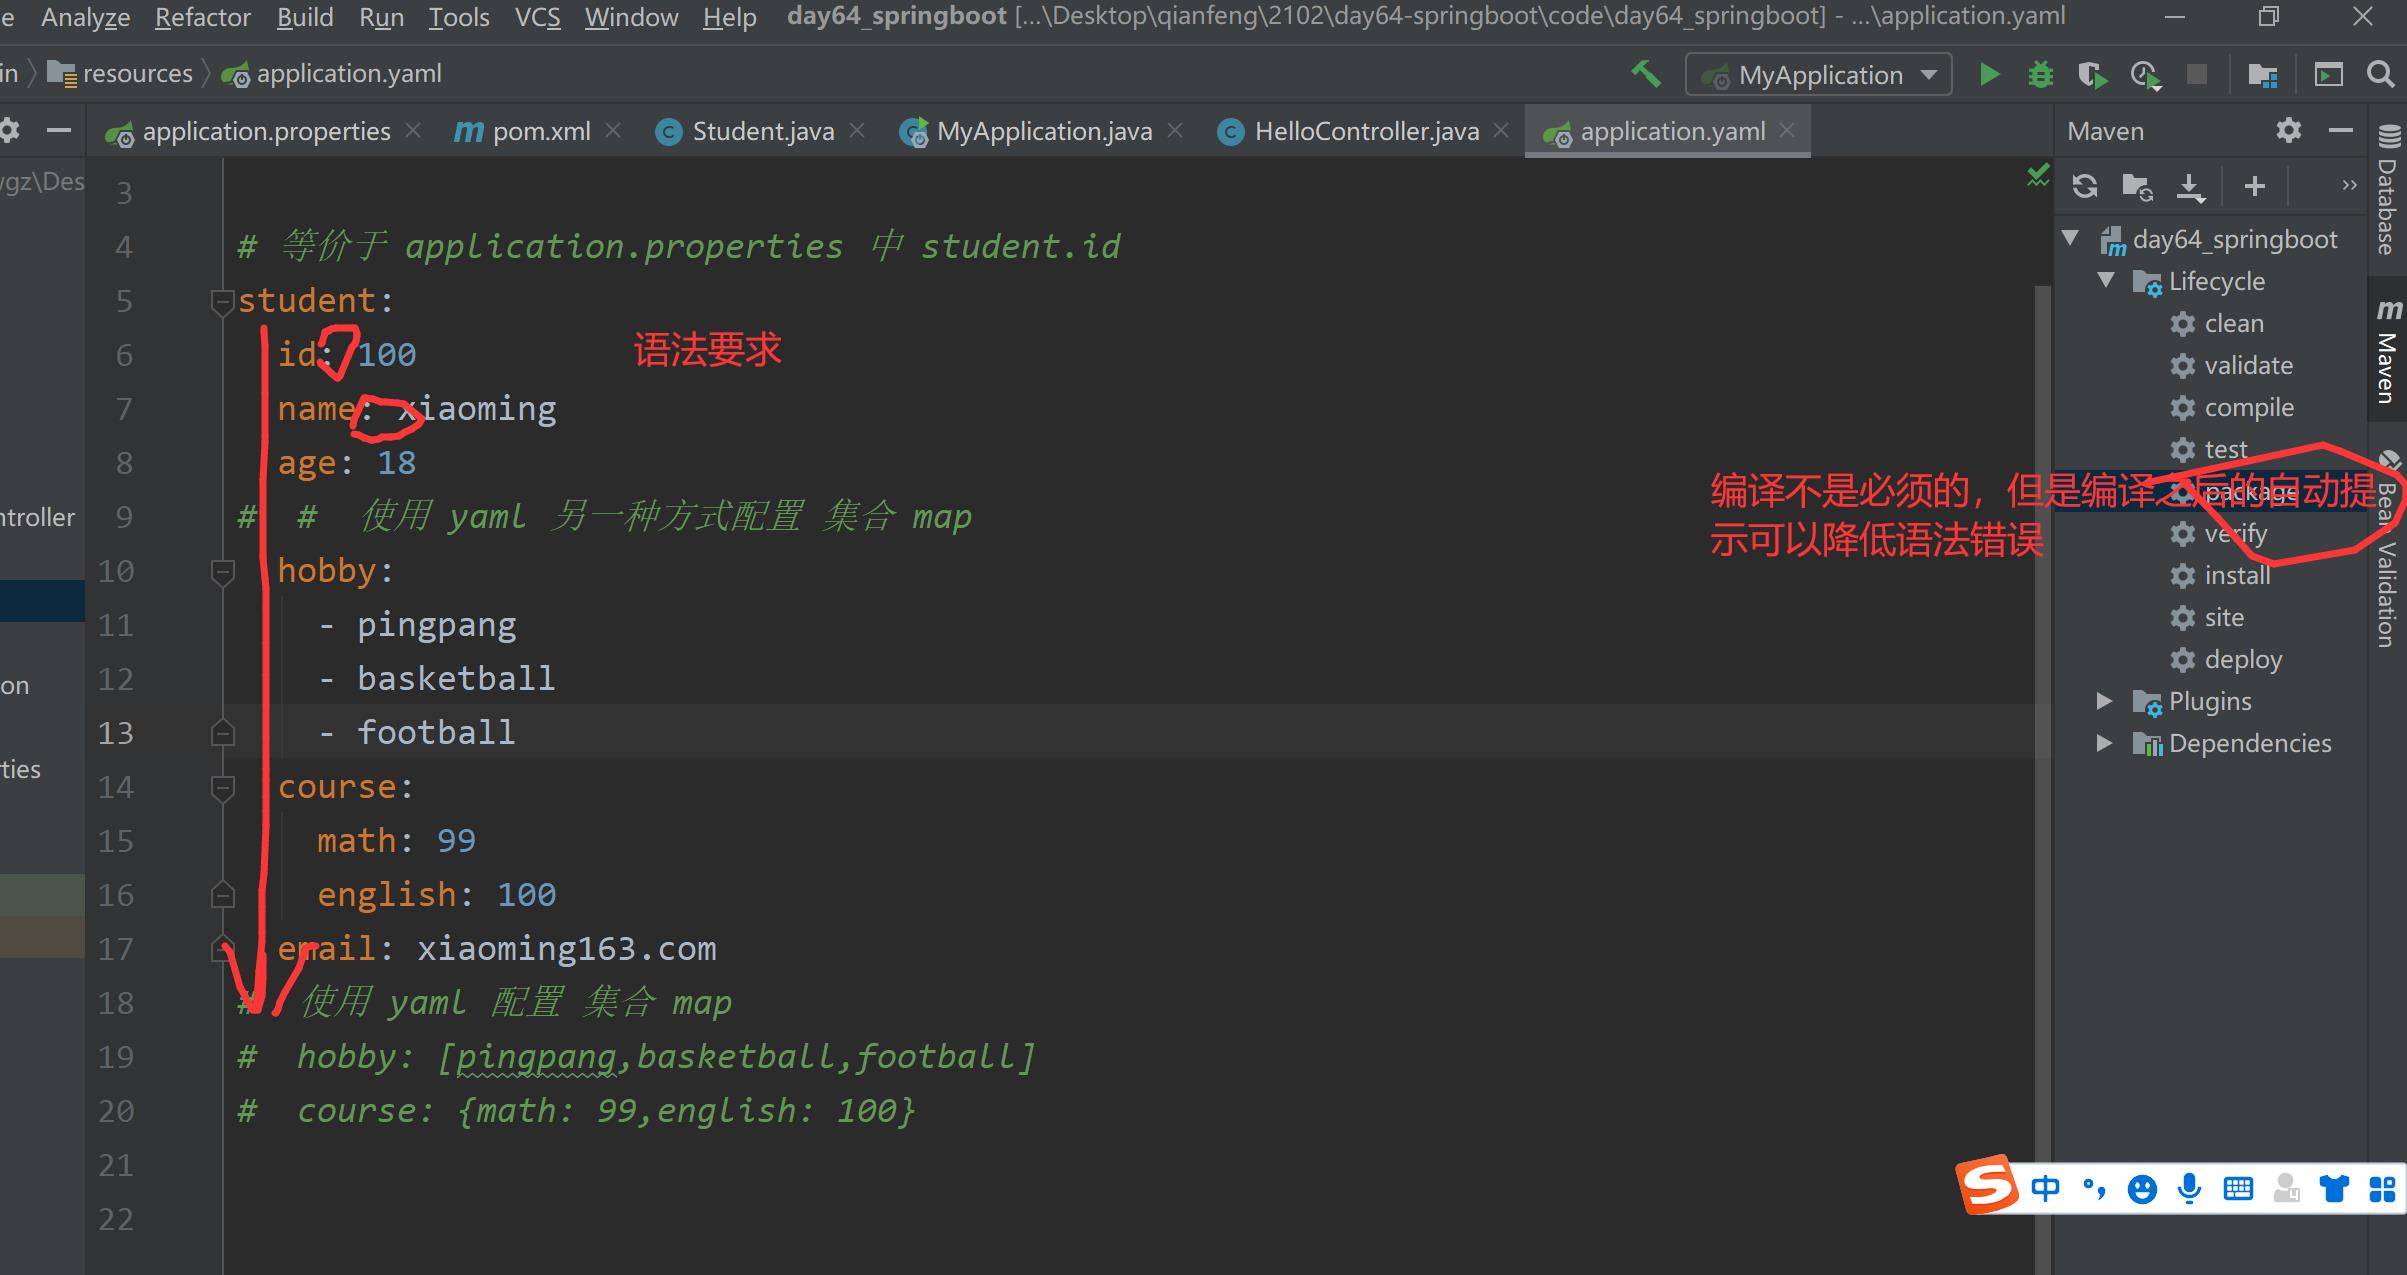
3、自动提示
第一步、添加依赖
 <!-- Spring Boot提供的配置处理器依赖

             作用就是:让自定义属性配置  在编写配置文件时有提示:
                       必须先编译才会有提示
         -->
        <dependency>
            <groupId>org.springframework.boot</groupId>
            <artifactId>spring-boot-configuration-processor</artifactId>
            <optional>true</optional>
        </dependency>
第二步、编译
mvn compile # 或者 点击按钮 compile
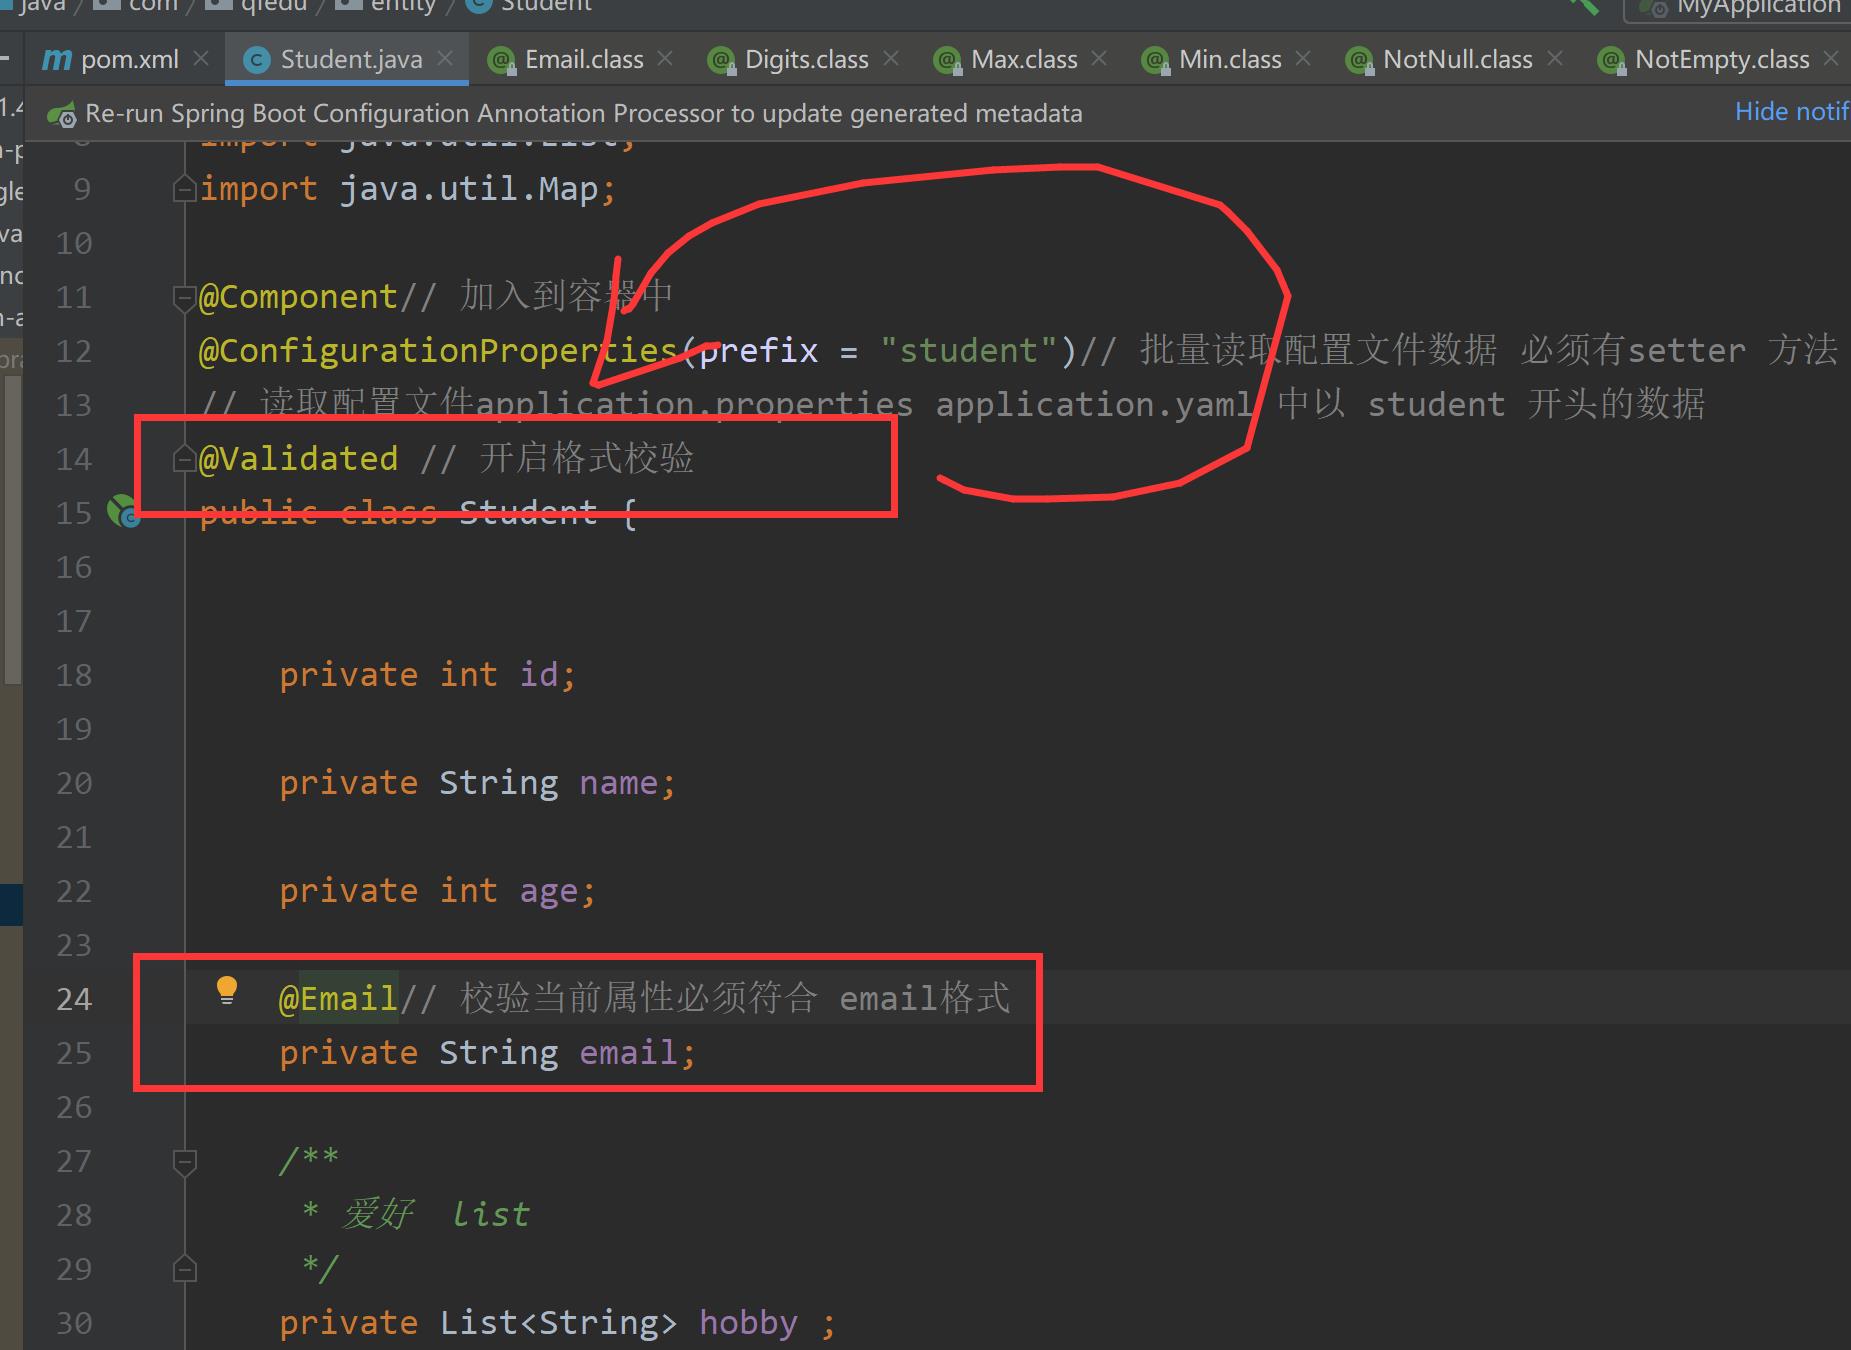
4、格式校验
在类上校验@Validated
在属性添加 @Email @Max……
5、批量读取自定义配置文件
mybatis.properties
jdbc.driver=com.mysql.jdbc.Driver
jdbc.url=jdbc:mysql://localhost:3306/qfofficejava2102
jdbc.name=root
jdbc.password=123456
@Component
@ConfigurationProperties(prefix = "jdbc")//只能读取 application.properties application.yaml
@PropertySource(value = "mybatis.properties") //如果读取自定义配置文件 必须使用 @PropertySource(value = "mybatis.properties") 制定路径
public class JdbcProperties {

    private String driver;

    private String url;

    private String name;

    private String password;


    public String getDriver() {
        return driver;
    }

    public void setDriver(String driver) {
        this.driver = driver;
    }

    public String getUrl() {
        return url;
    }

    public void setUrl(String url) {
        this.url = url;
    }

    public String getName() {
        return name;
    }

    public void setName(String name) {
        this.name = name;
    }

    public String getPassword() {
        return password;
    }

    public void setPassword(String password) {
        this.password = password;
    }
}
6、@Value单个读取属性
/**
 * 测试  @Value单个读取属性
 *
 * 总结 1.@Value("${student.id}") 单个读取 配置文件application.yaml
 *      2.不支持复杂数据类型  集合 map
 *      3.@Value 不需要set 方法支持
 *
 */
@Component
public class Student2 implements Serializable {


    @Value("${student.id}")
    private int id;

    @Value("${student.name}")
    private String name;

    @Value("${student.age}")
    private int age;

    @Value("${student.email}")
    private String email;

    /**
     * 爱好  list
     */
//    @Value("${student.hobby}")  @Value 不支持 集合读取
    private List<String> hobby ;


    /**
     * 科目对应成绩  map
     */
//    @Value("${student.course}")   @Value 不支持 map读取
    private Map<String,Integer> course;


    public int getId() {
        return id;
    }

//    public void setId(int id) {
//        this.id = id;
//    }

    public String getName() {
        return name;
    }

//    public void setName(String name) {
//        this.name = name;
//    }

    public int getAge() {
        return age;
    }

//    public void setAge(int age) {
//        this.age = age;
//    }

    public String getEmail() {
        return email;
    }

    public void setEmail(String email) {
        this.email = email;
    }

    public List<String> getHobby() {
        return hobby;
    }

    public void setHobby(List<String> hobby) {
        this.hobby = hobby;
    }

    public Map<String, Integer> getCourse() {
        return course;
    }

    public void setCourse(Map<String, Integer> course) {
        this.course = course;
    }

    @Override
    public String toString() {
        return "Student2{" +
                "id=" + id +
                ", name='" + name + '\\'' +
                ", age=" + age +
                ", email='" + email + '\\'' +
                ", hobby=" + hobby +
                ", course=" + course +
                '}';
    }
}
五、总结
@ConfigurationProperties 是批量读取配置文件
@ConfigurationProperties和@Value的对比
| 对比点 | @ConfigurationProperties | @Value |
|---|---|---|
| 底层框架 | Spring Boot | Spring |
| 功能 | 批量注入配置文件中的属性 | 单个注入 |
| 属性setXX()方法 | 需要 | 不需要 |
| 复杂类型属性注入 | 支持 | 不支持 |
| 松散绑定 | 支持 | 不支持 |
| JSR303数据校验 @Email | 支持 | 不支持 |
| SpEL表达式 | 不支持 | 支持 |
以上是关于Springboot的主要内容,如果未能解决你的问题,请参考以下文章