python自动化web自动化:7.测试框架实战三之并发执行用例
Posted new nm个对象
tags:
篇首语:本文由小常识网(cha138.com)小编为大家整理,主要介绍了python自动化web自动化:7.测试框架实战三之并发执行用例相关的知识,希望对你有一定的参考价值。
一.多进程并发执行测试用例
- 当我们的自动化进行到一定程度时,用例数量将十分庞大。也许执行一遍用例就会花费几个小时。这时使用分布式来并行执行用例将十分重要。
- pytest框架可以使用pytest-xdist来十分方便的进行分布式测试。
(1)pytest-xdist讲解
- 安装
pip install pytest-xdist
- 使用:多cpu并行执行用例,直接加个-n参数即可,后面num参数就是并行数量,比如num设置为3
pytest -n 3
pytest -n auto # 自动识别cpu个数,启动对应进程
(2)多进程执行用例
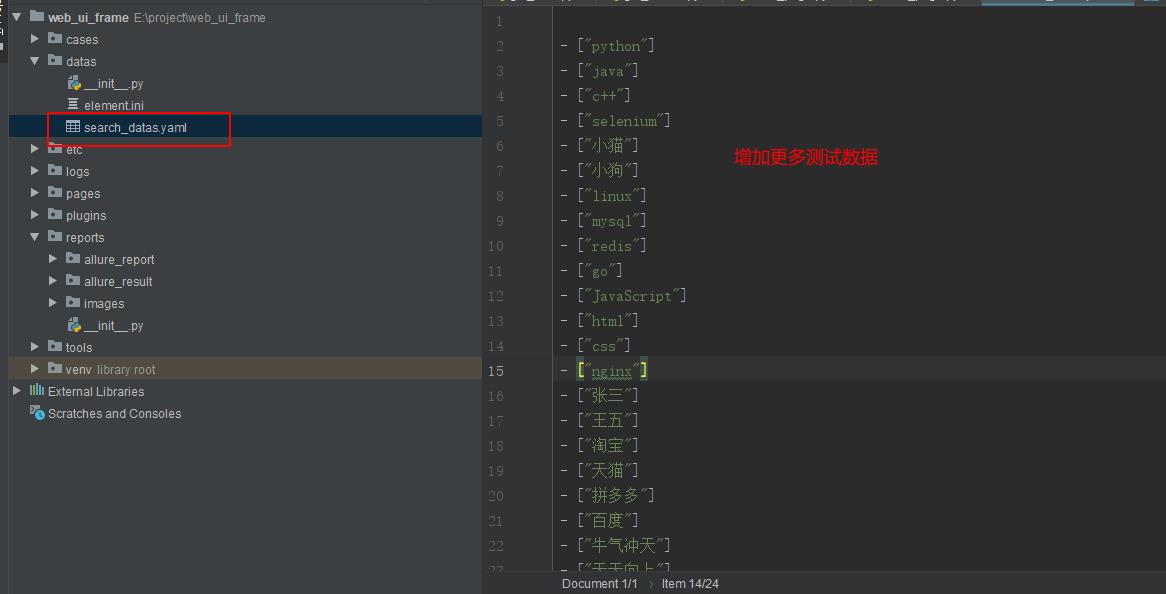
多进程要看出效果,需要用例数量较多才行,所以我们可以在yaml数据文件中增加更多数据。

- 单进程执行用例
#! /usr/bin/python
# -*- coding: utf-8 -*-
import os
import time
import allure
import pytest
from etc.config import LOGGER
from pages.index_page import IndexPage
from tools.get_data import get_data_from_yaml
from etc.config import BASEDIR
from tools.get_strtime import get_now_time

class Test_case_search:
    """
    搜索功能测试用例
    """
    datas = get_data_from_yaml(os.path.join(BASEDIR,'datas/search_datas.yaml'))
    def setup(self):
        LOGGER.info('START TO EXECUTE TEST CASE')
        self.index = IndexPage()
        self.index._get_url('https://www.baidu.com/')


    def teardown(self):
        self.index._quit_driver()

    @pytest.mark.parametrize("text",datas) # 数据参数化,实现数据驱动
    def test_search(self,text):
        try:
            self.index.search_contact(text=text)
            time.sleep(3)
            assert text[0] in self.index._get_title() # 添加断言
            LOGGER.info('EXECUTE TEST CASE SUCCESS')
        except Exception as e:
            LOGGER.error(f'EXECUTE TEST CASE failed, the reason is {e}')
            img_path = os.path.join(BASEDIR,f'reports/images/{get_now_time()}.png')
            self.index._get_screenshot_as_file(img_path) # 失败截图
            allure.attach.file(source=img_path,name='失败截图',attachment_type=allure.attachment_type.PNG) # 将失败截图上传到测试报告中
            raise e

if __name__ == "__main__":
    json_path = os.path.join(BASEDIR, f'reports/allure_result/{get_now_time()}')  # 指定生成的json报告文件的路径
    html_path = os.path.join(BASEDIR, f'reports/allure_report/{get_now_time()}')  # 指定生成的html报告文件的路径
    pytest.main(['-vs', 'test_search_case.py', f'--alluredir={json_path}']) # 生成json报告
    os.system(f'allure generate {json_path} -o {html_path}') # 使用allure生成HTML报告

- 多进程执行用例
#! /usr/bin/python
# -*- coding: utf-8 -*-
import os
import time
import allure
import pytest
from etc.config import LOGGER
from pages.index_page import IndexPage
from tools.get_data import get_data_from_yaml
from etc.config import BASEDIR
from tools.get_strtime import get_now_time

class Test_case_search:
    """
    搜索功能测试用例
    """
    datas = get_data_from_yaml(os.path.join(BASEDIR,'datas/search_datas.yaml'))
    def setup(self):
        LOGGER.info('START TO EXECUTE TEST CASE')
        self.index = IndexPage()
        self.index._get_url('https://www.baidu.com/')


    def teardown(self):
        self.index._quit_driver()

    @pytest.mark.parametrize("text",datas) # 数据参数化,实现数据驱动
    def test_search(self,text):
        try:
            self.index.search_contact(text=text)
            time.sleep(3)
            assert text[0] in self.index._get_title() # 添加断言
            LOGGER.info('EXECUTE TEST CASE SUCCESS')
        except Exception as e:
            LOGGER.error(f'EXECUTE TEST CASE failed, the reason is {e}')
            img_path = os.path.join(BASEDIR,f'reports/images/{get_now_time()}.png')
            self.index._get_screenshot_as_file(img_path) # 失败截图
            allure.attach.file(source=img_path,name='失败截图',attachment_type=allure.attachment_type.PNG) # 将失败截图上传到测试报告中
            raise e

if __name__ == "__main__":
    json_path = os.path.join(BASEDIR, f'reports/allure_result/{get_now_time()}')  # 指定生成的json报告文件的路径
    html_path = os.path.join(BASEDIR, f'reports/allure_report/{get_now_time()}')  # 指定生成的html报告文件的路径
    pytest.main(['-vs','-n 3', 'test_search_case.py', f'--alluredir={json_path}']) # 生成json报告,使用`-n 3`指定三个进程执行用例
    os.system(f'allure generate {json_path} -o {html_path}') # 使用allure生成HTML报告
运行结果如下:

以上是关于python自动化web自动化:7.测试框架实战三之并发执行用例的主要内容,如果未能解决你的问题,请参考以下文章