普歌-前端实现模拟购物商城案例实现
Posted 一号程序猿
tags:
篇首语:本文由小常识网(cha138.com)小编为大家整理,主要介绍了普歌-前端实现模拟购物商城案例实现相关的知识,希望对你有一定的参考价值。
学习html,css和js前端的小伙伴们,这次来分享购物商城案例的实现!
准备阶段:
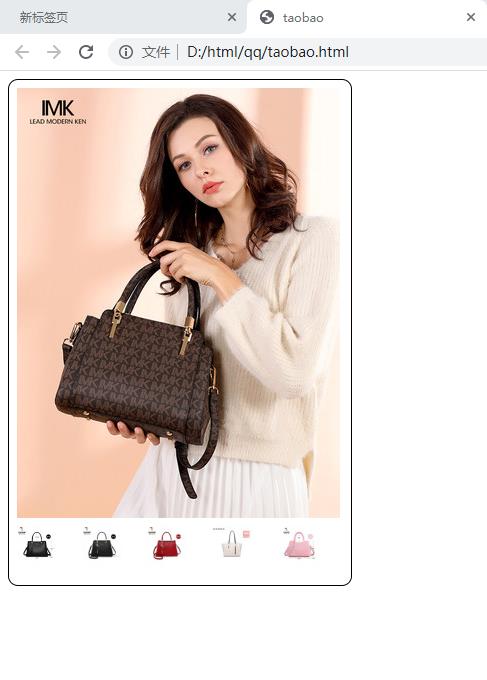
准备一些需要放到页面上的图片,小图和其对应的大图,博主这边举例为小图(40 x 40),大图(321 x 430)。
结构分析:
- 大图区域
- 小图区域
- 整体边框区域
效果分析:
- 鼠标放在小图片上大图会对应显示。
- 鼠标放在小图片上面会有对应效果。
- 鼠标移出时小边框对应效果消失。
使用css对边框进行设置:
- 对div标签进行设置(对边框属性进行设置):
#showdiv{ width: 342px; height: 505px; border: solid 1px ; border-radius: 10px; } - 对table标签进行设置(不需要边框,且离顶部有一定的距离):
#ta{
          margin: auto;
          margin-top: 5px;
      }
使用js对页面动态效果进行设置:
-
鼠标进入的函数:
function operInImg(img,src){ //设置图片的样式 img.style.border="solid 1px blue"; //设置大图的img路径 //获取大图路径 var big = document.getElementById("big"); //设置路径 big.src=src; } function operOutImg(img){ //设置图片的样式 img.style.border=""; } -
鼠标移出函数:
function operOutImg(img){
          //设置图片的样式
          img.style.border="";
      }
整体代码实现:
<!DOCTYPE html>
<html lang="en">
<head>
    <meta charset="UTF-8">
    <meta http-equiv="X-UA-Compatible" content="IE=edge">
    <meta name="viewport" content="width=device-width, initial-scale=1.0">
    <!--声明js代码域-->
    <script>
        //创建函数进行照片的联动和样式设置
        function operInImg(img,src){
            //设置图片的样式
            img.style.border="solid 1px blue";
            //设置大图的img路径
                //获取大图路径
                var big = document.getElementById("big");
                //设置路径
                big.src=src;
        }
        function operOutImg(img){
            //设置图片的样式
            img.style.border="";
        }


    </script>

    <!---声明css代码域-->
    <style>
        /*设置div样式*/
        #showdiv{
            width: 342px;
            height: 505px;
            border: solid 1px ;
            border-radius: 10px;
        }
        /*设置table样式*/
        #ta{
            margin: auto;
            margin-top: 5px;
        }

    </style>
    <title>taobao</title>
</head>
<body>
     <div id="showdiv">
         <table width ="332px" height = "440px" id="ta">
             <tr height="300px">
                 <td colspan="5"><img src="./images/demo-big.jpg" alt=""  id="big"></td>
             </tr>
             <tr height="40px">
                 <td><img src="./images/demo01.jpg" alt="" onmouseover="operInImg(this,'./images/demo-big01.jpg')" onmouseout="operOutImg(this)"></td>
                 <td><img src="./images/demo02.jpg" alt="" onmouseover="operInImg(this,'./images/demo-big02.jpg')" onmouseout="operOutImg(this)"> </td>
                 <td><img src="./images/demo03.jpg" alt="" onmouseover="operInImg(this,'./images/demo-big03.jpg')" onmouseout="operOutImg(this)"> </td>
                 <td><img src="./images/demo04.jpg" alt="" onmouseover="operInImg(this,'./images/demo-big04.jpg')" onmouseout="operOutImg(this)"> </td>
                 <td><img src="./images/demo05.jpg" alt="" onmouseover="operInImg(this,'./images/demo-big05.jpg')" onmouseout="operOutImg(this)"> </td>
             </tr>
         </table>
     </div>
</body>
</html>
实现效果:

感谢您的阅读,不足之处欢迎指正!
以上是关于普歌-前端实现模拟购物商城案例实现的主要内容,如果未能解决你的问题,请参考以下文章