CentOS中的 MySql Yum源安装
Posted sesiria
tags:
篇首语:本文由小常识网(cha138.com)小编为大家整理,主要介绍了CentOS中的 MySql Yum源安装相关的知识,希望对你有一定的参考价值。
部署服务器环境的时候经常需要安装mysql,以下是常见的安装方式
* 源码安装
* rpm包安装
* yum源安装
本文主要介绍yum源的安装
一、yum源下载
进入 https://dev.mysql.com/downloads/ 页面,可以看到很多下载项,可以选择MySQL Yum Repository
对应的链接是:
https://dev.mysql.com/downloads/repo/yum/
这里选择 mysql80-community-release-el7-3.noarch.rpm

直接在Linux命令执行以下命令(CentOS)
wget https://repo.mysql.com//mysql80-community-release-el7-3.noarch.rpm进入下载 msql80-community-release-el7-3.noarch.rpm的目录
执行 这里通常还需要root权限
sudo rpm -ivh mysql80-community-release-el7-3.noarch.rpm二、修改yum源的下载(可选)
如果网络不佳可能需要修改yum的默认下载源,国内可以修改成阿里云的链接
1. 备份系统自带的yum源配置文件
sudo mv /etc/yum.repos.d/CentOS-Base.repo /etc/yum.repos.d/CentOS-Base.repo.bak2. 下载aliyun的yum配置文件到/etc/yum.repos.d
cd /etc/yum.repos.d/
sudo wget -O /etc/yum.repos.d/CentOS-Base.repo  http://mirrors.aliyun.com/repo/Centos-7.repo
三、选择版本
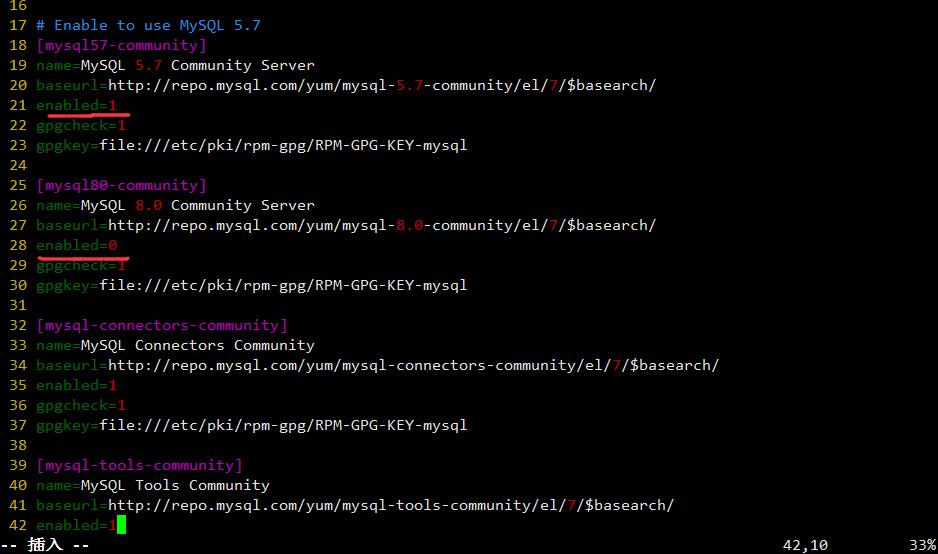
yum源配置文件中会包含多个版本的mysql,默认会选择最新的MySQL 8.0. 这里我们选择版本为MySQL 5.7
编辑 /etc/yum/repos.d/mysql-community.repo文件,把[mysql57-community]的enabled设置为1,把默认的
[mysql80-community]的enbaled设置为0
sudo vim /etc/yum.repos.d/mysql-community.repo

四,安装mysql
使用一下命令安装MySQL,命令会安装MySQL服务和其他MySQL包
sudo yum install mysql-community-server安装完以后使用一下命令启动MySQL
sudo systemctl start mysqldMySQL第一次启动时会执行以下的操作
1. 服务器的初始化
2. data目录会产生SSL证书和Key文件
3. 安装validate_password组件并生效
4.创建超级账户'root@localhost' 为超级账户生成密码并把密码保存在错误日志中农,通过一下命令可以获取密码
sudo grep 'temporary password' /var/log/mysqld.logroot的密码是临时生成的,需要尽快修改,使用以下命令修改
经过测试临时密码无效。这里采用先屏蔽密码验证,然后登陆sql再修改密码,后启用的方式。
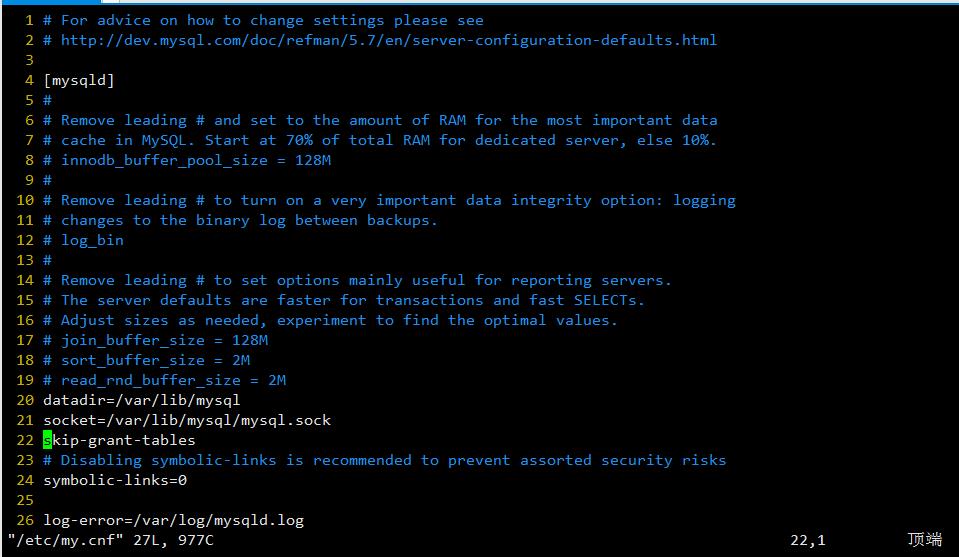
首先执行
sudo /etc/my.cnf加入一行
skip-grant-tables

保存后重启mysql 服务
sudo systemctl restart mysqld然后再登陆mysql
mysql -uroot并执行以下sql命令
Welcome to the MySQL monitor.  Commands end with ; or \\g.
Your MySQL connection id is 3
Server version: 5.7.34 MySQL Community Server (GPL)

Copyright (c) 2000, 2021, Oracle and/or its affiliates.

Oracle is a registered trademark of Oracle Corporation and/or its
affiliates. Other names may be trademarks of their respective
owners.

Type 'help;' or '\\h' for help. Type '\\c' to clear the current input statement.

mysql> update mysql.user set authentication_string = password('123456')
    -> where user = 'root' and host = 'localhost';
Query OK, 0 rows affected, 1 warning (0.00 sec)
Rows matched: 1  Changed: 0  Warnings: 1
然后再注释掉/etc/my.cnf中的那行
skip-grant-tables
并重启mysql
sudo systemctl restart mysqld接着就可以使用以下命令正常登陆了
mysql -u root -p修改Mysql配置
mysql配置默认是在/etc/my.cnf,可以根据项目的具体需要设置选项。以下是几个常用设置项
datadir=/var/lib/mysql
socket=/var/lib/mysql/mysql.sock
log-error=/var/log/mysqld.log
pid-file=/var/run/mysqld/mysqld.pid
character-set-server=utf8
port=3306
collation-server=utf8_general_ci
expire-logs-days = 300
max_connections = 1024
default_storage_engine = InnoDB
以上是关于CentOS中的 MySql Yum源安装的主要内容,如果未能解决你的问题,请参考以下文章