SpringCloud篇-SpringCloud基本使用
Posted _微风轻起
tags:
篇首语:本文由小常识网(cha138.com)小编为大家整理,主要介绍了SpringCloud篇-SpringCloud基本使用相关的知识,希望对你有一定的参考价值。
一、整体项目结构
1、项目结构
首先我们创建一个父工程,然后其的POM文件是:
<?xml version="1.0" encoding="UTF-8"?>
<project xmlns="http://maven.apache.org/POM/4.0.0"
         xmlns:xsi="http://www.w3.org/2001/XMLSchema-instance"
         xsi:schemaLocation="http://maven.apache.org/POM/4.0.0 http://maven.apache.org/xsd/maven-4.0.0.xsd">
    <modelVersion>4.0.0</modelVersion>

    <parent>
        <groupId>org.springframework.boot</groupId>
        <artifactId>spring-boot-starter-parent</artifactId>
        <version>2.0.3.RELEASE</version>
        <relativePath/>
    </parent>

    <properties>
        <spring-cloud-version>Finchley.RELEASE</spring-cloud-version>
    </properties>

    <groupId>com.fev</groupId>
    <artifactId>spring-cloud-demo</artifactId>
    <packaging>pom</packaging>
    <version>1.0</version>

    <dependencies>
        <!--解决TypeNotPresentException   如果是jdk9 需要添加-->
        <dependency>
            <groupId>javax.xml.bind</groupId>
            <artifactId>jaxb-api</artifactId>
            <version>2.3.1</version>
        </dependency>
        <dependency>
            <groupId>com.sun.xml.bind</groupId>
            <artifactId>jaxb-impl</artifactId>
            <version>2.3.1</version>
        </dependency>
        <dependency>
            <groupId>org.glassfish.jaxb</groupId>
            <artifactId>jaxb-runtime</artifactId>
            <version>2.3.1</version>
        </dependency>
    </dependencies>

    <dependencyManagement>
        <dependencies>
            <dependency>
                <groupId>org.springframework.cloud</groupId>
                <artifactId>spring-cloud-dependencies</artifactId>
                <version>${spring-cloud-version}</version>
                <type>pom</type>
                <scope>import</scope>
            </dependency>
        </dependencies>
    </dependencyManagement>

</project>
我们当前使用的spring-cloud的版本是Finchley.RELEASE。
二、eureka注册中心使用
1、项目创建
我们再添加一个子模块,用于eureka注册中心
2、项目结构

可以看到我们的eureka注册中心是很简单的。
3、项目内容
1)、POM文件
<?xml version="1.0" encoding="UTF-8"?>
<project xmlns="http://maven.apache.org/POM/4.0.0"
         xmlns:xsi="http://www.w3.org/2001/XMLSchema-instance"
         xsi:schemaLocation="http://maven.apache.org/POM/4.0.0 http://maven.apache.org/xsd/maven-4.0.0.xsd">
    <parent>
        <artifactId>spring-cloud-demo</artifactId>
        <groupId>com.fev</groupId>
        <version>1.0</version>
    </parent>
    <modelVersion>4.0.0</modelVersion>

    <artifactId>euerka-server1</artifactId>

    <dependencies>
        <dependency>
            <groupId>org.springframework.cloud</groupId>
            <artifactId>spring-cloud-starter-netflix-eureka-server</artifactId>
        </dependency>
    </dependencies>

</project>
这里引用了spring-cloud-starter-netflix-eureka-server,用于注入eureka客户端内容
2)、application文件
server:
  port: 7001

spring:
  application:
    name: eureka-server1	#应用名称
eureka:
  instance:
    hostname: localhost #本服务实例名称
  client:
    #需不需要将自己注册到注册中心 false表示不用,因为其本身就是server
    register-with-eureka: false
    #需不需要从注册中心获取其他的服务,由于是服务端,其是维护服务的,所以其也为false
    fetch-registry: false
    service-url:
	# 表示注册中心地址,向这个地址来注册实例
      defaultZone: http://${eureka.instance.hostname}:${server.port}/eureka/
3)、Application类
@SpringBootApplication
@EnableEurekaServer
public class EuerkaServerApplication1 {

    public static void main(String[] args) {
        SpringApplication.run(EuerkaServerApplication1.class,args);
    }

}
这个也很简单,只需要加@EnableEurekaServer表明这个是eureka服务端
4、启动服务
我们启动后,就可以输入http://localhost:7001就可以看到eureka服务端的界面了,目前没有向它注册的实例,所以是Noinstances available。

三、eureka客户端
下面我们就编写客户端来向服务端注册
1、项目创建
我们再在父工程创建一个客户端子模块
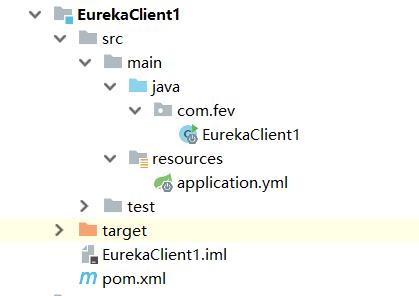
2、项目结构

3、项目内容
1)、POM文件
<?xml version="1.0" encoding="UTF-8"?>
<project xmlns="http://maven.apache.org/POM/4.0.0"
         xmlns:xsi="http://www.w3.org/2001/XMLSchema-instance"
         xsi:schemaLocation="http://maven.apache.org/POM/4.0.0 http://maven.apache.org/xsd/maven-4.0.0.xsd">
    <parent>
        <artifactId>spring-cloud-demo</artifactId>
        <groupId>com.fev</groupId>
        <version>1.0</version>
    </parent>
    <modelVersion>4.0.0</modelVersion>

    <artifactId>eureka-client1</artifactId>

    <dependencies>
        <dependency>
            <groupId>org.springframework.cloud</groupId>
            <artifactId>spring-cloud-starter-netflix-eureka-client</artifactId>
        </dependency>
        <dependency>
            <groupId>org.springframework.boot</groupId>
            <artifactId>spring-boot-starter-web</artifactId>
        </dependency>
    </dependencies>

</project>
这里是引用了一个spring-cloud-starter-netflix-eureka-client来注入eureka客户端相关的内容
2)、application文件
server:
  port: 7005
eureka:
  instance:
    hostname: localhost
    instance-id: eureka-client7005
  client:
    # 从注册中心获取注册信息
    fetch-registry: true
    # 将本服务注册到注册中心
    register-with-eureka: true
    service-url:
#     defaultZone: http://localhost:7001/eureka,http://localhost:7001/eureka
     defaultZone: http://localhost:7001/eureka
spring:
  application:
    name: eureka-client
3)、Application类
@SpringBootApplication
@EnableEurekaClient
public class EurekaClient1 {

    public static void main(String[] args) {
        SpringApplication.run(EurekaClient1.class,args);
    }

}
这里和前面注册中心类似,只是这里加的是客户端注@EnableEureClient。
4、启动服务
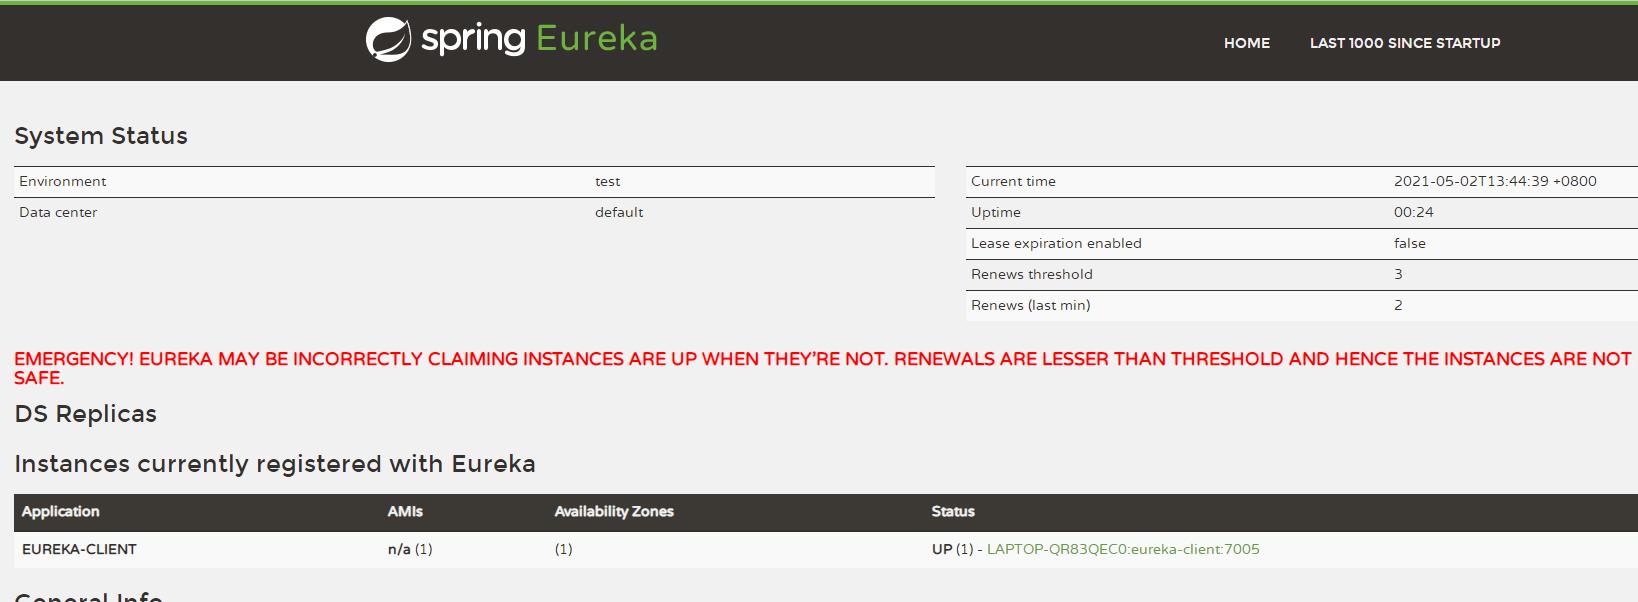
我们现在启动客户端服务,就可以在7001注册中心看到这个注册的实例了。

5、拓展说明
上面我们只是简单的说明了注册中心与客户端的关系,不过其实你要使用这种微服务模型,简单是有三个服务。
注册中心:这个用来给所有的客户端注册的。
生产者与消费者:这是表示其他的两个服务,其对于注册中心来说都是客户端,都注册到注册中心。然后这两个客户端之间通过注册中心来相互调用,例如一个服务(消费者)需要去另一个服务(生产者)调用接口获取信息,比如一个客户服务需要调用订单服务获取这个客户的所有订单信息,这个关系也是相对的,也可以是要获取一个订单的具体客户信息。
6、eureka额外设置
1)、eureka客户端配置
server:
  port: 7005
eureka:
  instance:
    hostname: localhost
    # 主机ID
    instance-id: eureka-client7005
    # 展示主机IP
    prefer-ip-address: true
  client:
    # 从注册中心获取注册信息
    fetch-registry: true
    # 将本服务注册到注册中心
    register-with-eureka: true
    service-url:
     defaultZone: http://localhost:7001/eureka
spring:
  application:
    name: eureka-client
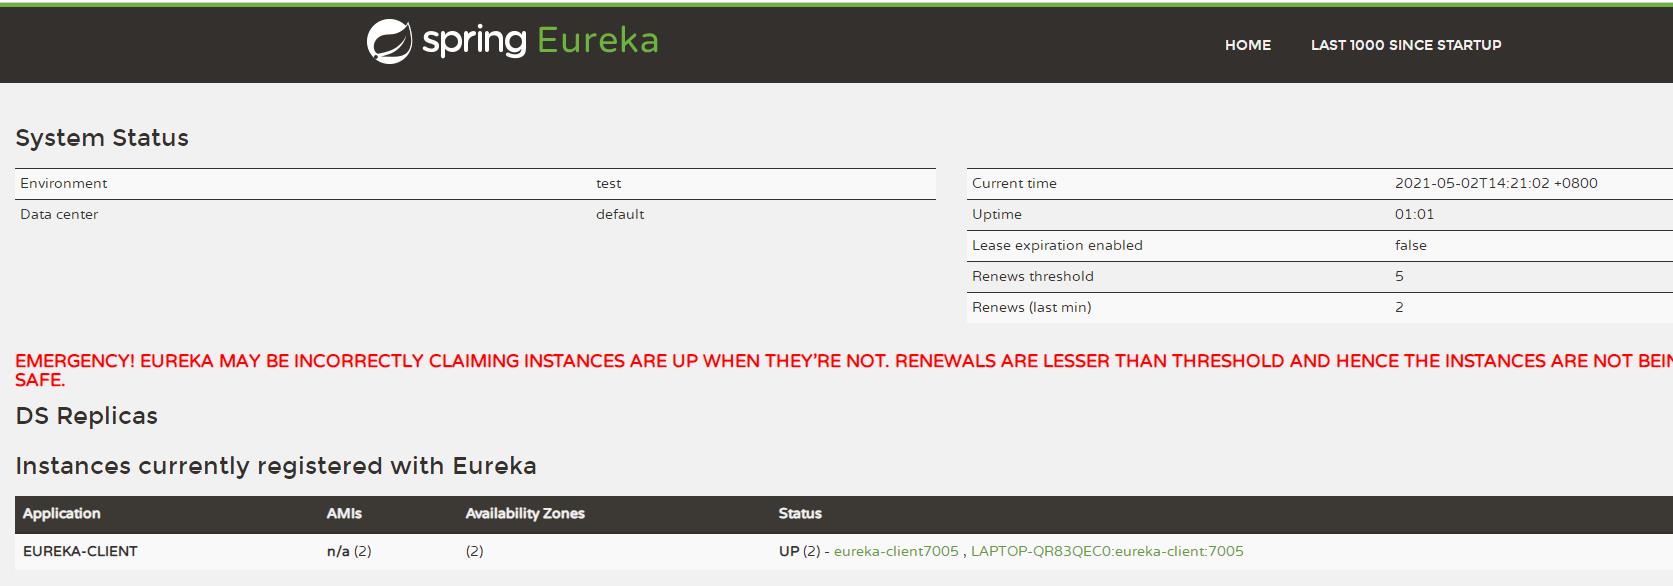
这里与前面相比,多了几个属性。一个是instance-id,这个表示的是展示的主机ID,然后prefer-ip-address表示的是需要展示的IP(不然展示的就是hostname主机名称),我们以这个配置启动客户端,再看eureka注册中心页面:

可以看到我们现在多例一个实例eureka-client7005,就是我们设置的instance-id。这里有一个问题,我们只是重启了服务,但为什么原来的实例名称LAPTOP-QR83QEC0:eureka-client:7005还是存在?这里我们下面再讲。
2)、eureka注册中心的自我保护
这个自我保护就是:我们知道一般在客户端与注册中心之间是通过定时发送心跳包来确定两服务都还是开启的,但可能存在暂时性的网络波动,我们一般不会例如因为一次或短期的几次就判定这个客户端已经挂了,直接将这个注册的服务就删除了,而是注册中心开启自我保护模式,即使发送心跳没有回复我们也先暂时保留,也不是直接删除,这个也是上面重启出现两个实例名称的原因。
下面我们就来关闭这个注册中心的自我保护机制,来让我们自己决定在什么情况下就可以删除注册的客户端了
注册中心的配置:
server:
  port: 7001

spring:
  application:
    name: eureka-server1
eureka:
  instance:
    hostname: localhost #本服务实例名称
  client:
    #需不需要将自己注册到注册中心 false表示不用将注册为server,因为其本身就是server
    register-with-eureka: false
    #需不需要从注册中心获取其他的服务,由于是服务端,其是维护服务的,所以其也为false
    fetch-registry: false
    service-url:
      defaultZone: http://${eureka.instance.hostname}:${server.port}/eureka/
  server:
    # 设置不自我保留false,默认为true
    enable-self-preservation: false
    # 有多久没有心跳就删除客户端实例 (单位: ms)
    eviction-interval-timer-in-ms: 5000
客户端配置:
server:
  port: 7005
eureka:
  instance:
    hostname: localhost
    # 主机ID
    instance-id: eureka-client7005
    # 展示主机IP
    prefer-ip-address: true
    # 表示多久向注册中心发生一次心跳
    lease-renewal-interval-in-seconds: 1
    # 心跳的到期时间
    lease-expiration-duration-in-seconds: 2
    # 主机IP
  client:
    # 从注册中心获取注册信息
    fetch-registry: true
    # 将本服务注册到注册中心
    register-with-eureka: true
    service-url:
     defaultZone: http://localhost:7001/eureka
spring:
  application:
    name: eureka-client
可以看到这里主要是设置了4个属性,注册中心与客户端分别的两个。这个就能我们自己看着多久删除实例了。
四、OpenFeign使用
首先我们需要知道OpenFeign是用来干什么的,我们使用微服务一般是会在两个服务之间进行服务调用,这个调用一般是可以使用Http请求,但在微服务中我们一般是不会自己自己去写Http请求来获取&解析返回结果的。在微服务的整个生态中一般会有组件来封装这个Http请求,来将这些http请求直接封装为接口调用的形式,让你无感知Http请求,而是直接以接口的方式来获取另一个微服务的返回。OpenFeign就是一种怎样的组件,其就是一个接口形式的Http请求,具体的Http实现由OpenFeign内部实现。
1、项目使用
1)、生产者(被请求方)
我们先在原来的EurekaClient1提供一个Controller方法。
@RestController
public class Client1Controller {

    @Value("${server.port}")
    private Long nowPort;

    @RequestMapping(value = "getClientInfo",method = RequestMethod.GET)
    public String getClientInfo(@RequestParam("name") String name)
    {
        return name + " request client, now port is : "+ nowPort;
    }

}
然后我们启动,请求http://localhost:7005/getClientInfo,就能获取当前的返回:
now port is : 7005
2)、消费者(请求方)
现在我们来创建client2项目,所有的POM&application.yml都与client1项目相同,但我们需要改下配置文件的端口,我们改为7006,以及实例id(instance-id)。下面我们来写下client2的Controller,用其使用OpenFeign来调用client1的方法。
要使用OpenFeign我们首先需要引入maven依赖:
<dependency>
    <groupId>org.springframework.cloud</groupId>
    <artifactId>spring-cloud-starter-openfeign</artifactId>
</dependency>
然后在Application类中添加注解@EnableFeignClients。
然后我们来写Controller&Service的内容:
@RestController
public class Client2Controller {

    @Autowired
    private FeignServiceClient feignServiceClient;

    @RequestMapping(value = "client2/getClientInfo",method = RequestMethod.GET)
    public String getClientInfo(@RequestParam("name") String name)
    {
        return feignServiceClient.getClientInfo(name);
    }

}
@FeignClient(name = "eureka-client")  // 被调用的服务名称
public interface FeignServiceClient {

    @RequestMapping(value = "/getClientInfo",method = RequestMethod.GET)
    String getClientInfo(@RequestParam("name") String name);
}
我们可以看到FeignServiceClient,其通过@FeignClient注解,然后写上name被调研的服务名称,再使用接口结合@RequestMapping就是一个接口方法就完成了其他服务的调用,同时这个Http请求对于我们来说是透明的,我们直接面向的是一个接口方法。
然后我们请求http://localhost:7006/client2/getClientInfo?name=client2,就可以看到其调用7005机器的返回:
client2 request client, now port is : 7005
2、openFeign的属性设置
1)、超时配置
我们在client2中添加yml配置:
ribbon:
  ReadTimeOut: 5000	#建立连接的超时时间
  connectionTimeOut: 5000  # 请求的超时时间
这里为什么是ribbon开头的呢?因为Feign是集成了ribbon。
然后我们需要修改client1中的Controller方法:
@RestController
public class Client1Controller {

    @Value("${server.port}")
    private Long nowPort;

    @RequestMapping(value = "/getClientInfo",method = RequestMethod.GET)
    public String getClientInfo(@RequestParam("name") String name)
    {
        try {
            Thread.sleep(6000L);
        } catch (InterruptedException e) {
            e.printStackTrace();
        }
        return name + " request client, now port is : "+ nowPort;
    }

}
这里我们让它睡眠了6秒钟,我们再通过http://localhost:7006/client2/getClientInfo?name=client2请求client2就会报超时异常了:
java.net.SocketTimeoutException: Read timed out
	at java.base/java.net.SocketInputStream.socketRead0(Native Method) ~[na:na]
	at java.base/java.net.SocketInputStream.socketRead(SocketInputStream.java:116) ~[na:na]
	at java.base/java.net.SocketInputStream.read(SocketInputStream.java:171) ~[na:na]
	at java.base/java.net.SocketInputStream.read(SocketInputStream.java:141) ~[na:na]
	at java.base/java.io.BufferedInputStream.fill(BufferedInputStream.java:246) ~[na:na]
	at java.base/java.io.BufferedInputStream.read1(BufferedInputStream.java:286) ~[na:na]
	at java.base/java.io.BufferedInputStream.read(BufferedInputStream.java:345) ~[na:na]
五、hystrix的使用
1、hystrix的介绍
hystrix是断路器,一般用于方法调用的降级、熔断,而且一般是用于远程调用的,例如结合OpenFeign来使用。
2、项目使用
我们所有前面的client2服务,然后要使用hystrix我们需要引入依赖
<dependency>
    <groupId>org.springframework.cloud</groupId>
    <artifactId>spring-cloud-starter-netflix-hystrix</artifactId>
</dependency>
1)、简单使用
我们先写一个简单的Service:
@Service
public class HystrixClientService {

    /**
     * @see @HystrixProperty的其他属性可以看 {https://github.com/Netflix/Hystrix/wiki/Configuration}
     *   hystrixExecutionFailure表示这个方法发生异常会调用的方法,然后后面的timeoutInMilliseconds是设置这个方法调用执行	   *	的超时时间
     * @return
     */
    @HystrixCommand(fallbackMethod = "hystrixExecutionFailure",
    commandProperties = {
            @HystrixProperty(name = "execution.isolation.thread.timeoutInMilliseconds",value = "3000")
    })
    public String hystrixInfo()
    {
        return "success ";
    }

    public String hystrixExecutionFailure()
    {
        return "execution failure !!!";
    }

}
然后我们在原来的Controller再添加另一个方法
@RequestMapping(value = "client2/executionHystrix",method = RequestMethod.GET)
public String executionHystrix()
{
    return hystrixClientService.hystrixInfo();
}
我们现在请求http://localhost:7006/client2/executionHystrix,其返回是:
success
下面我们改下service的方法,添加睡眠4秒钟
   /**
     * @see @HystrixProperty的其他属性可以看 {https://github.com/Netflix/Hystrix/wiki/Configuration}
     * @return
     */
    @HystrixCommand(fallbackMethod = "hystrixExecutionFailure",
    commandProperties = {
            @HystrixProperty(name = "execution.isolation.thread.timeoutInMilliseconds",value = "3000")
    })
    public String hystrixInfo()
    {
        try {
            Thread.sleep(4000L);
        } catch (InterruptedException e) {
            e.printStackTrace();
        }
        return "success ";
    }
我们再来请求,前端返回的是
execution failure !!!
后端控制台已经报错了
java.lang.InterruptedException: sleep interrupted
	at java.base/java.lang.Thread.sleep(Native Method)
	at com.fev.service.HystrixClientService.hystrixInfo(HystrixClientService.java:27)
	at java.base/jdk.internal.reflect.NativeMethodAccessorImpl.invoke0(Native Method)
同时这里还可以使用一个注解来确定默认的fallback方法DefaultProperties:
@Service
@DefaultProperties(defaultFallback = "defaultFailure")
public class HystrixClientService {

    /**
     * @see @HystrixProperty的其他属性可以看 {https://github.com/Netflix/Hystrix/wiki/Configuration}
     * @return
     */
    /*@HystrixCommand(fallbackMethod = "hystrixExecutionFailure",
    commandProperties = {
            @HystrixProperty(name = "execution.isolation.thread.timeoutInMilliseconds",value = "3000")
    })*/
    @HystrixCommand
    public String hystrixInfo()
    {
        try {
            Thread.sleep(4000L);
        } catch (InterruptedException e) {
          以上是关于SpringCloud篇-SpringCloud基本使用的主要内容,如果未能解决你的问题,请参考以下文章