Linux系统-LNMP部署农场牧场
Posted Mr.zhou_Zxy
tags:
篇首语:本文由小常识网(cha138.com)小编为大家整理,主要介绍了Linux系统-LNMP部署农场牧场相关的知识,希望对你有一定的参考价值。
部署农场牧场
转载:https://blog.csdn.net/m0_51197424/article/details/116613803
一 部署LNMP环境
LNMP就是Linux+nginx+mysql+php
Linux是一类Unix计算机操作系统的统称。
Nginx是一个高性能的HTTP和反向代理服务器。
MySQL是一个小型关系型数据库管理系统
PHP是一种在服务器端执行的嵌入式html文档的脚本语言
这四种软件均为开源免费软件,组合到一起,成为一个免费、高校、扩展性强的网站服务系统。
1.安装nginx
[root@hadoop-clone1 apps]# yum -y install wget
[root@hadoop-clone1 apps]# wget -O /etc/yum.repos.d/CentOS-Base.repo http://mirrors.aliyun.com/repo/Centos-7.repo
[root@hadoop-clone1 apps]#  yum -y install epel-release
[root@hadoop-clone1 apps]# yum -y install nginx
已加载插件:fastestmirror
Loading mirror speeds from cached hostfile
 * base: mirrors.aliyun.com
 * extras: mirrors.163.com
 * updates: mirrors.aliyun.com
base                                                               | 3.6 kB  00:00:00
extras                                                             | 2.9 kB  00:00:00
mysql-connectors-community                                         | 2.6 kB  00:00:00
mysql-tools-community                                              | 2.6 kB  00:00:00
mysql56-community                                                  | 2.6 kB  00:00:00
......
已安装:
  nginx.x86_64 1:1.16.1-3.el7
tips: nginx不在官方的源中,需要添加第三方源或者手动安装
2.安装php服务及插件
[root@hadoop-clone1 apps]# yum -y install php php-fpm php-curl php-intl php-mysql
已加载插件:fastestmirror
Loading mirror speeds from cached hostfile
 * base: mirrors.aliyun.com
 * epel: mirrors.bfsu.edu.cn
 * extras: mirrors.163.com
 * updates: mirrors.aliyun.com


已安装:
  php.x86_64 0:5.4.16-48.el7               php-common.x86_64 0:5.4.16-48.el7          php-fpm.x86_64 0:5.4.16-48.el7
  php-intl.x86_64 0:5.4.16-48.el7          php-mysql.x86_64 0:5.4.16-48.el7

作为依赖被安装:
  apr.x86_64 0:1.4.8-7.el7                      apr-util.x86_64 0:1.5.2-6.el7       httpd.x86_64 0:2.4.6-97.el7.centos
  httpd-tools.x86_64 0:2.4.6-97.el7.centos      libicu.x86_64 0:50.2-4.el7_7        libzip.x86_64 0:0.10.1-8.el7
  mailcap.noarch 0:2.1.41-2.el7                 php-cli.x86_64 0:5.4.16-48.el7      php-pdo.x86_64 0:5.4.16-48.el7

完毕!
3.安装Mysql服务(熙哥)
## 1. 切换到本地yum仓库
[root@hadoop ~]# cd /etc/yum.repos.d/
[root@hadoop yum.repos.d]# ll
total 8
-rw-r--r-- 1 root root 614 Apr 25 10:07 CentOS-Base.repo
-rw-r--r-- 1 root root 230 Apr 25 10:07 CentOS-Epel.repo

##2. 本地安装引导
[root@hadoop software]# yum -y localinstall mysql-community-release-el6-5.noarch.rpm

##3. 安装
[root@hadoop yum.repos.d]# yum -y install mysql-server

##4. 启动服务
[root@hadoop yum.repos.d]# service mysqld start

##5. 初始化密码
[root@hadoop yum.repos.d]# mysqladmin -uroot password '123456'

##6. 登陆
[root@hadoop yum.repos.d]# mysql -uroot -p123456

##7. 远程授权
mysql> grant all privileges on *.* to root@"%" identified by '123456' with grant option;
mysql> flush privileges;

##8. 关闭防火墙
[root@hadoop ~]# service firewalld stop
Redirecting to /bin/systemctl stop firewalld.service
4.创建数据库
[root@hadoop-clone1 apps]# mysql -uroot -p111213


mysql> show databases;
+--------------------+
| Database           |
+--------------------+
| information_schema |
| mysql              |
| performance_schema |
+--------------------+
3 rows in set (0.34 sec)


mysql> create database ZXY;
Query OK, 1 row affected (0.00 sec)

mysql> show databases;
+--------------------+
| Database           |
+--------------------+
| information_schema |
| ZXY                |
| mysql              |
| performance_schema |
+--------------------+
4 rows in set (0.00 sec)
二 部署PHP
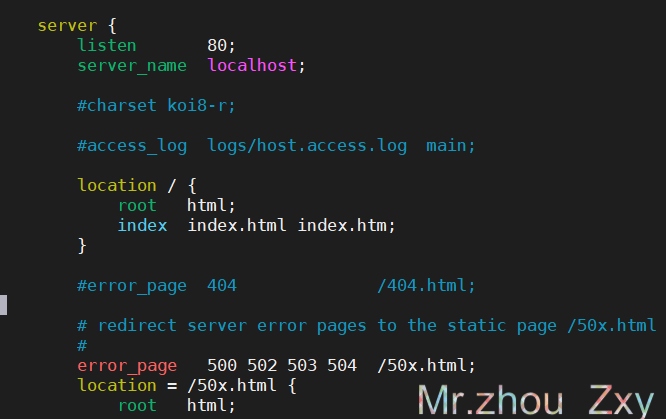
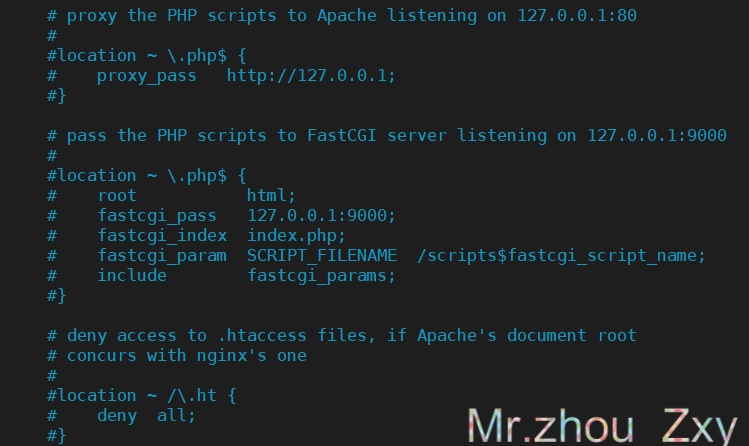
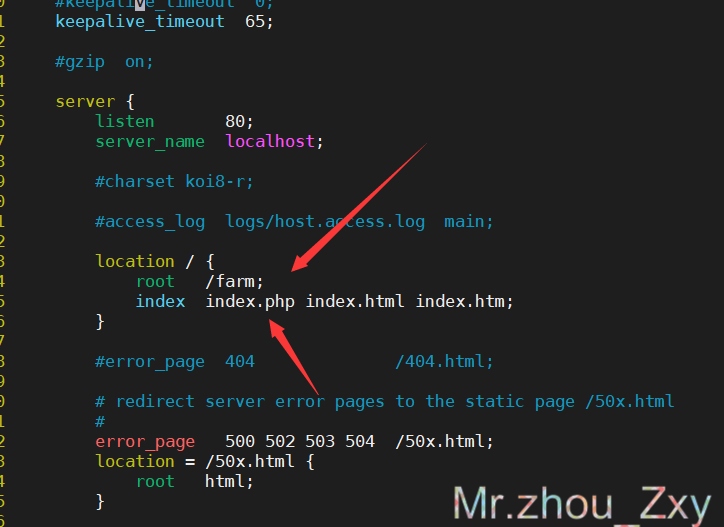
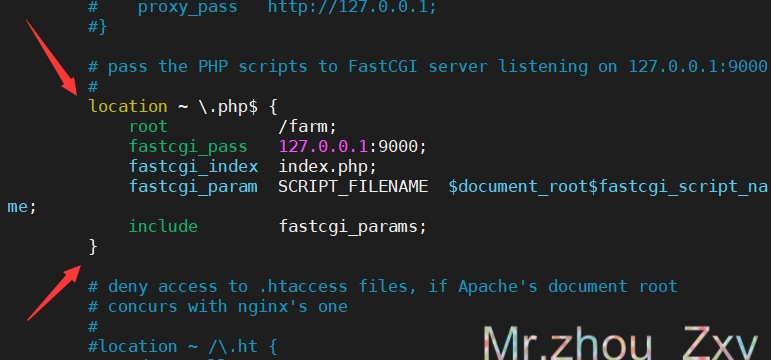
1.修改PHP配置文件
[root@hadoop-clone1]# rm -rf /etc/nginx/nginx.conf
[root@hadoop-clone1]# mv /etc/nginx/nginx.conf.default /etc/nginx/nginx.conf
[root@hadoop-clone1]# vim /etc/nginx/nginx.conf
-
修改前
-
修改后
2.部署PHP服务
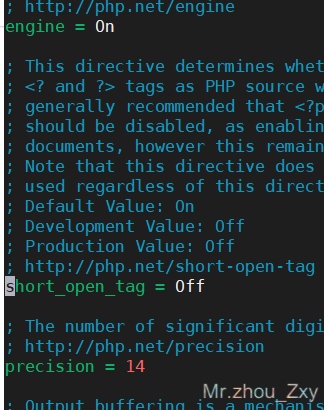
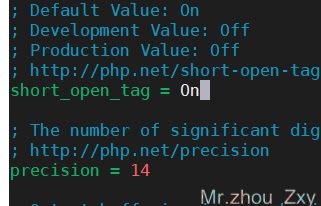
[root@hadoop-clone1]# vim /etc/php.in
- 修改前
 211 short_open_tag = Off
 212
 213 ; Allow ASP-style <% %> tags.
 214 ; http://php.net/asp-tags
 215 asp_tags = Off
- 修改后
 211 short_open_tag = On
 212
 213 ; Allow ASP-style <% %> tags.
 214 ; http://php.net/asp-tags
 215 asp_tags = Off
3.重启服务,让配置文件生效
[root@hadoop-clone1 etc]# systemctl restart nginx
[root@hadoop-clone1 etc]# echo $?
0
[root@hadoop-clone1 etc]# systemctl restart php-fpm
[root@hadoop-clone1 etc]# echo $?
0
三 项目部署
1. 上传项目
#1
[root@hadoop-clone1 /]# mkdir farm
#2
[root@hadoop-clone1 software]# yum -y install unzip
已加载插件:fastestmirror
Loading mirror speeds from cached hostfile
.......
已安装:
  unzip.x86_64 0:6.0-21.el7

完毕!
[root@hadoop-clone1 software]# echo $?
0
#3.
[root@hadoop-clone1 software]# unzip farm-ucenter1.5.zip
Archive:  farm-ucenter1.5.zip
   creating: upload/
   creating: upload/bbs/
   creating: upload/bbs/admin/
....
#4.
[root@hadoop-clone1 software]# cp -r upload/* /farm
#5.
[root@hadoop-clone1 software]# chmod 777 /farm -R
2. 将数据库导入
[root@hadoop-clone1 farm]# mysql -u root -p farm < qqfarm.sql
Enter password:
3. 关闭防火墙
[root@hadoop-clone1 farm]# systemctl stop firewalld
[root@hadoop-clone1 farm]# setenforcce 0
- 执行setenforce 0 表示关闭selinux防火墙
- SElinux是“Security Enhanced Linux”的缩写,安全性增强的linux,是linux系统中的一个安全子系统
4. 访问成功后数据
UCenter的访问网址:
http://192.168.130.131/ucenter

UCenter 创始人密码:111213


DISCUZ!的访问网址:
http://192.168.130.131/bbs

管理员访问网址:
http://192.168.130.131/bbs/admincp.php

管理员帐号:admin 管理员密码:111213


UCenter Home的访问网址:
http://192.168.130.131/home

管理员访问网址:
http://192.168.130.131/home/admincp.php

管理员帐号:admin 管理员密码:111213
四 成功页面


完成以上操作,就可以在自己的电脑上玩农场牧场了
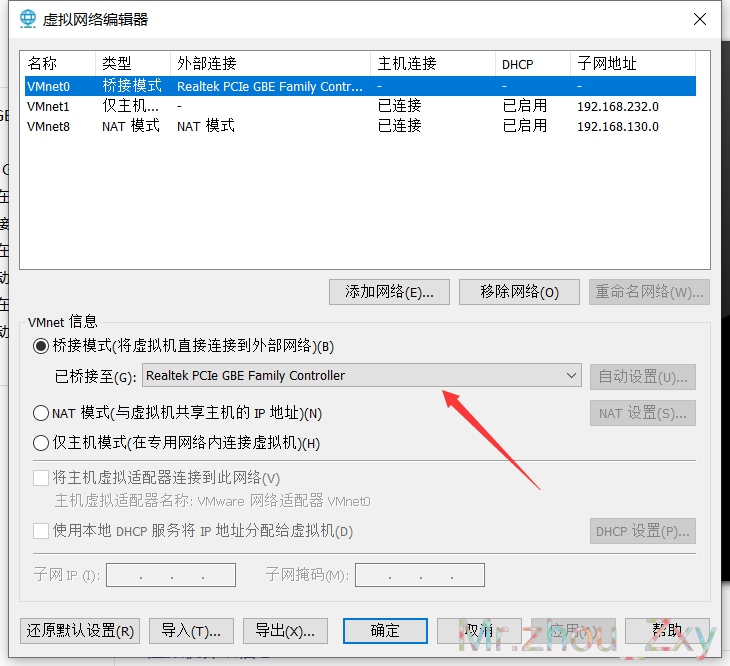
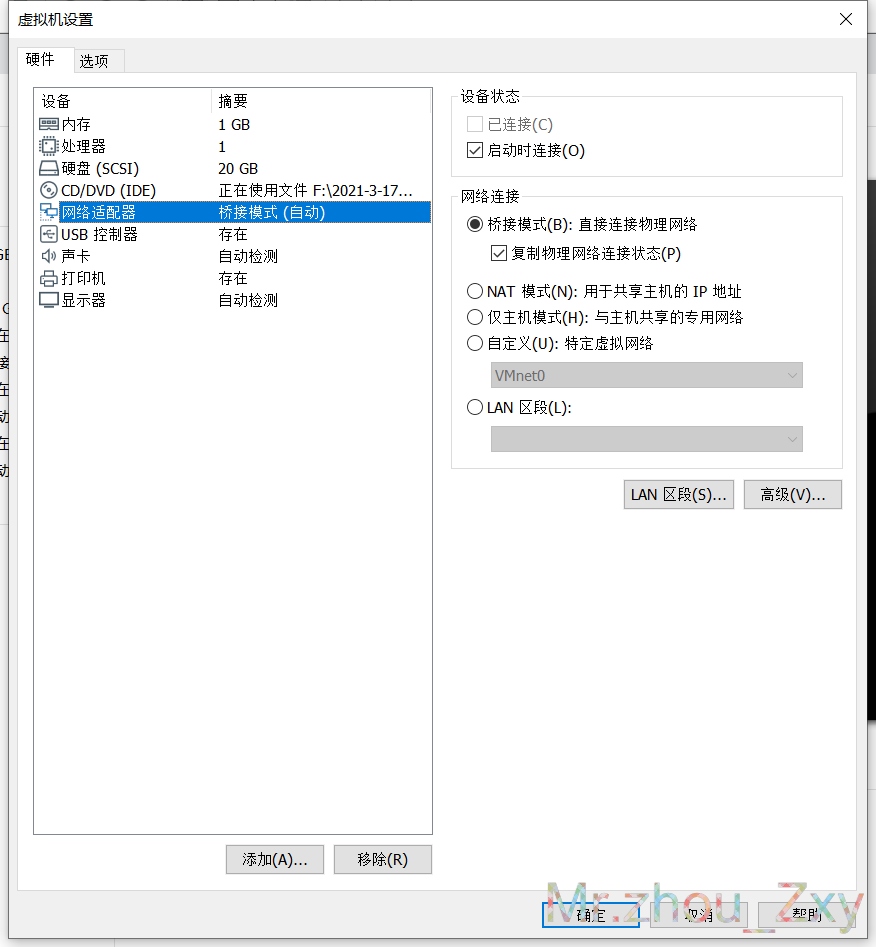
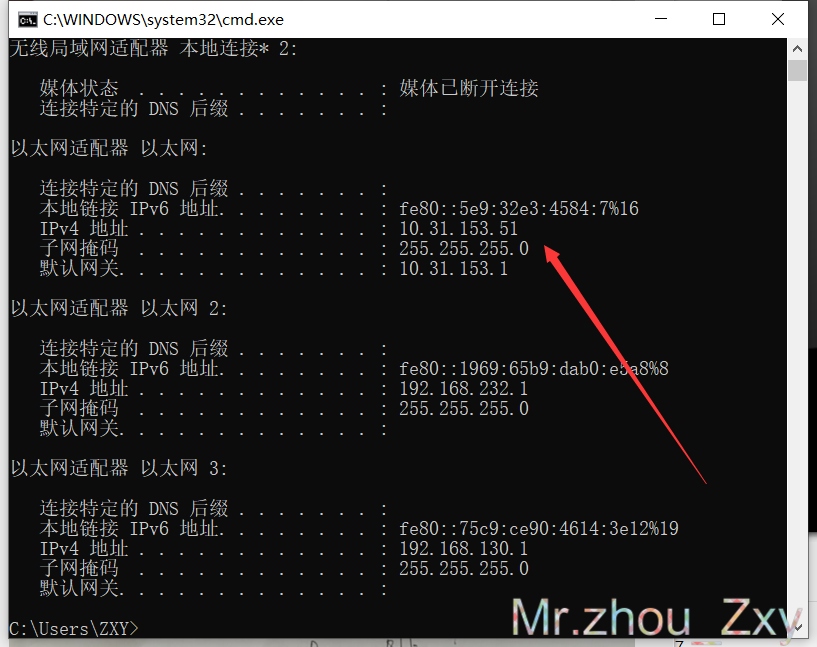
五 额外补充(NAT模式转桥接)
1.查看主机网络名称
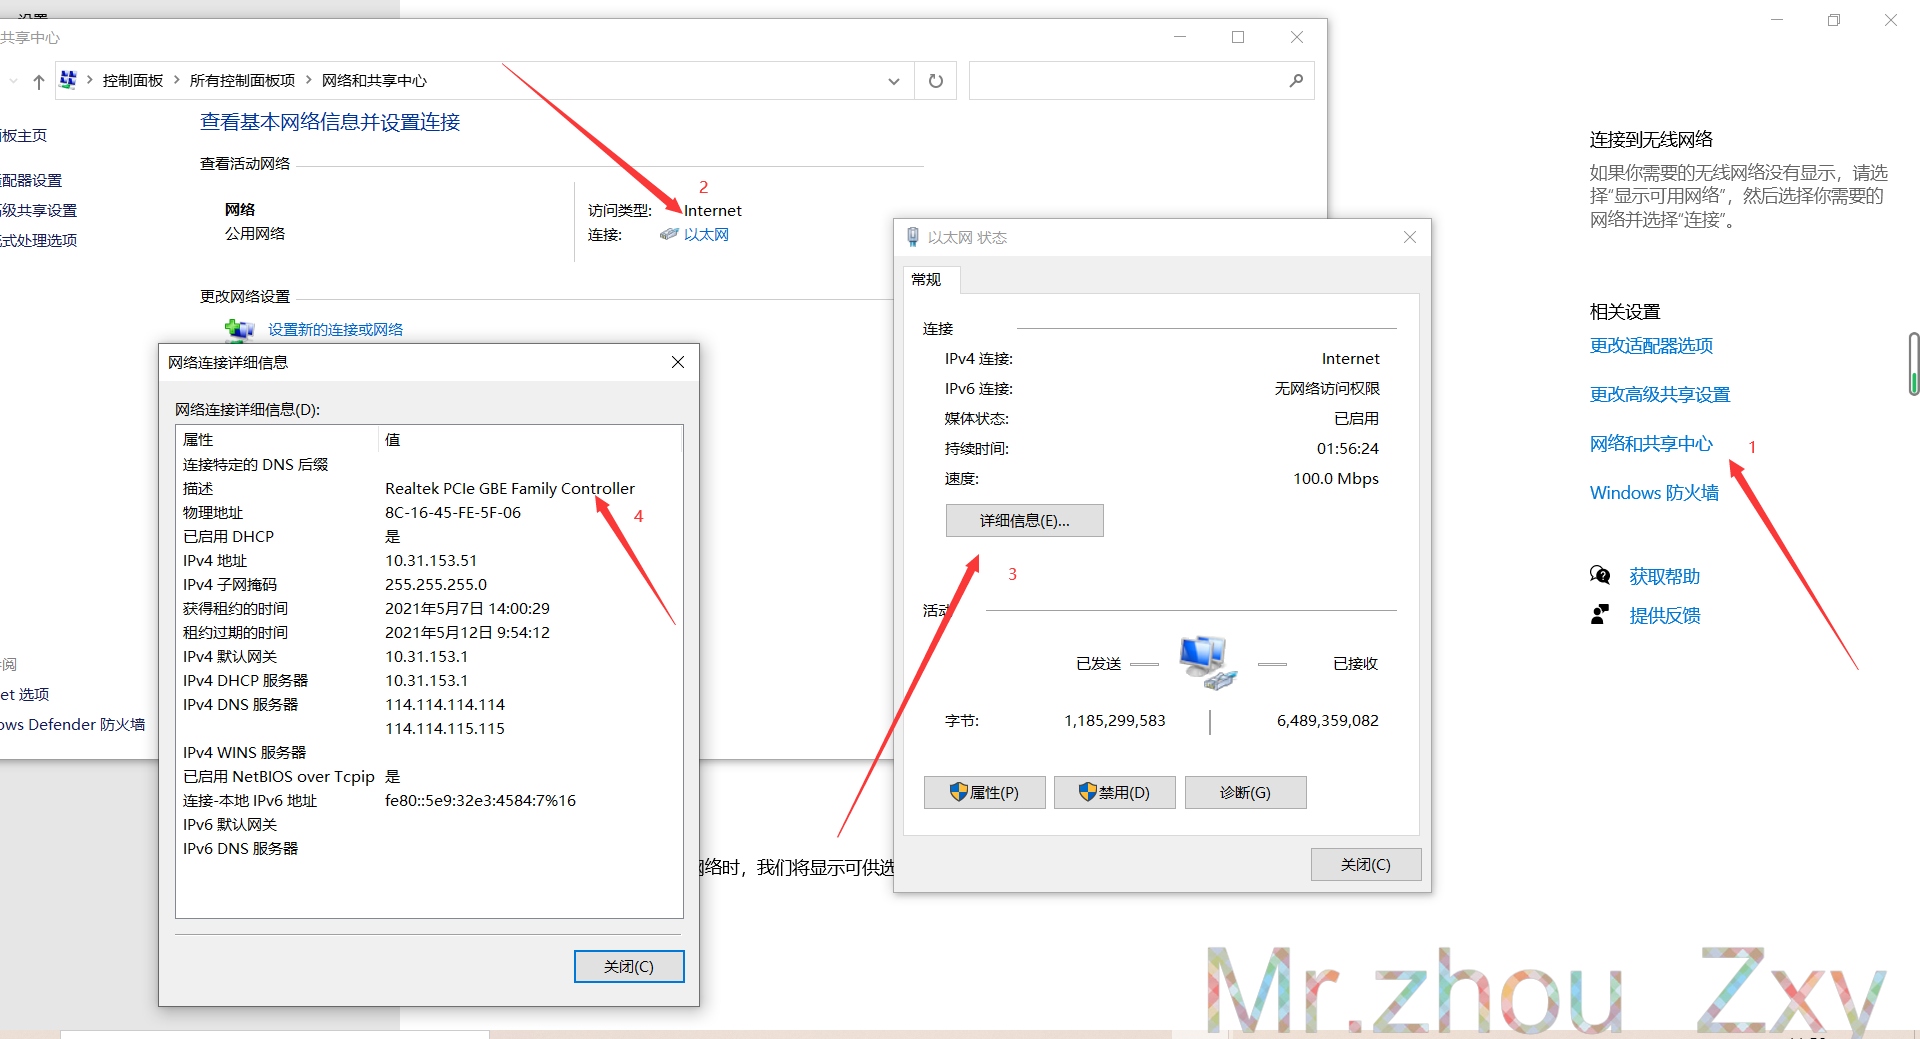
描述: Realtek PCIe GBE Family Controller
2.修改虚拟机配置
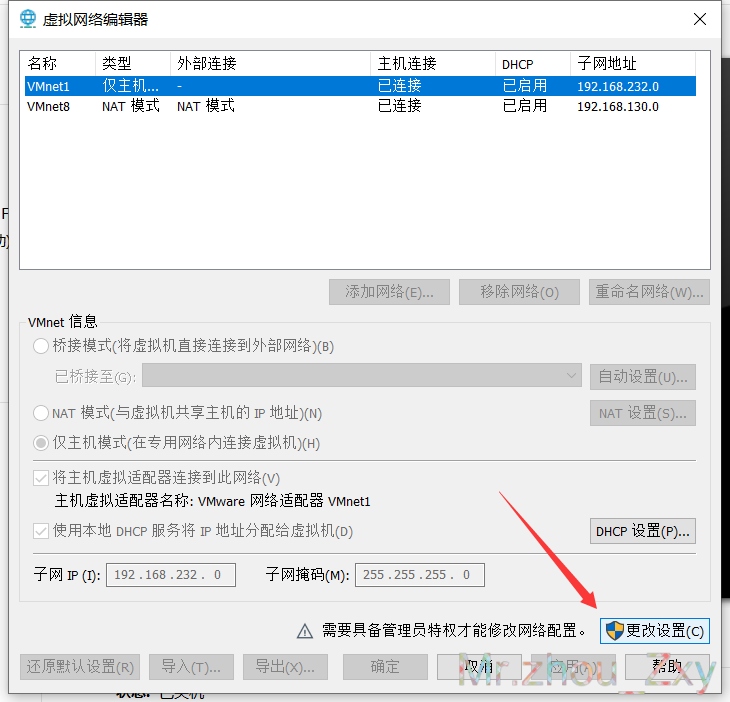
3.查看主机IP
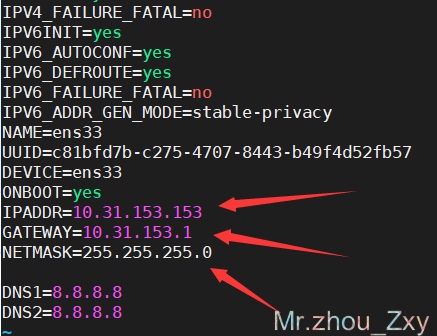
4.修改虚拟机IP
[root@hadoop-clone1 network-scripts]# cd /etc/sysconfig/network-scripts
[root@hadoop-clone1 network-scripts]# vi ifcfg-ens33
- 根据主机的IP地址、子网掩码、网关设置虚拟机网络
-
重启网卡服务
[root@VM-0-4-centos network-scripts]# service network restart
5.主机ping虚拟机
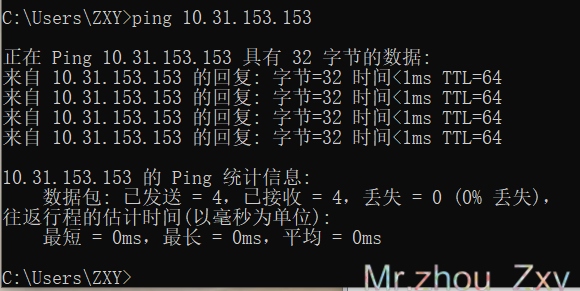
tips:http://10.31.153.153/
以上是关于Linux系统-LNMP部署农场牧场的主要内容,如果未能解决你的问题,请参考以下文章