运维实战案例 容器部分 使用Statefulset部署MySQL主从集群
Posted 洛冰音
tags:
篇首语:本文由小常识网(cha138.com)小编为大家整理,主要介绍了运维实战案例 容器部分 使用Statefulset部署MySQL主从集群相关的知识,希望对你有一定的参考价值。
运维实战案例 容器部分 使用Statefulset部署mysql主从集群
需求分析
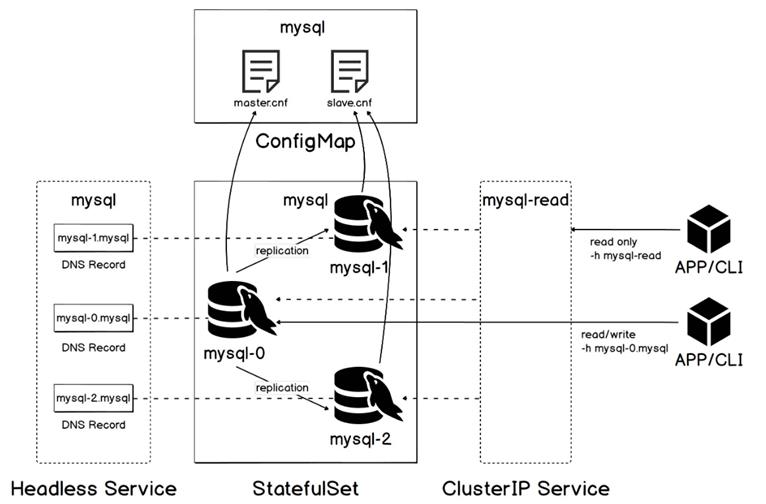
一主多从模式只能有一个写入端, 多个查询端需要能负载均衡和健康检查- 如何保证
MASTER端恒定且连接方式不飘逸 - 解决主从机配置文件不同的问题
- 每台机器的配置文件中
server-id不同, 如何用同一个配置文件模板为所有从机分配各自的配置文件 - 如何进行数据的持久化
解决思路
-
根据
StatefulSet控制器的特点, 上一个Pod报告就绪后, 才会开始生成下一个Pod, 因此我们可以断定, 第一个就绪的Pod一定是MASTER端, 且如果MASTER端初始化出现问题, 整个后续都不会继续. -
根据
Headless Service的特点, 首先启动的Pod一定对应的是mysql-0.mysql, 后续会被Pod的DNS自行补全, 因此MASTER端的唯一性和确定性也可以保证 -
所有
Pod又可以放入一个新的svc中管理, 通过ClusterIP实现负载均衡和健康检查 -
之前我们学过, 在容器创建前依旧会有
Init 容器存在, 且顺序执行, 将配置文件的放入和处理操作在Init 容器中执行, 既可以保证容器创建时有符合要求的配置文件,Init 容器本身顺序执行且必须执行完毕的特性也保证了只要逻辑得当, 生成的配置文件一定是符合要求的 -
两个
Service实现读写分离 -
借助
Init 容器实现对配置文件的操作 -
StatefulSet控制器实现有序建立和定位 -
PVC动态生成PV来实现数据持久化
参考教程
注意事项
- 实验采用的设置都不是生产环境下的设置, 并不具备生产环境的安全性
- 重点在于构建的思路
ConfigMap部分
- 通过
ConfigMap实现将配置模板挂入Pod中的目的
apiVersion: v1
kind: ConfigMap
metadata:
  name: mysql
  labels:
    app: mysql
data:
  master.cnf: |
    # Apply this config only on the master.
    [mysqld]
    log-bin
  slave.cnf: |
    # Apply this config only on slaves.
    [mysqld]
    super-read-only
可以看到master.cnf和slave.cnf被分别存放, slave.cnf中包括super-read-only参数来实现只读, 这一步是为了提供my.cnf的内容
Service部分
- 创建读写分离所需要的两个服务
- 写服务为
Headless Service
# Headless service for stable DNS entries of StatefulSet members.
apiVersion: v1
kind: Service
metadata:
  name: mysql
  labels:
    app: mysql
spec:
  ports:
  - name: mysql
    port: 3306
  clusterIP: None
  selector:
    app: mysql
---
# Client service for connecting to any MySQL instance for reads.
# For writes, you must instead connect to the master: mysql-0.mysql.
apiVersion: v1
kind: Service
metadata:
  name: mysql-read
  labels:
    app: mysql
spec:
  ports:
  - name: mysql
    port: 3306
  selector:
    app: mysql
无头服务为每个Pod提供一个DNS解析, 因为服务名为 mysql, 所以可以通过在同一 Kubernetes 集群和名字中的任何其他 Pod 内解析 <Pod 名称>.mysql 来访问 Pod, 又因为MASTER端永远第一个被建立, 因此其解析地址永远为mysql-0.mysql
Read相关的服务就是普通的服务, 通过ClusterIP提供负载均衡和健康检查
StatefulSet控制器部分
也是本实验最重要的部分, 可以说以下内容都是通过StatefulSet的特性来实现的
- 配置文件中
server-id的有序递增 Pod创建顺序的有序化- 新生成的
Pod从上一个Pod复制数据的实现
apiVersion: apps/v1
kind: StatefulSet
metadata:
  name: mysql
spec:
  selector:
    matchLabels:
      app: mysql
  serviceName: mysql
  replicas: 3
  template:
    metadata:
      labels:
        app: mysql
    spec:
      initContainers:
      - name: init-mysql
        image: mysql:5.7
        command:
        - bash
        - "-c"
        - |
          set -ex
          # Generate mysql server-id from pod ordinal index.
          [[ `hostname` =~ -([0-9]+)$ ]] || exit 1
          ordinal=${BASH_REMATCH[1]}
          echo [mysqld] > /mnt/conf.d/server-id.cnf
          # Add an offset to avoid reserved server-id=0 value.
          echo server-id=$((100 + $ordinal)) >> /mnt/conf.d/server-id.cnf
          # Copy appropriate conf.d files from config-map to emptyDir.
          if [[ $ordinal -eq 0 ]]; then
            cp /mnt/config-map/master.cnf /mnt/conf.d/
          else
            cp /mnt/config-map/slave.cnf /mnt/conf.d/
          fi
        volumeMounts:
        - name: conf
          mountPath: /mnt/conf.d
        - name: config-map
          mountPath: /mnt/config-map
      - name: clone-mysql
        image: gcr.io/google-samples/xtrabackup:1.0
        command:
        - bash
        - "-c"
        - |
          set -ex
          # Skip the clone if data already exists.
          [[ -d /var/lib/mysql/mysql ]] && exit 0
          # Skip the clone on master (ordinal index 0).
          [[ `hostname` =~ -([0-9]+)$ ]] || exit 1
          ordinal=${BASH_REMATCH[1]}
          [[ $ordinal -eq 0 ]] && exit 0
          # Clone data from previous peer.
          ncat --recv-only mysql-$(($ordinal-1)).mysql 3307 | xbstream -x -C /var/lib/mysql
          # Prepare the backup.
          xtrabackup --prepare --target-dir=/var/lib/mysql
        volumeMounts:
        - name: data
          mountPath: /var/lib/mysql
          subPath: mysql
        - name: conf
          mountPath: /etc/mysql/conf.d
      containers:
      - name: mysql
        image: mysql:5.7
        env:
        - name: MYSQL_ALLOW_EMPTY_PASSWORD
          value: "1"
        ports:
        - name: mysql
          containerPort: 3306
        volumeMounts:
        - name: data
          mountPath: /var/lib/mysql
          subPath: mysql
        - name: conf
          mountPath: /etc/mysql/conf.d
        resources:
          requests:
            cpu: 500m
            memory: 1Gi
        livenessProbe:
          exec:
            command: ["mysqladmin", "ping"]
          initialDelaySeconds: 30
          periodSeconds: 10
          timeoutSeconds: 5
        readinessProbe:
          exec:
            # Check we can execute queries over TCP (skip-networking is off).
            command: ["mysql", "-h", "127.0.0.1", "-e", "SELECT 1"]
          initialDelaySeconds: 5
          periodSeconds: 2
          timeoutSeconds: 1
      - name: xtrabackup
        image: gcr.io/google-samples/xtrabackup:1.0
        ports:
        - name: xtrabackup
          containerPort: 3307
        command:
        - bash
        - "-c"
        - |
          set -ex
          cd /var/lib/mysql

          # Determine binlog position of cloned data, if any.
          if [[ -f xtrabackup_slave_info && "x$(<xtrabackup_slave_info)" != "x" ]]; then
            # XtraBackup already generated a partial "CHANGE MASTER TO" query
            # because we're cloning from an existing slave. (Need to remove the tailing semicolon!)
            cat xtrabackup_slave_info | sed -E 's/;$//g' > change_master_to.sql.in
            # Ignore xtrabackup_binlog_info in this case (it's useless).
            rm -f xtrabackup_slave_info xtrabackup_binlog_info
          elif [[ -f xtrabackup_binlog_info ]]; then
            # We're cloning directly from master. Parse binlog position.
            [[ `cat xtrabackup_binlog_info` =~ ^(.*?)[[:space:]]+(.*?)$ ]] || exit 1
            rm -f xtrabackup_binlog_info xtrabackup_slave_info
            echo "CHANGE MASTER TO MASTER_LOG_FILE='${BASH_REMATCH[1]}',\\
                  MASTER_LOG_POS=${BASH_REMATCH[2]}" > change_master_to.sql.in
          fi

          # Check if we need to complete a clone by starting replication.
          if [[ -f change_master_to.sql.in ]]; then
            echo "Waiting for mysqld to be ready (accepting connections)"
            until mysql -h 127.0.0.1 -e "SELECT 1"; do sleep 1; done

            echo "Initializing replication from clone position"
            mysql -h 127.0.0.1 \\
                  -e "$(<change_master_to.sql.in), \\
                          MASTER_HOST='mysql-0.mysql', \\
                          MASTER_USER='root', \\
                          MASTER_PASSWORD='', \\
                          MASTER_CONNECT_RETRY=10; \\
                        START SLAVE;" || exit 1
            # In case of container restart, attempt this at-most-once.
            mv change_master_to.sql.in change_master_to.sql.orig
          fi

          # Start a server to send backups when requested by peers.
          exec ncat --listen --keep-open --send-only --max-conns=1 3307 -c \\
            "xtrabackup --backup --slave-info --stream=xbstream --host=127.0.0.1 --user=root"
        volumeMounts:
        - name: data
          mountPath: /var/lib/mysql
          subPath: mysql
        - name: conf
          mountPath: /etc/mysql/conf.d
        resources:
          requests:
            cpu: 100m
            memory: 100Mi
      volumes:
      - name: conf
        emptyDir: {}
      - name: config-map
        configMap:
          name: mysql
  volumeClaimTemplates:
  - metadata:
      name: data
    spec:
      accessModes: ["ReadWriteOnce"]
      resources:
        requests:
          storage: 10Gi
上面的很长很长的资源清单可以拆分为几个部分来看
第一部分
- 生成第一个初始化容器:
init-mysql, 用MySQL 5.7的镜像作为母盘构建数据库本体服务的容器 - 采用
创建顺序 + 100作为server-id的形式进行配置文件的修改 - 将
conf和config-map两个数据盘挂载进容器
第二部分
-
生成第二个初始化容器:
clone-mysql, 用来进行数据同步, 第一次在带有空PersistentVolume的副本Pod上启动时, 会在从属Pod上执行克隆操作. -
这意味着它将从另一个运行中的
Pod复制所有现有数据, 使此其本地状态足够一致, 从而可以开始从主服务器复制. -
当新 Pod 作为副本节点加入集合时, 必须假定 MySQL 主节点可能已经有数据. 还必须假设复制日志可能不会一直追溯到时间的开始.
-
用
xtrabackup:1.0的镜像作为母盘构建数据复制的容器 -
在克隆期间, 源
MySQL服务器性能可能会受到影响. 为了最大程度地减少对MySQL主服务器的影响, 该脚本指示每个Pod从序号较低的Pod中克隆, 也就是上一个Pod. 可以这样做的原因是StatefulSet控制器始终确保在启动Pod N + 1之前Pod N已准备就绪. -
这个初始化容器使用
3307端口进行工作
Init 容器运行完成, 进入主要阶段
第三部分
- 所以实际上的
Pod由提供MySQL服务的MySQL容器和进行辅助的xtrabackup容器组成 xtrabackup容器查看查看克隆的数据文件, 确定是否有必要在副本服务器上初始化MySQL复制- 如果需要, 他将等待
mysqld准备就绪后复制, 这是用到了上面初始化容器中写好的复制参数 - 在执行了
CHANGE MASTER TO和START SLAVE之后, 数据完成同步 - 在同步完成后, 其也会自动寻找
MASTER端并连接 - 开始复制后,
xtrabackup容器监听来自其他Pod的连接, 处理其数据克隆请求. 如果StatefulSet扩大规模, 或者下一个Pod失去其PersistentVolumeClaim并需要重新克隆, 则此服务器将无限期保持运行
至此, 构建步骤完成
操作实录与测试流程
[root@Server2 MySQLStateful]# kubectl get pod -n nfs-client-provisioner
NAME                                     READY   STATUS    RESTARTS   AGE
nfs-client-provisioner-dbd6bcd94-4h6xh   1/1     Running   1          43h
[root@Server2 MySQLStateful]# systemctl enable --now nfs

[root@Server2 mnt]# cd MySQLStateful/
[root@Server2 MySQLStateful]# kubectl apply -f ConfigMap.yaml
configmap/mysql created
[root@Server2 MySQLStateful]# kubectl get cm
NAME               DATA   AGE
kube-root-ca.crt   1      3d
mysql              2      33s

[root@Server2 MySQLStateful]# kubectl apply -f Services.yaml
service/mysql created
service/mysql-read created
[root@Server2 MySQLStateful]# kubectl get svc
NAME         TYPE        CLUSTER-IP      EXTERNAL-IP   PORT(S)    AGE
kubernetes   ClusterIP   10.96.0.1       <none>        443/TCP    3d
mysql        ClusterIP   None            <none>        3306/TCP   5s
mysql-read   ClusterIP   10.111.252.35   <none>        3306/TCP   5s

[root@Server2 MySQLStateful]# kubectl apply -f StatefulSet.yaml
[root@Server2 MySQLStateful]# kubectl get pod
NAME      READY   STATUS     RESTARTS   AGE
mysql-0   2/2     Running    0          28s
mysql-1   2/2     Running    0          19s
mysql-2   0/2     Init:1/2   0          11s
[root@Server2 MySQLStateful]# kubectl get pod
NAME      READY   STATUS    RESTARTS   AGE
mysql-0   2/2     Running   0          2m25s
mysql-1   2/2     Running   0          2m16s
mysql-2   2/2     Running   0          2m8s

##运行测试Pod
[root@Server2 MySQLStateful]# kubectl run demo -it --image=mysql:5.7 -- bash
If you don't see a command prompt, try pressing enter.
root@demo:/# exit
exit
Session ended, resume using 'kubectl attach demo -c demo -i -t' command when the pod is running
[root@Server2 MySQLStateful]# kubectl get pod -o wide
NAME      READY   STATUS    RESTARTS   AGE     IP               NODE      NOMINATED NODE   READINESS GATES
demo      1/1     Running   1          20s     10.244.141.222   server3   <none>           <none>
mysql-0   2/2     Running   0          3m18s   10.244.22.20     server4   <none>           <none>
mysql-1   2/2     Running   0          3m9s    10.244.141.221   server3   <none>           <none>
mysql-2   2/2     Running   0          3m1s    10.244.22.21     server4   <none>           <none>
[root@Server2 MySQLStateful]# kubectl attach demo -it
If you don't see a command prompt, try pressing enter.

##连接Master端进行写入测试
root@demo:/# mysql mysql -h mysql-0.mysql
Reading table information for completion of table and column names
You can turn off this feature to get a quicker startup with -A

Welcome to the MySQL monitor.  Commands end with ; or \\g.
Your MySQL connection id is 178
Server version: 5.7.30-log MySQL Community Server (GPL)

Copyright (c) 2000, 2020, Oracle and/or its affiliates. All rights reserved.

Oracle is a registered trademark of Oracle Corporation and/or its
affiliates. Other names may be trademarks of their respective
owners.

Type 'help;' or '\\h' for help. Type '\\c' to clear the current input statement.

mysql> show databases;
+------------------------+
| Database               |
+------------------------+
| information_schema     |
| mysql                  |
| performance_schema     |
| sys                    |
| xtrabackup_backupfiles |
+------------------------+
5 rows in set (0.01 sec)

mysql> create database test;
Query OK, 1 row affected (0.02 sec)

mysql> show databases;
+------------------------+
| Database               |
+------------------------+
| information_schema     |
| mysql                  |
| performance_schema     |
| sys                    |
| test                   |
| xtrabackup_backupfiles |
+------------------------+
6 rows in set (0.02 sec)

mysql> exit
Bye

##分别连接其他终端进行读取测试, 测试主从复制情况
root@demo:/# mysql mysql -h mysql-1.mysql
Reading table information for completion of table and column names
You can turn off this feature to get a quicker startup with -A

Welcome to the MySQL monitor.  Commands end with ; or \\g.
Your MySQL connection id is 195
Server version: 5.7.30 MySQL Community Server (GPL)

Copyright (c) 2000, 2020, Oracle and/or its affiliates. All rights reserved.

Oracle is a registered trademark of Oracle Corporation and/or its
affiliates. Other names may be trademarks of their respective
owners.

Type 'help;' or '\\h' for help. Type '\\c' to clear the current input statement.

mysql> show databases;
+------------------------+
| Database               |
+------------------------+
| information_schema     |
| mysql                  |
| performance_schema     |
| sys                    |
| test                   |
| xtrabackup_backupfiles |
+------------------------+
6 rows in set (0.01 sec)

mysql> show slave status/G;
ERROR 1064 (42000): You have an error in your SQL syntax; check the manual that corresponds to your MySQL server version for the right syntax to use near '/G' at line 1
mysql> show slave status\\G;
*************************** 1. row ***************************
               Slave_IO_State: Waiting for master to send event
                  Master_Host: mysql-0.mysql
                  Master_User: root
                  Master_Port: 3306
                Connect_Retry: 10
              Master_Log_File: mysql-0-bin.000005
          Read_Master_Log_Pos: 313
               Relay_Log_File: mysql-1-relay-bin.000005
                Relay_Log_Pos: 530
        Relay_Master_Log_File: mysql-0-bin.000005
             Slave_IO_Running: Yes
            Slave_SQL_Running: Yes
              Replicate_Do_DB:
          Replicate_Ignore_DB:
           Replicate_Do_Table:
       Replicate_Ignore_Table:
      Replicate_Wild_Do_Table:
  Replicate_Wild_Ignore_Table:
                   Last_Errno: 0
                   Last_Error:
                 Skip_Counter: 0
          Exec_Master_Log_Pos: 313
              Relay_Log_Space: 907
              Until_Condition: None
               Until_Log_File:
                Until_Log_Pos: 0
           Master_SSL_Allowed: No
           Master_SSL_CA_File:
           Master_SSL_CA_Path:
              Master_SSL_Cert:
            Master_SSL_Cipher:
               Master_SSL_Key:
        Seconds_Behind_Master: 0
Master_SSL_Verify_Server_Cert: No
                Last_IO_Errno: 0
                Last_IO_Error:
               Last_SQL_Errno: 0
               Last_SQL_Error:
  Replicate_Ignore_Server_Ids:
             Master_Server_Id: 100
                  Master_UUID: d9f1bc4f-b463-11eb-80db-9637abf7b267
             Master_Info_File: /var/lib/mysql/master.info
                    SQL_Delay: 0
          SQL_Remaining_Delay: NULL
      Slave_SQL_Running_State: Slave has read all relay log; waiting for more updates
           Master_Retry_Count: 86400
                  Master_Bind:
      Last_IO_Error_Timestamp:
     Last_SQL_Error_Timestamp:
               Master_SSL_Crl:
           Master_SSL_Crlpath:
           Retrieved_Gtid_Set:
            Executed_Gtid_Set:
                Auto_Position: 0
         Replicate_Rewrite_DB:
                 Channel_Name:
           Master_TLS_Version:
1 row in set (0.00 sec)

ERROR:
No query specified
mysql> exit
Bye

root@demo:/# mysql mysql -h mysql-2.mysql
Reading table information for completion of table and column names
You can turn off this feature to get a quicker startup with -A

Welcome to the MySQL monitor.  Commands end with ; or \\g.
Your MySQL connection id is 205
Server version: 5.7.30 MySQL Community Server (GPL)

Copyright (c) 2000, 2020, Oracle and/or its affiliates. All rights reserved.

Oracle is a registered trademark of Oracle Corporation and/or its
affiliates. Other names may be trademarks of their respective
owners.

Type 'help;' or '\\h' for help. Type '\\c' to clear the current input statement.

mysql> show databases;
+------------------------+
| Database               |
+------------------------+
| information_schema     |
| mysql                  |
| performance_schema     |
| sys                    |
| test                   |
| xtrabackup_backupfiles |
+------------------------+
6 rows in set (0.01 sec)

root@demo:/# mysql mysql -h 10.111.252.35
Reading table information for completion of table and column names
You can turn off this feature to get a quicker startup with -A

Welcome to the MySQL monitor.  Commands end with ; or \\g.
Your MySQL connection id is 276
Server version: 5.7.30 MySQL Community Server (GPL)

Copyright (c) 2000, 2020, Oracle and/or its affiliates. All rights reserved.

Oracle is a registered trademark of Oracle Corporation and/or its
affiliates. Other names may be trademarks of their respective
owners.

Type 'help;' or '\\h' for help. Type '\\c' to clear the current input statement.

mysql> show databases;
+------------------------+
| Database               |
+------------------------+
| information_schema     |
| mysql                  |
| performance_schema     |
| sys                    |
| test                   |
| xtrabackup_backupfiles |
+------------------------+
6 rows in set (0.00 sec)

mysql> exit
Bye
root@demo:/# exit
exit
Session ended, resume using 'kubectl attach demo -c demo -i -t' command when the pod is running

##查看持续化存储情况
[root@Server2 MySQLStateful]# kubectl get pvc
NAME           STATUS   VOLUME                                     CAPACITY   ACCESS MODES   STORAGECLASS          AGE
data-mysql-0   Bound    pvc-c25eede4-6e01-4da5-84aa-fc37296570e1   10Gi       RWO            managed-nfs-storage   24m
data-mysql-1   Bound    pvc-d1f574cb-b8e5-4a3e-8f55-695f8dd36797   10Gi       RWO            managed-nfs-storage   23m
data-mysql-2   Bound    pvc-be316432-2b0c-411f-8554-ac32009c042f   10Gi       RWO            managed-nfs-storage   12m
[root@Server2 MySQLStateful]# kubectl get pv
NAME                                       CAPACITY   ACCESS MODES   RECLAIM POLICY   STATUS   CLAIM                  STORAGECLASS          REASON   AGE
pvc-be316432-2b0c-411f-8554-ac32009c042f   10Gi       RWO            Delete           Bound    default/data-mysql-2   managed-nfs-storage            12m
pvc-c25eede4-6e01-4da5-84aa-fc37296570e1   10Gi       RWO            Delete           Bound    default/data-mysql-0   managed-nfs-storage            24m
pvc-d1f574cb-b8e5-4a3e-8f55-695f8dd36797   10Gi       RWO            Delete           Bound    default/data-mysql-1   managed-nfs-storage            23m
以上是关于运维实战案例 容器部分 使用Statefulset部署MySQL主从集群的主要内容,如果未能解决你的问题,请参考以下文章