Android第十讲笔记(WebView,SharedPreferences)
Posted a碟
tags:
篇首语:本文由小常识网(cha138.com)小编为大家整理,主要介绍了Android第十讲笔记(WebView,SharedPreferences)相关的知识,希望对你有一定的参考价值。
目录
1.WebView
1.WebView概述
背景
手机QQ中打开网页

可以在app里面 访问网页
微信公众号

上述这些案例都是在手机的应用程序上实现了网页的插入。如何实现这些功能呢,就是WebView,它能用来显示网页。
android WebView在Android平台上是一个特殊的View,它能用来显示网
页,这个WebView类可以被用来在app中仅仅显示一张在线的网页,当 然还可以用来开发浏览器。
WebView内部实现是采用渲染引擎(WebKit)来展示view的内容,提供网 页前进后退、网页放大、缩小、搜索等功能。
WebView是一个基于WebKit引擎、展现Web页面的控件,Android的
WebView在低版本和高版本采用了不同的WebKit版本内核。
Android的Webview在低版本和高版本采用了不同的webkit版本内核,
4.4后直接使用了Chrome。
WebView的优点:
1.对于不同系统ios和Android,我们实现同一个功能需要写两种方法实现、但是通过写一个网页然后再用webview来加载的话就只需要写一个登录界面,也就是说减少了一半的工作量。
2.开发的内容可以随时修改,只需修改网页上的内容即可。
WebView的缺点:性能比不上Android原生实现
而现在的Androd开发,只在少量页面中用网页来实现。
2.准备工作
添加权限
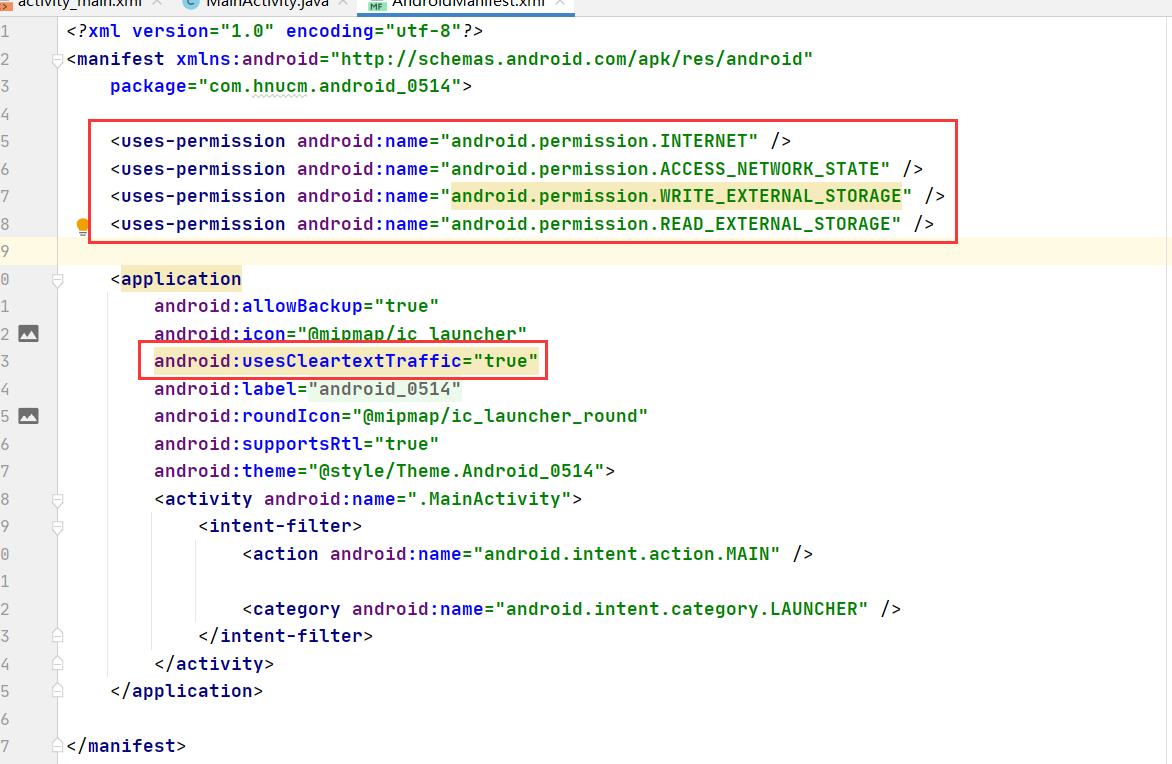
<uses-permission android:name="android.permission.INTERNET" />
<uses-permission android:name="android.permission.ACCESS_NETWORK_STATE" />
<uses-permission android:name="android.permission.WRITE_EXTERNAL_STORAGE" />
<uses-permission android:name="android.permission.READ_EXTERNAL_STORAGE" />
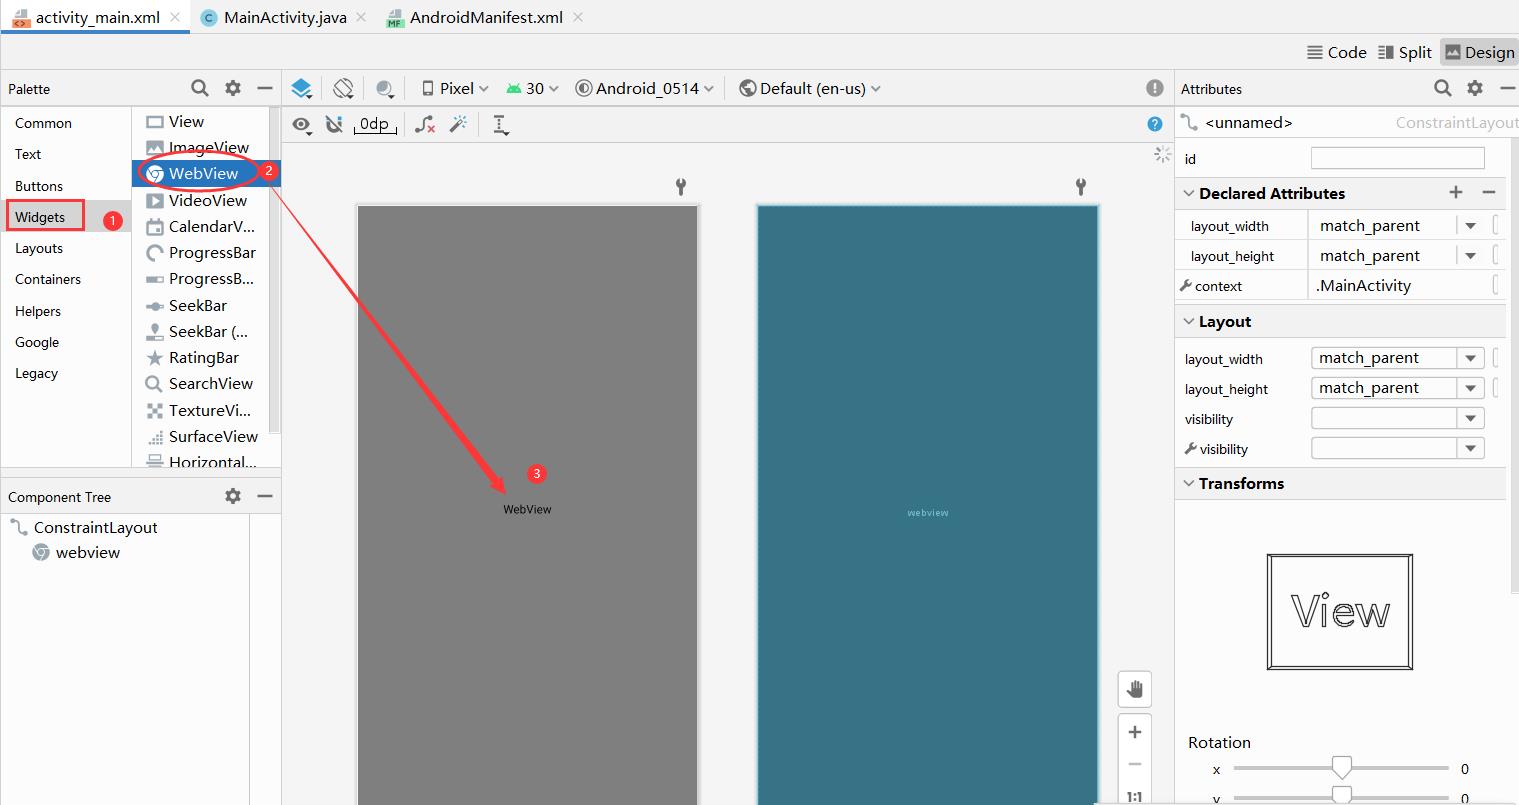
添加WebView在activity_main.xml中

MainActivity.java代码
package com.hnucm.android_0514;

import androidx.appcompat.app.AppCompatActivity;

import android.os.Bundle;
import android.webkit.WebView;

public class MainActivity extends AppCompatActivity {

    WebView webview;
    @Override
    protected void onCreate(Bundle savedInstanceState) {
        super.onCreate(savedInstanceState);
        setContentView(R.layout.activity_main);
        webview = findViewById(R.id.webview);
        webview.loadUrl("https://blog.csdn.net/ladiez?type=blog");
    }
}
如果网页是http请求头,Android会自动打开手机默认浏览器。
解决方法:改写上述代码

webView.setWebViewClient(new WebViewClient(){
            @Override
            public boolean shouldOverrideUrlLoading(WebView view, String url) {
                view.loadUrl(url);
                return true;
            }
        });
但是这样出来的页面
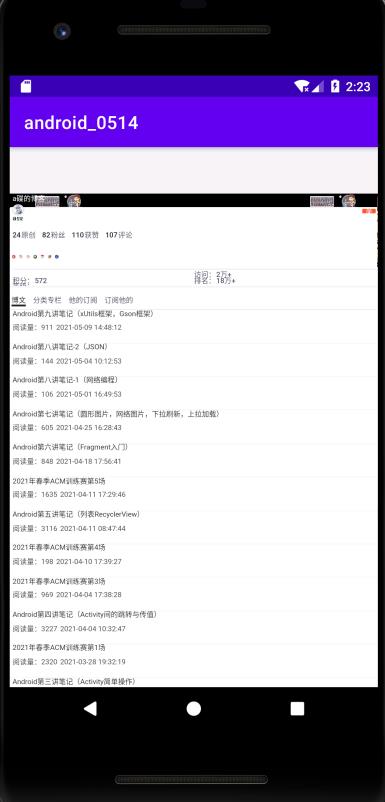
可以发现,页面的布局等等都不好看,而且无法点击
这个时候,我们需要加入配置的代码
WebSettings webSettings = webView.getSettings();
//如果访问的页面中要与javascript交互,则webview必须设置支持Javascript
        webSettings.setJavaScriptEnabled(true);

//设置自适应屏幕,两者合用
        webSettings.setUseWideViewPort(true); //将图片调整到适合webview的大小
        webSettings.setLoadWithOverviewMode(true); // 缩放至屏幕的大小
//自适应屏幕
        webView.getSettings().setLayoutAlgorithm(WebSettings.LayoutAlgorithm.SINGLE_COLUMN);
        webSettings.setLoadWithOverviewMode(true); // 缩放至屏幕的大小

//缩放操作
        webSettings.setSupportZoom(true); //支持缩放,默认为true。是下面那个的前提。
        webSettings.setBuiltInZoomControls(true); //设置内置的缩放控件。若为false,则该WebView不可缩放
        webSettings.setDisplayZoomControls(false); //隐藏原生的缩放控件

//其他细节操作
        webSettings.setCacheMode(WebSettings.LOAD_CACHE_ELSE_NETWORK); //关闭webview中缓存
        webSettings.setAllowFileAccess(true); //设置可以访问文件
        webSettings.setJavaScriptCanOpenWindowsAutomatically(true); //支持通过JS打开新窗口
        webSettings.setLoadsImagesAutomatically(true); //支持自动加载图片
        webSettings.setDefaultTextEncodingName("utf-8");//设置编码格式

//优先使用缓存
        webSettings.setCacheMode(WebSettings.LOAD_CACHE_ELSE_NETWORK);
//缓存模式如下:
//LOAD_CACHE_ONLY: 不使用网络,只读取本地缓存数据
//LOAD_DEFAULT: (默认)根据cache-control决定是否从网络上取数据。
//LOAD_NO_CACHE: 不使用缓存,只从网络获取数据.
//LOAD_CACHE_ELSE_NETWORK,只要本地有,无论是否过期,或者no-cache,都使用缓存中的数据
//不使用缓存
        webSettings.setCacheMode(WebSettings.LOAD_NO_CACHE);
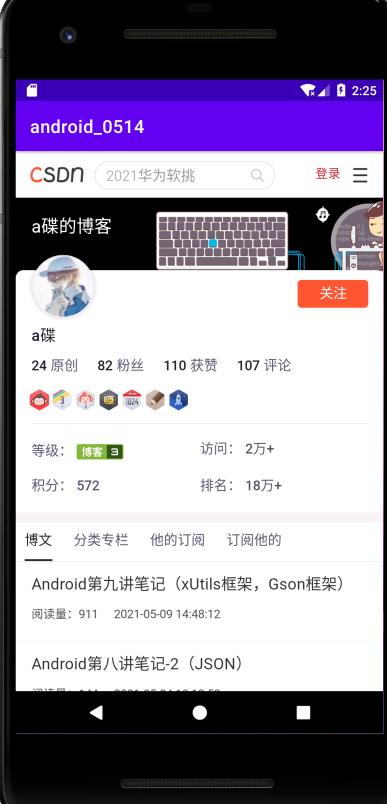
再次运行
3.加载本地网页
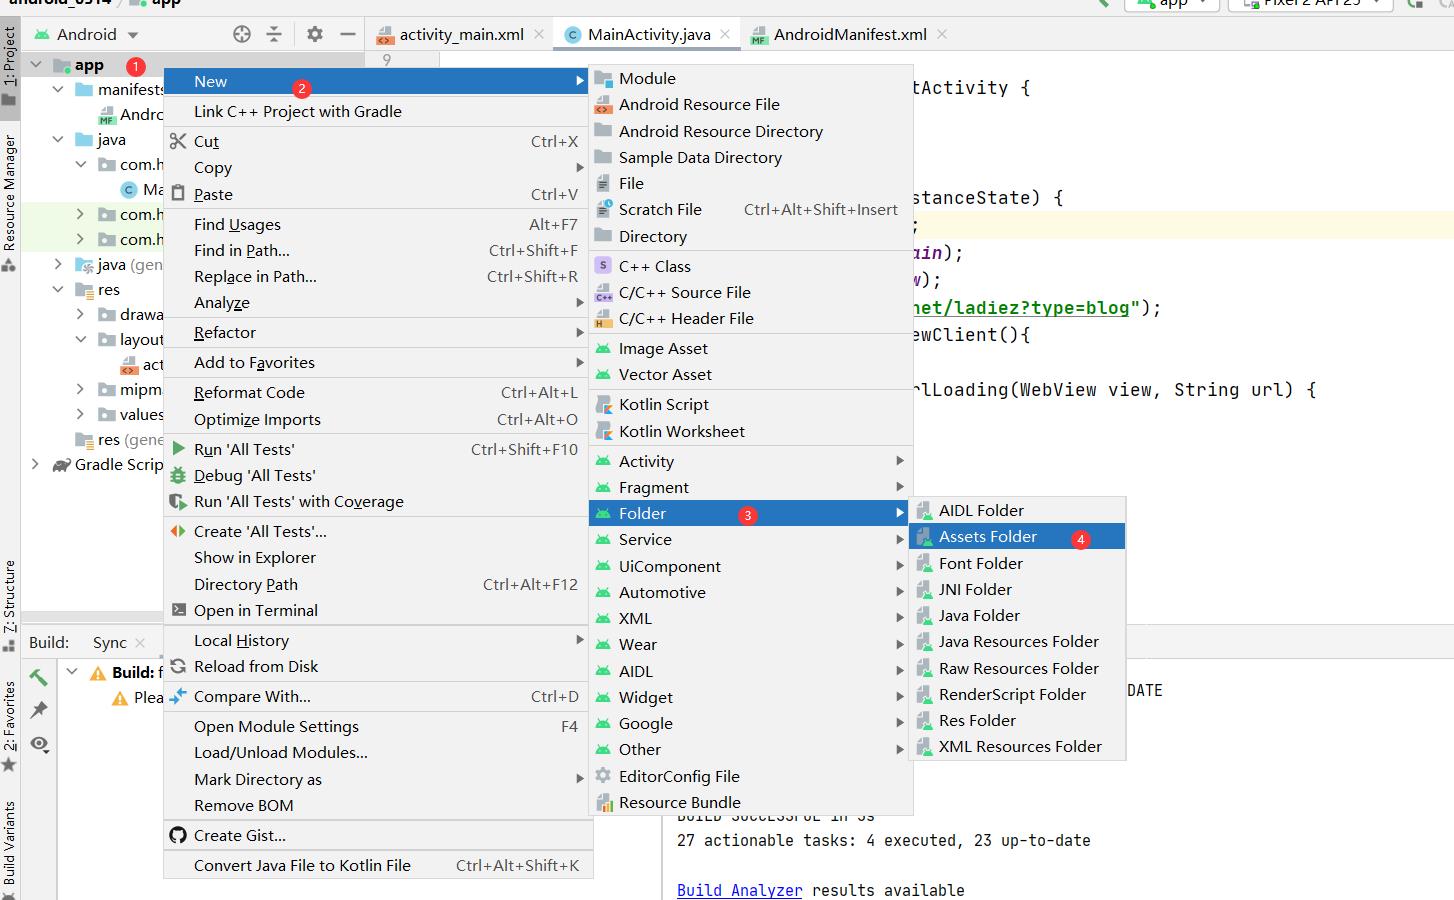
1.新建一个assets文件夹
里面用来存放html页面
2.写一个html文件
<!DOCTYPE html>
<html lang="en">
<head>
    <meta charset="UTF-8">
    <!--    自适应屏幕-->
    <meta name="viewport" content="width=device-width, initial-scale=1.0">
    <title>Document</title>
</head>
<body>
<h1>1</h1>
<h2>2</h2>
<input type="submit" value="提交">
</body>
</html>
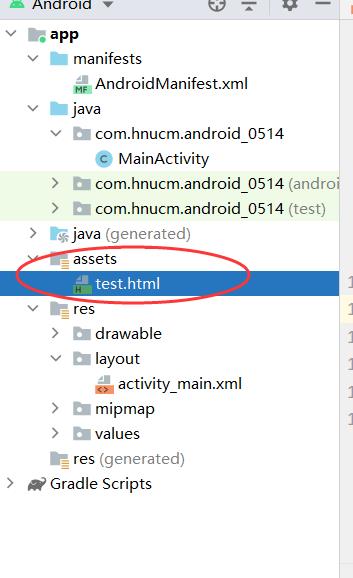
放进assets
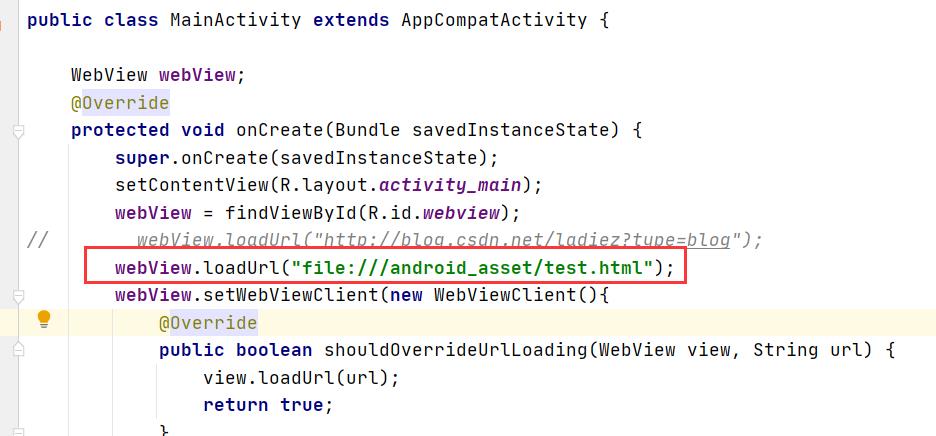
3.改写代码
webView.loadUrl("file:///android_asset/test.html");
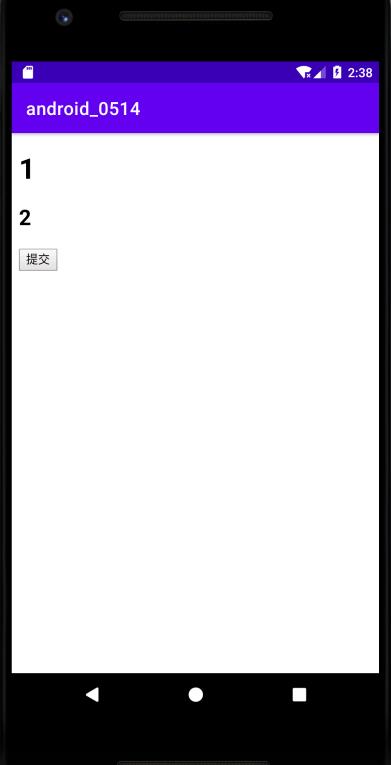
展示结果
可以看到,我们的AndoridAPP中展示了我们写好的html网页
4.流行框架
以下为推荐的框架,具体要了解可以进入官网查看。我需要的框架在后续会继续写博客记录。
1.MUI
https://dev.dcloud.net.cn/mui/
https://dev.dcloud.net.cn/mui/ui/
2.uniapp
https://uniapp.dcloud.io/README
3.javascript开发+原生渲染
中小型创业公司
效率也还行
节约成本,人员
闲鱼
常用框架:
1.React Native
React Native https://www.react-native.cn/
把H5的代码翻译成Android代码,所以还是相当于安卓的原生运行,所以在一定程度上减小了性能的损耗
例如:div 代码还是用前端html来写,编译 TextView布局
大公司开发还是用的Android原生技术
小公司多用React Native技术
考虑兼容性,可能有一些html代码翻译得没有那么准确。
2.Weex-基于Vue.js
https://weex.apache.org/zh/guide/introduction.html
3.Flutter
https://book.flutterchina.club/#%E7%BC%98%E8%B5%B7
19年推出。谷歌公司 ,安卓团队 ,推出的技术。可以在Android上运行也可以在iOS上运行,还可以在网页端运行,而且甚至可以把WebView在性能上的损耗降到0或以下,也就是说用Flutter写出来的代码可能比android写出来的代码性能还会更高,兼容完美,是目前安卓最流行的一种技术之一。
2.SharedPreferences
SharedPreferences是Android平台上一个轻量级的存储辅助类,用来保存应用的一些常用配置,它提供了string,set, int, long, float, boolean六种数据类型。最终数据是以xml形式进行存储。在应用中通常做一些简单数据的持久化缓存。
1.概述
SharedPreferences是Android平台上-个轻量级的存储辅助类,用来保存应用的一些常用配置,它提供了string,set, int, long, float, boolean六种数据类型。最终数据是以xml形式进行存储。在应用中通常做一些简单数据的持久化缓存。
SharedPreferences比较特殊的地方在于,其本质上就是一种xml的形式来存储,存储的方式可以来存一些安卓的基本类型, int, long, float, boolean类型,也包括string,set类型。
SharedPreferences的应用场景:如在QQ登陆中,第一次登陆成功了,那么第二次进入QQ,会直接进入主界面,不会再进入到登陆界面。也就是说,当我们第一次登录成功的时候,系统会把我们登陆的状态,可以用一个boolean类型的值保存到本地,登陆成功就可以保存为ture,保存到本地的形式可以使用接下来所要讲到的SharedPreferences,SharedPreferences主要是来存储这种少量的数据。
,而且优势就是sp读写起来会比文件更加方便,所以像这种情况我们就可以用SharedPreferences的形式来存储。
2.SharedPreferences的使用方法
通过一个简单案例来展示
我们现在布局中加入两个button组件
<?xml version="1.0" encoding="utf-8"?>
<androidx.constraintlayout.widget.ConstraintLayout xmlns:android="http://schemas.android.com/apk/res/android"
    xmlns:app="http://schemas.android.com/apk/res-auto"
    xmlns:tools="http://schemas.android.com/tools"
    android:layout_width="match_parent"
    android:layout_height="match_parent"
    tools:context=".MainActivity">

    <Button
        android:id="@+id/button"
        android:layout_width="wrap_content"
        android:layout_height="wrap_content"
        android:layout_marginTop="231dp"
        android:layout_marginEnd="98dp"
        android:layout_marginRight="98dp"
        android:text="Button"
        app:layout_constraintEnd_toEndOf="parent"
        app:layout_constraintTop_toTopOf="parent" />

    <Button
        android:id="@+id/button2"
        android:layout_width="wrap_content"
        android:layout_height="wrap_content"
        android:layout_marginTop="95dp"
        android:layout_marginEnd="115dp"
        android:layout_marginRight="115dp"
        android:text="Button"
        app:layout_constraintEnd_toEndOf="parent"
        app:layout_constraintTop_toBottomOf="@+id/button" />
</androidx.constraintlayout.widget.ConstraintLayout>
然后在MainActivity.java中给按钮添加点击事件
第一个按钮

第二个按钮

代码
package com.hnucm.android_0514;

import androidx.appcompat.app.AppCompatActivity;

import android.content.SharedPreferences;
import android.os.Bundle;
import android.util.Log;
import android.view.View;
import android.webkit.WebSettings;
import android.webkit.WebView;
import android.webkit.WebViewClient;
import android.widget.Button;

public class MainActivity extends AppCompatActivity {

    @Override
    protected void onCreate(Bundle savedInstanceState) {
        super.onCreate(savedInstanceState);
        setContentView(R.layout.activity_main);
        Button button=findViewById(R.id.button);
        button.setOnClickListener(new View.OnClickListener() {
            @Override
            public void onClick(View v) {
                SharedPreferences sharedPreferences=getSharedPreferences("user",MODE_PRIVATE);//MODE_PRIVATE私有权限,保护文件
                SharedPreferences.Editor editor=sharedPreferences.edit();
                editor.putString("classname","计科2班");
                editor.putInt("number",20);
                editor.commit();
            }
        });
        Button button1 = findViewById(R.id.button2);
        button1.setOnClickListener(new View.OnClickListener() {
            @Override
            public void onClick(View v) {
                SharedPreferences sharedPreferences=getSharedPreferences("user",MODE_PRIVATE);
                String classname = sharedPreferences.getString("classname", "test");
                Log.i("MainActivity","name="+classname);
            }
        });
    }
}
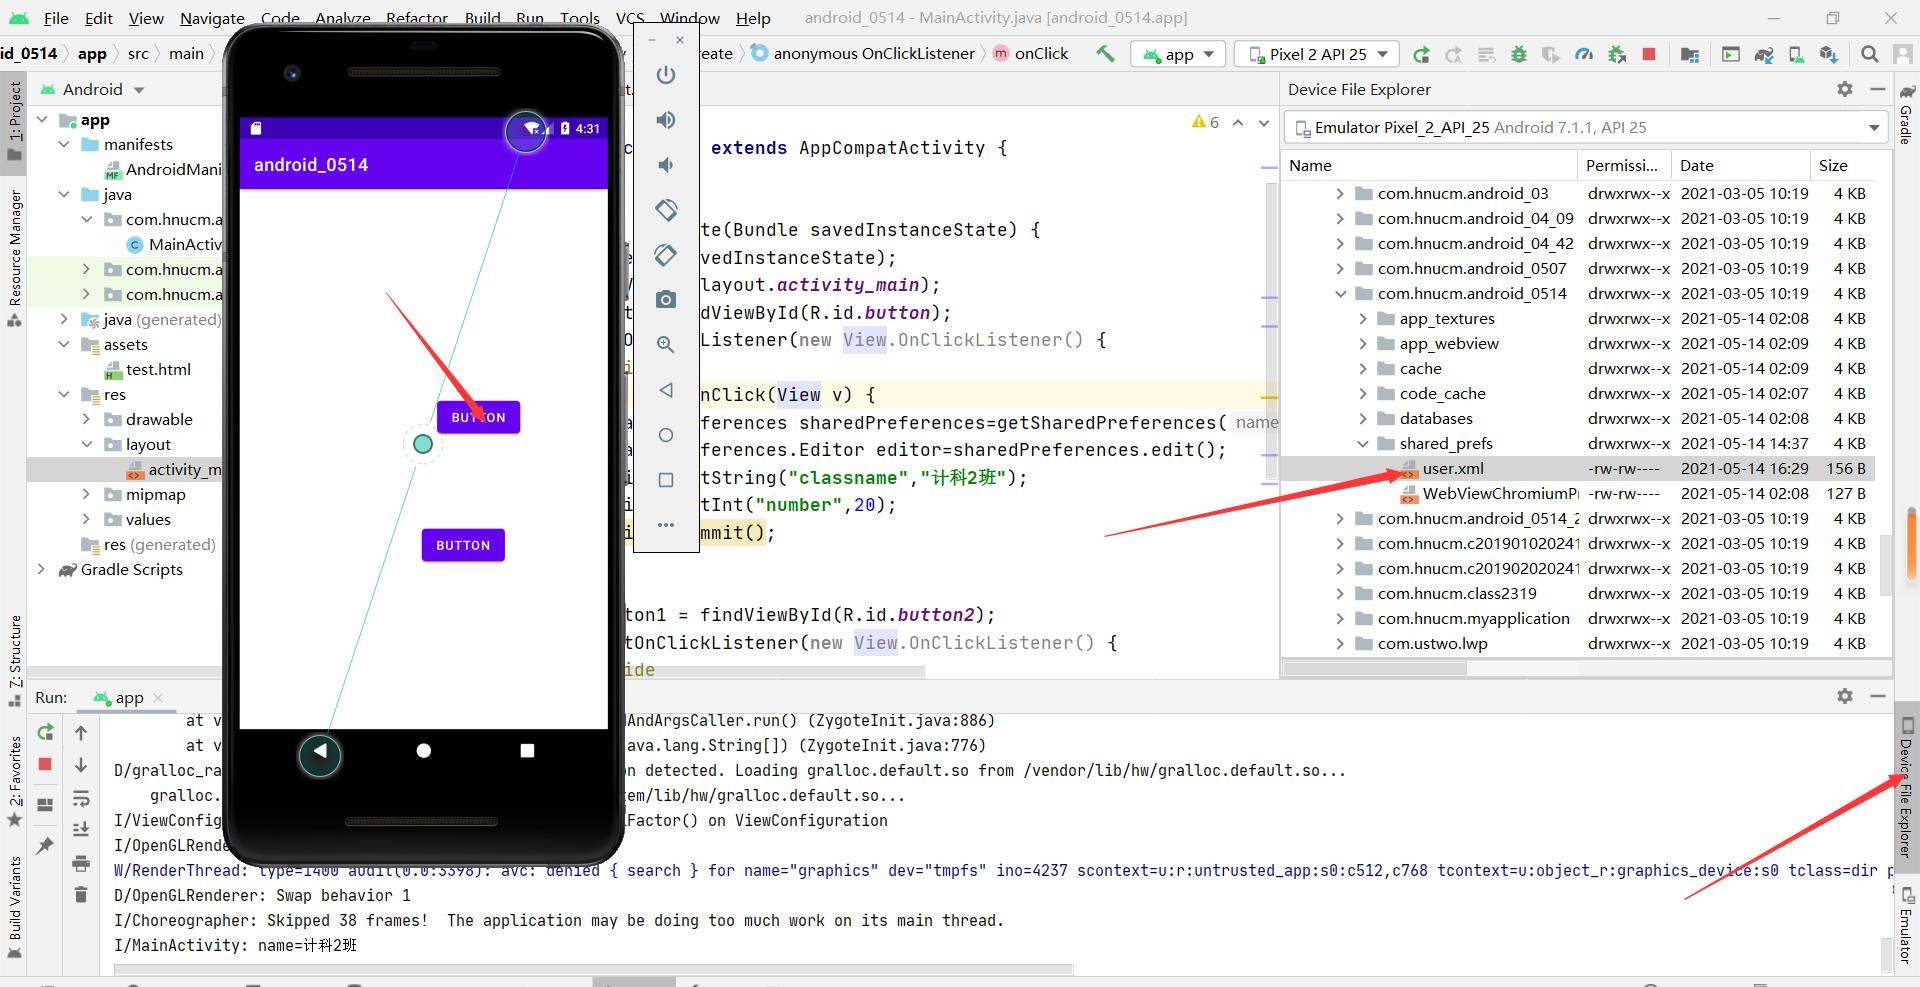
在点击第一个按钮之后,在data/data/包名目录下,我们发现我们的数据被保存到了一个文件夹,并且是xml形式
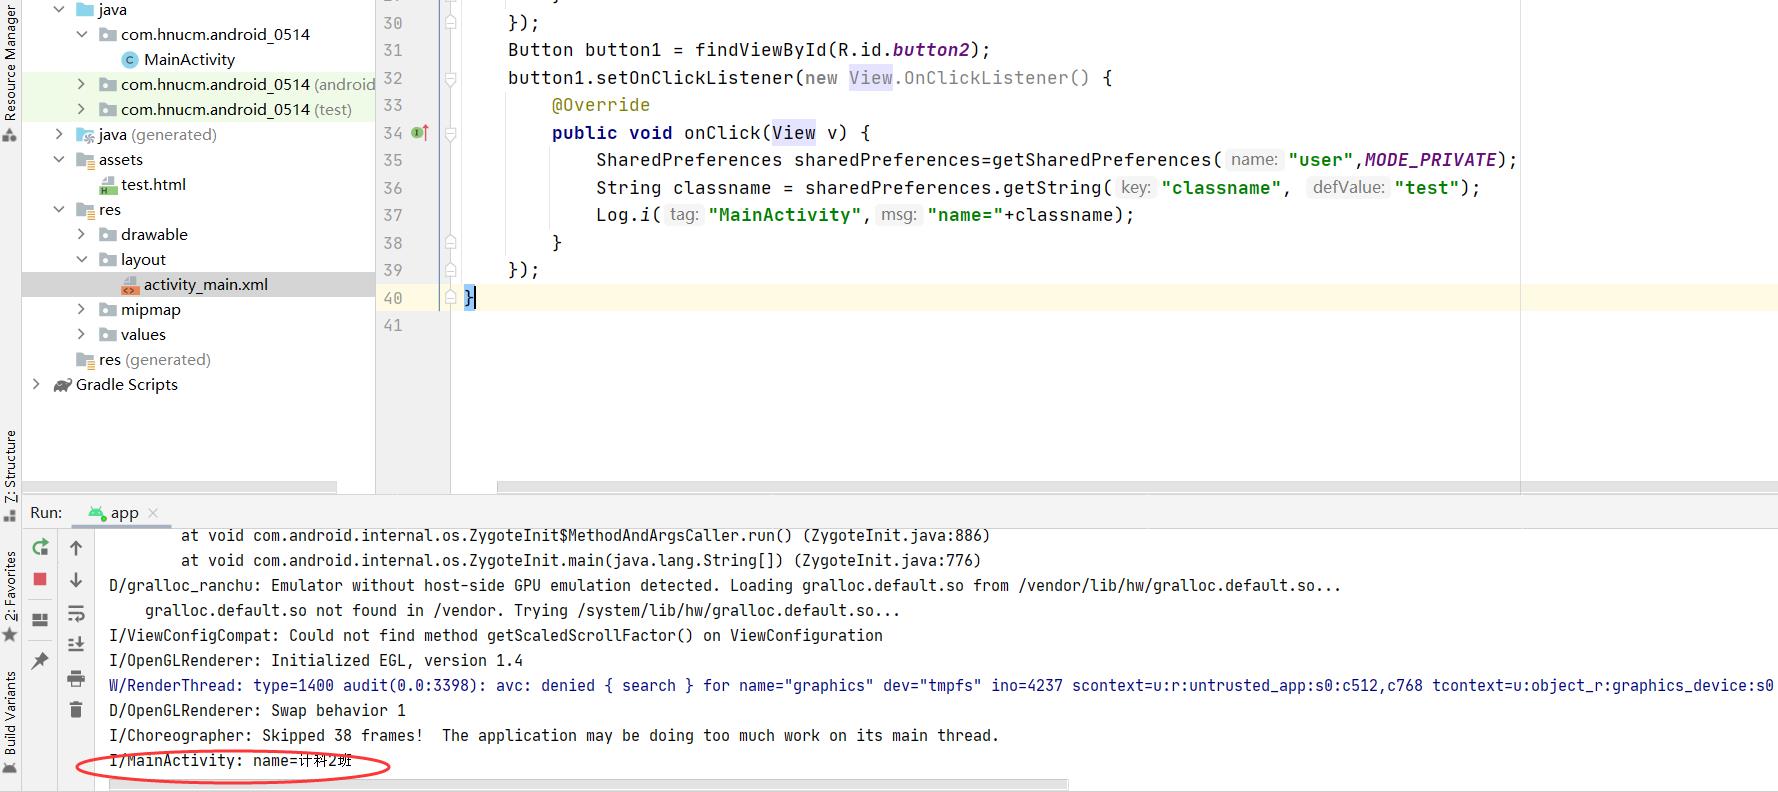
在点击第二个按钮之后,我们打印出来了在SharedPreferences中的数据
3.QQ登陆简单demo实现
在概述部分我们说了,在QQ登陆中,第一次登陆成功了,那么第二次进入QQ,会直接进入主界面,不会再进入到登陆界面。也就是说,当我们第一次登录成功的时候,系统会把我们登陆的状态,可以用一个boolean类型的值保存到本地,登陆成功就可以保存为ture。
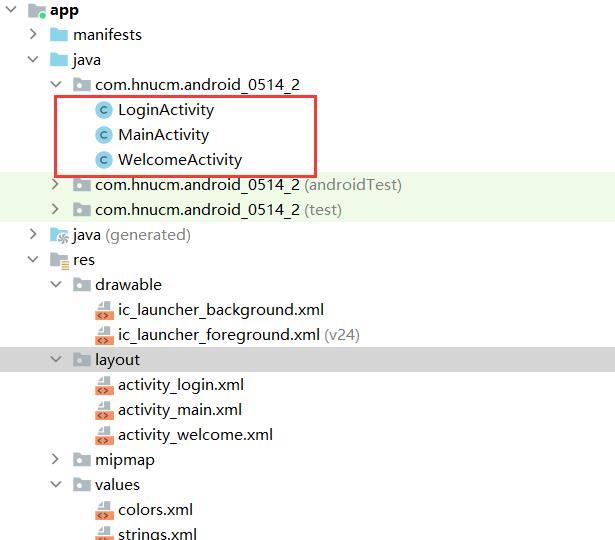
所以我们需要三个界面:第一个是登陆页面,第二个是启动跳转页面,第三个是主界面。
1.创建Activity
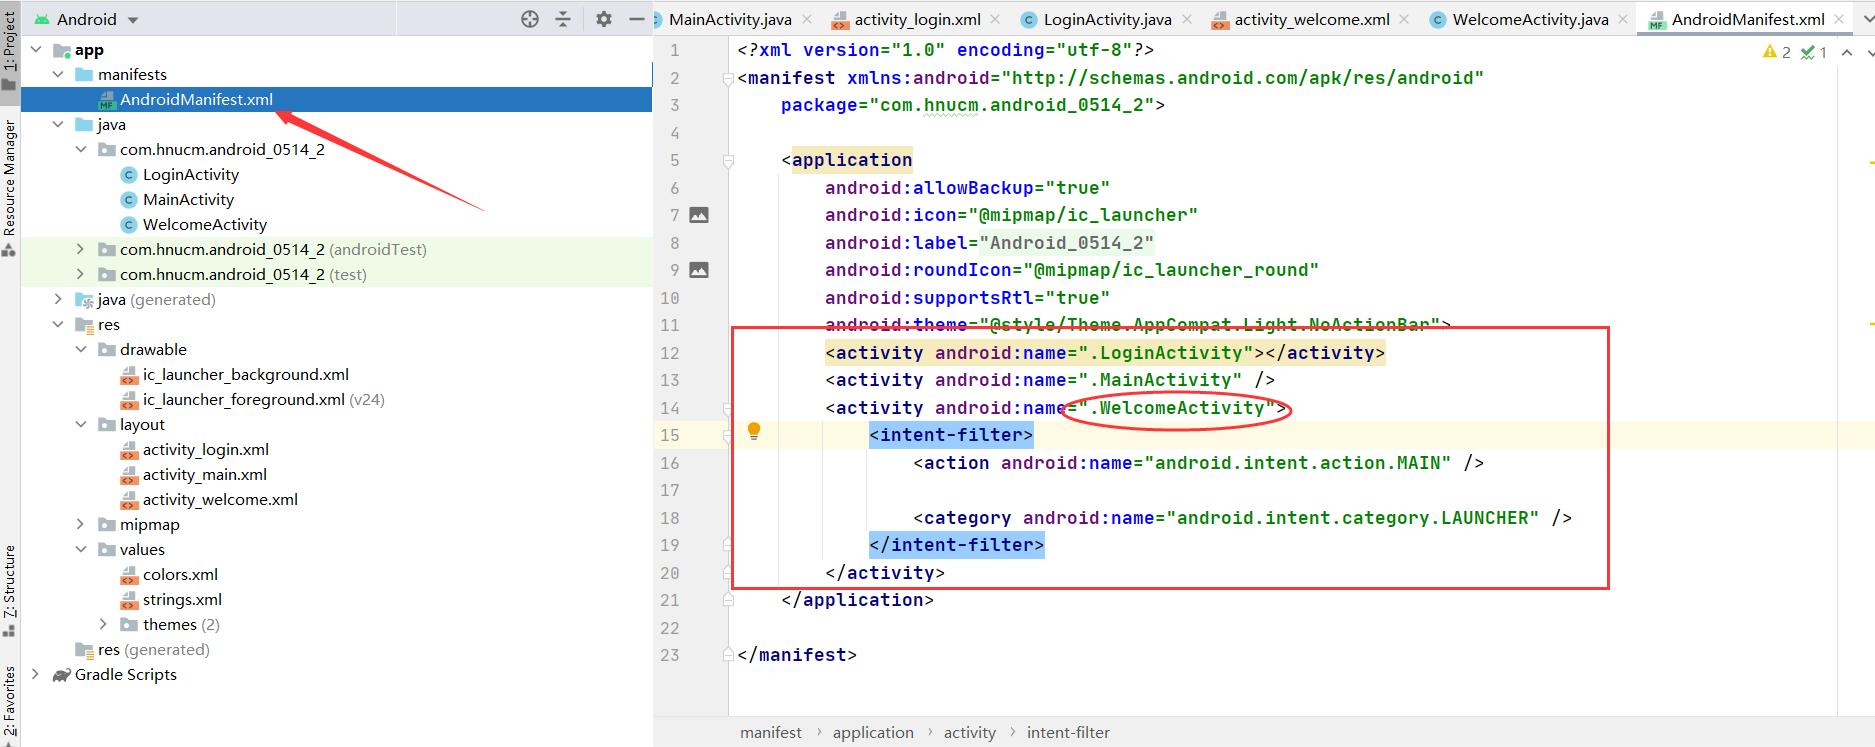
因为默认第一个出现的是MainActivity页面,我们需要将启动跳转页面设置为第一个出现的页面
在themes.xml中设置去掉应用的标题框,通知栏等等
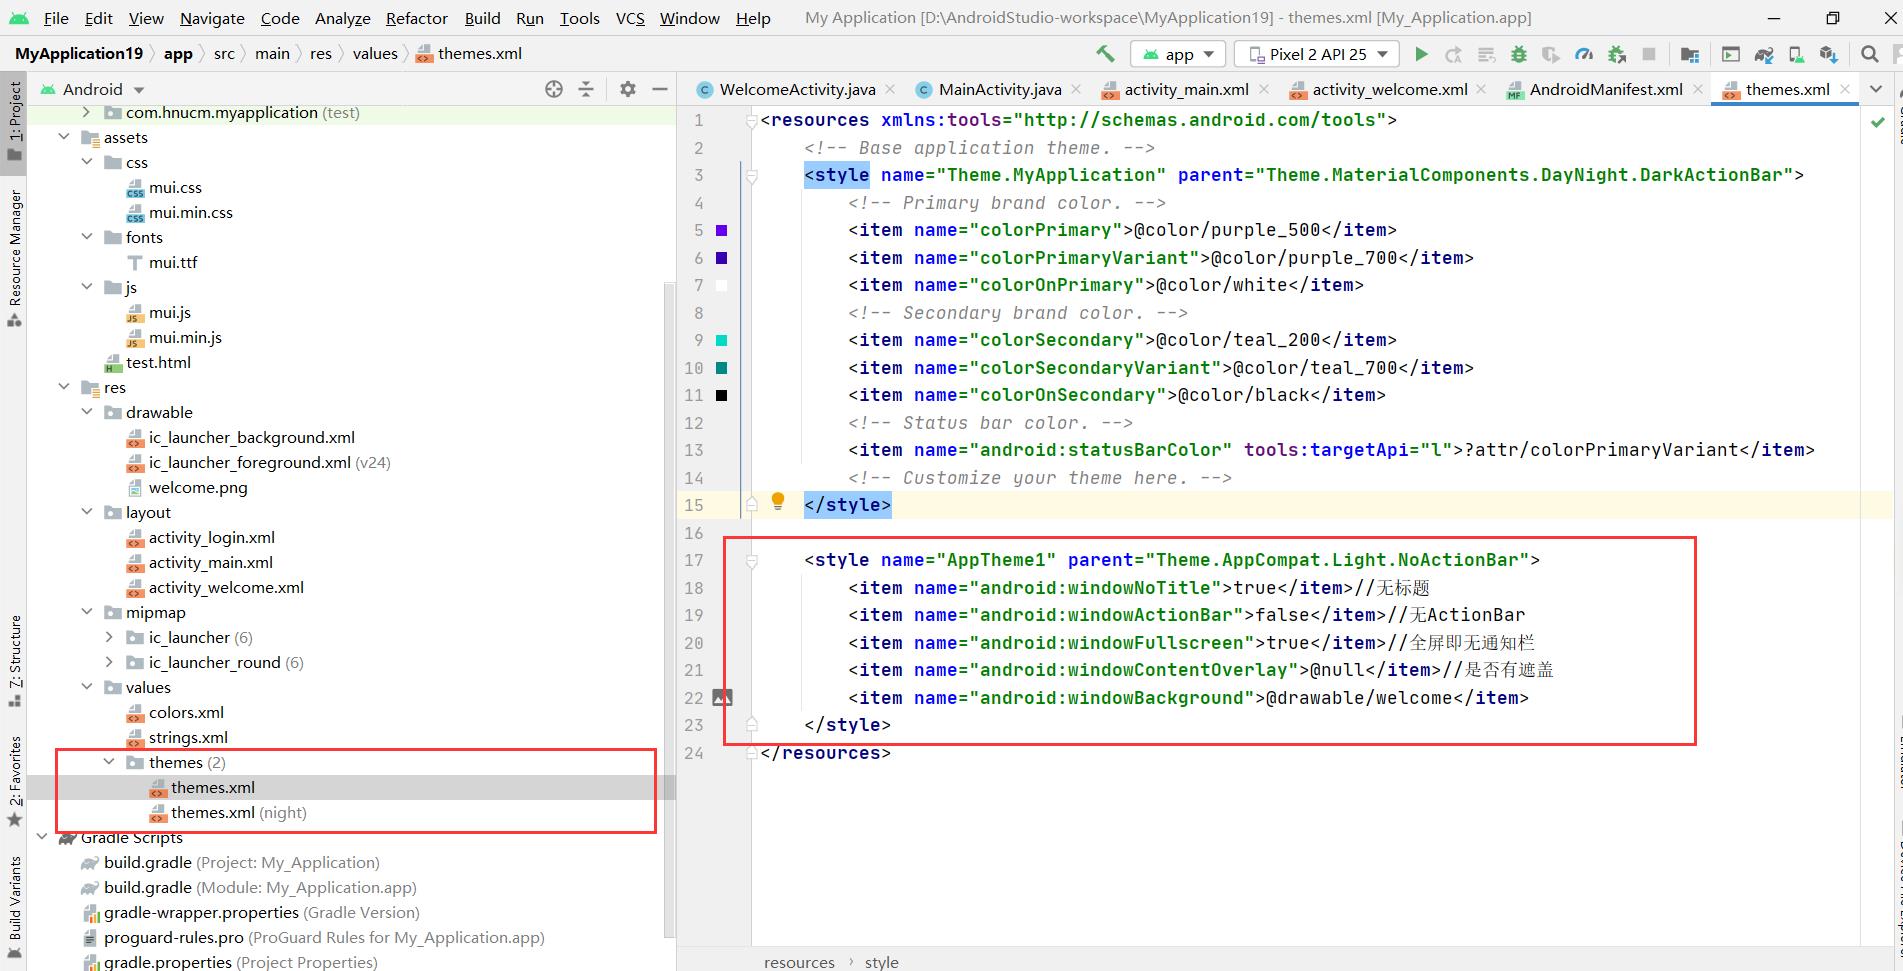
<style name="AppTheme1" parent="Theme.AppCompat.Light.NoActionBar">
    <item name="android:windowNoTitle">true</item>//无标题
    <item name="android:windowActionBar">false</item>//无ActionBar
    <item name="android:windowFullscreen">true</item>//全屏即无通知栏
    <item name="android:windowContentOverlay">@null</item>//是否有遮盖
    <item name="android:windowBackground">@drawable/welcome</item>
</style>
2.启动跳转页面
启动跳转页面的背景图

activity_welcome.xml
设置背景图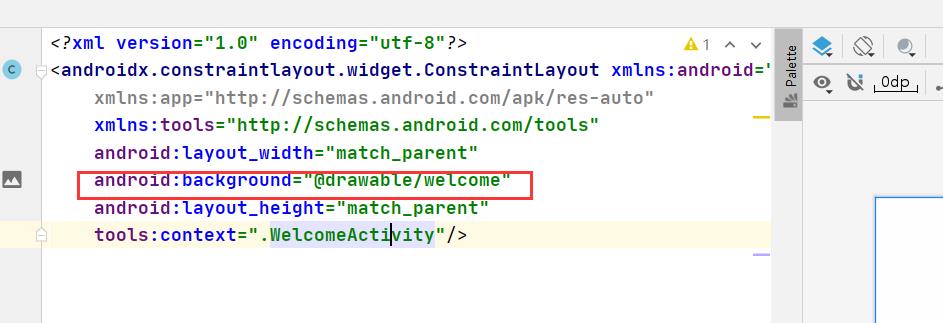
3.登陆页面
LoginActivity.java
package com.hnucm.android_0514_2;

import androidx.appcompat.app.AppCompatActivity;

import android.content.Intent;
import android.content.SharedPreferences;
import android.os.Bundle;
import android.view.View;
import android.widget.EditText;
import android.widget.Toast;

public class LoginActivity extends AppCompatActivity {

    EditText editText,editText1;
    @Override
    protected void onCreate(Bundle savedInstanceState) {
        super.onCreate(savedInstanceState);
        setContentView(R.layout.activity_login);
        editText = findViewById(R.id.editTextTextPersonName);
        editText1 = findViewById(R.id.editTextTextPersonName2);

        findViewById(R.id.button5).setOnClickListener(new View.OnClickListener() {
            @Override
            public void onClick(View v) {
                String username=editText.getText().toString();
                String psw=editText1.getText().toString();
                if (username.equals("hnucm") && psw.equals("123456")){
                    SharedPreferences sharedPreferences = getSharedPreferences("user",MODE_PRIVATE);
                    SharedPreferences.Editor editor = sharedPreferences.edit();
                    editor.putBoolean("islogin",true);//islogin设置为true代表已经登陆
                    editor.commit();
                    Intent intent = new Intent(LoginActivity.this,MainActivity.class);
                    startActivity(intent);
                }else {
                    Toast.makeText(LoginActivity.this,"用户名或密码错误",Toast.LENGTH_SHORT).show();
                }
            }
        });

    }
}
activity_login.xml
<?xml version="1.0" encoding="utf-8"?>
<androidx.constraintlayout.widget.ConstraintLayout xmlns:android="http://schemas.android.com/apk/res/android"
xmlns:app="http://schemas.android.com/apk/res-auto"
xmlns:tools="http://schemas.android.com/tools"
android:layout_width="match_parent"
android:layout_height="match_parent"
tools:context=".LoginActivity">
<EditText
android:id="@+id/editTextTextPersonName"
android:layout_width="wrap_content"
android:layout_height="wrap_content"
android:layout_marginTop="137dp"
android:layout_marginEnd="87dp"
android:layout_marginRight="87dp"
android:ems="10"
android:hint="请输入用户名"
android:inputType="textPersonName"
app:layout_constraintEnd_toEndOf="parent"
app:layout_constraintTop_toTopOf="parent" />
<EditText
android:id="@+id/editTextTextPersonName2"
android:layout_width="wrap_content"
android:layout_height="wrap_content"