Springboot -自动配置分析
Posted guardwhy
tags:
篇首语:本文由小常识网(cha138.com)小编为大家整理,主要介绍了Springboot -自动配置分析相关的知识,希望对你有一定的参考价值。
学习视频: https://www.bilibili.com/video/BV1PE411i7CV?p=6
1.1 相关依赖配置
Pom.xml
它主要是依赖一个父项目,主要是管理项目的资源过滤及插件!
<!--父依赖-->
<parent>
    <groupId>org.springframework.boot</groupId>
    <artifactId>spring-boot-starter-parent</artifactId>
    <version>2.4.5</version>
</parent>
点进去,发现还有一个父依赖。
<parent>
    <groupId>org.springframework.boot</groupId>
    <artifactId>spring-boot-dependencies</artifactId>
    <version>2.4.5</version>
</parent>
这里才是真正管理SpringBoot应用里面所有依赖版本的地方,SpringBoot的版本控制中心,以后导入依赖默认是不需要写版本。但是如果导入的包没有在依赖中管理着就需要手动配置版本了。
启动器 spring-boot-starter
<dependency>
    <groupId>org.springframework.boot</groupId>
    <artifactId>spring-boot-starter-web</artifactId>
</dependency>
- springboot-boot-starter-xxx:就是spring-boot的场景启动器。
- spring-boot-starter-web:帮我们导入了web模块正常运行所依赖的组件。
- SpringBoot将所有的功能场景都抽取出来,做成一个个的starter 启动器,只需要在项目中引入这些starter即可,所有相关的依赖都会导入进来。
- 要用什么功能就导入什么样的场景启动器即可,我们未来也可以自己自定义
starter。
1.2 主启动类自动装配原理
默认启动类
package cn.guardwhy;

import org.springframework.boot.SpringApplication;
import org.springframework.boot.autoconfigure.SpringBootApplication;

@SpringBootApplication // 标注了一个主程序类,说明这是一个Spring Boot应用.
public class SpringbootDemo01Application {

    public static void main(String[] args) {
        // 启动了一个服务
        SpringApplication.run(SpringbootDemo01Application.class, args);
    }
}
@SpringBootApplication
进入这个注解,可以看到上面还有很多其他注解。

作用:标注在某个类上说明这个类是SpringBoot的主配置类 , SpringBoot就应该运行这个类的main方法来启动SpringBoot应用。
public @interface SpringBootApplication {
  // 源码示例
}
1.2.1 @ComponentScan
这个注解在Spring中很重要 ,它对应XML配置中的元素,扫描当前启动类同级的包。
自动扫描并加载符合条件的组件或者bean , 将这个bean定义加载到IOC容器中。
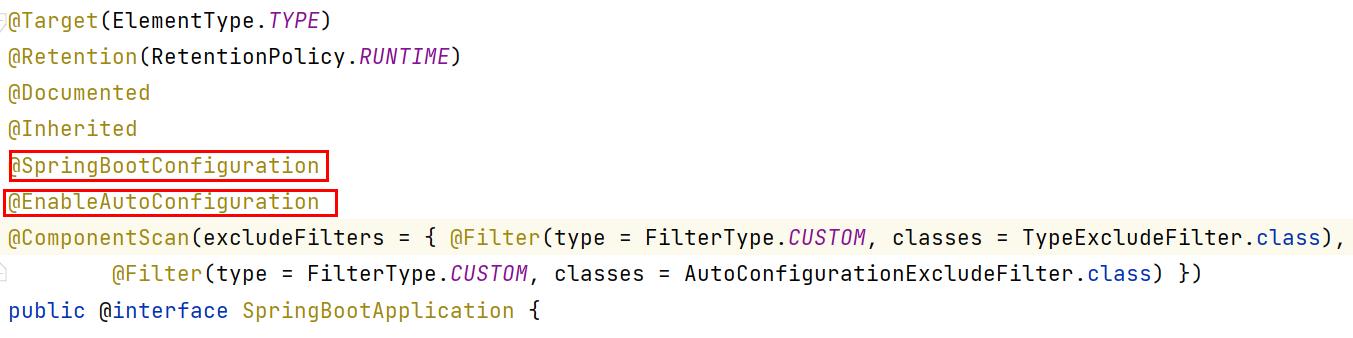
1.2.2 @SpringBootConfiguration
标注在某个类上 , 表示这是一个SpringBoot的配置类,继续点击注解查看。

@Configuration
@Target({ElementType.TYPE})
@Retention(RetentionPolicy.RUNTIME)
@Documented
@Configuration
public @interface SpringBootConfiguration {
    @AliasFor(
        annotation = Configuration.class
    )
    boolean proxyBeanMethods() default true;
}
这里的 @Configuration,说明这是一个配置类 ,配置类就是对应Spring的xml 配置文件。继续点击下去
@Component
@Target({ElementType.TYPE})
@Retention(RetentionPolicy.RUNTIME)
@Documented
@Component
public @interface Configuration {
    @AliasFor(
        annotation = Component.class
    )
    String value() default "";

    boolean proxyBeanMethods() default true;
}
里面的 @Component 这就说明,启动类本身也是Spring中的一个组件而已,负责启动应用!!!
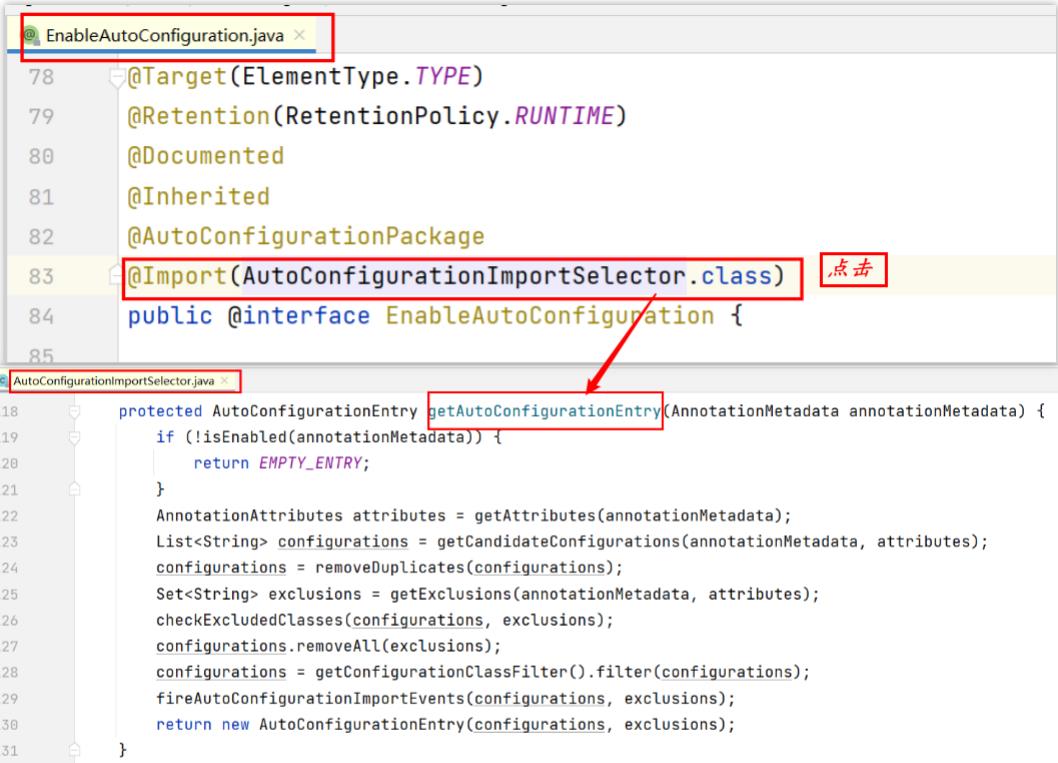
1.2.3 @EnableAutoConfiguration
单体应用架构需要自己配置文件,而现在SpringBoot可以自动帮我们配置 。
@EnableAutoConfiguration(自动导入包)告诉SpringBoot开启自动配置功能,这样自动配置才能生效,点击注解继续查看。
@AutoConfigurationPackage
具体作用
自动配置包,继续点击下去。
@Target(ElementType.TYPE)
@Retention(RetentionPolicy.RUNTIME)
@Documented
@Inherited
@AutoConfigurationPackage
@Import(AutoConfigurationImportSelector.class)
public @interface EnableAutoConfiguration {

	/**
	 * Environment property that can be used to override when auto-configuration is
	 * enabled.
	 */
	String ENABLED_OVERRIDE_PROPERTY = "spring.boot.enableautoconfiguration";

	/**
	 * Exclude specific auto-configuration classes such that they will never be applied.
	 * @return the classes to exclude
	 */
	Class<?>[] exclude() default {};

	/**
	 * Exclude specific auto-configuration class names such that they will never be
	 * applied.
	 * @return the class names to exclude
	 * @since 1.3.0
	 */
	String[] excludeName() default {};

}
@Import(AutoConfigurationPackages.Registrar.class)
基本作用
Spring底层注解@import,给容器中导入一个组件。Registrar.class将主启动类的所在包及包下面所有子包里面的所有组件扫描到Spring容器 。自动配置,自动注册包。
@Target(ElementType.TYPE)
@Retention(RetentionPolicy.RUNTIME)
@Documented
@Inherited
@Import(AutoConfigurationPackages.Registrar.class)
public @interface AutoConfigurationPackage {

	/**
	 * Base packages that should be registered with {@link AutoConfigurationPackages}.
	 * <p>
	 * Use {@link #basePackageClasses} for a type-safe alternative to String-based package
	 * names.
	 * @return the back package names
	 * @since 2.3.0
	 */
	String[] basePackages() default {};

	/**
	 * Type-safe alternative to {@link #basePackages} for specifying the packages to be
	 * registered with {@link AutoConfigurationPackages}.
	 * <p>
	 * Consider creating a special no-op marker class or interface in each package that
	 * serves no purpose other than being referenced by this attribute.
	 * @return the base package classes
	 * @since 2.3.0
	 */
	Class<?>[] basePackageClasses() default {};
}
@Import(AutoConfigurationImportSelector.class)
给容器导入组件,自动导入包的核心!!!
@Target(ElementType.TYPE)
@Retention(RetentionPolicy.RUNTIME)
@Documented
@Inherited
@AutoConfigurationPackage
@Import(AutoConfigurationImportSelector.class)
public @interface EnableAutoConfiguration {
	String ENABLED_OVERRIDE_PROPERTY = "spring.boot.enableautoconfiguration";
	Class<?>[] exclude() default {};

	String[] excludeName() default {};
}
AutoConfigurationImportSelector
自动导入选择器,选择了啥?
获取所有的配置,继续点击。
List<String> configurations = getCandidateConfigurations(annotationMetadata, attributes);
获取候选的配置
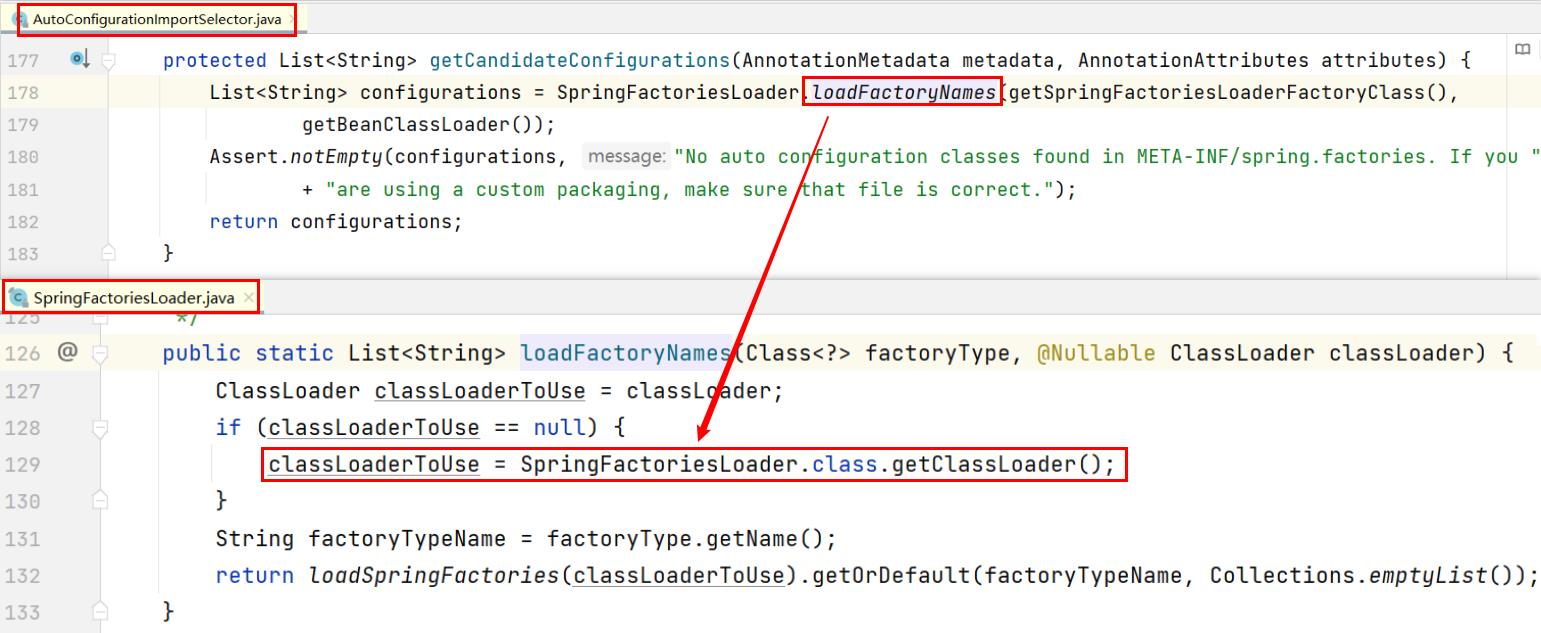
// 方法
protected List<String> getCandidateConfigurations(AnnotationMetadata metadata, AnnotationAttributes attributes) {
    List<String> configurations = SpringFactoriesLoader.loadFactoryNames(getSpringFactoriesLoaderFactoryClass(),
                                                                         getBeanClassLoader());
    Assert.notEmpty(configurations, "No auto configuration classes found in META-INF/spring.factories. If you "
                    + "are using a custom packaging, make sure that file is correct.");
    return configurations;
}
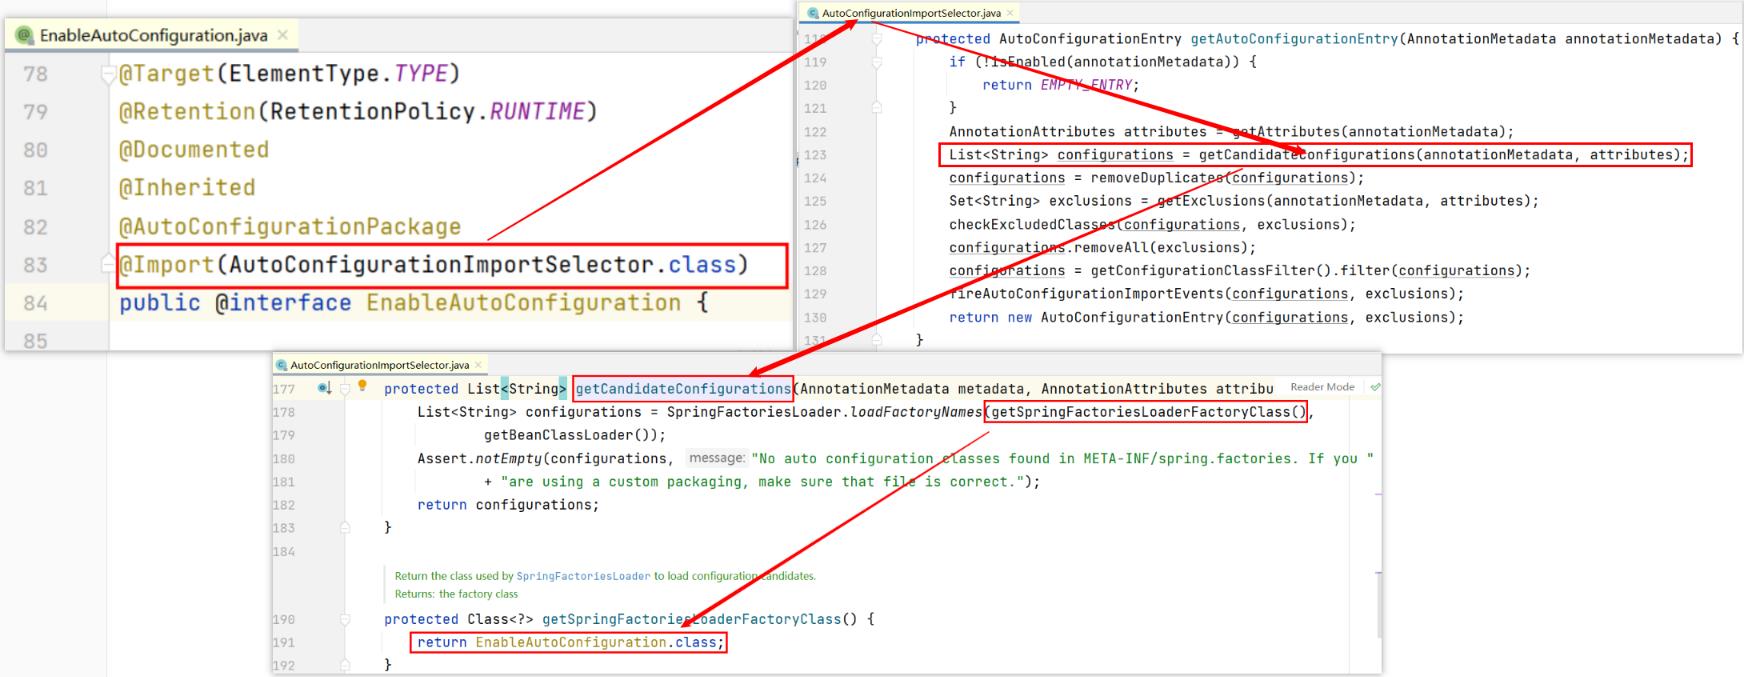
getAutoConfigurationEntry( )
获得自动配置的实体!!!
getCandidateConfigurations( )
获取候选的配置!!!
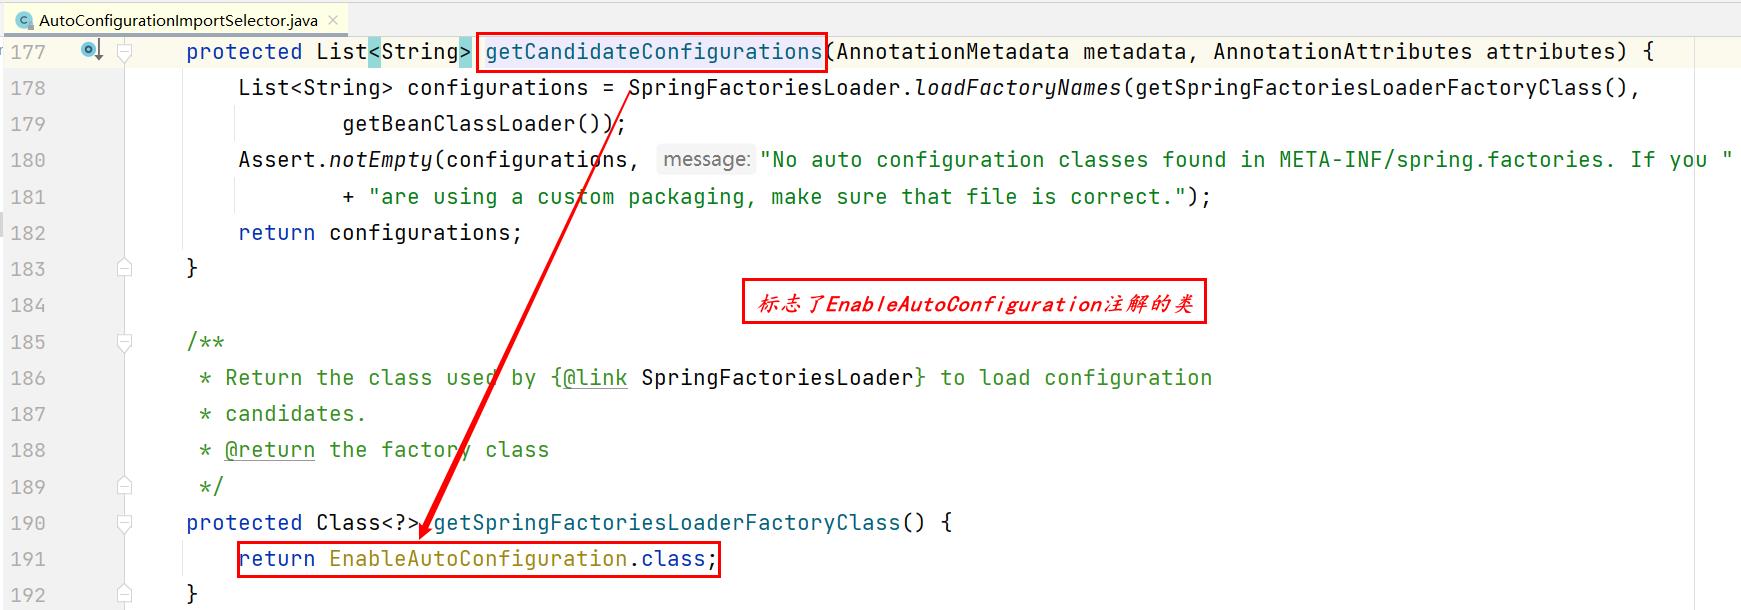
public static List loadFactoryNames( )
获取所有的加载配置!!!
1.2.4 loadSpringFactories
继续点击源码,调用了 SpringFactoriesLoader 类的静态方法!进入SpringFactoriesLoader类loadFactoryNames( )方法
 public static List<String> loadFactoryNames(Class<?> factoryType, @Nullable ClassLoader classLoader) {
     ClassLoader classLoaderToUse = classLoader;
     if (classLoader == null) {
         classLoaderToUse = SpringFactoriesLoader.class.getClassLoader();
     }

     String factoryTypeName = factoryType.getName();
     return (List)loadSpringFactories(classLoaderToUse).getOrDefault(factoryTypeName, Collections.emptyList());
}
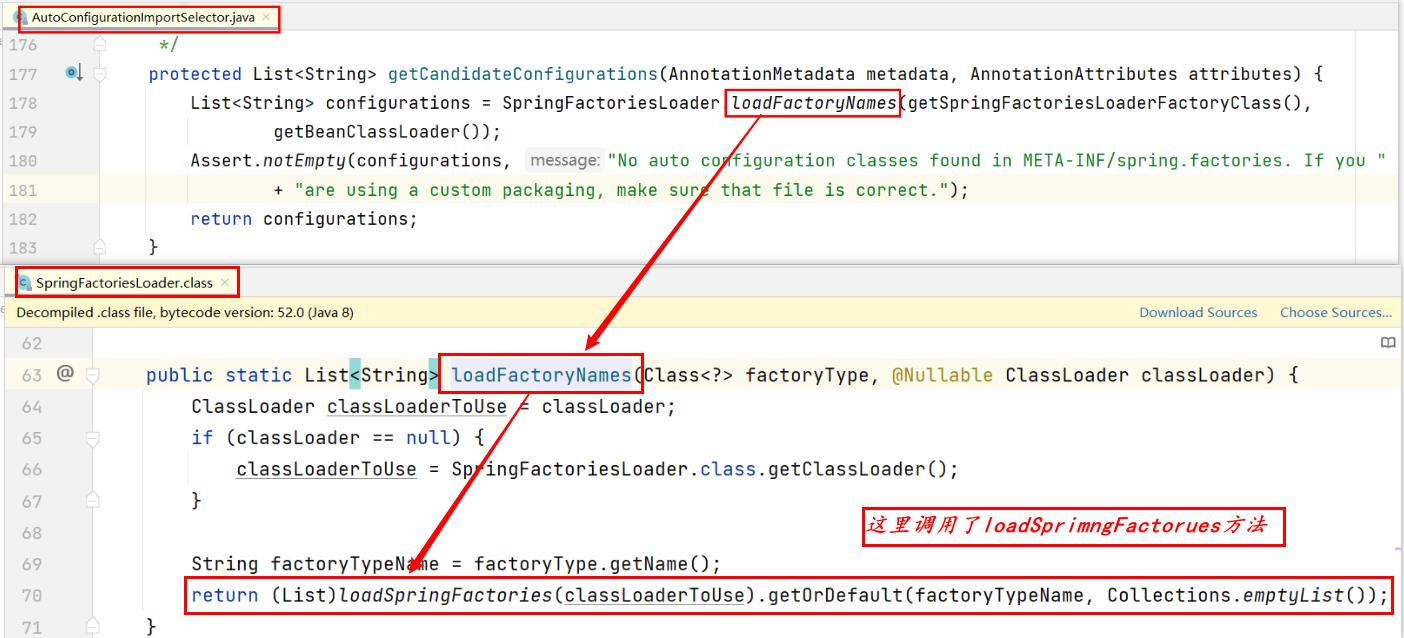
继续点击查看 loadSpringFactories 方法
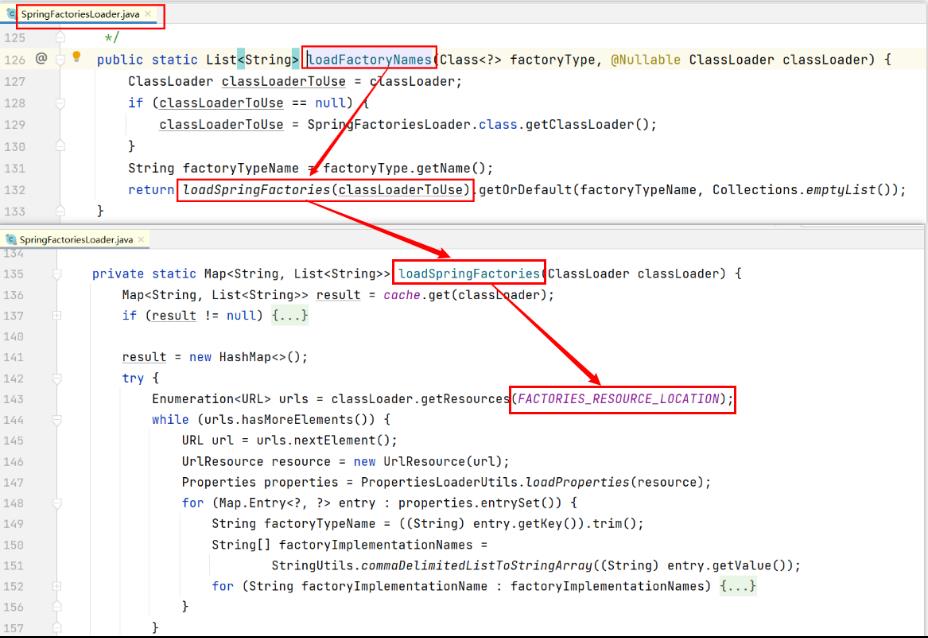
获取项目资源:classLoader.getResources(FACTORIES_RESOURCE_LOCATION);
private static Map<String, List<String>> loadSpringFactories(ClassLoader classLoader) {
    Map<String, List<String>> result = cache.get(classLoader);
	// 获得classLoader,返回可以看到这里得到的EnableAutoConfiguration标注的类本身
    if (result != null) {
        return result;
    }

    result = new HashMap<>();
    try {
        Enumeration<URL> urls = classLoader.getResources(FACTORIES_RESOURCE_LOCATION);
        // 判断是否存在更多的元素
        while (urls.hasMoreElements()) {
            URL url = urls.nextElement();
            UrlResource resource = new UrlResource(url);
            // 将读取到的资源遍历,封装成一个Properties,所有的资源加载到配置类中
            Properties properties = PropertiesLoaderUtils.loadProperties(resource);
            for (Map.Entry<?, ?> entry : properties.entrySet()) {
                String factoryTypeName = ((String) entry.getKey()).trim();
                String[] factoryImplementationNames =
                    StringUtils.commaDelimitedListToStringArray((String) entry.getValue());
                for (String factoryImplementationName : factoryImplementationNames) {
                    result.computeIfAbsent(factoryTypeName, key -> new ArrayList<>())
                        .add(factoryImplementationName.trim());
                }
            }
        }

        // Replace all lists with unmodifiable lists containing unique elements
        result.replaceAll((factoryType, implementations) -> implementations.stream().distinct()
                          .collect(Collectors.collectingAndThen(Collectors.toList(), Collections::unmodifiableList)));
        cache.put(classLoader, result);
    }
    catch (IOException ex) {
        throw new IllegalArgumentException("Unable to load factories from location [" +
                                           FACTORIES_RESOURCE_LOCATION + "]", ex);
    }
    return result;
}
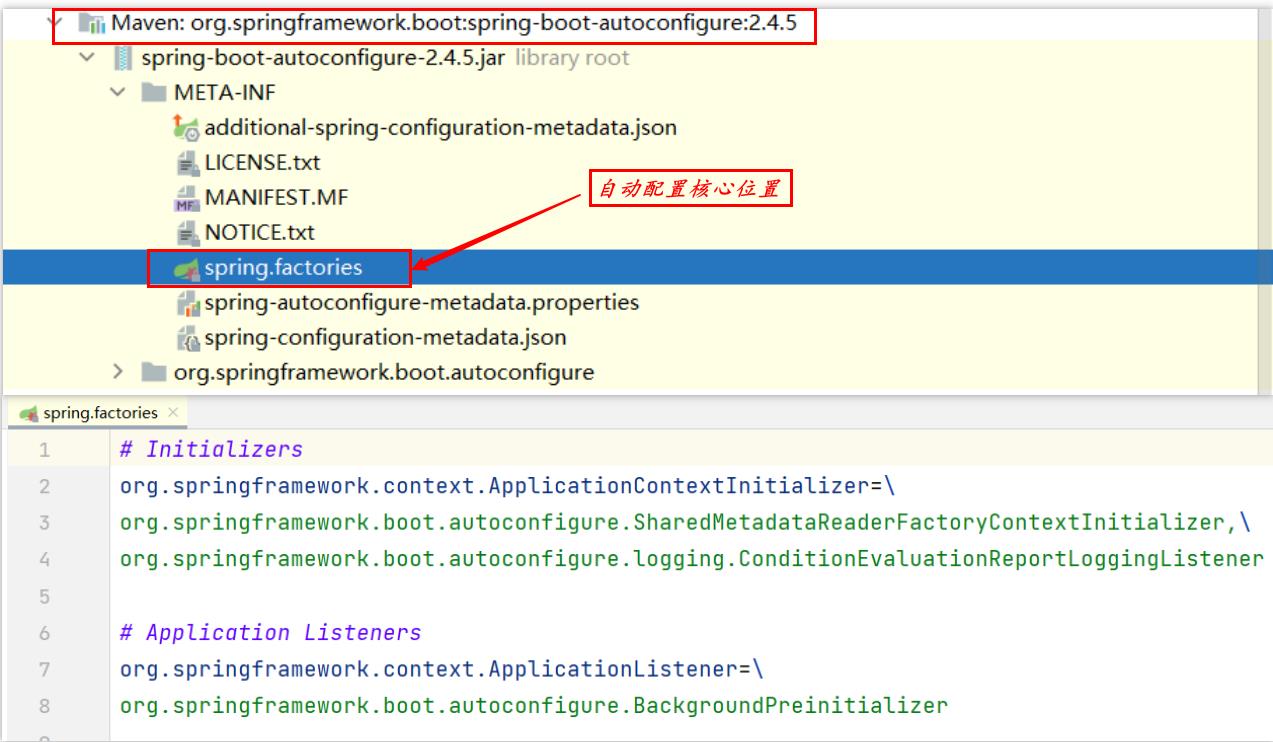
spring.factories
从这里获取系统文件(自动配置核心):"META-INF/spring.factories";
根据源码打开spring.factories , 看到了很多自动配置的文件,这就是自动配置根源所在!
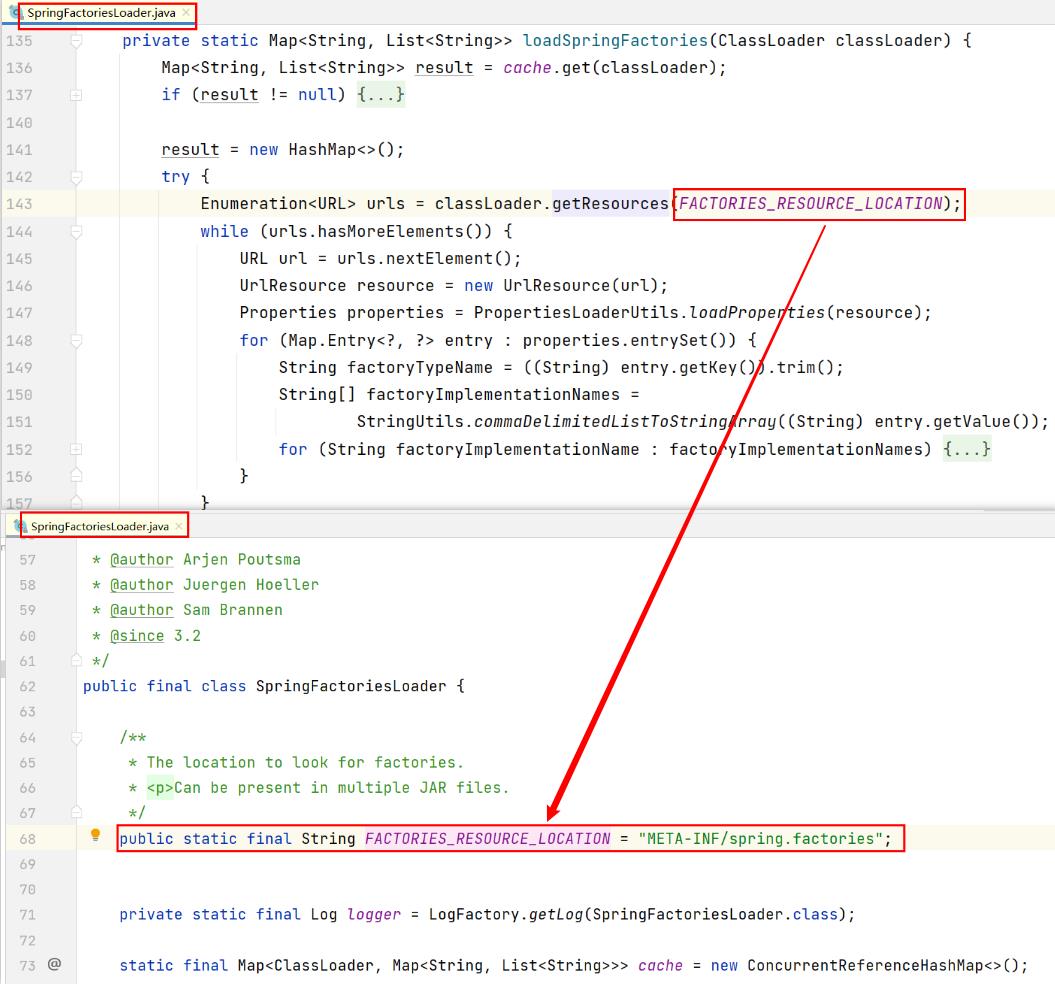
通过该文件找到相对应的jar包,从jar包中找到Springboot自动配置核心文件!!!
1.2.5 WebMvcAutoConfiguration
随机在自动配置类打开看看,比如选择WebMvcAutoConfiguration类。
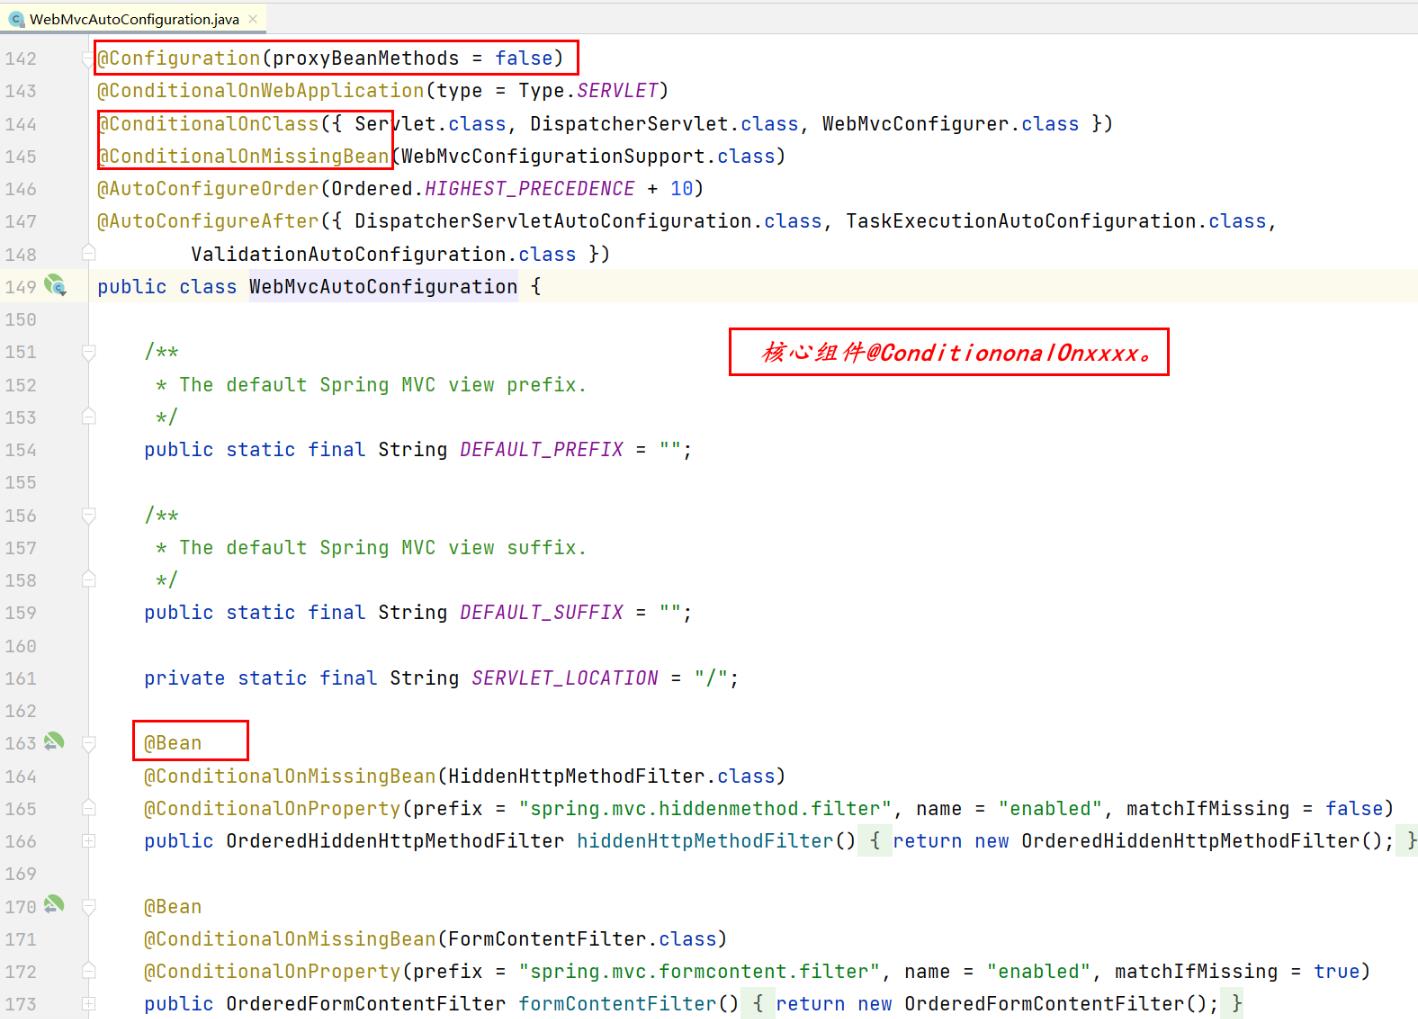
可以看到这些一个个的都是JavaConfig配置类,而且都注入了一些Bean,自动配置真正实现是从classpath中搜寻所有的META-INF/spring.factories配置文件 ,并将其中对应的 org.springframework.boot.autoconfigure 包下的配置项。
通过反射实例化为对应标注了@Configuration的JavaConfig形式的IOC容器配置类 , 然后将这些都汇总成为一个实例并加载到IOC容器中。
注意事项:有些自动配置为啥有的没有生效,需要导入相应的start才能有作用?
核心注解:@ConditionalOnXXX,如果这里面的条件都满足,才会生效!!!
1.2.6 小结
SpringBoot所自动配置都是在启动的时候扫描并且加载spring.factories所有的自动配置类都在这里面,但是不一定生效。要判断条件是否生效,只要导入了对应的start,就有对应的启动器了就有对应的启动器了,自动装配就会生效,然后就配置成功!!!
- Springboot在启动的时候,从类路径之下
/META-INF/spring.factories获取指定的值,将这些自动配置的类导入容器,自动配置就会生效,帮我们进行自动配置! - 以前我们需要自动配置的东西,现在由Springboot帮助我们做了,整合JavaEE,解决方案和自动配置的东西都在
spring-boot-autoconfigure-2.4.5.jar这个包下面。它会把所有的需要导入的组件,以类名的方式返回,这些组件就会被添加到容器。 - 容器中也会存在非常多的
xxxAutoConfiguration的文件(@Bean),就是这些类给容器中导入了这个场景需要的所有组件,并且自动配置(@Configuration,JavaConfig)!!有了自动配置类,免去了手动编写配置文件的工作。
1.3 主启动类运行
最初以为就是运行了一个main方法,但是真实的情况是开启了一个服务。
package cn.guardwhy;

import org.springframework.boot.SpringApplication;
import org.springframework.boot.autoconfigure.SpringBootApplication;

@SpringBootApplication
public class SpringbootDemo01Application {

    public static void main(String[] args) {
        SpringApplication.run(SpringbootDemo01Application.class, args);
   }
}
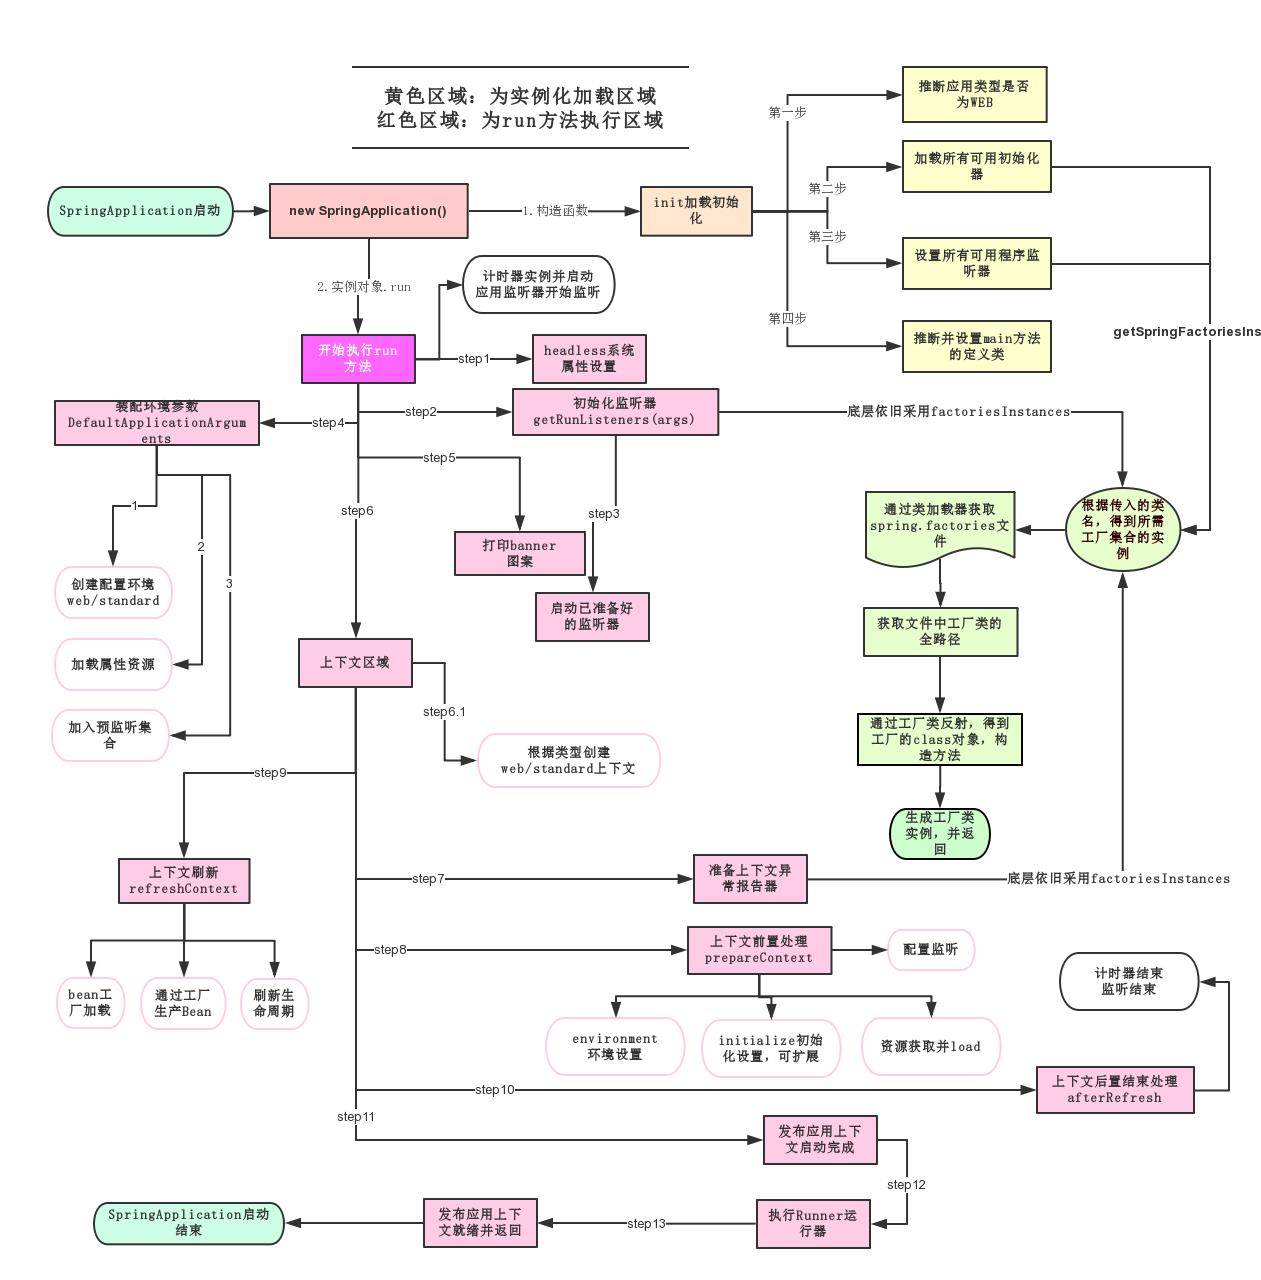
主启动类运行主要分为两个方面:一部分是SpringApplication的实例化,二是run方法的执行。
1.3.1 SpringApplication实例化
- 推断应用的类型是普通的项目还是Web项目。
查找并加载所有可用初始化器 , 设置到initializers属性中。 - 找出所有的应用程序监听器,设置到listeners属性中。
- 推断并设置main方法的定义类,找到运行的主类。
查看SpringApplication的构造器
public SpringApplication(ResourceLoader resourceLoader, Class<?>... primarySources) {
    this.sources = new LinkedHashSet();
    this.bannerMode = Mode.CONSOLE;
    this.logStartupInfo = true;
    this.addCommandLineProperties = true;
    this.addConversionService = true;
    this.headless = true;
    this.registerShutdownHook = true;
    this.additionalProfiles = Collections.emptySet();
    this.isCustomEnvironment = false;
    this.lazyInitialization = false;
    this.applicationContextFactory = ApplicationContextFactory.DEFAULT;
    this.applicationStartup = ApplicationStartup.DEFAULT;
    this.resourceLoader = resourceLoader;
    Assert.notNull(primarySources, "PrimarySources must not be null");
    this.primarySources = new LinkedHashSet(Arrays.asList(primarySources));
    this.webApplicationType = WebApplicationType.deduceFromClasspath();
    this.bootstrapRegistryInitializers = this.getBootstrapRegistryInitializersFromSpringFactories();
    this.setInitializers(this.getSpringFactoriesInstances(ApplicationContextInitializer.class));
    this.setListeners(this.getSpringFactoriesInstances(ApplicationListener.class));
    this.mainApplicationClass = this.deduceMainApplicationClass();
}
1.3.2 run方法的执行
1.4 分析自动配置原理
以HttpEncodingAutoConfiguration(Http编码自动配置)为例解释自动配置原理
package org.springframework.boot.autoconfigure.web.servlet;
import org.springframework.boot.autoconfigure.EnableAutoConfiguration;
import org.springframework.boot.autoconfigure.condition.ConditionalOnClass;
import org.springframework.boot.autoconfigure.condition.ConditionalOnMissingBean;
import org.springframework.boot.autoconfigure.condition.ConditionalOnProperty;
import org.springframework.boot.autoconfigure.condition.ConditionalOnWebApplication;
import org.springframework.boot.autoconfigure.web.ServerProperties;
import org.springframework.boot.context.properties.EnableConfigurationProperties;
import org.springframework.boot.web.server.WebServerFactoryCustomizer;
import org.springframework.boot.web.servlet.filter.OrderedCharacterEncodingFilter;
import org.springframework.boot.web.servlet.server.ConfigurableServletWebServerFactory;
import org.springframework.boot.web.servlet.server.Encoding;
import org.springframework.context.annotation.Bean;
import org.springframework.context.annotation.Configuration;
import org.springframework.core.Ordered;
import org.springframework.web.filter.CharacterEncodingFilter;
// 表示这是一个配置类, 也可以给容器中添加组件。
@Configuration(proxyBeanMethods = false)
// 将配置文件中对应的值和ServerProperties绑定起来,并把ServerProperties加入到ioc容器中
@EnableConfigurationProperties(ServerProperties.class)
// Spring底层@Conditional注解:根据不同的条件判断,如果满足指定的条件,整个配置类里面的配置就会生效。
// 判断当前应用是否是web应用, 如果是当前配置类生效。
@ConditionalOnWebApplication(type = ConditionalOnWebApplication.Type.SERVLET)
//判断当前项目有没有这个类CharacterEncodingFilter,SpringMVC中进行乱码解决的过滤器。
@ConditionalOnClass(CharacterEncodingFilter.class)
/*
判断配置文件中是否存在某个配置: server.servlet.encoding
如果不存在,判断也是成立的,即使我们配置文件中不配置server.servlet.encoding = true, 也是默认生效的。
*/
@ConditionalOnProperty(prefix = "server.servlet.encoding", value = "enabled", matchIfMissing = true)
public class HttpEncodingAutoConfiguration {
//它已经和SpringBoot的配置文件映射了
private final Encoding properties;
//只有一个有参构造器的情况下,参数的值就会从容器中拿
public HttpEncodingAutoConfiguration(ServerProperties properties) {
this.properties = properties.getServlet().getEncoding();
}
//给容器中添加一个组件,这个组件的某些值需要从properties中获取
@Bean
@ConditionalOnMissingBean // 判断容器有没有这个组件?
public CharacterEncodingFilter characterEncodingFilter() {
CharacterEncodingFilter filter = new OrderedCharacterEncodingFilter();
filter.setEncoding(this.properties.getCharset().name());
filter.setForceRequestEncoding(this.properties.shouldForce(Encoding.Type.REQUEST));
filter.setForceResponseEncoding(this.properties.shouldForce(Encoding.Type.RESPONSE));
return filter;
}
@Bean
public LocaleCharsetMappingsCustomizer localeCharsetMappingsCustomizer() {
return new LocaleCharsetMappingsCustomizer(this.properties);
}
static class LocaleCharsetMappingsCustomizer
implements SpringBoot入门到精通-SpringBoot入门