Android TabLayout 使用进阶(含源码)
Posted 初学者-Study
tags:
篇首语:本文由小常识网(cha138.com)小编为大家整理,主要介绍了Android TabLayout 使用进阶(含源码)相关的知识,希望对你有一定的参考价值。
TabLayout 使用进阶
前言
对于android开发来说,画页面算是必不可少的,因此你会接触很多不同的UI布局,你需要去绘制出来,在这过程中你已经接触过TabLayout。
演示效果图,这个图大概一分钟,请耐心看完。
扫描二维码下载APK试用
正文
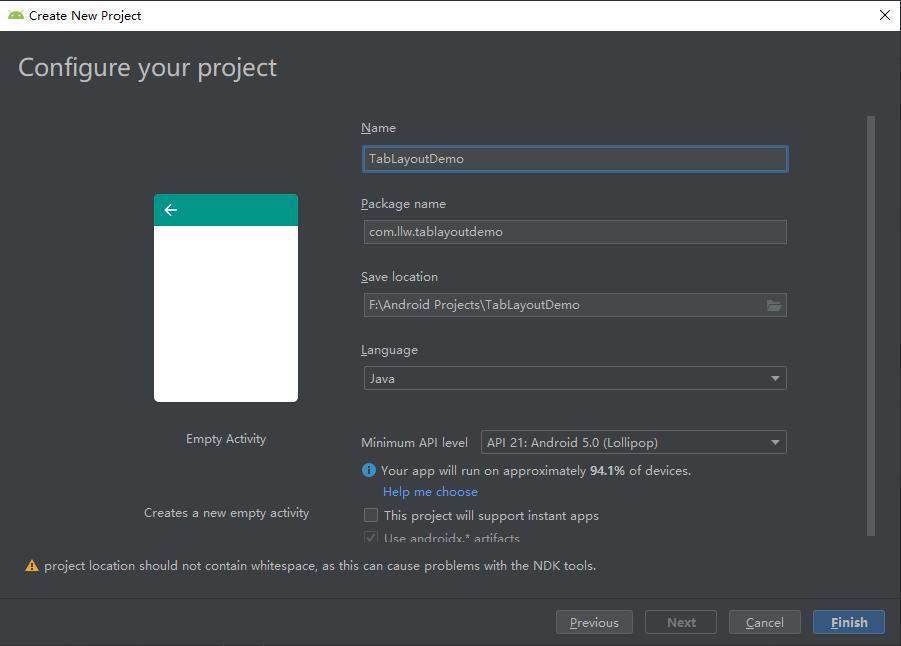
为了方便讲解,我依然是新建一个TabLayoutDemo项目来说明。
一、控件基础使用
首先在现在的版本中,TabLayout已经迁移到androidx下了。因此先在你的app下的build.gradle中的dependencies{}闭包下添加如下依赖:
implementation 'com.google.android.material:material:1.2.1'
添加之后点击Sync Now同步一下。
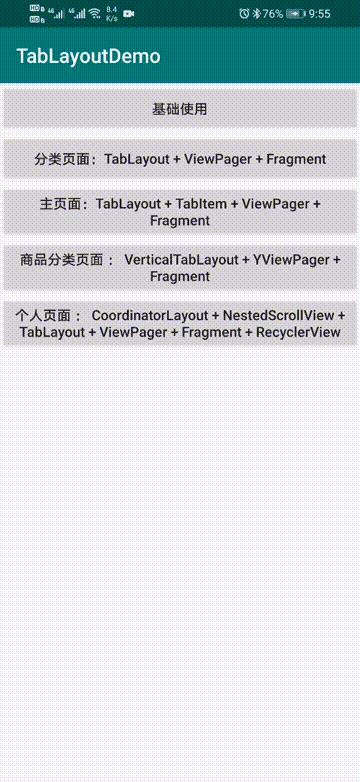
同样为了方便演示我这里的MainActivity的布局中只放按钮,方便根据不同的使用方式进入不同的页面进行相应的演示。下面修改activity_main.xml。
<?xml version="1.0" encoding="utf-8"?>
<LinearLayout xmlns:android="http://schemas.android.com/apk/res/android"
    xmlns:app="http://schemas.android.com/apk/res-auto"
    xmlns:tools="http://schemas.android.com/tools"
    android:layout_width="match_parent"
    android:layout_height="match_parent"
    android:orientation="vertical"
    tools:context=".MainActivity">

    <Button
        android:text="基础使用"
        android:onClick="mode1"
        android:layout_width="match_parent"
        android:layout_height="50dp"/>

</LinearLayout>
在MainActivity中新增一个方法。
	/**
     * 基础使用
     * @param view
     */
    public void mode1(View view) {

    }
这个命名就不是很规范,实际中不要这么做,我这样是为了方便演示。
而基础的使用也需要进入一个新的Activity,那么很简单,在com.llw.tablayoutdemo下新建一个mode1,这个包下新建一个BasicUseActivity,布局是activity_basic_use.xml。
接下来从MainActivity通过点击按钮进入BasicUseActivity。
	public void mode1(View view) {
        startActivity(new Intent(this, BasicUseActivity.class));
    }
下面修改activity_basic_use.xml
<?xml version="1.0" encoding="utf-8"?>
<LinearLayout xmlns:android="http://schemas.android.com/apk/res/android"
    xmlns:app="http://schemas.android.com/apk/res-auto"
    xmlns:tools="http://schemas.android.com/tools"
    android:layout_width="match_parent"
    android:layout_height="match_parent"
    tools:context=".mode1.BasicUseActivity">

    <com.google.android.material.tabs.TabLayout
        android:id="@+id/tab_layout"
        android:layout_width="match_parent"
        android:layout_height="wrap_content"
        android:background="#FFF" />
</LinearLayout>
这里面只有一个TabLayout。回到BasicUseActivity中,使用它。
① 设置标题
public class BasicUseActivity extends AppCompatActivity {

    private TabLayout tabLayout;
    /**
     * 标题数组
     */
    private String[] titles = {"one","two","three","four","five"};

    @Override
    protected void onCreate(Bundle savedInstanceState) {
        super.onCreate(savedInstanceState);
        setContentView(R.layout.activity_basic_use);

        tabLayout = findViewById(R.id.tab_layout);

        for (String title : titles) {
            //设置标签标题
            tabLayout.addTab(tabLayout.newTab().setText(title));
        }
    }
}
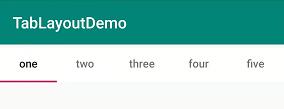
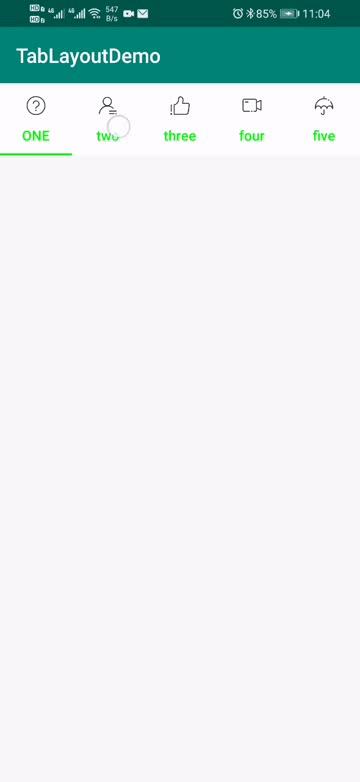
下面运行一下:
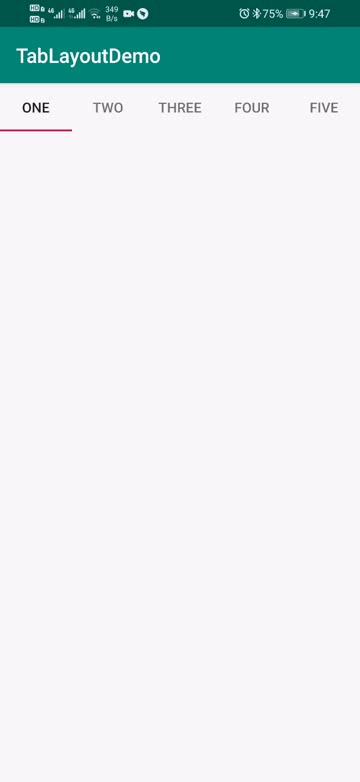
这样标题就设置好了,不过你会看到这个标题我设置的是英文小写,而这运行出来就变成了大写,这个原理有Button是一样的,你只需要将textAllCaps属性设置为false就可以了。
但是你发现这个TabLayout控件中并没有找到这个属性,这可怎么办呢?
设置样式,在你的res → values → styles.xml,在里面增加
	<!--Tab英文文字小写-->
    <style name="TabTextAllCapStyle" parent="TextAppearance.Design.Tab">
        <!--不启用大写-->
        <item name="textAllCaps">false</item>
    </style>
然后通过
app:tabTextAppearance="@style/TabTextAllCapStyle"
设置到这个控件里面就可以了,如下所示。
	<com.google.android.material.tabs.TabLayout
        android:id="@+id/tab_layout"
        android:layout_width="match_parent"
        android:layout_height="wrap_content"
        android:background="#FFF"
        app:tabTextAppearance="@style/TabTextAllCapStyle" />
再运行一下:
可以看到变成了小写。

我觉得还是有搞头的,试试看。
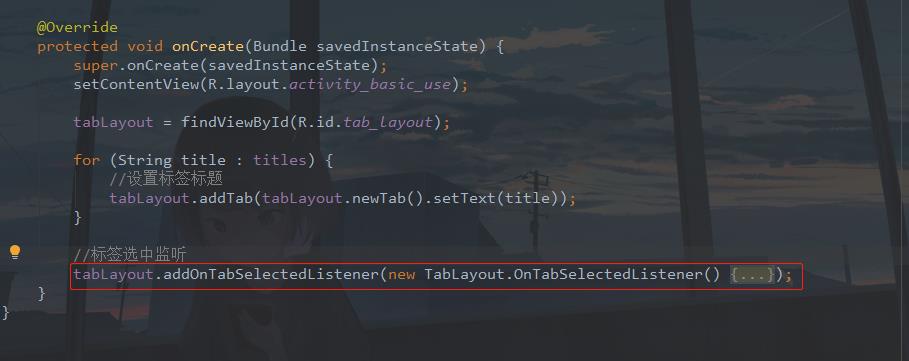
修改代码:
		//标签选中监听
        tabLayout.addOnTabSelectedListener(new TabLayout.OnTabSelectedListener() {
            /**
             * 选中
             * @param tab
             */
            @RequiresApi(api = Build.VERSION_CODES.M)
            @Override
            public void onTabSelected(TabLayout.Tab tab) {
                //大写
                tab.setText(titles[tab.getPosition()].toUpperCase());
            }

            /**
             * 未选中
             * @param tab
             */
            @Override
            public void onTabUnselected(TabLayout.Tab tab) {
                //小写
                tab.setText(titles[tab.getPosition()].toLowerCase());
            }

            /**
             * 重新选中
             * @param tab
             */
            @Override
            public void onTabReselected(TabLayout.Tab tab) {
				//大写
                tab.setText(titles[tab.getPosition()].toUpperCase());
            }
        });
下面运行一下:

可以看到这样就可以使用实现了,只不过这是对于英文标题来说的,而中文标题的话通常我们是在选中时更改文字大小,而上图中,你会发现第一次进入时,是默认选中的第一个Tab,它的文字并没有大写,这是因为它没有触发监听,那么可以通过代码来设置。
		//选中第一个
        tabLayout.getTabAt(0).select();
这样设置就可以了。
② 设置图标
TabLayout也是可以设置图标的。首先放入五个图标


然后添加图标数组
	/**
     * 标题图标
     */
    private Integer[] icons = {R.mipmap.common_problem, R.mipmap.community_me, R.mipmap.good_line,
            R.mipmap.live, R.mipmap.umbrella_line};
再修改一个刚才的for循环
	for (int i = 0;i < titles.length; i++){
            //设置标签标题和图标
            tabLayout.addTab(tabLayout.newTab().setText(titles[i]).setIcon(icons[i]));
        }
这里你必须保证标题和图标数量一致,否则就会出现数组越界的情况导致程序崩溃。
下面运行一下。
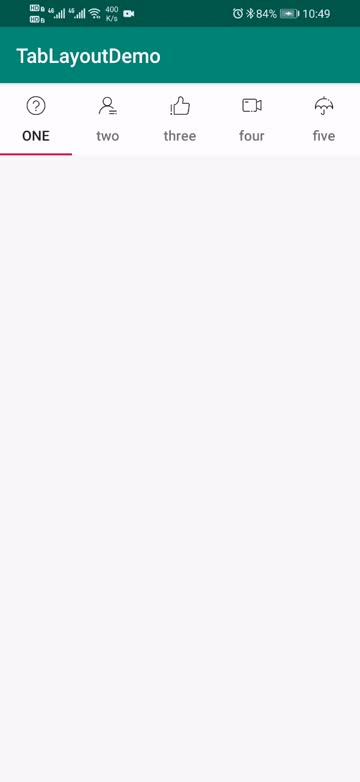
这样看起来是不是很像一些App主页面的底部操作栏了,这个后面我会讲到的,怎么使用TabLayout+ViewPager+Fragment打造App主页面。
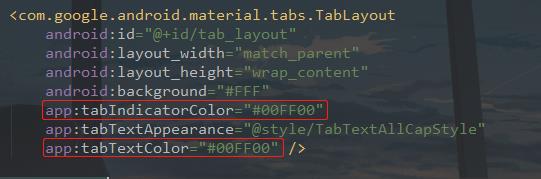
③ 设置下划线
从上面的图可以看到TabLayout默认是一个下划线的,这个下划线默认的颜色比较的丑,我们修改一下它。
通过
app:tabIndicatorColor="#00FF00"
就可以设置下划线的颜色了00FF00就是原谅绿。爱是一道光,绿到你发慌。
然后再通过
app:tabTextColor="#00FF00"
把标签的文字颜色也改成这个原谅绿,
运行看看。
啧啧啧,是不是很环保啊!这个颜色。然后你如果不需要下划线,最简单的办法就是设置透明,
app:tabIndicatorColor="#00000000"
这样设置就看不到下划线了。
当然更多实际需求是修改下划线的长度可以随文字大小改变而改变,这个设置其实也比较的简单,超出你想象之外的简单。
通过
app:tabIndicatorFullWidth="false"
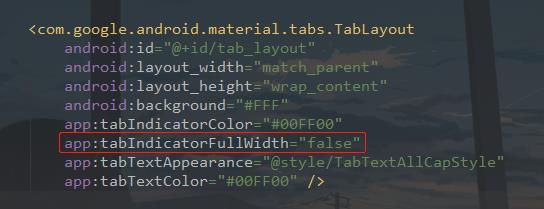
运行一下:
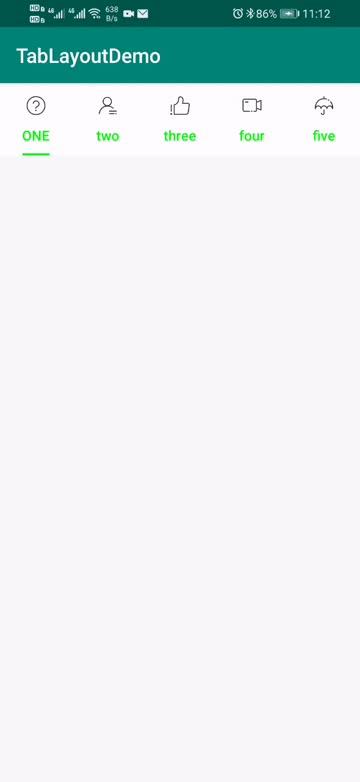
是不是很简单呢?基本上这个就能满足你的需求了,那么这个TabLayout的基本使用就介绍完了,有想要我添加的可以评论区留言哦,否则我就会以为你们都会了。
二、分类页面 (TabLayout + ViewPager + Fragment)
什么是分类页面呢?

可以看到类似与这种的都可以称之为分类页面,当然这是我的个人看法,我没有见过什么世面,浅显的这么认为。那么这样的页面看起来不错,但是怎么去入手呢?
分析一下可能就是TabLayout + ViewPager + Fragment构成的,这三个组合在写分类页面和App主页面时稍有不同,文中都会讲到的,莫急。
为了更好的演示,我还是会新建一个Activity,在com.llw.tablayoutdemo下新建一个mode2包,该包下新建ClassificationActivity,布局activity_classification.xml,布局代码:
<?xml version="1.0" encoding="utf-8"?>
<LinearLayout xmlns:android="http://schemas.android.com/apk/res/android"
    xmlns:app="http://schemas.android.com/apk/res-auto"
    xmlns:tools="http://schemas.android.com/tools"
    android:layout_width="match_parent"
    android:layout_height="match_parent"
    android:orientation="vertical"
    tools:context=".mode2.ClassificationActivity">
    <com.google.android.material.tabs.TabLayout
        android:id="@+id/tab_layout"
        android:layout_width="match_parent"
        android:layout_height="wrap_content"
        android:background="#FFF"
        app:tabIndicatorColor="#00FF00"
        app:tabIndicatorFullWidth="false"
        app:tabMode="scrollable"
        app:tabRippleColor="#00000000"
        app:tabSelectedTextColor="#00FF00"
        app:tabTextColor="#000" />

    <androidx.viewpager.widget.ViewPager
        android:id="@+id/view_pager"
        android:layout_width="match_parent"
        android:layout_height="match_parent"/>
</LinearLayout>
还差Fragment了,假设当前的Activity是要做视频的分类,有类别如下:电视剧、电影、综艺、体育、新闻、国际这六项。那么我们就需要建6个Fragment,这个些fragment同样放在mode2包下。分别是
① 创建Fragment
TVSeriesFragment
public class TVSeriesFragment extends Fragment {

    @Override
    public View onCreateView(final LayoutInflater inflater,
                             ViewGroup container, Bundle savedInstanceState) {
        final View view = inflater.inflate(R.layout.fragment_tv_series,
                container, false);
        return view;
    }
}
MovieFragment
public class MovieFragment extends Fragment {

    @Override
    public View onCreateView(final LayoutInflater inflater,
                             ViewGroup container, Bundle savedInstanceState) {
        final View view = inflater.inflate(R.layout.fragment_movie,
                container, false);
        return view;
    }
}
VarietyShowFragment
public class VarietyShowFragment extends Fragment {

    @Override
    public View onCreateView(final LayoutInflater inflater,
                             ViewGroup container, Bundle savedInstanceState) {
        final View view = inflater.inflate(R.layout.fragment_variety_show,
                container, false);
        return view;
    }
}
SportsFragment
public class SportsFragment extends Fragment {

    @Override
    public View onCreateView(final LayoutInflater inflater,
                             ViewGroup container, Bundle savedInstanceState) {
        final View view = inflater.inflate(R.layout.fragment_sports,
                container, false);
        return view;
    }
}
NewsFragment
public class NewsFragment extends Fragment {

    @Override
    public View onCreateView(final LayoutInflater inflater,
                             ViewGroup container, Bundle savedInstanceState) {
        final View view = inflater.inflate(R.layout.fragment_news,
                container, false);
        return view;
    }
}
InternationalFragment。
public class InternationalFragment extends Fragment {

    @Override
    public View onCreateView(final LayoutInflater inflater,
                             ViewGroup container, Bundle savedInstanceState) {
        final View view = inflater.inflate(R.layout.fragment_international,
                container, false);
        return view;
    }
}
六个Fragment各自对应的xml如下:
fragment_tv_series.xml
<?xml version="1.0" encoding="utf-8"?>
<LinearLayout xmlns:android="http://schemas.android.com/apk/res/android"
    android:layout_width="match_parent"
    android:layout_height="match_parent"
    android:gravity="center"
    android:orientation="vertical">

    <TextView
        android:layout_width="wrap_content"
        android:layout_height="wrap_content"
        android:text="电视剧"
        android:textColor="#000"
        android:textSize="24sp" />
</LinearLayout>
fragment_movie.xml
<?xml version="1.0" encoding="utf-8"?>
<LinearLayout xmlns:android="http://schemas.android.com/apk/res/android"
    android:layout_width="match_parent"
    android:layout_height="match_parent"
    android:gravity="center"
    android:orientation="vertical">

    <TextView
        android:layout_width="wrap_content"
        android:layout_height="wrap_content"
        android:text="电影"
        android:textColor="#000"
        android:textSize="24sp" />
</LinearLayout>
fragment_variety_show.xml
<?xml version="1.0" encoding="utf-8"?>
<LinearLayout xmlns:android="http://schemas.android.com/apk/res/android"
    android:layout_width="match_parent"
    android:layout_height="match_parent"
    android:gravity="center"
    android:orientation="vertical">

    <TextView
        android:layout_width="wrap_content"
        android:layout_height="wrap_content"
        android:text="综艺"
        android:textColor="#000"
        android:textSize="24sp" />
</LinearLayout>
fragment_sports.xml
<?xml version="1.0" encoding="utf-8"?>
<LinearLayout xmlns:android="http://schemas.android.com/apk/res/android"
    android:layout_width="match_parent"
    android:layout_height="match_parent"
    android:gravity="center"
    android:orientation="vertical">

    <TextView
        android:layout_width="wrap_content"
        android:layout_height="wrap_content"
        android:text="体育"
        android:textColor="#000"
        android:textSize="24sp" />
</LinearLayout>
fragment_news.xml
<?xml version="1.0" encoding="utf-8"?>
<LinearLayout xmlns:android="http://schemas.android.com/apk/res/android"
    android:layout_width="match_parent"
    android:layout_height="match_parent"
    android:gravity="center"
    android:orientation="vertical">

    <TextView
        android:layout_width="wrap_content"
        android:layout_height="wrap_content"
        android:text="新闻"
        android:textColor="#000"
        android:textSize="24sp" />
</LinearLayout>
fragment_international.xml
<?xml version="1.0" encoding="utf-8"?>
<LinearLayout xmlns:android="http://schemas.android.com/apk/res/android"
    android:layout_width="match_parent"
    android:layout_height="match_parent"
    android:gravity="center"
    android:orientation="vertical">

    <TextView
        android:layout_width="wrap_content"
        android:layout_height="wrap_content"
        android:text="国际"
        android:textColor="#000"
        android:textSize="24sp" />
</LinearLayout>
我这么实在的博主现在可不多了,这么多余的代码我都给贴出来了。
② Fragment适配器
现在Fragment的就写好了。下面写一个适配器,在com.llw.tablayoutdemo下新建一个adapter包,该包下新建一个BasicFragmentAdapter,里面的代码如下:
package com.llw.tablayoutdemo.adapter;

import android.view.ViewGroup;

import androidx.annotation.NonNull;
import androidx.annotation.Nullable;
import androidx.fragment.app.Fragment;
import androidx.fragment.app.FragmentManager;
import androidx.fragment.app.FragmentPagerAdapter;

import java.util.List;

/**
 * Fragment适配器
 *
 * @author llw
 * @date 2021/4/28 15:08
 */
public class BasicFragmentAdapter extends FragmentPagerAdapter {

    String titleArr[];
    List<Fragment> mFragmentList;

    public BasicFragmentAdapter(FragmentManager fm, List<Fragment> list, String[] titleArr) {
        super(fm);
        mFragmentList = list;
        this.titleArr = titleArr;
    }

    @Override
    public Fragment getItem(int i) {
        return mFragmentList.get(i);
    }

    @Override
    public int getCount() {
        return mFragmentList != null ? mFragmentList.size() : 0;
    }

    @Nullable
    @Override
    public CharSequence getPageTitle(int position) {
        return titleArr[position];
    }

    @Override
    public void destroyItem(@NonNull ViewGroup container, int position, @NonNull Object object) {
//        super.destroyItem(container, position, object);
    }
}
③ 编码运行
现在都具备了,回到ClassificationActivity中,修改代码如下:
package com.llw.tablayoutdemo.mode2;

import androidx.appcompat.app.AppCompatActivity;
import androidx.fragment.app.Fragment;
import androidx.viewpager.widget.ViewPager;

import android.os.Bundle;

import com.google.android.material.tabs.TabLayout;
import com.llw.tablayoutdemo.R;
import com.llw.tablayoutdemo.adapter.BasicFragmentAdapter;

import java.util.ArrayList;
import java.util.List;

/**
 * 分类页面  ;TabLayout + ViewPager + Fragment
 *
 * @author llw
 */
public class ClassificationActivity extends AppCompatActivity {

    private TabLayout tabLayout;
    private ViewPager viewPager;
	String[] titleArray = new String[]{"电视剧", "电影", "综艺", "体育", "新闻", "国际"};

    @Override
    以上是关于Android TabLayout 使用进阶(含源码)的主要内容,如果未能解决你的问题,请参考以下文章