女朋友想减肥,程序员花了3天写了个卡路里计数器
Posted 华为移动服务
tags:
篇首语:本文由小常识网(cha138.com)小编为大家整理,主要介绍了女朋友想减肥,程序员花了3天写了个卡路里计数器相关的知识,希望对你有一定的参考价值。
“女朋友说想减肥了,该怎么回答她?”🤔
有的男同胞饶有信心,认为这是一道送分题——当然是毫不迟疑地告诉女友:”不用减,你一点也不胖,仔细琢磨还有点瘦……”
No!🙅太年轻,一看就不懂生活。答案早就更新n个版本了!我厂阿强近期也被提了此问,他给出了一个有技术含量的暖心答案——女友关心体态和体重器上的数量,阿强更关心她的身体健康。于是阿强发挥自己看家本事,写了个卡路里计数器,把对关怀女友精确到数字,用数字告诉她日常应该保持怎样的健康饮食和运动量,同时陪她一起践行健康生活。
这里把整个开发过程分享出来,供广大男同胞学习和借鉴。以下是如何通过android Studio的Kotlin开发一个简单的卡路里计数器应用的全过程。
实现原理
华为Health Kit是一个免费的套件,允许用户存储智能手机或其他设备收集的运动健康数据,如智能手表、智能手环和计步器上的数据。这些数据可以在生态系统中安全共享。
主要功能
- 数据存储:轻松存储你的运动与健康数据。
- 数据开放:除了提供许多运动和保健数据接口外,它还支持共享各种运动与健康数据,包括步数、体重和心率。
- 数据访问授权管理:用户可以管理开发人员对其运动与健康数据的访问,保障自身的数据隐私和合法权利。
- 设备访问:可以通过蓝牙测量硬件设备的数据,并允许我们上传这些数据。
应用功能
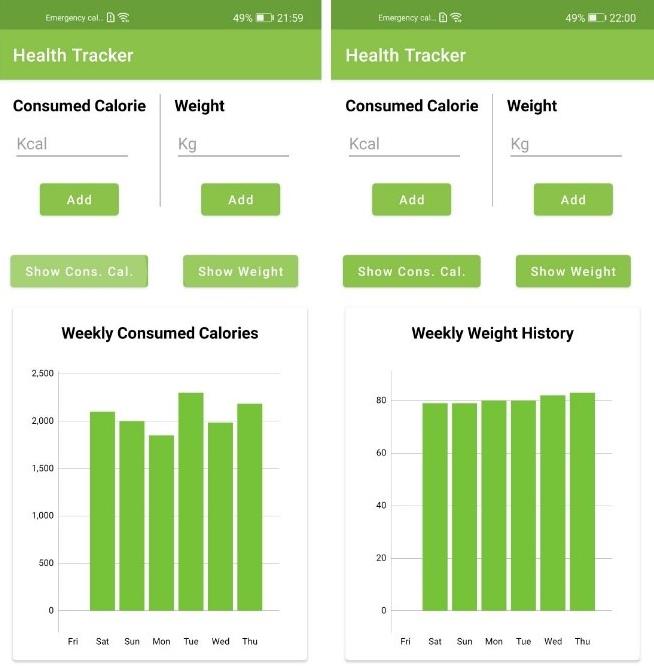
这个卡路里计数器应用包含两个界面。通过华为Account Kit的首页,点击“登录华为账号”按钮登录应用。登陆后进入下一个界面,在这个页面上,可添加“卡路里”和“体重”信息。信息以图形的方式显示,借助了MPAndroidChart的免费库。示例代码已在相关社区进行开源,欢迎开发者关注、下载并提供宝贵意见:
Github官方地址:https://github.com/HMS-Core/hms-health-demo-kotlin
Gitee官方地址:https://gitee.com/hms-core/hms-health-demo-kotlin

集成HUAWEI HMS Core
首先,我们需要在Console上创建一个帐户,然后创建一个项目,并将其集成到应用中。可以按照此链接中概述的步骤快速完成此操作,也可以借助官方codelab来完成操作。
集成华为Health Kit
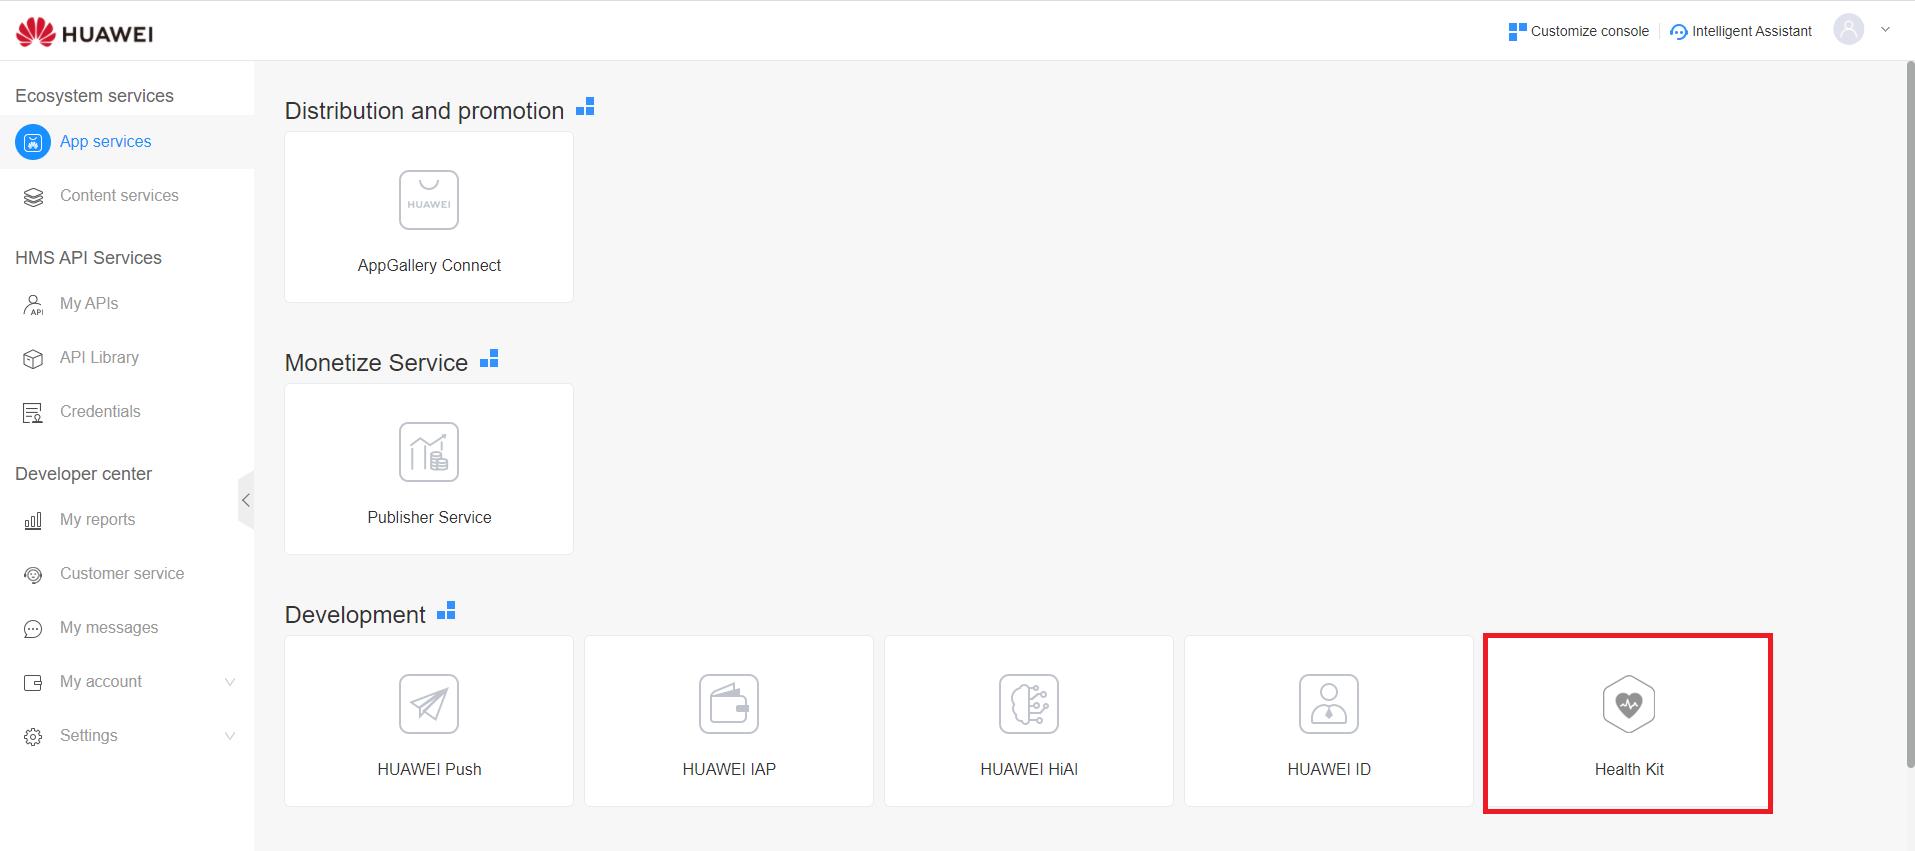
申请获取Health Kit服务。通过此链接登录Console后,单击下图中显示的“Health Kit”。

然后,单击“申请Health Kit”即可完成申请。

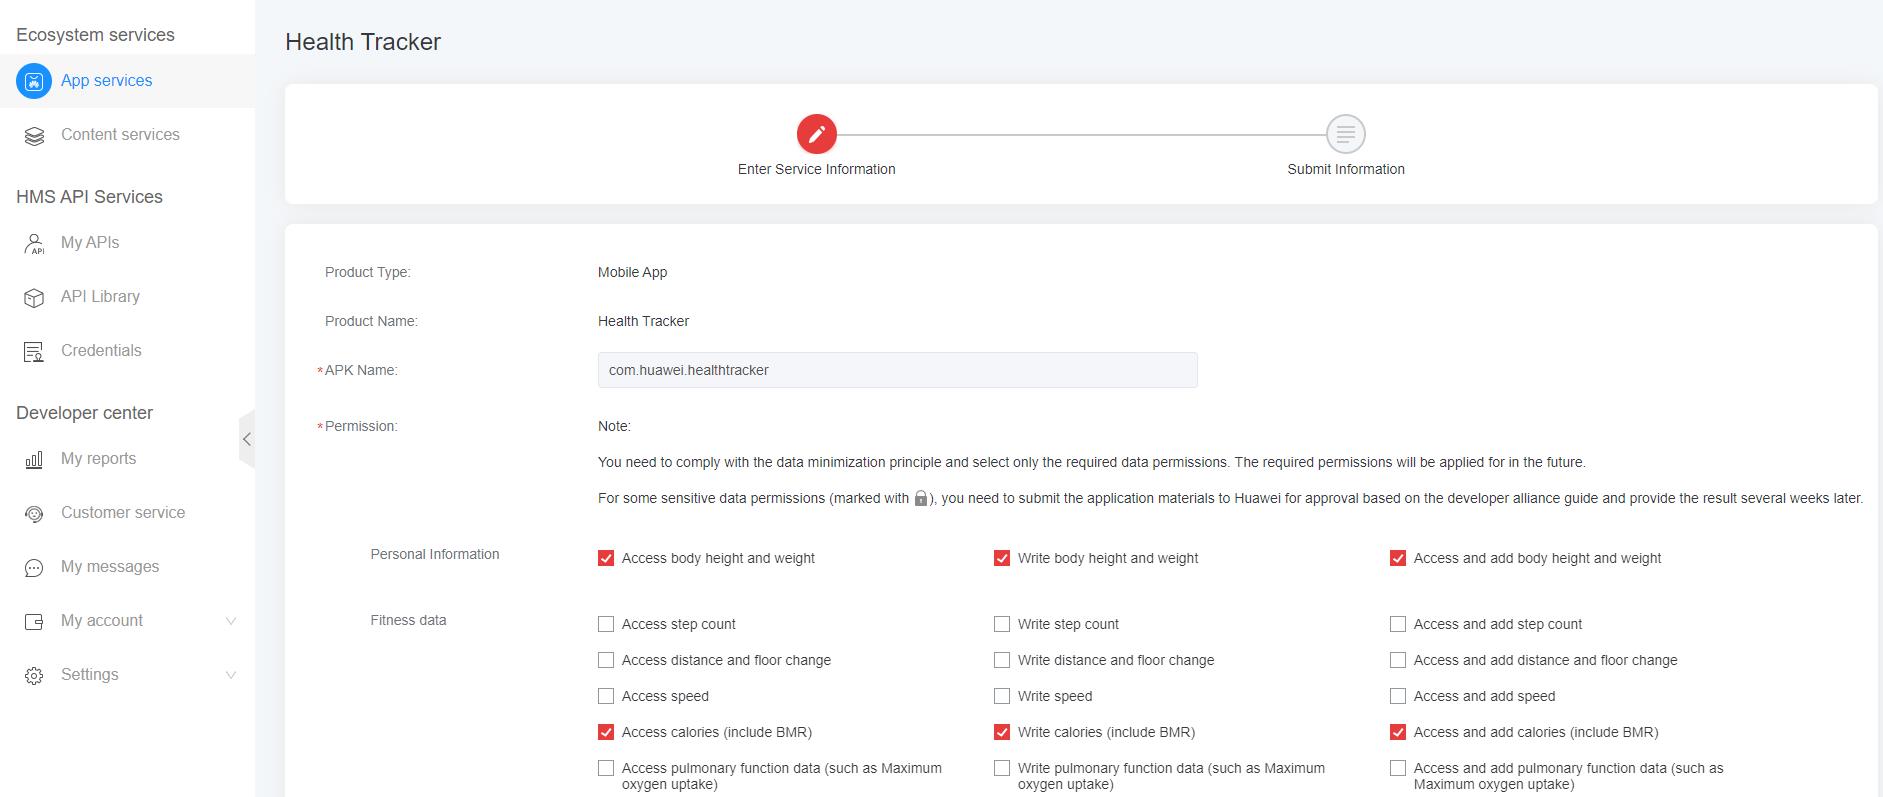
接下来需要请求应用使用数据的许可,包括“体重”和“卡路里”数据。只申请必要的数据权限,即“访问和添加身高和体重数据”和“访问和添加卡路里(包括基础代谢率BMR)数据”
然后单击“提交”按钮,完成所有流程。
需要注意的是,你会看到下图中的某些选项被锁定,因为它们是敏感数据。如果你想在应用中使用敏感数据,还需要发送电子邮件至hihealth@huawei.com邮箱,标题命名为“申请Health Kit开放权限”。对方会尽快回复。你可以从点击此链接获得更多详细信息。

在Console获得必要的权限后,打开Android Studio继续开发应用。
点击“build.gradle (工程级)”,然后将所需的依赖添加到项目级的“build.gradle”文件中。
注意:我们为图形库添加了jitpack链接。
maven {url ‘https://developer.huawei.com/repo/'}
maven { url ‘https://jitpack.io' }
点击打开“build.gradle(应用级)”文件。以下依赖关系对于运行Health Kit来说就足够了,但我们还将添加Account Kit和图形库的依赖关系。
implementation 'com.huawei.agconnect:agconnect-core:1.4.2.301'
implementation 'com.huawei.hms:hwid:5.1.0.301'
implementation 'com.huawei.hms:health:5.1.0.301'
implementation 'com.github.PhilJay:MPAndroidChart:v3.1.0'
最后,打开“AndroidManifest.xml”文件,将App ID作为元数据信息添加到“Application”标签中。可以通过以下两种方法获取我们的应用ID:1. 进入Console,单击开发部分的“华为ID”,然后选择项目,查看应用ID。2. 在“agconnect-services.json”文件中找到应用ID。
<meta-data
     android:name="com.huawei.hms.client.appid"
     android:value="您的应用 Id"/>
开发应用
Health Kit为我们提供了3个API:
- DataController:添加、更新、删除和读取运动与健康数据。
- ActivityRecordsController:将活动记录写入平台并更新记录。
- AutoRecordController:读取实时运动与健康数据。
我们使用DataController在应用中处理卡路里和体重数据。Health Kit提供了安全可靠的数据服务,所以我们会请求用户允许使用他们的健康数据。
“activity_main.xml”文件包含logo、应用名、输入按钮等信息。
<?xml version="1.0" encoding="utf-8"?>
<androidx.constraintlayout.widget.ConstraintLayout xmlns:android="http://schemas.android.com/apk/res/android"
    xmlns:app="http://schemas.android.com/apk/res-auto"
    xmlns:tools="http://schemas.android.com/tools"
    android:layout_width="match_parent"
    android:layout_height="match_parent"
    tools:context=".MainActivity">

    <TextView
        android:id="@+id/tvAppName"
        android:layout_width="wrap_content"
        android:layout_height="wrap_content"
        android:layout_marginTop="8dp"
        android:text="@string/app_name"
        android:textColor="@color/colorPrimary"
        android:textSize="24sp"
        android:textStyle="bold"
        app:layout_constraintLeft_toLeftOf="parent"
        app:layout_constraintRight_toRightOf="parent"
        app:layout_constraintTop_toBottomOf="@+id/ivLogo" />


    <com.huawei.hms.support.hwid.ui.HuaweiIdAuthButton
        android:id="@+id/btnLogin"
        android:layout_width="wrap_content"
        android:layout_height="wrap_content"
        app:layout_constraintBottom_toBottomOf="parent"
        app:layout_constraintEnd_toEndOf="parent"
        app:layout_constraintStart_toStartOf="parent"
        app:layout_constraintTop_toTopOf="parent"
        app:layout_constraintVertical_bias="0.7" />

    <ImageView
        android:id="@+id/ivLogo"
        android:layout_width="172dp"
        android:layout_height="113dp"
        app:layout_constraintBottom_toBottomOf="parent"
        app:layout_constraintEnd_toEndOf="parent"
        app:layout_constraintHorizontal_bias="0.497"
        app:layout_constraintStart_toStartOf="parent"
        app:layout_constraintTop_toTopOf="parent"
        app:layout_constraintVertical_bias="0.3"
        app:srcCompat="@drawable/ic_logo" />

</androidx.constraintlayout.widget.ConstraintLayout>
MainActivity.kt包含登录过程所需的代码。

package com.huawei.healthtracker

import android.content.Intent
import android.os.Bundle
import android.util.Log
import androidx.appcompat.app.AppCompatActivity
import com.huawei.hms.common.ApiException
import com.huawei.hms.hihealth.data.Scopes
import com.huawei.hms.support.api.entity.auth.Scope
import com.huawei.hms.support.hwid.HuaweiIdAuthManager
import com.huawei.hms.support.hwid.request.HuaweiIdAuthParams
import com.huawei.hms.support.hwid.request.HuaweiIdAuthParamsHelper
import com.huawei.hms.support.hwid.service.HuaweiIdAuthService
import com.huawei.hms.support.hwid.ui.HuaweiIdAuthButton

class MainActivity : AppCompatActivity() {

    private val TAG = "MainActivity"

    private lateinit var btnLogin: HuaweiIdAuthButton
    private lateinit var mAuthParam: HuaweiIdAuthParams
    private lateinit var mAuthService: HuaweiIdAuthService

    private val REQUEST_SIGN_IN_LOGIN = 1001


    override fun onCreate(savedInstanceState: Bundle?) {

        super.onCreate(savedInstanceState)
        setContentView(R.layout.activity_main)

        btnLogin = findViewById(R.id.btnLogin)

        btnLogin.setOnClickListener {
            signIn()
        }

    }

    private fun signIn() {

        val scopeList = listOf(
            Scope(Scopes.HEALTHKIT_CALORIES_BOTH),
            Scope(Scopes.HEALTHKIT_HEIGHTWEIGHT_BOTH),
        )

        mAuthParam =
            HuaweiIdAuthParamsHelper(HuaweiIdAuthParams.DEFAULT_AUTH_REQUEST_PARAM).apply {
                setIdToken()
                    .setAccessToken()
                    .setScopeList(scopeList)
            }.createParams()

        mAuthService = HuaweiIdAuthManager.getService(this, mAuthParam)

        val authHuaweiIdTask = mAuthService.silentSignIn()

        authHuaweiIdTask.addOnSuccessListener {
            val intent = Intent(this, CalorieTrackerActivity::class.java)
            startActivity(intent)
        }
            .addOnFailureListener {
                startActivityForResult(mAuthService.signInIntent, REQUEST_SIGN_IN_LOGIN)
            }
    }

    override fun onActivityResult(requestCode: Int, resultCode: Int, data: Intent?) {
        super.onActivityResult(requestCode, resultCode, data)

        when (requestCode) {
            REQUEST_SIGN_IN_LOGIN -> {

                val authHuaweiIdTask = HuaweiIdAuthManager.parseAuthResultFromIntent(data)
                if (authHuaweiIdTask.isSuccessful) {

                    val intent = Intent(this, CalorieTrackerActivity::class.java)
                    startActivity(intent)

                } else {
                    Log.i(
                        TAG,
                        "signIn failed: ${(authHuaweiIdTask.exception as ApiException).statusCode}"
                    )
                }
            }
        }
    }

}
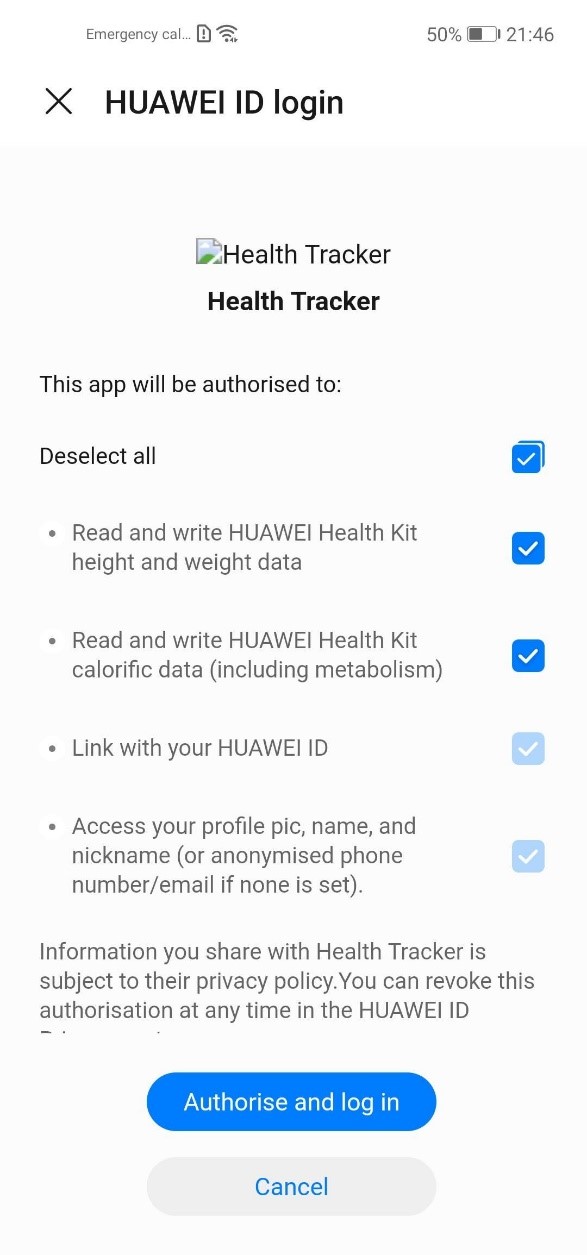
确保你已将数据的权限设置为“范围”。单击登录按钮时,用户将看到授权页面。并且,授权页面在“范围”字段中显示权限。默认情况下不标记这些权限,因此用户应标记它们。

在“CalorieTrackerActivity”页面上,可以添加和查看卡路里和体重信息。
“activity_calorie_tracker.xml”包含卡路里计数器页面的设计代码。
<?xml version="1.0" encoding="utf-8"?>
<androidx.constraintlayout.widget.ConstraintLayout xmlns:android="http://schemas.android.com/apk/res/android"
    xmlns:app="http://schemas.android.com/apk/res-auto"
    xmlns:tools="http://schemas.android.com/tools"
    android:layout_width="match_parent"
    android:layout_height="match_parent"
    tools:context=".CalorieTrackerActivity">

    <Button
        android:id="@+id/btnShowConsCal"
        android:layout_width="wrap_content"
        android:layout_height="wrap_content"
        android:layout_marginTop="32dp"
        android:text="Show Cons. Cal."
        android:textAllCaps="false"
        app:layout_constraintEnd_toStartOf="@+id/guideline"
        app:layout_constraintHorizontal_bias="0.5"
        app:layout_constraintStart_toStartOf="parent"
        app:layout_constraintTop_toBottomOf="@+id/btnAddConsumedCal" />

    <Button
        android:id="@+id/btnShowWeight"
        android:layout_width="wrap_content"
        android:layout_height="wrap_content"
        android:layout_marginTop="32dp"
        android:text="Show Weight"
        android:textAllCaps="false"
        app:layout_constraintEnd_toEndOf="parent"
        app:layout_constraintHorizontal_bias="0.5"
        app:layout_constraintStart_toStartOf="@+id/guideline"
        app:layout_constraintTop_toBottomOf="@+id/btnAddWeight" />

    <Button
        android:id="@+id/btnAddConsumedCal"
        android:layout_width="wrap_content"
        android:layout_height="wrap_content"
        android:layout_marginTop="16dp"
        android:text="Add"
        android:textAllCaps="false"
        app:layout_constraintEnd_toStartOf="@+id/guideline"
        app:layout_constraintHorizontal_bias="0.5"
        app:layout_constraintStart_toStartOf="parent"
        app:layout_constraintTop_toBottomOf="@+id/etConsumedCal" />

    <Button
        android:id="@+id/btnAddWeight"
        android:layout_width="wrap_content"
        android:layout_height="wrap_content"
        android:layout_marginTop="16dp"
        android:text="Add"
        android:textAllCaps="false"
        app:layout_constraintEnd_toEndOf="parent"
        app:layout_constraintHorizontal_bias="0.5"
        app:layout_constraintStart_toStartOf="@+id/guideline"
        app:layout_constraintTop_toBottomOf="@+id/etBurntCal" />

    <TextView
        android:id="@+id/textView"
        android:layout_width="0dp"
        android:layout_height="wrap_content"
        android:layout_marginStart="16dp"
        android:layout_marginTop="16dp"
        android:text="Consumed Calorie"
        android:textColor="@color/black"
        android:textSize="18sp"
        android:textStyle="bold"
        app:layout_constraintEnd_toStartOf="@+id/guideline"
        app:layout_constraintStart_toStartOf="parent"
        app:layout_constraintTop_toTopOf="parent" />

    <TextView
        android:id="@+id/textView2"
        android:layout_width="0dp"
        android:layout_height="wrap_content"
        android:layout_marginStart="16dp"
        android:layout_marginTop="16dp"
        android:text="Weight"
        android:textColor="@color/black"
        android:textSize="18sp"
        android:textStyle="bold"
        app:layout_constraintEnd_toEndOf="parent"
        app:layout_constraintStart_toStartOf="@+id/guideline"
        app:layout_constraintTop_toTopOf="parent" />

    <EditText
        android:id="@+id/etConsumedCal"
        android:layout_width="0dp"
        android:layout_height="wrap_content"
        android:layout_marginStart="16dp"
        android:layout_marginTop="8dp"
        android:layout_marginEnd="32dp"
        android:ems="10"
        android:hint="Kcal"
        android:inputType="number"
        android:maxLength="4"
        app:layout_constraintEnd_toStartOf="@+id/guideline"
        app:layout_constraintStart_toStartOf="parent"
        app:layout_constraintTop_toBottomOf="@+id/textView" />

    <EditText
        android:id="@+id/etBurntCal"
        android:layout_width="0dp"
        android:layout_height="wrap_content"
        android:layout_marginStart="16dp"
        android:layout_marginTop="8dp"
        android:layout_marginEnd="32dp"
        android:ems="10"
        android:hint="Kg"
        android:inputType="number"
        android:maxLength="3"
        app:layout_constraintEnd_toEndOf="parent"
        app:layout_constraintStart_toStartOf="@+id/guideline"
        app:layout_constraintTop_toBottomOf="@+id/textView2" />

    <androidx.constraintlayout.widget.Guideline
        android:id="@+id/guideline"
        android:layout_width="wrap_content"
        android:layout_height="wrap_content"
        android:orientation="vertical"
        app:layout_constraintGuide_percent="0.5"
        app:layout_constraintTop_toTopOf="parent" />


    <View
        android:id="@+id/view_vertical"
        android:layout_width="1dp"
        android:layout_height="0dp"
        android:layout_marginTop="16dp"
        android:layout_marginBottom="16dp"
        android:background="@android:color/darker_gray"
        app:layout_constraintBottom_toBottomOf="@+id/btnAddConsumedCal"
        app:layout_constraintEnd_toEndOf="parent"
        app:layout_constraintStart_toStartOf="parent"
        app:layout_constraintTop_toTopOf="parent" />

    <androidx.cardview.widget.CardView
        android:layout_width="0dp"
        android:layout_height="0dp"
        android:layout_marginStart="16dp"
        android:layout_marginTop="16dp"
        android:layout_marginEnd="16dp"
        android:layout_marginBottom="32dp"
        android:background="@color/colorCardBackground"
        app:cardCornerRadius="4dp"
        app:layout_constraintBottom_toBottomOf="parent"
        app:layout_constraintEnd_toEndOf="parent"
        app:layout_constraintStart_toStartOf="parent"
        app:layout_constraintTop_toBottomOf="@+id/btnShowWeight">

        <LinearLayout
            android:layout_width="match_parent"
            android:layout_height="match_parent"
            android:orientation="vertical">

            <TextView
                android:id="@+id/tvChartHead"
                android:layout_width="match_parent"
                android:layout_height="wrap_content"
                android:layout_marginTop="16dp"
                android:gravity="center_horizontal"
                android:text="Weekly Consumed Calories"
                android:textColor="@color/black"
                android:textSize="18sp"
                android:textStyle="bold" />

            <com.github.mikephil.charting.charts.BarChart
                android:id="@+id/barchartWeeklyCal"
                android:layout_width="match_parent"
                android:layout_height="match_parent"
                android:layout_margin="16dp"
                android:background="@android:color/white" />
        </LinearLayout>
    </androidx.cardview.widget.CardView>

</androidx.constraintlayout.widget.ConstraintLayout>
刚刚我们介绍了Data Controllers,现在就来创建一个Data Controller,然后将要使用的数据写入权限。
class CalorieTrackerActivity : AppCompatActivity() {
  // ...
    private lateinit var dataController: DataController

    override fun onCreate(savedInstanceState: Bundle?) {
        super.onCreate(savedInstanceState)
        setContentView(R.layout.activity_calorie_tracker)

        initDataController()

        //...
    }

     private fun initDataController() {
        val hiHealthOptions = HiHealthOptions.builder()
            .addDataType(DataType.DT_CONTINUOUS_CALORIES_CONSUMED, HiHealthOptions.ACCESS_READ)
            .addDataType(DataType.DT_CONTINUOUS_CALORIES_CONSUMED, HiHealthOptions.ACCESS_WRITE)
            .addDataType(DataType.DT_INSTANTANEOUS_BODY_WEIGHT, HiHealthOptions.ACCESS_READ)
            .addDataType(DataType.DT_INSTANTANEOUS_BODY_WEIGHT, HiHealthOptions.ACCESS_WRITE)
            .build()

        val signInHuaweiId = HuaweiIdAuthManager.getExtendedAuthResult(hiHealthOptions)
        dataController = HuaweiHiHealth.getDataController(this, signInHuaweiId)
    }


}通过addConsumedCalorie方法来记录数据。此前,需要设置一个时间间隔:将当前时间作为结束时间,并将其之前的一秒作为开始时间。
    private fun addConsumedCalorie(calorie: Float) {
        val dataCollector: DataCollector = DataCollector.Builder().setPackageName(this)
            .setDataType(DataType.DT_CONTINUOUS_CALORIES_CONSUMED)
            .setDataGenerateType(DataCollector.DATA_TYPE_RAW)
            .build()

        val sampleSet = SampleSet.create(dataCollector)

        val currentTime = System.currentTimeMillis()

        val samplePoint = sampleSet.createSamplePoint()
            .setTimeInterval(currentTime - 1, currentTime, TimeUnit.MILLISECONDS)
        samplePoint.getFieldValue(Field.FIELD_CALORIES).setFloatValue(calorie)
        sampleSet.addSample(samplePoint)

        val insertTask: Task<Void> = dataController.insert(sampleSet)

        insertTask.addOnSuccessListener {
            Toast.makeText(this, "Calorie added successfully", Toast.LENGTH_SHORT).show()
        }.addOnFailureListener { e ->
            Toast.makeText(this, e.message.toString(), Toast.LENGTH_LONG).show()
        }
    }
我们创建了一个名为addWightData的方法,类似于addConsumedCalori方法。但这一次,输入的开始时间和结束时间的值必须相同。否则,当输入重量信息时,应用将出现崩溃。我们还更改了数据类型。
    private fun addWeightData(weight: Float) {
        val dataCollector: DataCollector = DataCollector.Builder().setPackageName(this)
            .setDataType(DataType.DT_INSTANTANEOUS_BODY_WEIGHT)
            .setDataGenerateType(DataCollector.DATA_TYPE_RAW)
            .build()

        val sampleSet = SampleSet.create(dataCollector)

        val currentTime = System.currentTimeMillis()

        val samplePoint = sampleSet.createSamplePoint()
            .setTimeInterval(currentTime, currentTime, TimeUnit.MILLISECONDS)
        samplePoint.getFieldValue(Field.FIELD_BODY_WEIGHT).setFloatValue(weight)
        sampleSet.addSample(samplePoint)

        val insertTask: Task<Void> = dataController.insert(sampleSet)

        insertTask.addOnSuccessListener {
            Toast.makeText(this, "Weight added successfully", Toast.LENGTH_SHORT).show()
        }.addOnFailureListener { e ->
            Toast.makeText(this, e.message.toString(), Toast.LENGTH_SHORT).show()
        }
    }
接下来使用readConsumedData方法来读取消耗的卡路里数据。我们选择了一周前到当前的时间范围,然后检索了这个时间范围内的所有数据,并将其作为时间值放在Map上。最后,调用showCaloriesWeekly方法在条形图中显示这些数据。
    private fun readConsumedData() {

        val caloriesMap = mutableMapOf<Long, Float>()

        val endDate = System.currentTimeMillis()
        val startDate = endDate - SIX_DAY_MILLIS

        val readOptions = ReadOptions.Builder()
            .read(DataType.DT_CONTINUOUS_CALORIES_CONSUMED)
            .setTimeRange(startDate, endDate, TimeUnit.MILLISECONDS).build()

        val readReplyTask = dataController.read(readOptions)

        readReplyTask.addOnSuccessListener { readReply ->
            for (sampleSet in readReply.sampleSets) {
                if (sampleSet.isEmpty.not()) {
                    sampleSet.samplePoints.forEach {
                        caloriesMap.put(
                            it.getStartTime(TimeUnit.MILLISECONDS),
                            it.getFieldValue(Field.FIELD_CALORIES).asFloatValue()
                        )
                    }
                } else {
                    Toast.makeText(this, "No data to show", Toast.LENGTH_SHORT).show()
                }
            }

            showCaloriesWeekly(caloriesMap)

        }.addOnFailureListener {
            Log.i(TAG, it.message.toString())
        }
    }
使用readWightData方法来检索记录的体重信息。
    private fun readWeightData() {

        val weightsMap = mutableMapOf<Long, Float>()

        val endDate = System.currentTimeMillis()
        val startDate = endDate - SIX_DAY_MILLIS

        val readOptions = ReadOptions.Builder().read(DataType.DT_INSTANTANEOUS_BODY_WEIGHT)
            .setTimeRange(startDate, endDate, TimeUnit.MILLISECONDS).build()

        val readReplyTask = dataController.read(readOptions)

        readReplyTask.addOnSuccessListener { readReply ->

            for (sampleSet in readReply.sampleSets) {
                if (sampleSet.isEmpty.not()) {
                    sampleSet.samplePoints.forEach {
                        weightsMap.put(
                            it.getStartTime(TimeUnit.MILLISECONDS),
                            it.getFieldValue(Field.FIELD_BODY_WEIGHT).asFloatValue()
                        )
                    }
                } else {
                    Toast.makeText(this, "No data to show", Toast.LENGTH_SHORT).show()
                }
            }

            showWeightsWeekly(weightsMap)

        }.addOnFailureListener {
            Log.i(TAG, it.message.toString())
        }
    }
使用showCaloriesWeekly方法获取上周的数据作为时间值。在获取值后,将上周每天的数据相加。最后调用initBarChart方法在条形图上显示每日数据。
    private fun showCaloriesWeekly(dataList: Map<Long, Float>) {

        val arrangedValuesAsMap = mutableMapOf<Long, Float>()
        val currentTimeMillis = System.currentTimeMillis()

        var firstDayCal = 0f
        var secondDayCal = 0f
        var thirdDayCal = 0f
        var fourthDayCal = 0f
        var fifthDayCal = 0f
        var sixthDayCal = 0f
        var seventhDayCal = 0f

        dataList.forEach { (time, value) ->
            when (time) {
                in getTodayStartInMillis()..currentTimeMillis -> {
                    seventhDayCal += value
                }
                in getTodayStartInMillis() - ONE_DAY_MILLIS until getTodayStartInMillis() -> {
                    sixthDayCal += value
                }
                in getTodayStartInMillis() - ONE_DAY_MILLIS * 2 until
                        getTodayStartInMillis() - ONE_DAY_MILLIS -> {
                    fifthDayCal += value
                }
                in getTodayStartInMillis() - ONE_DAY_MILLIS * 3 until
                        getTodayStartInMillis() - ONE_DAY_MILLIS * 2 -> {
                    fourthDayCal += value
                }
                in getTodayStartInMillis() - ONE_DAY_MILLIS * 4 until
                        getTodayStartInMillis() - ONE_DAY_MILLIS * 3 -> {
                    thirdDayCal += value
                }
                in getTodayStartInMillis() - ONE_DAY_MILLIS * 5 until
                        getTodayStartInMillis() - ONE_DAY_MILLIS * 4 -> {
                    secondDayCal += value
                }
                in getTodayStartInMillis() - ONE_DAY_MILLIS * 6 until
                        getTodayStartInMillis() - ONE_DAY_MILLIS * 5 -> {
                    firstDayCal += value
                }
            }
        }

        arrangedValuesAsMap.put(getTodayStartInMillis() - ONE_DAY_MILLIS * 6, firstDayCal)
        arrangedValuesAsMap.put(getTodayStartInMillis() - ONE_DAY_MILLIS * 5, secondDayCal)
        arrangedValuesAsMap.put(getTodayStartInMillis() - ONE_DAY_MILLIS * 4, thirdDayCal)
        arrangedValuesAsMap.put(getTodayStartInMillis() - ONE_DAY_MILLIS * 3, fourthDayCal)
        arrangedValuesAsMap.put(getTodayStartInMillis() - ONE_DAY_MILLIS * 2, fifthDayCal)
        arrangedValuesAsMap.put(getTodayStartInMillis() - ONE_DAY_MILLIS, sixthDayCal)
        arrangedValuesAsMap.put(getTodayStartInMillis(), seventhDayCal)

        initBarChart(arrangedValuesAsMap)

    }
showWightWeekly的工作原理几乎与showCaloriesWeekly方法相似。它们之间唯一的区别是,我们不在showWightWeekly方法中求和每日值,而是只获得每日的一个最新值。
    private fun showWeightsWeekly(dataList: Map<Long, Float>) {

        val arrangedValuesAsMap = mutableMapOf<Long, Float>()
        val currentTimeMillis = System.currentTimeMillis()

        var firstDayWeight = 0f
        var secondDayWeight = 0f
        var thirdDayWeight = 0f
        var fourthDayWeight = 0f
        var fifthDayWeight = 0f
        var sixthDayWeight = 0f
        var seventhDayWeight = 0f

        dataList.forEach { (time, value) ->
            when (time) {
                in getTodayStartInMillis()..currentTimeMillis -> {
                    seventhDayWeight = value
                }
                in getTodayStartInMillis() - ONE_DAY_MILLIS until getTodayStartInMillis() -> {
                    sixthDayWeight = value
                }
                in getTodayStartInMillis() - ONE_DAY_MILLIS * 2 until
                        getTodayStartInMillis() - ONE_DAY_MILLIS -> {
                    fifthDayWeight = value
                }
                in getTodayStartInMillis() - ONE_DAY_MILLIS * 3 until
                        getTodayStartInMillis() - ONE_DAY_MILLIS * 2 -> {
                    fourthDayWeight = value
                }
                in getTodayStartInMillis() - ONE_DAY_MILLIS * 4 until
                        getTodayStartInMillis() - ONE_DAY_MILLIS * 3 -> {
                    thirdDayWeight = value
                }
                in getTodayStartInMillis() - ONE_DAY_MILLIS * 5 until
                        getTodayStartInMillis() - ONE_DAY_MILLIS * 4 -> {
                    secondDayWeight = value
                }
                in getTodayStartInMillis() - ONE_DAY_MILLIS * 6 until
                        getTodayStartInMillis() - ONE_DAY_MILLIS * 5 -> {
                    firstDayWeight = value
                }
            }
        }

        arrangedValuesAsMap.put(getTodayStartInMillis() - ONE_DAY_MILLIS * 6, firstDayWeight)
        arrangedValuesAsMap.put(getTodayStartInMillis() - ONE_DAY_MILLIS * 5, secondDayWeight)
        arrangedValuesAsMap.put(getTodayStartInMillis() - ONE_DAY_MILLIS * 4, thirdDayWeight)
        arrangedValuesAsMap.put(getTodayStartInMillis() - ONE_DAY_MILLIS * 3, fourthDayWeight)
        arrangedValuesAsMap.put(getTodayStartInMillis() - ONE_DAY_MILLIS * 2, fifthDayWeight)
        arrangedValuesAsMap.put(getTodayStartInMillis() - ONE_DAY_MILLIS, sixthDayWeight)
        arrangedValuesAsMap.put(getTodayStartInMillis(), seventhDayWeight)

        initBarChart(arrangedValuesAsMap)

    }
InitBarChart以图形形式显示数据。
    private fun initBarChart(values: MutableMap<Long, Float>) {

        var barIndex = 0f
        val labelWeekdayNames = arrayListOf<String>()
        val entries = ArrayList<BarEntry>()

        val simpleDateFormat = SimpleDateFormat("E", Locale.US)

        values.forEach { (time, value) ->
            labelWeekdayNames.add(simpleDateFormat.format(time))
            entries.add(BarEntry(barIndex, value))
            barIndex++
        }

        barChart.apply {
            setDrawBarShadow(false)
            setDrawValueAboveBar(false)
            description.isEnabled = false
            setDrawGridBackground(false)
            isDoubleTapToZoomEnabled = false
        }

        barChart.xAxis.apply {
            setDrawGridLines(false)
            position = XAxis.XAxisPosition.BOTTOM
            granularity = 1f
            setDrawLabels(true)
            setDrawAxisLine(false)
            valueFormatter = IndexAxisValueFormatter(labelWeekdayNames)
            axisMaximum = labelWeekdayNames.size.toFloat()
        }

        barChart.axisRight.isEnabled = false

        val legend = barChart.legend
        legend.isEnabled = false

        val dataSets = arrayListOf<IBarDataSet>()
        val barDataSet = BarDataSet(entries, " ")
        barDataSet.color = Color.parseColor("#76C33A")
        barDataSet.setDrawValues(false)
        dataSets.add(barDataSet)

        val data = BarData(dataSets)
        barChart.data = data
        barChart.invalidate()
        barChart.animateY(1500)

    }
此外,除了添加和读取运动与健康数据外,Health Kit还提供更新数据、删除数据和清除所有数据的功能。虽然我们没有在应用中使用这些功能,但也可以快速了解一下。
updateWight:可以在指定的时间范围内更新数据。如果想使用体重信息,那就需要将开始时间和结束时间设置为相同的时间值。但如果我们想更新卡路里值,就需要设置为一个稍长的时间范围。如果指定时间范围内没有要更新的值时,它将自动添加新的重量或卡路里值。
    private fun updateWeight(weight: Float, startTimeInMillis: Long, endTimeInMillis: Long) {

        val dataCollector: DataCollector = DataCollector.Builder().setPackageName(this)
            .setDataType(DataType.DT_INSTANTANEOUS_BODY_WEIGHT)
            .setDataGenerateType(DataCollector.DATA_TYPE_RAW)
            .build()

        val sampleSet = SampleSet.create(dataCollector)

        val samplePoint = sampleSet.createSamplePoint()
            .setTimeInterval(startTimeInMillis, endTimeInMillis, TimeUnit.MILLISECONDS)
        samplePoint.getFieldValue(Field.FIELD_BODY_WEIGHT).setFloatValue(weight)

        sampleSet.addSample(samplePoint)

        val updateOptions = UpdateOptions.Builder()
            .setTimeInterval(startTimeInMillis, endTimeInMillis, TimeUnit.MILLISECONDS)
            .setSampleSet(sampleSet)
            .build()

        dataController.update(updateOptions)
            .addOnSuccessListener {
                Toast.makeText(this, "Weight has been updated successfully", Toast.LENGTH_SHORT)
                    .show()
            }
            .addOnFailureListener { e ->
                Toast.makeText(this, e.message.toString(), Toast.LENGTH_SHORT).show()
            }

    }
deleteWight:删除指定范围内的值。
    private fun deleteWeight(startTimeInMillis: Long, endTimeInMillis: Long) {

        val dataCollector: DataCollector = DataCollector.Builder().setPackageName(this)
            .setDataType(DataType.DT_INSTANTANEOUS_BODY_WEIGHT)
            .setDataGenerateType(DataCollector.DATA_TYPE_RAW)
            .build()

        val deleteOptions = DeleteOptions.Builder()
            .addDataCollector(dataCollector)
            .setTimeInterval(startTimeInMillis, endTimeInMillis, TimeUnit.MILLISECONDS)
            .build()

        dataController.delete(deleteOptions).addOnSuccessListener {
            Toast.makeText(this, "Weight has been deleted successfully", Toast.LENGTH_SHORT)
                .show()
        }
            .addOnFailureListener { e ->
                Toast.makeText(this, e.message.toString(), Toast.LENGTH_SHORT).show()
            }

    }
clearHealthData:删除Health Kit中的所有数据。
    private fun clearHealthData() {

        dataController.clearAll()
            .addOnSuccessListener {
                Toast.makeText(this, "All Health Kit data has been deleted.", Toast.LENGTH_SHORT)
                    .show()
            }
            .addOnFailureListener { e ->
                Toast.makeText(this, e.message.toString(), Toast.LENGTH_SHORT).show()
            }

    }
提示:
⚠️确保已将数据的权限设置为范围,否则将返回错误代码50005。
⚠️使用data controller写入数据时,请确保使用正确的时间间隔。否则,当你尝试写入数据时,应用将发生崩溃。
>>访问官方论坛:女朋友想减肥,程序员花了3天写了个卡路里计数器
关注我们,第一时间了解华为移动服务最新技术资讯~
以上是关于女朋友想减肥,程序员花了3天写了个卡路里计数器的主要内容,如果未能解决你的问题,请参考以下文章