Spring
Posted xue_yun_xiang
tags:
篇首语:本文由小常识网(cha138.com)小编为大家整理,主要介绍了Spring相关的知识,希望对你有一定的参考价值。
一、bean的实例化
第一种:构造器实例化
 <!--
        无参构造器实例化
    -->
    <bean id="student1" class="com.qfedu.entity.Student">
        <property name="id" value="100"></property>
        <property name="name" value="xiaoming"></property>
    </bean>
第一种:静态工厂实例化
容器创建对象,不直接调用对象构造方法,而是调用静态工厂的创建对象的方法
好处:便于我们定制化创建对象,对象的初始化,需要访问网络中的数据
/**
 * 静态工厂
 *    静态方法创建对象
 */
public class StaticFactory {


    /**
     * 静态方法 创建对象
     * @return
     */
    public static Student createStudent(){

        Student student = new Student();


        // 好处就是 程序员可以 自定义 初始化对象,并交给spring容器创建
        student.setId(123);
        student.setName("小明");

        return  student;
    }

}
<!--
       告诉容器使用静态工厂 创建对象
        class="com.qfedu.factory.StaticFactory" 静态工厂
        factory-method="createStudent" 调用静态工厂的方法名
    -->
    <bean id="student2" class="com.qfedu.factory.StaticFactory" factory-method="createStudent">

    </bean>
第三种:实例工厂实例化
/**
 * 实例工厂 创建对象
 */
public class Factory {


    /**
     * 实例方法 创建对象
     * @return
     */
    public  Student createStudent(){

        Student student = new Student();


        // 好处就是 程序员可以 自定义 初始化对象,并交给spring容器创建
        student.setId(123);
        student.setName("小明");

        return  student;
    }
}
<?xml version="1.0" encoding="UTF-8"?>
<beans xmlns="http://www.springframework.org/schema/beans"
       xmlns:xsi="http://www.w3.org/2001/XMLSchema-instance"
       xsi:schemaLocation="http://www.springframework.org/schema/beans http://www.springframework.org/schema/beans/spring-beans.xsd">


    <!--
        创建实例工厂
    -->
    <bean id="factory" class="com.qfedu.factory.Factory">

    </bean>
    <!--
            目标创建 student  使用实例工厂
                factory-bean="factory" 引用实例工厂
                factory-method="createStudent" 调用实例工厂中的实例 方法
    -->
    <bean id="student" factory-bean="factory" factory-method="createStudent">

    </bean>

</beans>
工厂实例化的使用场景
工厂实例化作用:便于程序员自定义创建对象
使用场景:初始化数据库数据时,对数据库密码进行解密,将数据源放置到容器中,提高安全性
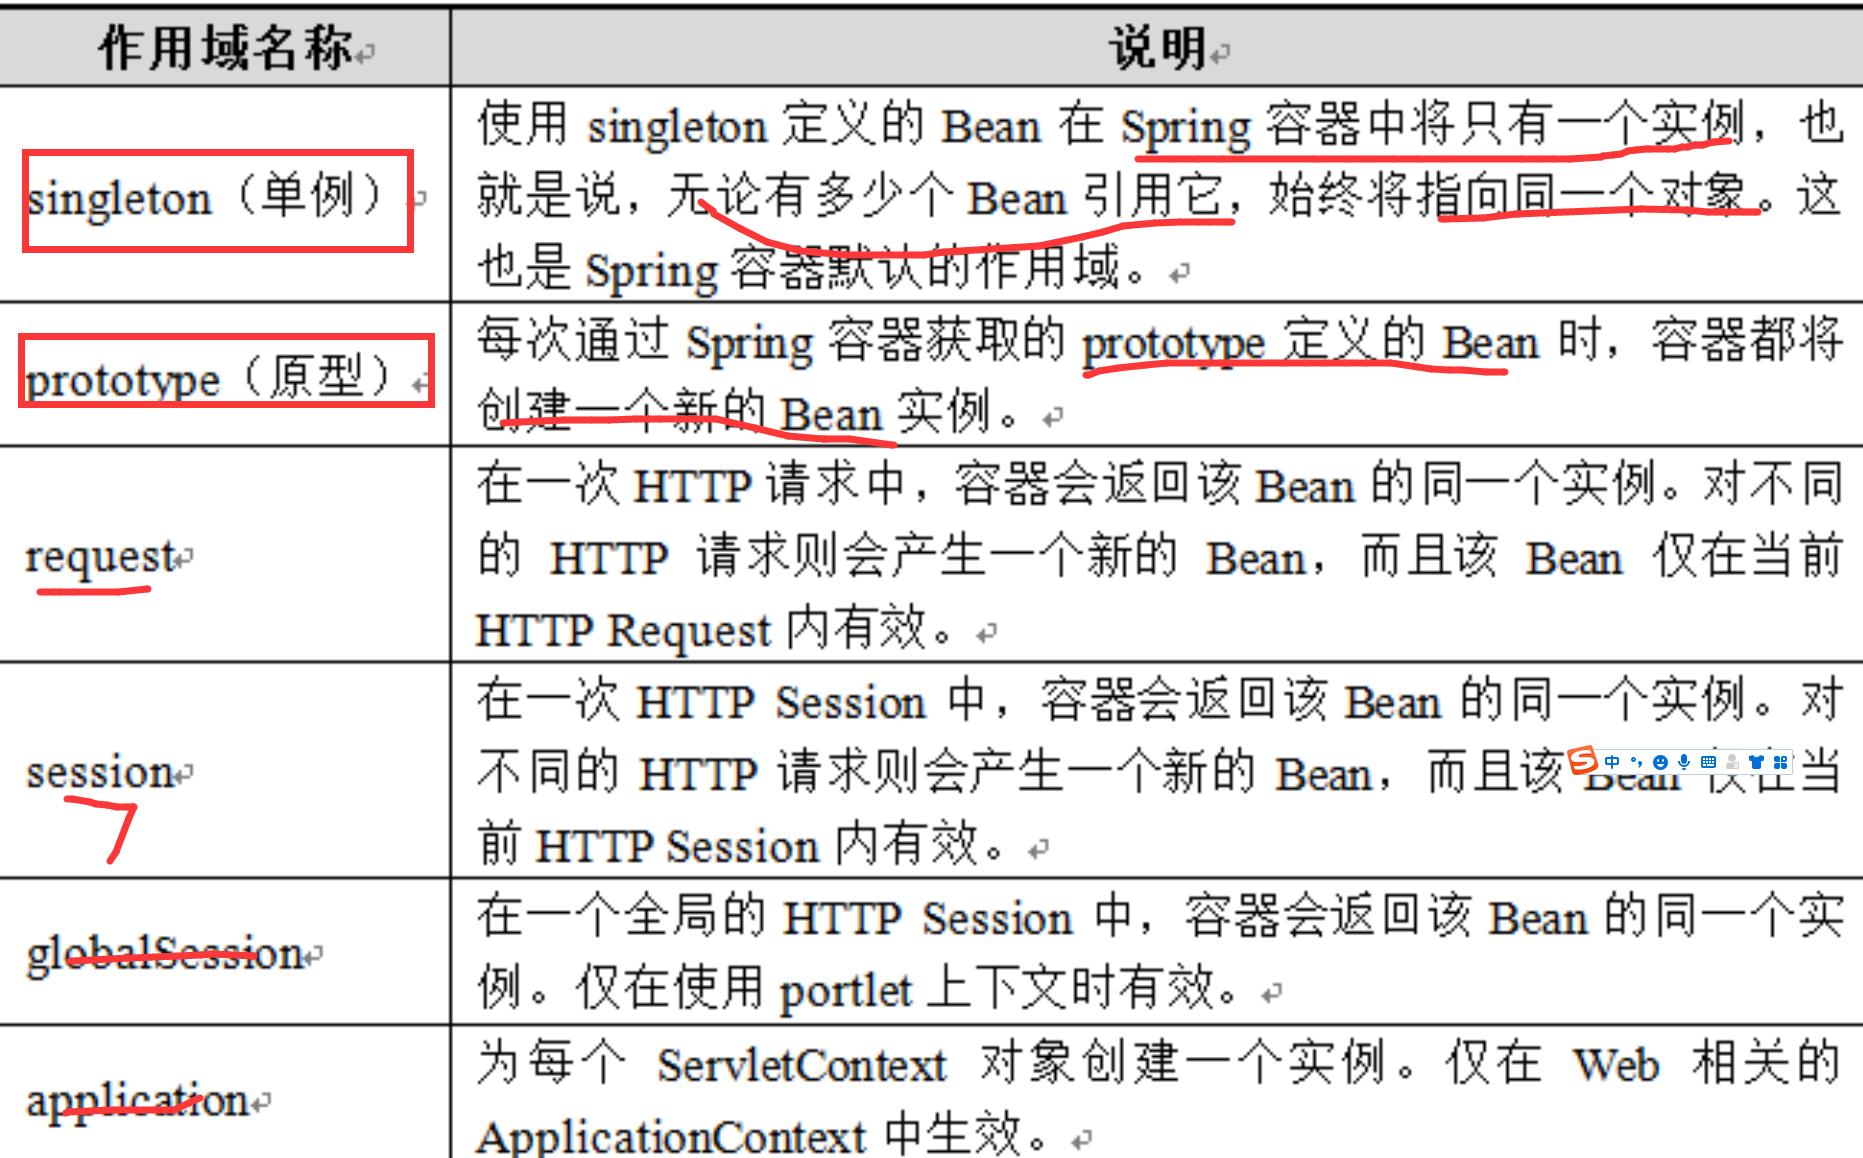
二、bean的作用域
作用域:就是bean 在容器中生存的范围
常用的:单例,原型

单例模式
 <!--
        让容器创建一个student
        默认 该bean 作用域 是单例singleton  scope="singleton"
              单例singleton 无论用户是否获取该bean,容器在启动创建该bean,而且只创建一个 对应bean id为 student
    -->
    <bean id="student" class="com.qfedu.entity.Student" scope="singleton">
        <property name="id" value="100"></property>
        <property name="name" value="xiaoming"></property>
    </bean>
原型测试
    <!--
        告诉容器创建一个 原型 bean  id="student1"
        什么时候创建? 容器启动不创将该bean,在用户获取时创建,而且每获取一次创建一个bean,容器只负责创建,
        不负责持有,管理该bean
    -->
    <bean id="student1" class="com.qfedu.entity.Student" scope="prototype">
        <property name="id" value="100"></property>
        <property name="name" value="xiaoming"></property>
    </bean>
测试
public class ScopeTest {
    public static void main(String[] args) {

        ApplicationContext applicationContext = new ClassPathXmlApplicationContext("scope/scope_bean.xml");

        System.out.println("单例测试");
        //单例的bena无论获取多少次都是单例
        Student student1 = (Student) applicationContext.getBean("student");

        Student student2 = (Student) applicationContext.getBean("student");

        System.out.println("student1 == student2:" + (student1 == student2));

        System.out.println("*********");
        System.out.println("原型测试");
        // 获取 原型bean, 每次获取都是一个新的对象,容器只负责创建,不负责持有,维护
        Student student3 = (Student) applicationContext.getBean("student1");

        Student student4 = (Student) applicationContext.getBean("student1");

        System.out.println("student3 == student4:" + (student3 == student4));
    }
}
三、bean的生命周期
bean:交给容器维护,容器管理bean
bean的生命周期 的bean 的作用域相关
singleton
Spring容器可以管理singleton作用域的Bean的生命周期,在此作用域下,Spring能够精确的知道该Bean何时被创建,何时初始化完成,以及何时被销毁。
容器创建bean,管理bean
容器初始化时创建 单例的 bean,并且持有bean, 容器销毁时 ,销毁bean
prototype
prototype作用域的Bean,Spring只负责创建,当容器创建了Bean实例后,Bean的实例就交给客户端代码来管理,Spring容器将不再跟踪其生命周期。
容器只创建bean不管理
容器初始化时,不会创建bean,只有在获取时才会创建bean,spring 只负责创建,不持有bean,也不负责销毁,还可以为bean 配置 init()初始化方法,destroy() 销毁方法
public class Student implements Serializable {

    private int id;

    private String name;

    /**
     * 初始化 资源
     */
    public void  init(){

        System.out.println("Student 初始化方法");
    }

    /**
     * 释放资源
     */
    public void destroy(){
        System.out.println("Student 销毁方法");
    }
。。。。
}
<?xml version="1.0" encoding="UTF-8"?>
<beans xmlns="http://www.springframework.org/schema/beans"
       xmlns:xsi="http://www.w3.org/2001/XMLSchema-instance"
       xsi:schemaLocation="http://www.springframework.org/schema/beans http://www.springframework.org/schema/beans/spring-beans.xsd">

    <!--
        单例bean scope="singleton"

              init-method="init" bean 在创建时调用 初始化方法
              destroy-method="destroy" 容器销毁 方法
    -->

    <bean id="student1" class="com.qfedu.entity.Student" scope="singleton"
          init-method="init" destroy-method="destroy">
        <property name="id" value="100"></property>
        <property name="name" value="xiaoming"></property>
    </bean>


    <!--
    原型bean scope="prototype"

          init-method="init" bean 在创建时调用 初始化方法
          destroy-method="destroy" 容器销毁 方法
-->
    <bean id="student2" class="com.qfedu.entity.Student" scope="prototype"
          init-method="init" destroy-method="destroy">
        <property name="id" value="100"></property>
        <property name="name" value="张三"></property>
    </bean>
</beans>
测试:
/**
 *bena的生命周期
 */
public class LifeTest {
    public static void main(String[] args) {
        ClassPathXmlApplicationContext classPathXmlApplicationContext  = new ClassPathXmlApplicationContext("life/life_bean.xml");

        Student student1 = (Student) classPathXmlApplicationContext.getBean("student1");

        System.out.println(student1);
        System.out.println("容器销毁");

        // 明示销毁容器,此时会调用容器中所有bean destroy() 方法
        // 单例bean 调用 destroy()
        // 原型bean  不会调用 destroy()  因为容器不持有该bean
        classPathXmlApplicationContext.destroy();
    }
}
4、Bean的装配
什么Bean的装配?
就是bean 属性的设置,以及bean 之间依赖关系的配置
基于XML的装配
property和构造方法设置值(无参和有参)
<?xml version="1.0" encoding="UTF-8"?>
<beans xmlns="http://www.springframework.org/schema/beans"
       xmlns:xsi="http://www.w3.org/2001/XMLSchema-instance"
       xsi:schemaLocation="http://www.springframework.org/schema/beans http://www.springframework.org/schema/beans/spring-beans.xsd">


    <!--
         通过无参构造 使用setter 初始化bean
    -->
    <bean id="student1" class="com.qfedu.entity.Student">
        <property name="id" value="100"></property>
        <property name="name" value="xiaoming"></property>
        <property name="sex" value="F"></property>

        <property name="course" >

            <list>
                <value>Java</value>
                <value>UI</value>
                <value>H5</value>
                <value>php</value>
            </list>
        </property>
    </bean>

    <!--
        通过有参构造创建  bean
        public Student(int id, String name, String sex, List<String> course)
                            0        1               2          3

          <constructor-arg index="0" value="111"></constructor-arg> 为每一个构造方法的参数设置
          属性
     -->
    <bean id="student1" class="com.qfedu.entity.Student">

        <constructor-arg index="0" value="111"></constructor-arg>
        <constructor-arg index="1" value="zhangsan"></constructor-arg>
        <constructor-arg index="2" value="F"></constructor-arg>
        <constructor-arg index="3" >

            <list>
                <value>Java</value>
                <value>UI</value>
                <value>H5</value>
                <value>php</value>
            </list>
        </constructor-arg>
    </bean>

</beans>
测试
public class XmlTest {
    public static void main(String[] args) {

        ApplicationContext applicationContext = new ClassPathXmlApplicationContext("xml/xml_bean.xml");

        Student student1 = (Student) applicationContext.getBean("student1");
        System.out.println("student1 = " + student1);

        Student student2 = (Student) applicationContext.getBean("student2");
        System.out.println("student2 = " + student2);
    }
}
基于注解的装配
注解:就是一个标记,记号
通过注解创建bean 并管理bean 之间的依赖关系
注入的注解
一个实例中的属性可以通过以下注解从容器获取对应的bean,并注入进来:
@Autowired:用于对Bean的属性变量、属性的setter方法及构造方法进行标注,配合对应的注解处理器完成Bean的自动配置工作
@Qualifier:与@Autowired注解配合使用,会将默认的按Bean类型装配修改为按Bean的实例名称装配,Bean的实例名称由@Qualifier注解的参数指定。
@Resource:其作用与Autowired一样。@Resource中有两个重要属性:name和type。Spring将name属性解析为Bean实例名称,type属性解析为Bean实例类型。
@Autowired + @Qualifier
激活注入的注解:
 <!--

        这是一个开关,激活 @Autowired    @ Resource 、@ PostConstruct、@ PreDestroy
                       让他们生效
    -->
    <context:annotation-config></context:annotation-config>
加入注解到容器中:
<!--
       将StudentDaoImpl加入到容器中StudentDaoImpl
   -->
    <bean id="studentDao1" class="com.qfedu.dao.StudentDaoImpl"></bean>
    <bean id="studentDao2" class="com.qfedu.dao.StudentDaoImpl"></bean>

    <!--
       将StudentServiceImpl加入到容器中
   -->
    <bean id="studentService" class="com.qfedu.service.StudentServiceImpl"></bean>
装配:
public class StudentServiceImpl implements StudentService{


    /*@Autowired 不需要 setter方法支持
     * 意义: 1.首先根据注解的类型 去容器中查找 如果只有一个,则设置
     *       2.如果按照类型查找到 多个 ,则使用 变量名( private StudentDao studentDao) 作为id 去容器中查找
     *       3.如果按照变量名找不到,可以使用@Qualifier("studentDao2") 配置,按照传递的参数作为iD 查找
     */

    // 去容器中查找 StudentDao 对应实例,并将当前 属性引用
    @Autowired
    @Qualifier("studentDao2")//如果找到多个使用  @Qualifier区分
    private StudentDao studentDao;

//    public void setStudentDao(StudentDao studentDao){
//        this.studentDao = studentDao;
//    }

    public Student findStudentById(int id) {
        return studentDao.findStudentById(id);
    }
}
@Resource
激活注入的注解:
 <!--

        这是一个开关,激活 @Autowired    @ Resource 、@ PostConstruct、@ PreDestroy
                       让他们生效
    -->
    <context:annotation-config></context:annotation-config>
加入注解到容器中:
    <!--
       将StudentDaoImpl加入到容器中StudentDaoImpl
   -->
    <bean id="studentDao1" class="com.qfedu.dao.StudentDaoImpl"></bean>
    <bean id="studentDao2" class="com.qfedu.dao.StudentDaoImpl"></bean>

    <!--
       将StudentServiceImpl加入到容器中
   -->
    <bean id="studentService" class="com.qfedu.service.StudentServiceImpl"></bean>
装配:
public class StudentServiceImpl implements StudentService{


    /*
     *  @Resource  也是 将容器中的bean 注入到当前对象中
     * 意义:
     *      1.首先按照声明 属性名作为id 去容器中查找(private StudentDao studentDao ),
     *      2.如果没有找到 按照类型查找 ,如果查找到一个则设置值, 如果查到多个,则进入第三步
     *      3.@Resource(name = "studentDao2"): 如果找到多个类型的bean 必须传入name 作为id 进行限定
     *
     * @Autowired    @Resource 的区别?
     *
     * 1. @Resource(name = "studentDao2") 等价于 @Autowired  @Qualifier
     * 2.意义
     * 3.@Resource 是jdk 注解 @Autowired 是spring 注解
    * */

    @Resource(name = "studentDao2")
    private StudentDao studentDao;

//    public void setStudentDao(StudentDao studentDao){
//        this.studentDao = studentDao;
//    }

    public Student findStudentById(int id) {
        return studentDao.findStudentById(id);
    }
}
总结
- @Autowired 不需要 setter方法支持
* 意义: 1.首先根据注解的类型 去容器中查找 如果只有一个,则设置
* 2.如果按照类型查找到 多个 ,则使用 变量名( private StudentDao studentDao) 作为id 去容器中查找
* 3.如果按照变量 名找不到,可以使用@Qualifier(“studentDao2”) 配置,按照传递的参数作为iD 查找
*
* @Resource 也是 将容器中的bean 注入到当前对象中
* 意义:
* 1.首先按照声明 属性名作为id 去容器中查找(private StudentDao studentDao ),
* 2.如果没有找到 按照类型查找 ,如果查找到一个设置值 如果多个,则进入第三部
* 3.@Resource(name = “studentDao2”) 如果找到多个类型的bean 必须传入name 作为id 进行限定
*
* @Autowired @Resource 的区别?
*
* 1. @Resource(name = “studentDao2”) 等价于 @Autowired @Qualifier
* 2.意义
* 3.@Resource 是jdk 注解 @Autowired spring 注解
*
生成bean的注解
@Component
//@Component // 在容器中加入bean 默认id studentServiceImpl
@Component(“studentService”) // 在容器中加入bean id studentService
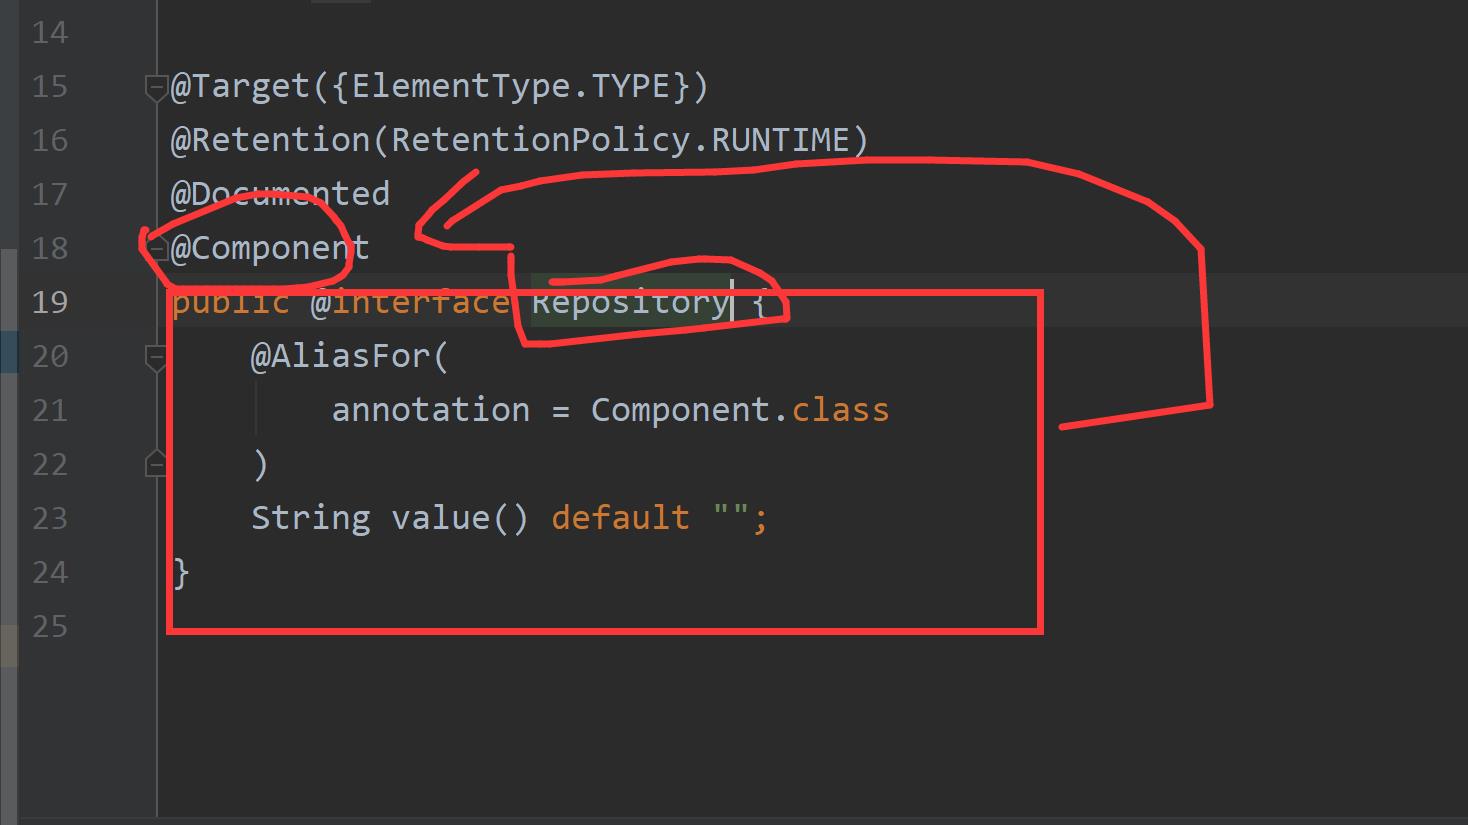
以下三个用法和 @Component 一样是@Component 的子注解
@Service 用于service
@Controller 用于控制层
@Repository 用于持久层 dao
<?xml version="1.0" encoding="UTF-8"?>
<beans xmlns="http://www.springframework.org/schema/beans"
       xmlns:xsi="http://www.w3.org/2001/XMLSchema-instance"
       xmlns:context="http://www.springframework.org/schema/context"
       xsi:schemaLocation="http://www.springframework.org/schema/beans http://www.springframework.org/schema/beans/spring-beans.xsd http://www.springframework.org/schema/context https://www.springframework.org/schema/context/spring-context.xsd">


    <!--
        包扫描器 :
        激活 注入注解   @Autowired    @ Resource
        激活生成bean 的注解
            @Component
                    //@Component // 在容器中加入bean 默认id  studentServiceImpl
                    @Component("studentService")   // 在容器中加入bean id  studentService
            以下三个用法和 @Component 一样是@Component 的子注解
            @Service   用于service
            @Controller 用于控制层
            @Repository  用于持久层 dao
    -->
    <context:component-scan base-package="com.qfedu"></context:component-scan>


</beans>
//@Component // 在容器中加入bean 默认id  studentServiceImpl
//@Component("studentService")   // 在容器中加入bean id  studentService
@Service("studentService")// 加入到容器  id  studentService
public class StudentServiceImpl implements StudentService {

    // 去容器中查找 StudentDao 对应实例,并将当前 属性引用
    /**
     *  @Autowired 不需要 setter方法支持
     * 意义: 1.首先根据注解的类型 去容器中查找 如果只有一个,则设置
     *       2.如果按照类型查找到 多个 ,则使用 变量名( private StudentDao studentDao) 作为id 去容器中查找
     *       3.如果按照变量 名找不到,可以使用@Qualifier("studentDao2") 配置,按照传递的参数作为iD 查找
     *
     * @Resource  也是 将容器中的bean 注入到当前对象中
     * 意义:
     *      1.首先按照声明 属性名作为id 去容器中查找(private StudentDao studentDao ),
     *      2.如果没有找到 按照类型查找 ,如果查找到一个设置值 如果多个,则进入第三部
     *      3.@Resource(name = "studentDao2") 如果找到多个类型的bean 必须传入name 作为id 进行限定
     *
     * @Autowired    @Resource 的区别?
     *
     * 1. @Resource(name = "studentDao2") 等价于 @Autowired  @Qualifier
     * 2.意义
     * 3.@Resource 是jdk 注解 @Autowired spring 注解
     *
     */
//    @Autowired
//    @Qualifier("studentDao2")//如果找到多个使用  @Qualifier区分
    @Resource
    private StudentDao studentDao ;

//    public void setStudentDao(StudentDao studentDao) {
//        this.studentDao = studentDao;
//    }

    public Student findStudentById(int id) {
        return studentDao.findStudentById(id);
    }
}
//@Component// 将当前类 创建一个bean 加入到容器中 id studentDaoImpl
@Repository // 加入到容器 id studentDaoImpl
public class StudentDaoImpl implements StudentDao{
    public Student findStudentById(int id) {

        // 模拟取数据库查询
        Student student = new Student();
        student.setId(id);
        student.setName("XXXXX");

        return student;
    }
}
测试:
/**
 * 自动转配
 */
public class AnnootaionTest {


    public static void main(String[] args) {

        ApplicationContext applicationContext = new ClassPathXmlApplicationContext("annotation/auto_annotation.xml");


        StudentService studentService = (StudentService) applicationContext.getBean("studentService");


        Student student =  studentService.findStudentById(12);
        System.out.以上是关于Spring的主要内容,如果未能解决你的问题,请参考以下文章
