Netty4 事件处理传播机制
Posted 中间件兴趣圈
tags:
篇首语:本文由小常识网(cha138.com)小编为大家整理,主要介绍了Netty4 事件处理传播机制相关的知识,希望对你有一定的参考价值。
做积极的人,越努力越幸运!
基于 Netty4 以源码分析为主要手段辅以流程图,从通道篇、内存篇、性能篇三个维度深度剖析Netty的实现原理。
本节将详细分析Netty事件传播机制,即事件链的实现机制。
1、ChannelPipeline 概述
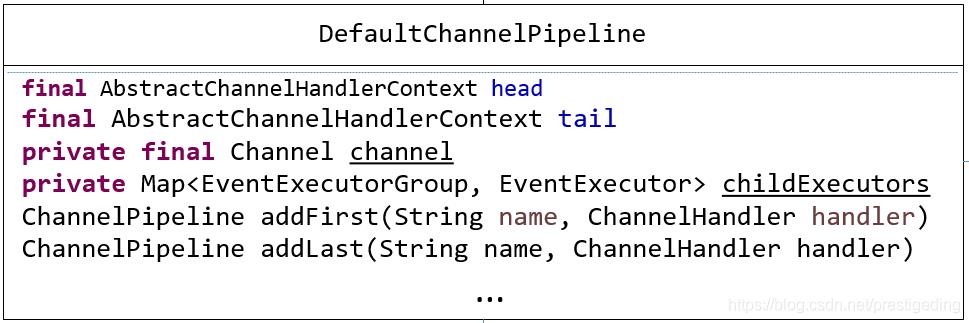
Netty4的事件链核心类如图所示:
接下先详细介绍上述核心类的核心方法。"Channel流水线",即Channel管道(事件处理链),其主要核心方法包括如下三类。
添加类操作
ChannelPipeline addFirst(String name, ChannelHandler handler)
ChannelPipeline addFirst(EventExecutorGroup group, String name, ChannelHandler handler)
ChannelPipeline addFirst(ChannelHandler… handlers)
ChannelPipeline addFirst(EventExecutorGroup group, ChannelHandler… handlers)
ChannelPipeline addLast(String name, ChannelHandler handler)
ChannelPipeline addBefore(String baseName, String name, ChannelHandler handler)
ChannelPipeline addAfter(String baseName, String name, ChannelHandler handler)
其中省略了addLast、addBefore、addAfter的其他重载方法,模式为addFirst类似。在这里着重讲解一下各个参数的含义。
EventExecutorGroup group
ChannelHandler执行的线程组EventLoop,如果为空,则ChannelHandler在Channel所注册的EventLoop。String name
ChannelHandler的名称,DefaultChannelPipeline会避免因重名而修改ChannelHandler的名称。
ChannelHandler的增删改查
ChannelPipeline remove(ChannelHandler handler)
ChannelHandler removeFirst()
省略其他API,此类API其实能反映出ChannelPipeline内部是一个双链表结构。
入端(inbound)事件传播
ChannelPipeline fireChannelRegistered()
ChannelPipeline fireChannelUnregistered()
ChannelPipeline fireChannelActive()
ChannelPipeline fireChannelInactive()
ChannelPipeline fireExceptionCaught(Throwable cause)
ChannelPipeline fireUserEventTriggered(Object event)
ChannelPipeline fireChannelRead(Object msg)
ChannelPipeline fireChannelReadComplete()
ChannelPipeline fireChannelWritabilityChanged()
不难看出,此类API方法名 fire + ChannelInboundHandler 中的方法。特别注意的是fireChannelRead(Object msg)的参数为通过网络SocketChannel#read一次读取的字节数组(ByteBuf),跟随着事件处理器一步一步的处理。
出端(outbound)事件传播
ChannelFuture bind(SocketAddress localAddress)
ChannelFuture connect(SocketAddress remoteAddress)
ChannelFuture connect(SocketAddress remoteAddress, SocketAddress localAddress)
ChannelFuture disconnect()
ChannelFuture close()
ChannelFuture deregister()
ChannelFuture bind(SocketAddress localAddress, ChannelPromise promise)
ChannelFuture connect(SocketAddress remoteAddress, ChannelPromise promise)
ChannelFuture connect(SocketAddress remoteAddress, SocketAddress localAddress, ChannelPromise promise)
ChannelFuture disconnect(ChannelPromise promise)
ChannelFuture close(ChannelPromise promise)
ChannelFuture deregister(ChannelPromise promise)
ChannelPipeline read()
ChannelFuture write(Object msg)
ChannelFuture write(Object msg, ChannelPromise promise)
ChannelPipeline flush()
ChannelFuture writeAndFlush(Object msg, ChannelPromise promise)
ChannelFuture writeAndFlush(Object msg)
不难看出,上述方法为ChannelOutboundHandler的方法。
2、DefaultChannelPipeline
ChannelPipeline的简单类图如下:

结合head、taill与下面的构造函数可知DefaultChannelPipeline的结构是其双链表,其中head、tail为双链表的首尾节点,并且其引用不能更改,其中节点(Node)实现为AbstractChannelHandlerContext,其内部必然定义两个属性prev与next,分别代表前一个节点与下一个节点。
final AbstractChannelHandlerContext head
final AbstractChannelHandlerContext tail
private final Channel channel
protected DefaultChannelPipeline(Channel channel) {
        this.channel = ObjectUtil.checkNotNull(channel, "channel");
        tail = new TailContext(this);
        head = new HeadContext(this);
        head.next = tail;
        tail.prev = head;
    }
从这里看一个Channel对应一个ChannelPipeline。
2.1 事件链构建
本节将以addFirst方法为例展示ChannelPipeline事件链的维护实现。
DefaultChannelPipeline#addFirst
public final ChannelPipeline addFirst(String name, ChannelHandler handler) {
        return addFirst(null, name, handler);
 }
内部调用其重载方法。接下来重点分析该方法
public final ChannelPipeline addFirst(EventExecutorGroup group, String name, ChannelHandler handler) {     // @1
        final AbstractChannelHandlerContext newCtx;
        synchronized (this) {
            checkMultiplicity(handler);                                                                                                                        // @2
            name = filterName(name, handler);
            newCtx = newContext(group, name, handler);                                                                                         // @3
            addFirst0(newCtx);                                                                                                                                   // @4
            // If the registered is false it means that the channel was not registered on an eventloop yet.
            // In this case we add the context to the pipeline and add a task that will call
            // ChannelHandler.handlerAdded(...) once the channel is registered.
            if (!registered) {                                                                                                                                        // @5
                newCtx.setAddPending();
                callHandlerCallbackLater(newCtx, true);
                return this;
            }
            EventExecutor executor = newCtx.executor();
            if (!executor.inEventLoop()) {                                                                                                                  // @6
                newCtx.setAddPending();
                executor.execute(new Runnable() {
                    @Override
                    public void run() {
                        callHandlerAdded0(newCtx);
                    }
                });
                return this;
            }
        }
        callHandlerAdded0(newCtx);                                                                                                                    // @7
        return this;
    }
代码@1:首先对参数简单说明一下:
EventExecutorGroup group:指定ChannelHandler在哪个事件选择器中执行(EventLoopGroup),如果为空,表示在Channel注册的事件轮询器中执行。
String name:ChannelHandler名称。
ChannelHandler channelHandler:待添加的事件处理器。
代码@2:检查是否重复添加,声明为Shareable的ChannelHandler允许重复添加。
代码@3:使用AbstractChannelHandlerContext类包装ChannelHandler,即双链表结构的Node类为AbstractChannelHandlerContext。
代码@4:将AbstractChannelHandlerContext调用addFirst0添加到双链表的“第一条”,其实是添加到双链表头结点(HeaderContext)的next值执行该节点。
代码@5-代码@7都是处理handerAdd事件,如果通道还未注册,handerAdd事件会“挂起”,也就是需要等待通道被注册后才执行,其实现思路也是构建PendingHandlerCallback链,DefaultChannelPipeline内部持有该链的头节点,待通道注册后,顺序触发handlerAdd事件的传播。
接下来看一下addFirst0的执行:
private void addFirst0(AbstractChannelHandlerContext newCtx) {
        AbstractChannelHandlerContext nextCtx = head.next;
        newCtx.prev = head;
        newCtx.next = nextCtx;
        head.next = newCtx;
        nextCtx.prev = newCtx;
    }
这里就是典型的链表操作过程。
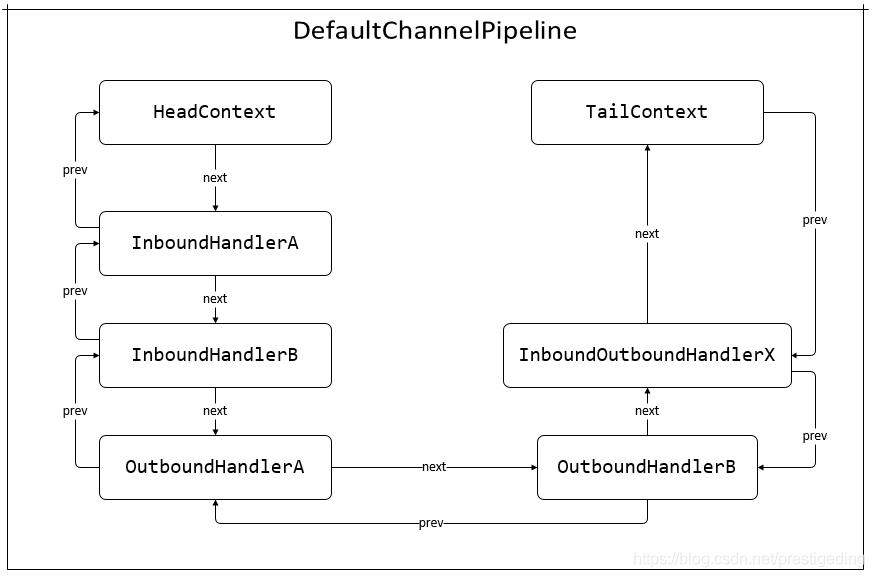
如果使用如下代码构建事件链,那事件是如何传播的呢?
p.addLast("1", new InboundHandlerA());
p.addLast("2", new InboundHandlerB());
p.addLast("3", new OutboundHandlerA());
p.addLast("4", new OutboundHandlerB());
p.addLast("5", new InboundOutboundHandlerX());
其构建的事件链最终如图所示:

但ChannelInboundHandler中的事件是如何传播的呢?ChannelOutboundHandler的事件又是如何传播的呢?
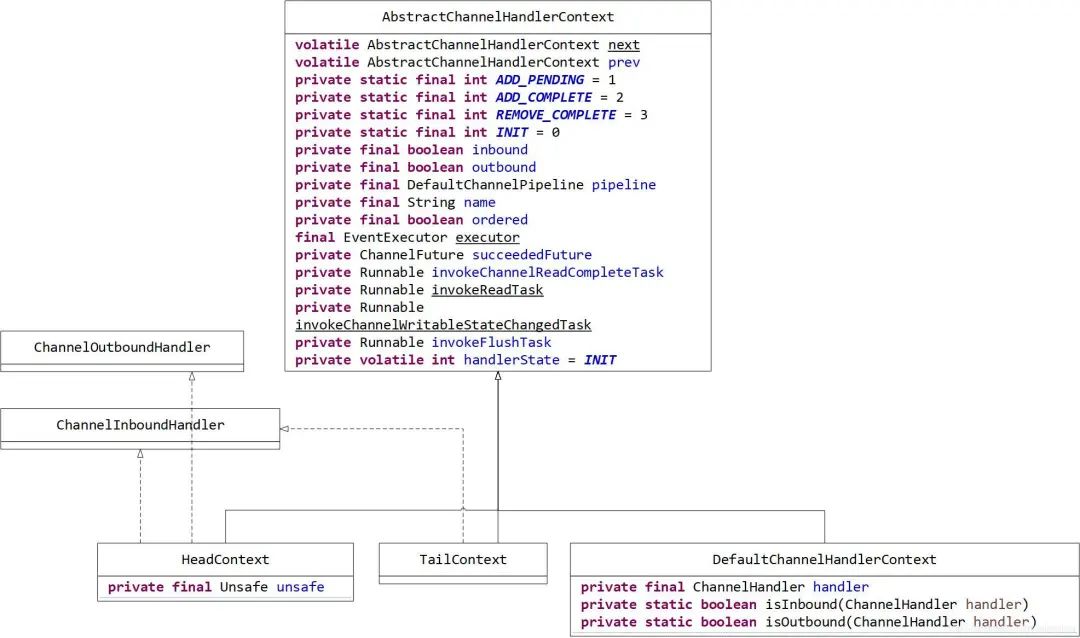
事件链中的节点对象为AbstractChannelHandlerContext,其类图如下:

HeadContext:事件链的头节点。
TailContext:事件链的尾节点。
DefaultChannelHandlerContext:用户定义的Handler所在的节点。
2.2 事件传播
inbound事件与outbound事件传播机制实现原理相同,只是方向不同,inbound事件的传播从HeadContext开始,沿着next指针进行传播,而outbound事件传播从TailContext开始,沿着prev指针向前传播,故下文重点分析inbound事件传播机制。
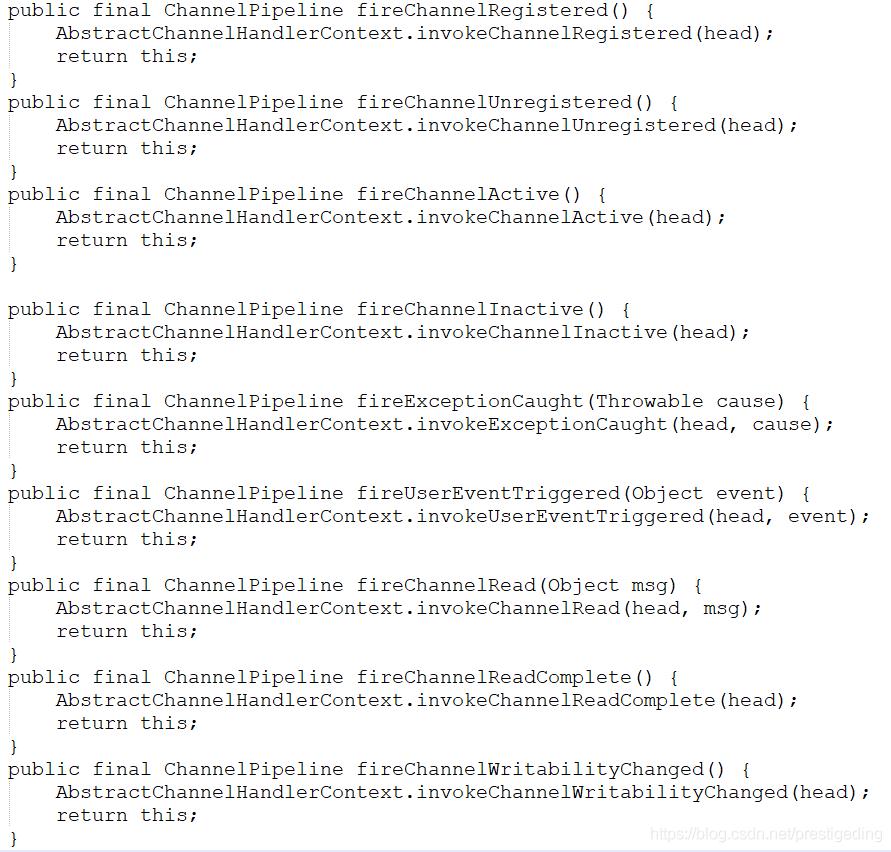
DefaultChannelPipeline有关于ChannelInboundHandler的方法实现如下:

所有的入端事件的传播入口都是从head开始传播。接下来我们以channelRead事件的传播为例,展示inbound的事件的流转。注意:以下观点都是针对NIO的读取。
DefaultChannelPipeline#fireChannelRead(Object msg) {
public final ChannelPipeline fireChannelRead(Object msg) {
     AbstractChannelHandlerContext.invokeChannelRead(head, msg);  // @1
        return this;
 }
首先在NIO事件选择器在网络读事件就绪后,会调用底层SocketChanel#read 方法从读缓存中读取字节,在Netty中使用ByteBuf来存储,然后调用DefaultChannelPipeline # fireChannelRead 方法进行事件传播,每个ChannelHandler针对输入进行加工处理,ChannelPipeline因此而得名,有关Netty基于NIO的事件就绪选择实现将在Netty线程模型、IO读写流程部分详细讲解。
从代码@1处可得知,通过AbstractChannelHandlerContext的静态方法invokerChanelRead,从HeadContext处开始执行,
AbstractChannelHandlerContext#invokerChanelRead
static void invokeChannelRead(final AbstractChannelHandlerContext next, final Object msg) {
        ObjectUtil.checkNotNull(msg, "msg");
        EventExecutor executor = next.executor();         // @1
        if (executor.inEventLoop()) {                                // @2
            next.invokeChannelRead(msg);
        } else {
            executor.execute(new Runnable() {              // @3
                @Override
                public void run() {
                    next.invokeChannelRead(msg);
                }
            });
        }
    }
这种写法是Netty处理事件执行的“模板”方法,都是先获取需要执行的线程组(EventLoop),如果当前线程不属于Eventloop,则将任务提交到EventLoop中异步执行,如果在,则直接调用。第一次调用,该next指针为HeadContext,那接下来重点关注一下HeadContext的invokeChannelRead方法。
AbstractChannelHandlerContext#invokeChannelRead
private void invokeChannelRead(Object msg) {
        if (invokeHandler()) {                                                                            // @1
            try {
                ((ChannelInboundHandler) handler()).channelRead(this, msg);   // @2
            } catch (Throwable t) {
                notifyHandlerException(t);
            }
        } else {
            fireChannelRead(msg);                                                                     // @3
        }
    }
代码@1:如果该通道已经成功添加@1,则执行对应的事件@2,否则只是传播事件@3。
传播事件在AbstractChannelHandlerContext的实现思路如下:
AbstractChannelHandlerContext#fireChannelRead
public ChannelHandlerContext fireChannelRead(final Object msg) {
        invokeChannelRead(findContextInbound(), msg);
        return this;
}
private AbstractChannelHandlerContext findContextInbound() {
        AbstractChannelHandlerContext ctx = this;
        do {
            ctx = ctx.next;
        } while (!ctx.inbound);
        return ctx;
 }
上述就从事件链中按顺序提取inbound类型的处理器,上述代码要最终能结束,那么TailContext必须是Inbound类型的事件处理器。
从代码@2中执行完对应的事件处理逻辑后,事件如何向下传播呢?如果需要继续将事件传播的话,请调用ChannelInboundHandlerAdapter 对应的传播事件方法,如上例中的 ChannelInboundHandlerAdapter#fireChannelRead,该方法会将事件链继续往下传播,如果在对应的事件处理中继续调用fireChannelRead,则事件传播则停止传播,也就是并不是事件一定会顺着整个调用链到达事件链的尾部TailContext,在实践中请特别重视。
Netty inbound 事件传播流程图如下:
上述主要分析了inboud事件的传播机制,为了加深理解,我们接下来浏览一下HeadContext、TailContext是如何实现各个事件方法的,这些事件,后续在梳理Netty读写流程时会再详细介绍。
2.3 源码分析DefaultChannelPipeline$HeadContex
2.3.1 HeadContext声明与构造方法
final class HeadContext extends AbstractChannelHandlerContext
            implements ChannelOutboundHandler, ChannelInboundHandler {    // @1

        private final Unsafe unsafe;                                                                     // @2

        HeadContext(DefaultChannelPipeline pipeline) {
            super(pipeline, null, HEAD_NAME, false, true);
            unsafe = pipeline.channel().unsafe();
            setAddComplete();
        }
}
代码@1:HeadContext实现ChannelInboundHandler与ChannelOutboundHandler,故它的inbound与outbound都返回true。
代码@2:Unsafe,Netty操作类。
2.3.2 handlerAdded、handlerRemoved
public void handlerAdded(ChannelHandlerContext ctx) throws Exception {
}
public void handlerRemoved(ChannelHandlerContext ctx) throws Exception {
}
ChanelHandler增加与移除事件处理逻辑:不做任何处理。为什么可以不传播呢?其实上文在讲解addFirst方法时已提到,在添加一个ChannelHandler到事件链时,会根据通道是否被注册,如果未注册,会先阻塞执行,DefaultChannelPipeline会保存一条执行链,等通道被注册后处触发执行,HeadContext作为一个非业务类型的事件处理器,对通道的增加与否无需关注。
2.3.3 exceptionCaught
public void exceptionCaught(ChannelHandlerContext ctx, Throwable cause) throws Exception {
            ctx.fireExceptionCaught(cause);
}
通道异常处理事件的处理逻辑:HeadContext的选择是自己不关注,直接将异常事件往下传播。
2.3.4 channelRegistered
public void channelRegistered(ChannelHandlerContext ctx) throws Exception {
            invokeHandlerAddedIfNeeded();
            ctx.fireChannelRegistered();
}
final void invokeHandlerAddedIfNeeded() {
        assert channel.eventLoop().inEventLoop();
        if (firstRegistration) {
            firstRegistration = false;
            // We are now registered to the EventLoop. It's time to call the callbacks for the ChannelHandlers,
            // that were added before the registration was done.
            callHandlerAddedForAllHandlers();
        }
    }
通道注册事件处理逻辑:当通道成功注册后,判断是否是第一次注册,如果是第一次注册的话,调用所有的ChannelHandler#handlerAdd事件,因为当通道增加到事件链后,如果该通道还未注册,channelAdd事件不会马上执行,需要等通道注册后才执行,故在这里首先需要执行完挂起(延迟等待的任务)。然后调用fireChannelRegistered沿着事件链传播通道注册成功事件。
2.3.5 channelUnregistered
public void channelUnregistered(ChannelHandlerContext ctx) throws Exception {
            ctx.fireChannelUnregistered();

            // Remove all handlers sequentially if channel is closed and unregistered.
            if (!channel.isOpen()) {
                destroy();
            }
        }
通道取消注册事件处理逻辑:首先传播事件,然后判断通道的状态,如果是处于关闭状态(通道调用了close方法),则需要移除所有的ChannelHandler。
2.3.6 channelActive
public void channelActive(ChannelHandlerContext ctx) throws Exception {
     ctx.fireChannelActive();
        readIfIsAutoRead();
 }
通道激活事件的处理逻辑(TCP连接建立成功后触发):首先传播该事件,如果开启自动读机制(autoRead为true),则调用Channel#read方法,向NIO Selector注册读事件。
2.3.7 channelInactive
public void channelInactive(ChannelHandlerContext ctx) throws Exception {
ctx.fireChannelInactive();
 }
通道非激活事件处理逻辑:只传播事件。
2.3.8 channelRead
public void channelRead(ChannelHandlerContext ctx, Object msg) throws Exception {
ctx.fireChannelRead(msg);
}
通道读事件处理逻辑:向下传播事件,各个编码器、业务处理器将各自处理业务逻辑。
2.3.9 channelReadComplete
public void channelReadComplete(ChannelHandlerContext ctx) throws Exception {
ctx.fireChannelReadComplete();
readIfIsAutoRead();
}
通道读完成事件,首先先传播事件,然后如果开启了自动读取的话,继续注册读事件。
2.3.10 userEventTriggered
public void userEventTriggered(ChannelHandlerContext ctx, Object evt) throws Exception {
            ctx.fireUserEventTriggered(evt);
}
用户自定义事件的处理逻辑:传播事件。
2.3.11 channelWritabilityChanged
public void channelWritabilityChanged(ChannelHandlerContext ctx) throws Exception {
            ctx.fireChannelWritabilityChanged();
}
通道可写状态变更事件的处理逻辑:传播事件。
接下来介绍HeadContext对于ChannelOutboundHander事件的处理逻辑:
2.3.12 bind
public void bind( ChannelHandlerContext ctx, SocketAddress localAddress, ChannelPromise promise)
                throws Exception {
unsafe.bind(localAddress, promise);
}
通过Unsafe实例完成具体的绑定操作,后续会重点分析该方法的实现原理。
由于HeadContex是outbound事件的尾部事件处理器,而且outbound是用户发送的API调用,其最终目的是希望通过Netty完成具体的网络操作,故HeadContex是离Netty底层机制最近的,到了这里,就意味者“应用程序”层面的定制化介绍,最终需要通过HeadContex直接调用Netty的API来完成具体的动作,故HeadContex关于outbound事件的实现,都是通过调用unsafe去完成具体的动作。故后面的方面就不在一一罗列。
2.3 源码分析DefaultChannelPipeline$TailContext
TailContext由于是 inbound事件链的最后一站,故该节点大部分事件都是空实现,其他实现的方法,基本上就是释放一下资源,我们看一下TailContex关于channelRead事件的处理逻辑:
public void channelRead(ChannelHandlerContext ctx, Object msg) throws Exception {
            onUnhandledInboundMessage(msg);
}
protected void onUnhandledInboundMessage(Object msg) {
        try {
            logger.debug(
                    "Discarded inbound message {} that reached at the tail of the pipeline. " +
                            "Please check your pipeline configuration.", msg);
        } finally {
            ReferenceCountUtil.release(msg);
        }
}
最后就是主动调用ReferenceCountUtil.release(msg)释放资源。
Netty事件传播机制就讲解到这里了。
欢迎关注『中间件兴趣圈』,交接中间件、架构设计、实战应用等技术课题。
年度精彩热文TOP3
以上是关于Netty4 事件处理传播机制的主要内容,如果未能解决你的问题,请参考以下文章