Android开发基础之控件CheckBox
Posted 舒泱
tags:
篇首语:本文由小常识网(cha138.com)小编为大家整理,主要介绍了Android开发基础之控件CheckBox相关的知识,希望对你有一定的参考价值。
一、基础属性
| 1、layout_width | 宽度 |
|---|---|
| 2、layout_height | 高度 |
| 3、id | 设置组件id |
| 4、text | 设置显示的内容 |
| 5、textColor | 设置字体颜色 |
| 6、textStyle | 设置字体风格:normal(无效果)、bold(加粗)、italic(斜体) |
| 7、textSize | 字体大小,单位常用sp |
| 8、background | 控件背景颜色 |
| 9、checked | 默认选中该选项 |
| 10、orientation | 内部控件排列的方向,例如水平排列或垂直排列 |
| 11、paddingXXX | 内边距,该控件内部控件间的距离 |
| 12、background | 控件背景颜色或图片 |
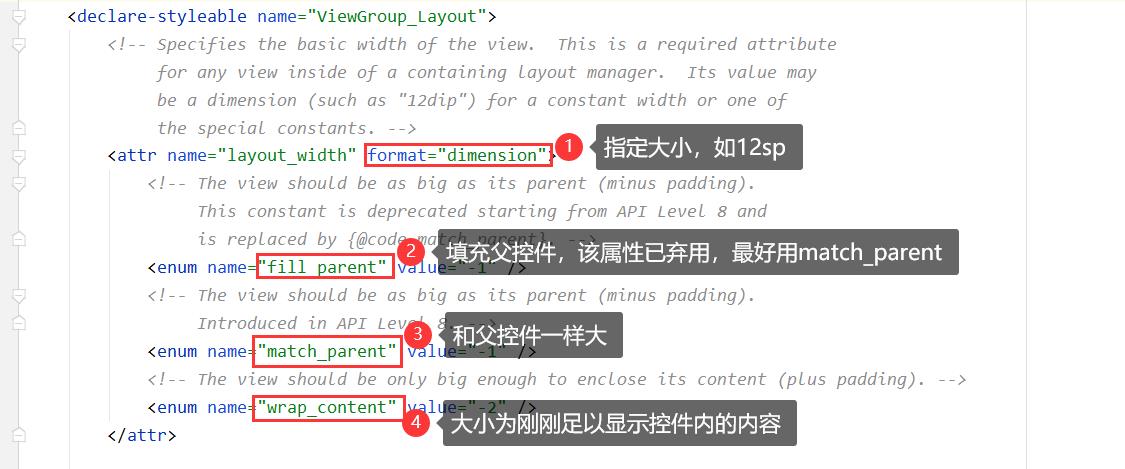
1、layout_width
2、layout_height
组件宽度和高度有4个可选值,如下图:
3、id
// activity_main.xml
android:id="@+id/cb1"  // 给当前控件取个id叫cb1
// MainActivity.java
CheckBox cb1=findViewById(R.id.cb1);  // 按id获取控件
cb1.setText("hh");                       // 对这个控件设置显示内容
如果在.java和.xml文件中对同一属性进行了不同设置,比如.java中设置控件内容hh,.xml中设置内容为aa,最后显示的是.java中的内容hh。
4、text
可以直接在activity_main.xml中写android:text="嘻嘻",也可以在strings.xml中定义好字符串,再在activity_main.xml中使用这个字符串。
// strings.xml
<string name="str1">嘻嘻</string>
// activity_main.xml
android:text="@string/str1"
5、textColor
与text类似,可以直接在activity_main.xml中写android:textColor="#FF0000FF",也可以在colors.xml中定义好颜色,再在activity_main.xml中使用这个颜色。
9、checked
checked=“true”,默认这个RadioButton是选中的。该属性只有在RadioGroup中每个RadioButton都设置了id的条件下才有效。
10、orientation
内部控件的排列方式:
- orientation=“vertical”,垂直排列
- orientation=“horizontal”,水平排列
11、paddingXXX
内边距,该控件与内部的控件间的距离,常用的padding有以下几种:
- padding,该控件与内部的控件间的距离
- paddingTop,该控件与内部的控件间的上方的距离
- paddingBottom,该控件与内部的控件间的下方的距离
- paddingRight,该控件与内部的控件间的左侧的距离
- paddingLeft,该控件与内部的控件间的右侧的距离
程序示例:
<?xml version="1.0" encoding="utf-8"?>
<LinearLayout xmlns:android="http://schemas.android.com/apk/res/android"
android:layout_height="match_parent"
android:layout_width="match_parent"
android:orientation="vertical">
<TextView
android:layout_width="match_parent"
android:layout_height="wrap_content"
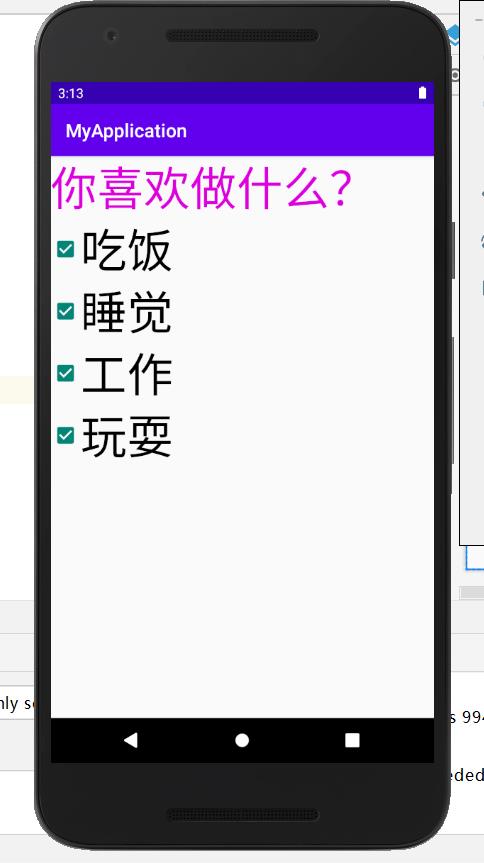
android:id="@+id/tv1"
android:text="你喜欢做什么?"
android:textSize="50sp"
android:textColor="@color/i_purple_700">
</TextView>
<CheckBox
android:layout_width="match_parent"
android:layout_height="wrap_content"
android:id="@+id/cb1"
android:text="吃饭"
android:textSize="50sp"
android:checked="true">
</CheckBox>
<CheckBox
android:layout_width="match_parent"
android:layout_height="wrap_content"
android:id="@+id/cb2"
android:text="睡觉"
android:textSize="50sp"
android:checked="true">
</CheckBox>
<CheckBox
android:layout_width="match_parent"
android:layout_height="wrap_content"
android:id="@+id/cb3"
android:text="工作"
android:textSize="50sp"
android:checked="true">
</CheckBox>
<CheckBox
android:layout_width="match_parent"
android:layout_height="wrap_content"
android:id="@+id/cb4"
android:text="玩耍"
android:textSize="50sp"
android:checked="true">
</CheckBox>
</LinearLayout>
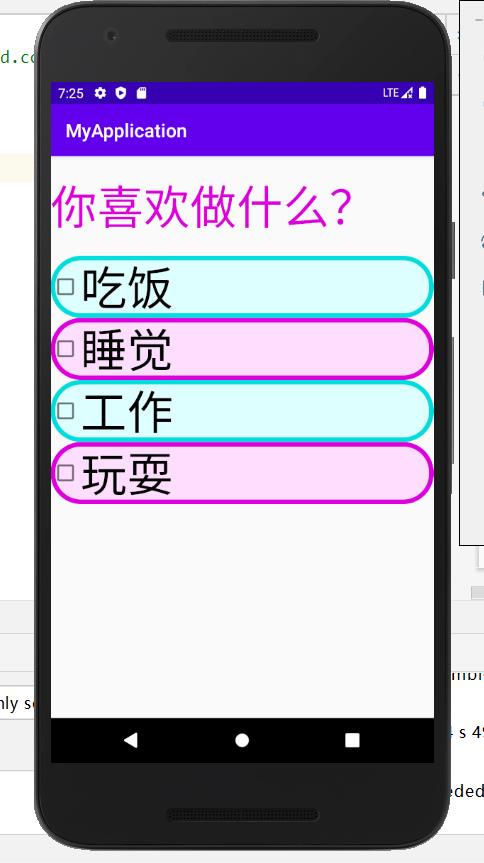
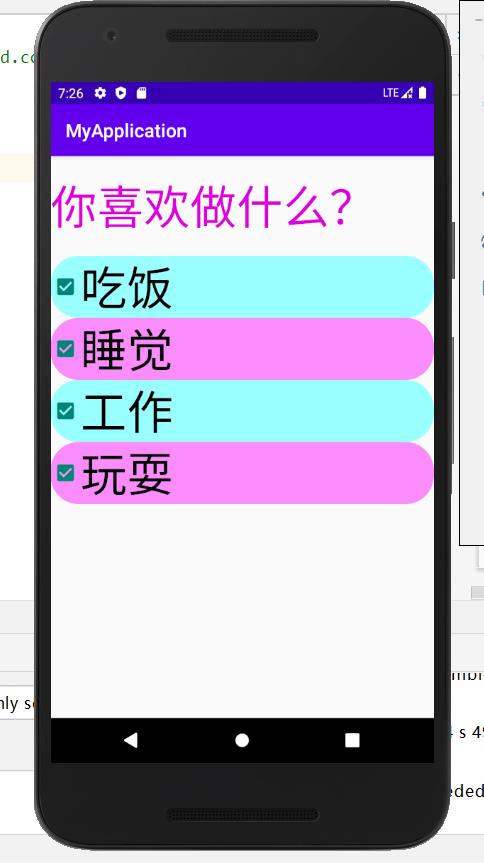
效果:
二、自定义样式
1、去掉CheckBox的勾选框
在CheckBox的属性里写上button="@null"
程序示例:
<CheckBox
    android:layout_width="match_parent"
    android:layout_height="wrap_content"
    android:id="@+id/cb1"
    android:text="吃饭"
    android:textSize="50sp"
    android:button="@null">
</CheckBox>
效果:

“吃饭”前面的勾选框没有了,不过这样做,你最好设置选中时一个背景,未选中时一个背景,不然像图上那样根本看不出来选没选中“吃饭”。
2、自定义背景颜色
新建一个选择器selector
在 你取的名字.xml文件内编写代码:
- item android:state_checked=“false” , 未选中这个CheckBox时的样式
- item android:state_checked=“true” ,选中这个CheckBox时的样式
- solid android:color="@color/yellow_100" ,设置实心的背景颜色
- stroke android:width=“10dp” ,设置边框粗细
android:color="@color/i_purple_700" ,设置边框颜色 - corners android:radius=“50dp” ,设置边框圆角大小
程序示例:
blue_selector.xml
<?xml version="1.0" encoding="utf-8"?>
<selector xmlns:android="http://schemas.android.com/apk/res/android">
    <item android:state_checked="false">
        <shape android:shape="rectangle">
            <solid android:color="@color/blue_100"></solid>
            <stroke android:color="@color/blue_700" android:width="5dp"></stroke>
            <corners android:radius="30dp"></corners>
        </shape>
    </item>
    <item android:state_checked="true">
        <shape android:shape="rectangle">
            <solid android:color="@color/blue_500"></solid>
            <corners android:radius="30dp"></corners>
        </shape>
    </item>
</selector>
activity_main.xml
<?xml version="1.0" encoding="utf-8"?>
<LinearLayout xmlns:android="http://schemas.android.com/apk/res/android"
    android:layout_height="match_parent"
    android:layout_width="match_parent"
    android:orientation="vertical">
    <TextView
        android:layout_width="match_parent"
        android:layout_height="wrap_content"
        android:id="@+id/tv1"
        android:text="你喜欢做什么?"
        android:textSize="50sp"
        android:textColor="@color/i_purple_700"
        android:paddingBottom="20dp"
        android:paddingTop="20dp">
    </TextView>
    <CheckBox
        android:layout_width="match_parent"
        android:layout_height="wrap_content"
        android:id="@+id/cb1"
        android:text="吃饭"
        android:textSize="50sp"
        android:background="@drawable/blue_selector">
    </CheckBox>
    <CheckBox
        android:layout_width="match_parent"
        android:layout_height="wrap_content"
        android:id="@+id/cb2"
        android:text="睡觉"
        android:textSize="50sp"
        android:background="@drawable/purple_selector">
    </CheckBox>
    <CheckBox
        android:layout_width="match_parent"
        android:layout_height="wrap_content"
        android:id="@+id/cb3"
        android:text="工作"
        android:textSize="50sp"
        android:background="@drawable/blue_selector">
    </CheckBox>
    <CheckBox
        android:layout_width="match_parent"
        android:layout_height="wrap_content"
        android:id="@+id/cb4"
        android:text="玩耍"
        android:textSize="50sp"
        android:background="@drawable/purple_selector">
    </CheckBox>
</LinearLayout>
都未选:
都选中:
3、自定义勾选框的背景图片
导入背景图片:
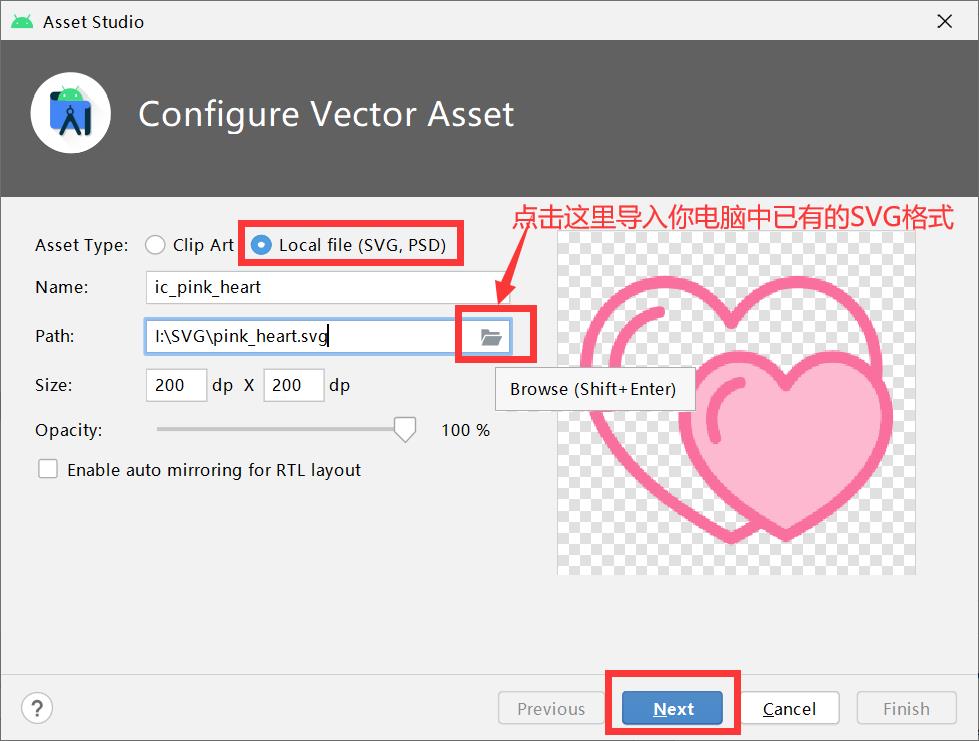
然后新建一个选择器selector
在 你取的名字.xml文件内编写代码:
- item android:state_checked=“false” , 未选中这个CheckBox时的样式
- item android:state_checked=“true” ,选中这个CheckBox时的样式
- drawable="@drawable/ic_pink_heart",设置背景图片
程序示例:
bg_checkbox.xml
<?xml version="1.0" encoding="utf-8"?>
<selector xmlns:android="http://schemas.android.com/apk/res/android">
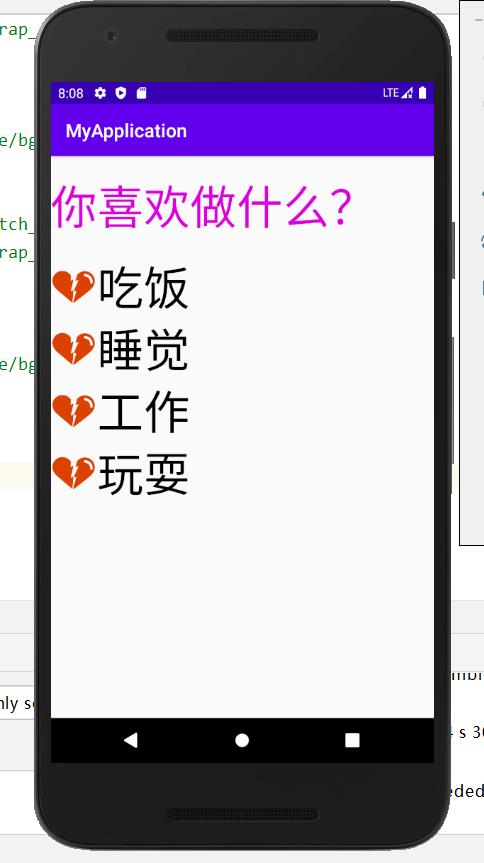
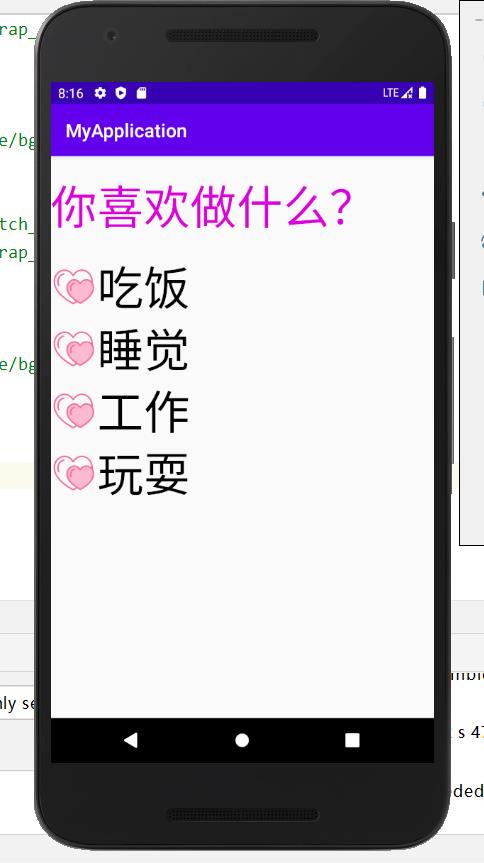
<item android:drawable="@drawable/ic_pink_heart" android:state_checked="true"></item>
<item android:drawable="@drawable/ic_heart_broken" android:state_checked="false"></item>
</selector>
activity_main.xml里写button="@drawable/bg_checkbox",使用写好的背景文件bg_checkbox.xml
<?xml version="1.0" encoding="utf-8"?>
<LinearLayout xmlns:android="http://schemas.android.com/apk/res/android"
    android:layout_height="match_parent"
    android:layout_width="match_parent"
    android:orientation="vertical">
    <TextView
        android:layout_width="match_parent"
        android:layout_height="wrap_content"
        android:id="@+id/tv1"
        android:text="你喜欢做什么?"
        android:textSize="50sp"
        android:textColor="@color/i_purple_700"
        android:paddingBottom="20dp"
        android:paddingTop="20dp">
    </TextView>
    <CheckBox
        android:layout_width="match_parent"
        android:layout_height="wrap_content"
        android:id="@+id/cb1"
        android:text="吃饭"
        android:textSize="50sp"
        android:button="@drawable/bg_checkbox">
    </CheckBox>
    <CheckBox
        android:layout_width="match_parent"
        android:layout_height="wrap_content"
        android:id="@+id/cb2"
        android:text="睡觉"
        android:textSize="50sp"
        android:button="@drawable/bg_checkbox">
    </CheckBox>
    <CheckBox
        android:layout_width="match_parent"
        android:layout_height="wrap_content"
        android:id="@+id/cb3"
        android:text="工作"
        android:textSize="50sp"
        android:button="@drawable/bg_checkbox">
    </CheckBox>
    <CheckBox
        android:layout_width="match_parent"
        android:layout_height="wrap_content"
        android:id="@+id/cb4"
        android:text="玩耍"
        android:textSize="50sp"
        android:button="@drawable/bg_checkbox">
    </CheckBox>
</LinearLayout>
都未选:
都选中:
当然这个图标换成√或者×都是可以的。
三、监听事件
在MainActivity.java内添加监听,当CheckBox的选中状态发生变化时,就会执行写好的操作:
public class MainActivity extends AppCompatActivity {
    private CheckBox cb1;
    private CheckBox cb2;
    private CheckBox cb3;
    private CheckBox cb4;

    @Override
    protected void onCreate(Bundle savedInstanceState) {
        super.onCreate(savedInstanceState);
        setContentView(R.layout.activity_main);

        // 获取控件id
        cb1=findViewById(R.id.cb1);
        cb2=findViewById(R.id.cb2);
        cb3=findViewById(R.id.cb3);
        cb4=findViewById(R.id.cb4);
        // 监听选中状态
        cb1.setOnCheckedChangeListener(new CompoundButton.OnCheckedChangeListener() {
            @Override
            public void onCheckedChanged(CompoundButton buttonView, boolean isChecked) {
                Toast.makeText(MainActivity.this,isChecked?"选中":"未选中",Toast.LENGTH_SHORT).show();
            }
        });
        cb2.setOnCheckedChangeListener(new CompoundButton.OnCheckedChangeListener() {
            @Override
            public void onCheckedChanged(CompoundButton buttonView, boolean isChecked) {
                Toast.makeText(MainActivity.this以上是关于Android开发基础之控件CheckBox的主要内容,如果未能解决你的问题,请参考以下文章