深度分析及实现哈希表
Posted 满眼*星辰
tags:
篇首语:本文由小常识网(cha138.com)小编为大家整理,主要介绍了深度分析及实现哈希表相关的知识,希望对你有一定的参考价值。
概念
顺序结构以及搜索树中,元素关键码与其存储位置之间没有对应的关系,因此在查找一个元素时,必须要经过关键码的多次比较。顺序查找时间复杂度为O(N),搜索树中为树的高度,即O(logn),搜索的效率取决于搜索过程中元素的比较次数。
理想的搜索方法:可以不经过任何比较,一次直接从表中得到要搜索的元素。 如果构造一种存储结构,通过某种函
数(hashFunc)使元素的存储位置与它的关键码之间能够建立一一映射的关系,那么在查找时通过该函数可以很快
找到该元素
该方式即为哈希(散列)方法,哈希方法中使用的转换函数称为哈希(散列)函数,构造出来的结构称为哈希表(Hash
Table)(或者称散列表)
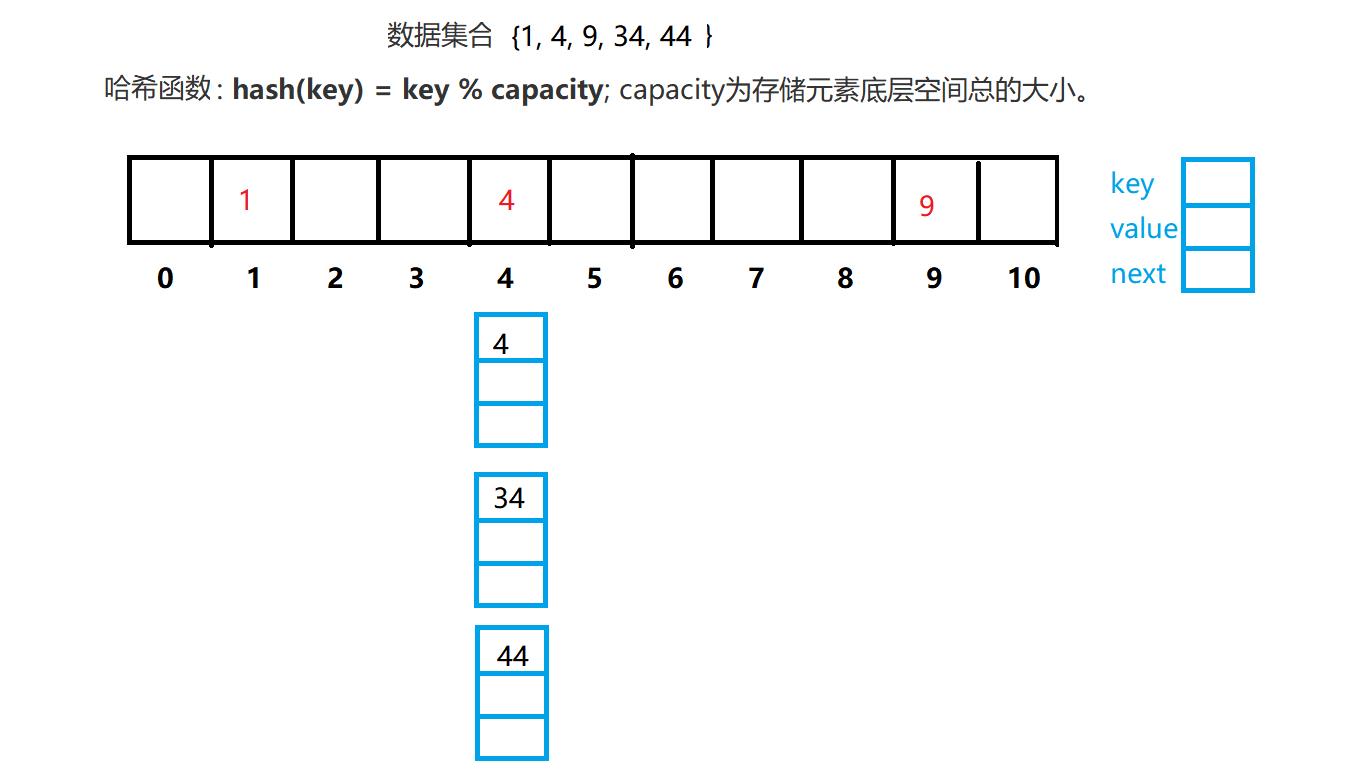
举个例子:

此时我们找某个数据,我们通过哈希函数算出来下标位置,则可以找到该数据,时间复杂度为O(1)
但是我们如果放44这个数组,会怎么样呢?
哈希冲突
不同关键字通过相同哈希哈数计算出相同的哈希地址,该种现象称为哈希冲突或哈希碰撞。
把具有不同关键码而具有相同哈希地址的数据元素称为**“同义词”**。
避免哈希冲突
由于我们哈希表底层数组的容量往往是小于实际要存储的关键字的数量的,这就导致一个问题,冲突的发生是必然的,但我们能做的应该是尽量的降低冲突率。
哈希函数设计
发生哈希冲突可能是哈希函数设计的不合理
哈希函数设计原则:
- 哈希函数的定义域必须包括需要存储的全部关键码,而如果散列表允许有m个地址时,其值域必须在0到m-1之间
- 哈希函数计算出来的地址能均匀分布在整个空间中
- 哈希函数应该比较简单
常见的哈希函数
- 直接定制法–(常用)
取关键字的某个线性函数为散列地址:Hash(Key)= A*Key + B 优点:简单、均匀 缺点:需要事先知道关
键字的分布情况 使用场景:适合查找比较小且连续的情况 - 除留余数法–(常用)
设散列表中允许的地址数为m,取一个不大于m,但最接近或者等于m的质数p作为除数,按照哈希函数:
Hash(key) = key% p(p<=m),将关键码转换成哈希地址
负载因子调节


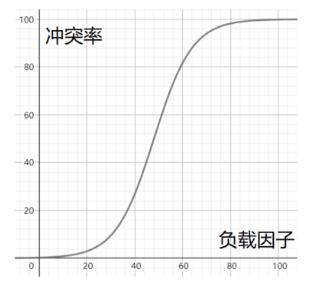
要想冲突率小,就必须让负载因子小
要想让负载因子小,则必须增加散列表长度
HashMap底层默认的负载因子是 0.75
解决哈希冲突
闭散列
也叫开放定址法,当发生哈希冲突时,如果哈希表未被装满,说明在哈希表中必然还有空位置,那么可以把key存放到冲突位置中的“下一个” 空位置中去。
线性探测
线性探测:从发生冲突的位置开始,依次向后探测,直到寻找到下一个空位置为止。
插入
- 通过哈希函数获取待插入元素在哈希表中的位置
- 如果该位置中没有元素则直接插入新元素,如果该位置中有元素发生哈希冲突,使用线性探测找到下一个空位置,插入新元素

删除
采用闭散列处理哈希冲突时,不能随便物理删除哈希表中已有的元素,若直接删除元素会影响其他元素的搜索。比如删除元素4,如果直接删除掉,44查找起来可能会受影响。因此线性探测采用标记的伪删除法来删除一个元素。
二次探测
线性探测的缺陷是产生冲突的数据堆积在一块,这与其找下一个空位置有关系,因为找空位置的方式就是挨着往后逐个去找,因此二次探测为了避免该问题,找下一个空位置的方法为: = ( + )% m, 或者:= ( - )% m。其中:i = 1,2,3…, 是通过散列函数Hash(x)对元素的关键码 key 进行计算得到的位置,m是表的大小。

闭散列缺点:空间利用率低
开散列
开散列法又叫链地址法(开链法),首先对关键码集合用散列函数计算散列地址,具有相同地址的关键码归于同一子集合,每一个子集合称为一个桶,各个桶中的元素通过一个单链表链接起来,各链表的头结点存储在哈希表中。

注意事项:
- 从 JDK 1.8 开始,每次都是尾插法进行插入
- 如果链表长度超过8,那么这个链表就会蜕变为红黑树
实现自定义哈希表
public class HashBuck {

    static class Node {
        public int key;
        public int val;
        public Node next;
        public Node(int key, int val) {
            this.key = key;
            this.val = val;
        }
    }

    public Node[] array;
    public int usedSize;

    public HashBuck() {
        this.array = new Node[8];
    }

    public void push(int key,int val) {
        Node node = new Node(key,val);
        int index = key % array.length;

        Node cur = array[index];
        Node pre = cur;
        while (cur != null) {
            if(cur.key == key) {
                cur.val = val;
                return;
            }
            pre = cur;
            cur = cur.next;
        }
//        node.next = array[index];
//        array[index] = node;

        //尾插
        if(pre == null) {
            array[index] = node;
        }else {
            pre.next = node;
        }
        this.usedSize++;

        //负载因子调整
        if (loadFactor() >= 0.75) {
            resize();
        }
    }

    /**
     * 求负载因子
     * @return
     */
    public double loadFactor() {
        return this.usedSize*1.0 / this.array.length;
    }

    /**
     * 超过了负载因子,我们需要进行扩容
     */
    public void resize() {
        Node[] newArray = new Node[2*array.length];
        //遍历原来的数组,把原来数组里面的每个元素都进行重新哈希
        for (int i = 0; i < array.length; i++) {
            Node cur = array[i];
            while (cur != null) {
                int index = cur.key % newArray.length;
                Node curNext = cur.next;
//                cur.next = newArray[index];
//                newArray[index] = cur;
//                cur = curNext;
                //尾插
                Node ind = newArray[index];
                if(ind == null) {
                    newArray[index] = cur;
                }else {
                    Node pre = ind;
                    while (ind != null) {
                        pre = ind;
                        ind = ind.next;
                    }
                    pre.next = cur;
                }
                cur.next = null;
                cur = curNext;
            }
        }
        //原来数组当中的数据 全部哈希到了 新的数组当中
        array = newArray;
    }

    public int get(int key) {
        int index = key % array.length;
        Node cur = array[index];
        while (cur != null) {
            if(cur.key == key) {
                return cur.val;
            }
            cur = cur.next;
        }
        return -1;
    }

    public static void main(String[] args) {
        HashBuck hashBuck = new HashBuck();
        hashBuck.push(1,1);
        hashBuck.push(2,2);
        hashBuck.push(10,10);
        hashBuck.push(4,4);
        hashBuck.push(5,5);
        hashBuck.push(6,6);
        hashBuck.push(7,7);
        System.out.println(hashBuck.get(6));
    }

}
如果要用自定义类作为 HashMap 的 key 或者 HashSet 的值,必须覆写 hashCode 和 equals 方法,而且要做到 equals 相等的对象,hashCode 一定是一致的
class Person {
    public Integer id;

    public Person(Integer id) {
        this.id = id;
    }

    @Override
    public String toString() {
        return "Person{" +
                "id=" + id +
                '}';
    }

    @Override
    public boolean equals(Object o) {
        if (this == o) return true;
        if (o == null || getClass() != o.getClass()) return false;
        Person person = (Person) o;
        return Objects.equals(id, person.id);
    }

    @Override
    public int hashCode() {
        return Objects.hash(id);
    }
}

public class HashBuck2<K,V> {
    static class Node<K,V> {
        public K key;
        public V val;
        public Node<K,V> next;

        public Node(K key, V val) {
            this.key = key;
            this.val = val;
        }
    }

    public Node<K,V>[] array;
    public int usedSize;

    public HashBuck2() {
        this.array = new Node[8];
    }

    public void push(K key, V val) {
        int hash = key.hashCode();
        int index = hash % array.length;

        Node<K,V> node = new Node<>(key,val);
        Node<K,V> cur = array[index];
        Node<K,V> pre = cur;
        while (cur != null) {
            if(cur.key.equals(key)) {
                cur.val = val;
                return;
            }
            pre = cur;
            cur = cur.next;
        }
//        node.next = array[index];
//        array[index] = node;

        //尾插
        if(pre == null) {
            array[index] = node;
        }else {
            pre.next = node;
        }
        this.usedSize++;

        //负载因子调整
        if (loadFactor() >= 0.75) {
            resize();
        }
    }

    /**
     * 求负载因子
     * @return
     */
    public double loadFactor() {
        return this.usedSize*1.0 / this.array.length;
    }

    /**
     * 超过了负载因子,我们需要进行扩容
     */
    public void resize() {
        Node<K,V>[] newArray = new Node[2*array.length];
        //遍历原来的数组,把原来数组里面的每个元素都进行重新哈希
        for (int i = 0; i < array.length; i++) {
            Node<K,V> cur = array[i];
            while (cur != null) {
                int index = cur.hashCode() % newArray.length;
                Node<K,V> curNext = cur.next;
//                cur.next = newArray[index];
//                newArray[index] = cur;
//                cur = curNext;
                //尾插
                Node<K,V> ind = newArray[index];
                if(ind == null) {
                    newArray[index] = cur;
                }else {
                    Node<K,V> pre = ind;
                    while (ind != null) {
                        pre = ind;
                        ind = ind.next;
                    }
                    pre.next = cur;
                }
                cur.next = null;
                cur = curNext;
            }
        }
        //原来数组当中的数据 全部哈希到了 新的数组当中
        array = newArray;
    }

    public V get(K key) {
        int index = key.hashCode() % array.length;
        Node<K,V> cur = array[index];
        while (cur != null) {
            if(cur.key.equals(key)) {
                return cur.val;
            }
            cur = cur.next;
        }
        return null;
    }

    public static void main(String[] args) {
        HashBuck2<Person,String> hashBuck2 = new HashBuck2<>();
        Person person1 = new Person(1);
        Person person2 = new Person(20);
        System.out.println(person1.hashCode());
        System.out.println(person2.hashCode());
    }

}
以上是关于深度分析及实现哈希表的主要内容,如果未能解决你的问题,请参考以下文章