SSM项目---员工管理系统的基础环境搭建
Posted 杀手不太冷!
tags:
篇首语:本文由小常识网(cha138.com)小编为大家整理,主要介绍了SSM项目---员工管理系统的基础环境搭建相关的知识,希望对你有一定的参考价值。
文章目录
SSM项目—员工管理系统的基础环境搭建
0.此项目使用的技术点
基础框架-ssm(SpringMVC+Spring+MyBatis)
数据库-mysql
前端框架爱-bootstrap快速搭建简介美观的界面
项目的依赖管理-Maven
分页-pagehelper
1.创建一个maven工程
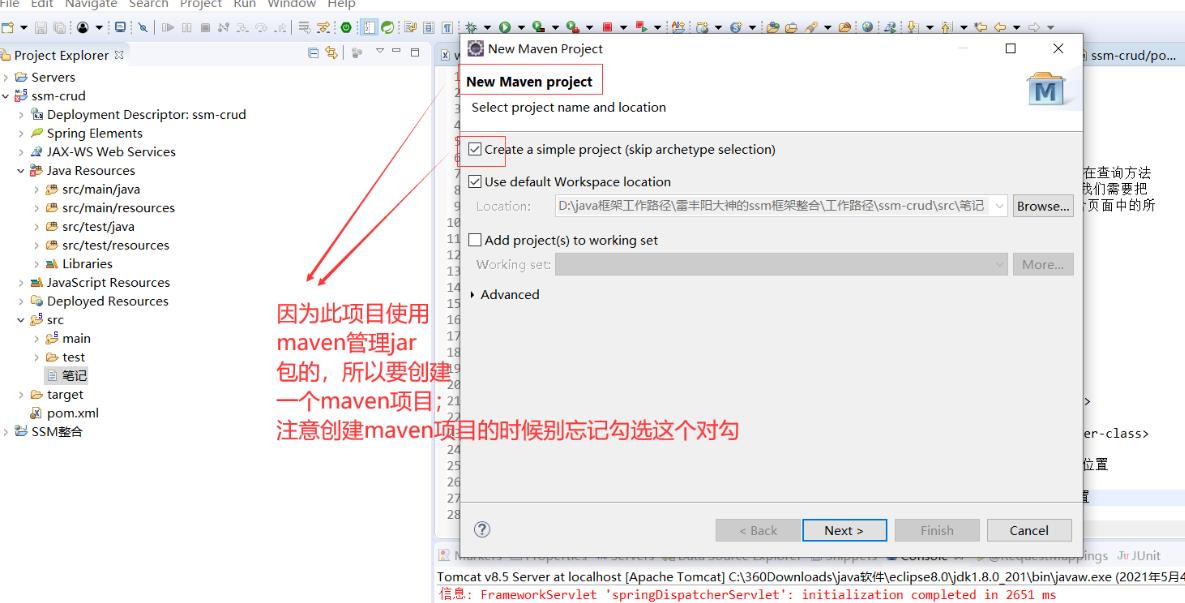
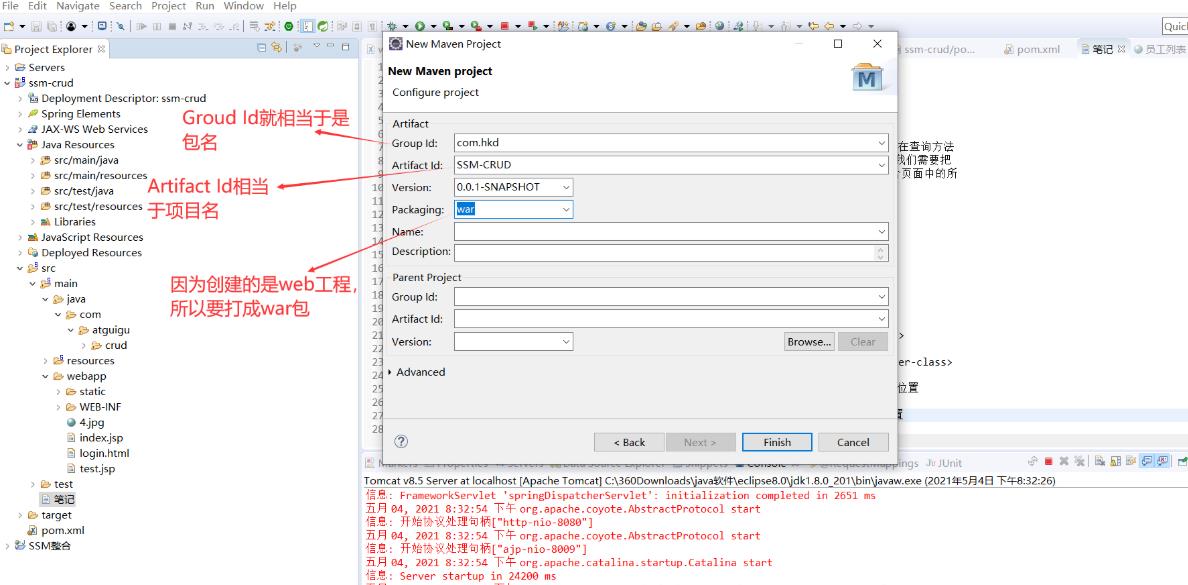
点击创建出现一个异常,如下图:
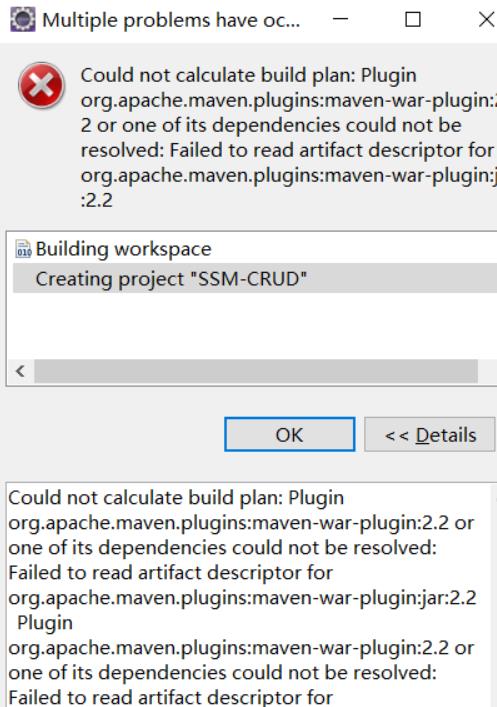
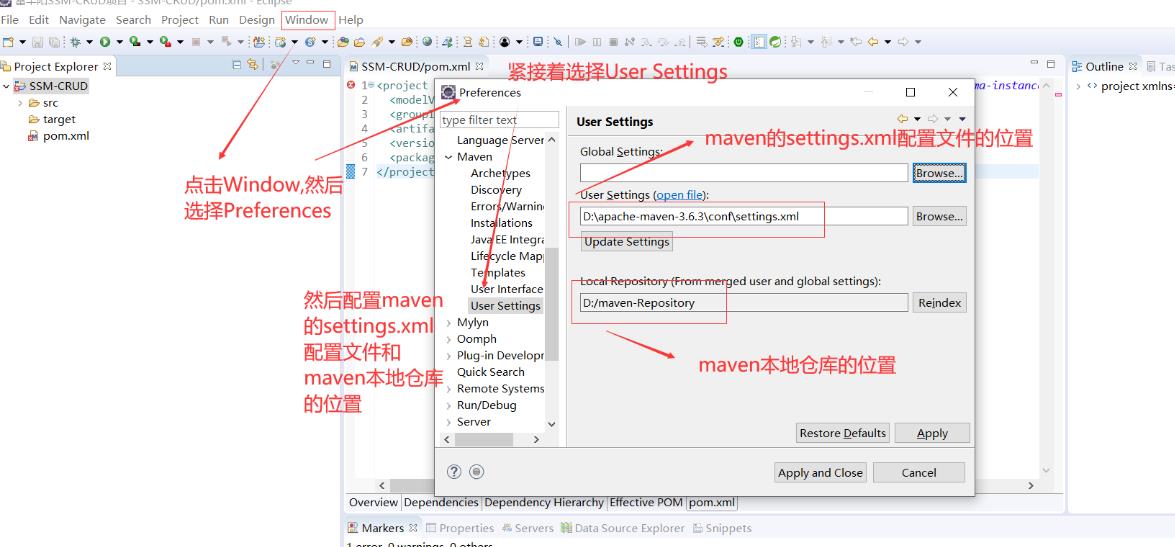
这个异常是因为,项目中没有配置maven环境,配置过maven环境之后,错误就会消失。
2.配置Maven运行环境

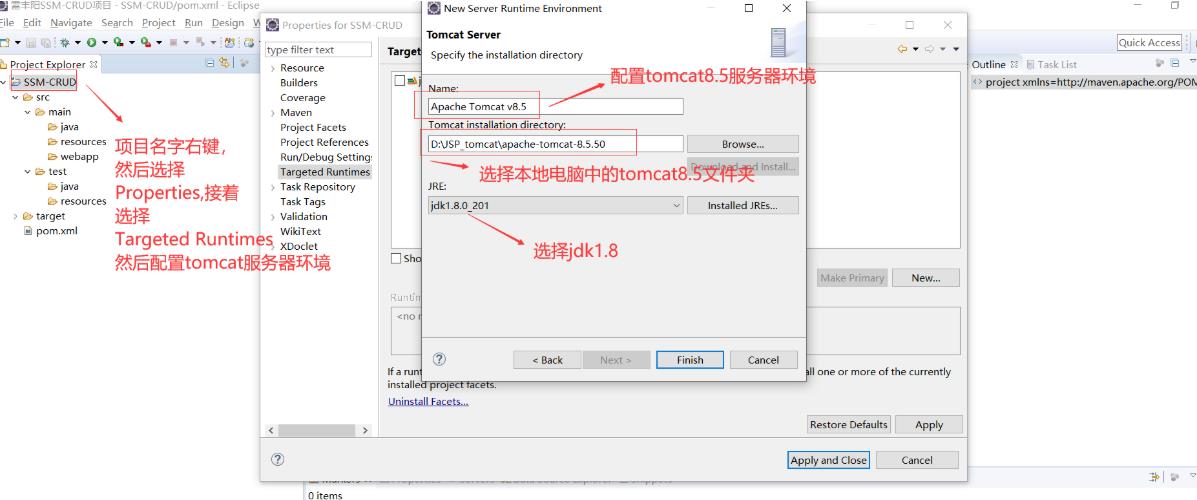
3.配置tomcat8.5服务器环境
如下图:
4.创建WEB-INF文件夹和web.xml文件
来看一看各个文件夹中存放东西的规定,如下图:
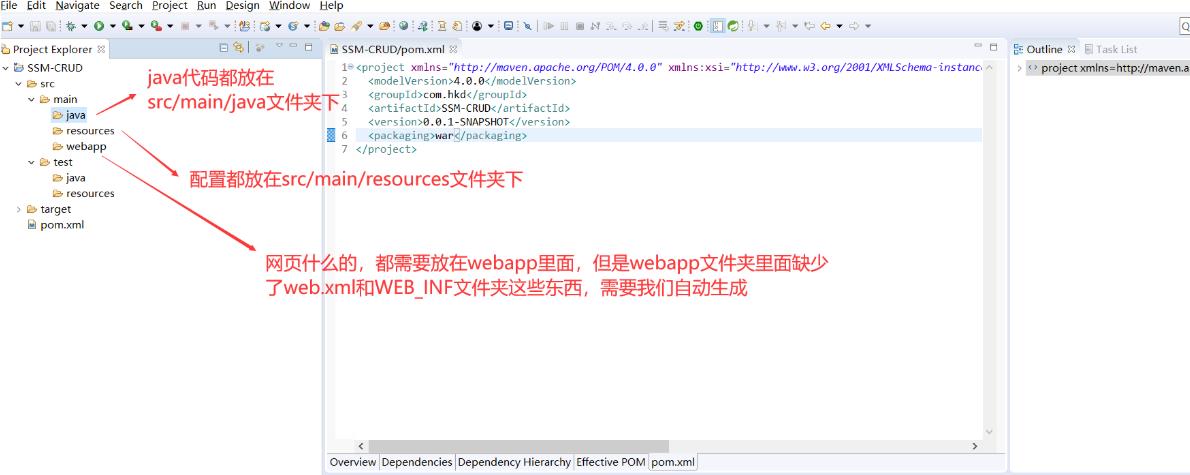
在src/main/webapp目录下创建WEB-INF文件夹,在WEB-INF文件夹下创建web.xml文件,如下图:

web.xml文件的内容文本如下:
<?xml version="1.0" encoding="UTF-8"?>
<web-app xmlns="http://xmlns.jcp.org/xml/ns/javaee"
         xmlns:xsi="http://www.w3.org/2001/XMLSchema-instance"
         xsi:schemaLocation="http://xmlns.jcp.org/xml/ns/javaee http://xmlns.jcp.org/xml/ns/javaee/web-app_4_0.xsd"
         version="4.0">
  <welcome-file-list>
    <welcome-file>index.jsp</welcome-file>
  </welcome-file-list>

</web-app>
注意:上面的手动创建WEB-INF文件夹和手动创建web.xml文件,并不能使maven项目变成一个web项目,因此不要用上面的方式。我知道如果你在看我的博客,你心里此时肯定会有一个独白:“你丫多半有病,不能用的东西,干嘛要往博客里写?”
这主要是因为,我觉得,这也算是一个坑,记录到博客中,就相当于把这个坑给添上了。
说到这,你心里可能还有一个疑问,为什么要把maven项目变成一个web工程呢?因为啊,如果你的项目仅仅是一个maven项目,你是不能把你的maven项目部署到tomcat服务器上的,也就是说,你不能够在浏览器中访问,那这肯定不行,对不对?因为我们虽然是用maven工程管理的我们的项目,但是我们的项目前提,它是一个web项目啊!
什么叫做不能在浏览器中访问呢?你就比如,如果是正常的web项目,项目里面有一个index.jsp文件,那么我们可以直接右键index.jsp文件—Run As—Run on Server,但是如果仅仅是maven项目,仍是这个index.jsp文件,你右键这个文件,右键index.jsp—Run As—Run Configurations,发现没有,此时没有Run on Server这个选项,如下图:

这也就意味着,你不能够在浏览器中显示index.jsp页面。
那么说了这么多,该怎么把maven项目,变成web项目工程呢?请看下一个标题。
5.把maven项目变成web工程项目
新建一个Artifact Id是SSM-CRUD-0505也即是项目名是SSM-CRUD-0505的项目,基础环境搭建的前三步都是一样的,创建maven项目,然后配置maven环境,接着配置tomcat服务器环境,但是第四步就不一样了,这里不再是手动创建web.xml文件和WEB-INF文件夹了,而是让maven项目自动变成一个web项目,这样就可以自动生成web.xml文件等,那么怎样才能让一个maven项目变成一个web工程项目呢?如下:
先来看一下我们新创建的maven项目SSM-CRUD-0505的目录结构,如下图:

接下来就是让此maven项目变成一个web工程项目,如下图:
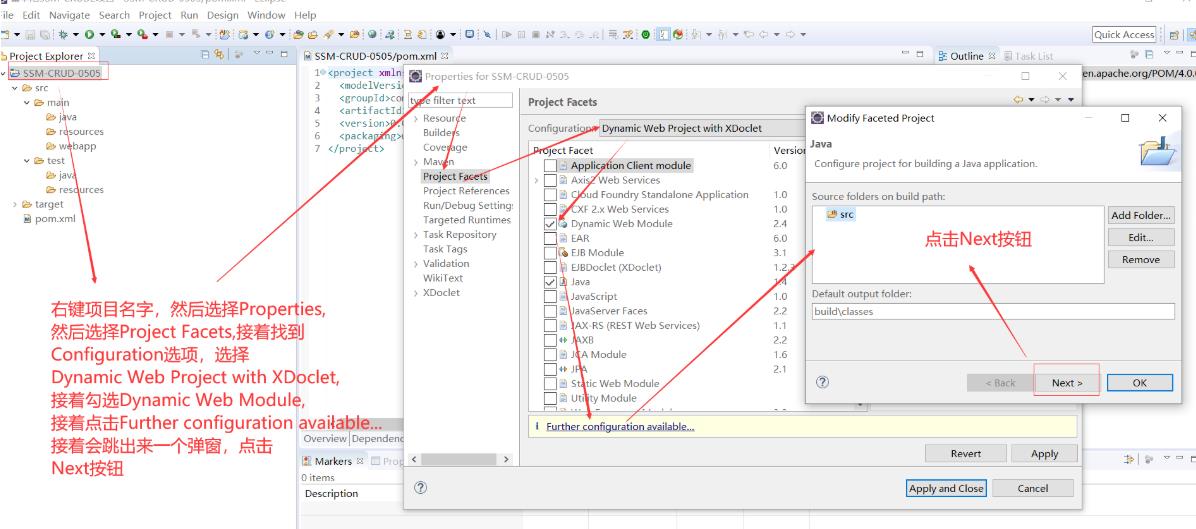
点击Next之后,如下图:
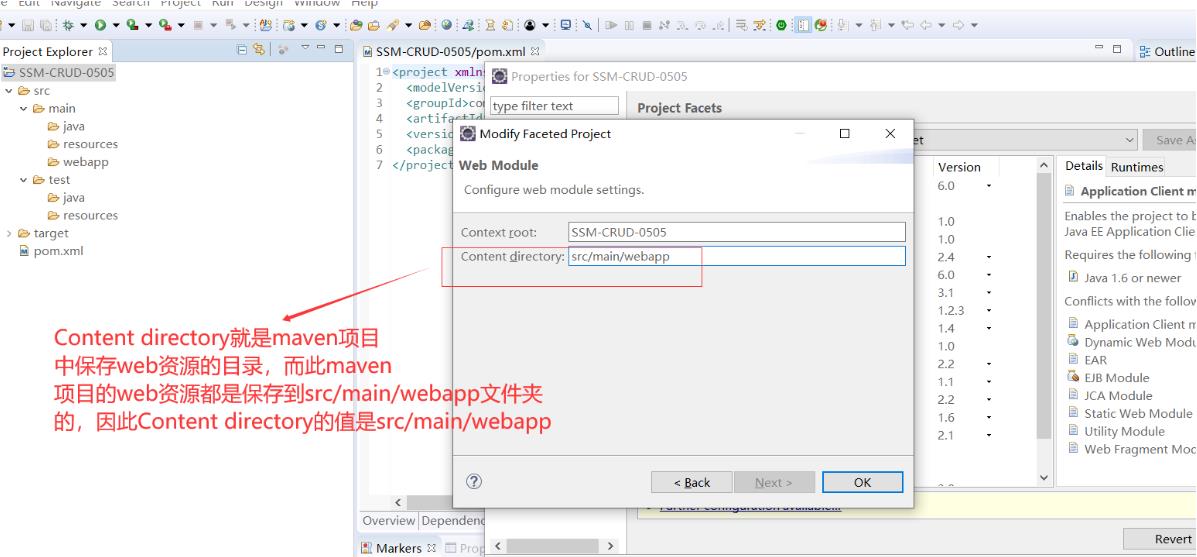
点击ok之后,原本的maven项目就变成一个web项目了,下图是此maven项目路径前后的变化,如下:
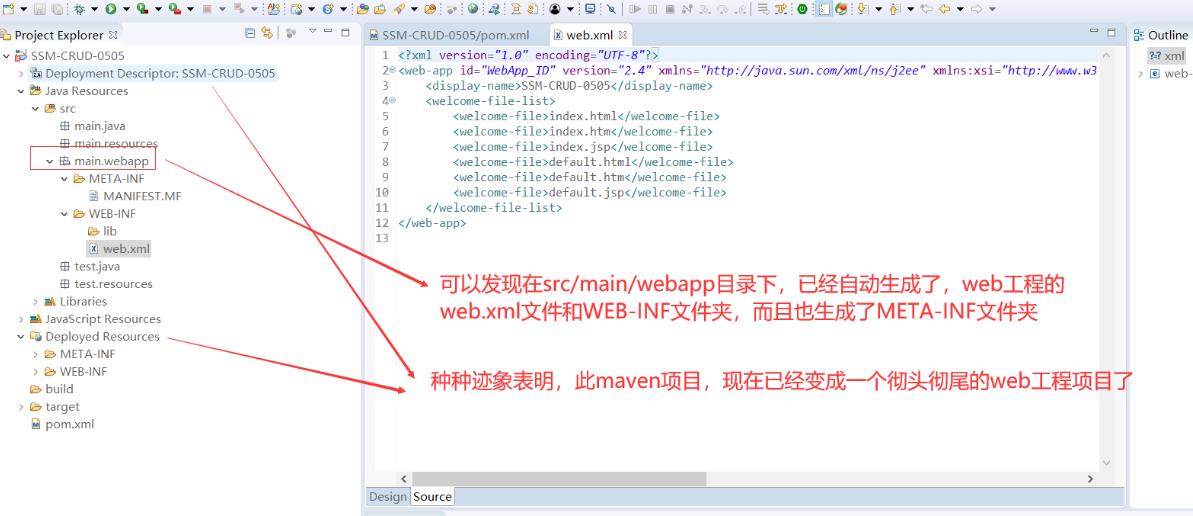
那么maven和web项目的结合项目,比起单纯的web项目有什么优点呢?
优点就是,如果单纯的web项目,那么不会有pom.xml文件,所以就不能够通过maven管理依赖,只能够把所有的jar包到放到WEB-INF/lib文件夹下,但是如果是maven项目和web项目的结合项目,就不一样了,它可以用maven管理依赖。
用上面的5步生成的SSM-CRUD-0505项目不规范,因为里面有一个bug,就是我们在pom.xml文件中导入依赖之后,不会在Libraries中生成Maven Dependencies依赖的Library管理,Maven Dependencies依赖的Library管理如下图:
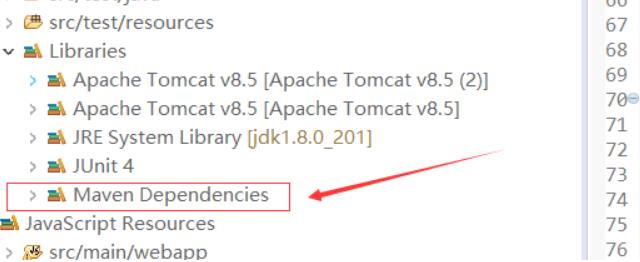
SSM-CRUD-0505项目中在pom.xml导入依赖之后,Libraries的目录结构如下图:
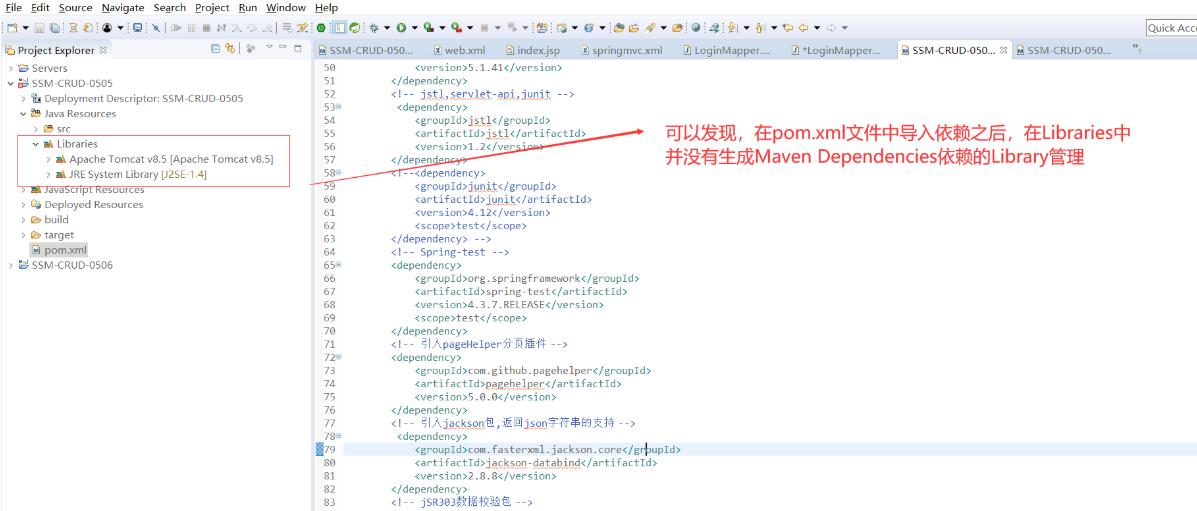
因此我们需要用6步骤里面讲的方法,去创建maven项目和web项目的结合项目。
6.上面五步创建的maven项目不要用,但是上面的五步要有,执行完上面的五步之后,重新创建一个maven项目,重新把这个maven项目变成web项目
我也不知道原因是什么,你必须要先执行完上面的5步了,然后你再创建maven项目,这个时候生成的项目才是规范的项目。所以创建maven项目并且把这个maven项目变成web项目的时候,一定要先执行完前5步,然后重新创建一个maven项目,然后重新把这个maven项目变成web项目,如下图:
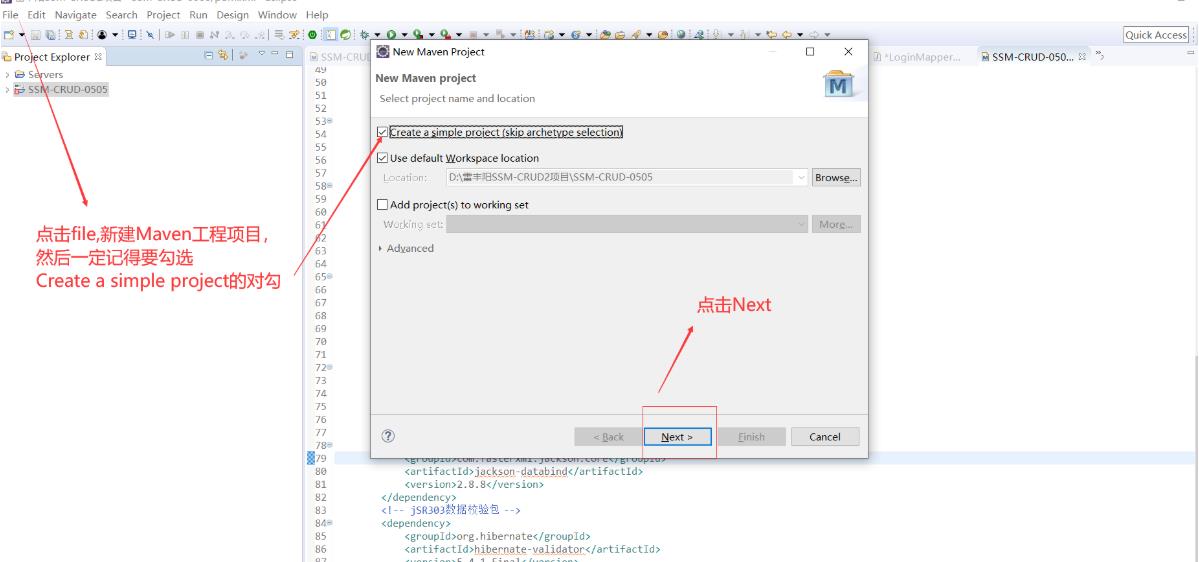
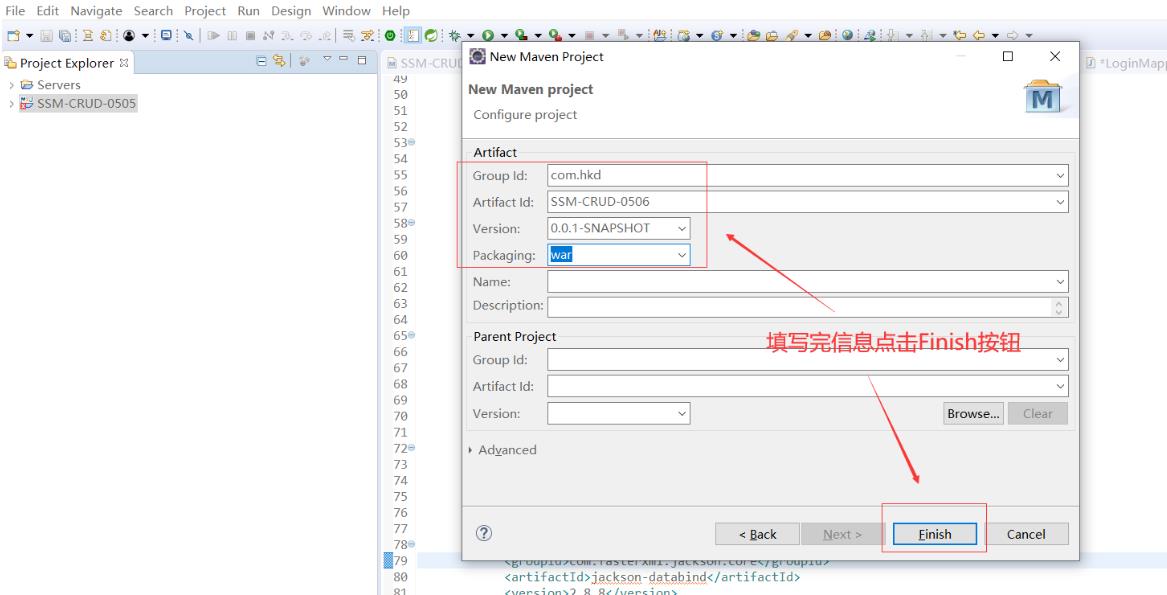
点击Finish之后,看看自动生成的maven项目的路径长什么样?看看和我们第一次创建maven项目的时候的路径有什么不同?请看下图:
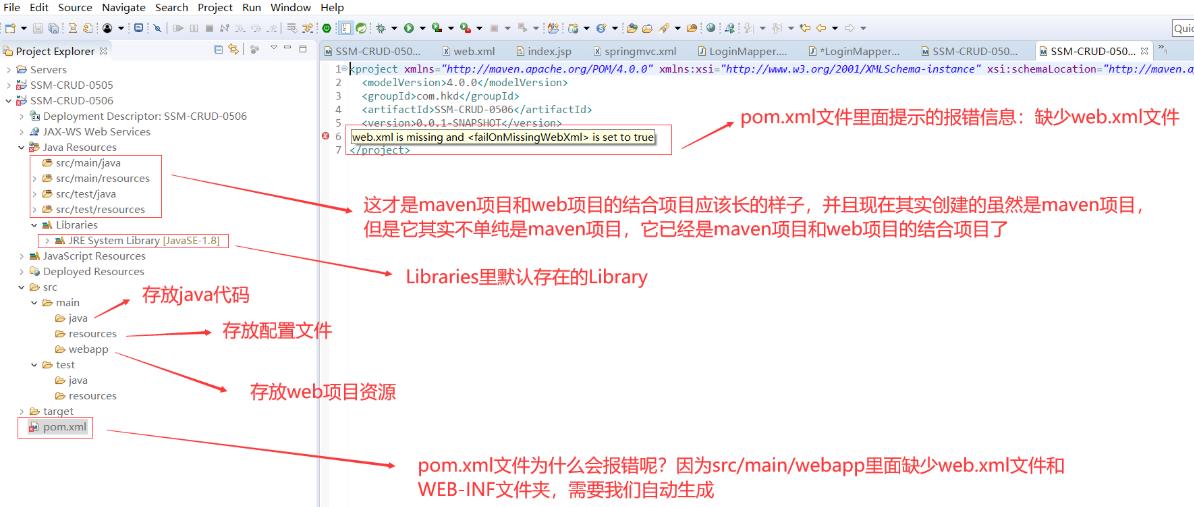
而第一次创建maven工程之后,生成的项目路径,如下图:

在src/main/webapp文件夹里自动生成web.xml文件和WEB-INF文件夹的流程,如下图:
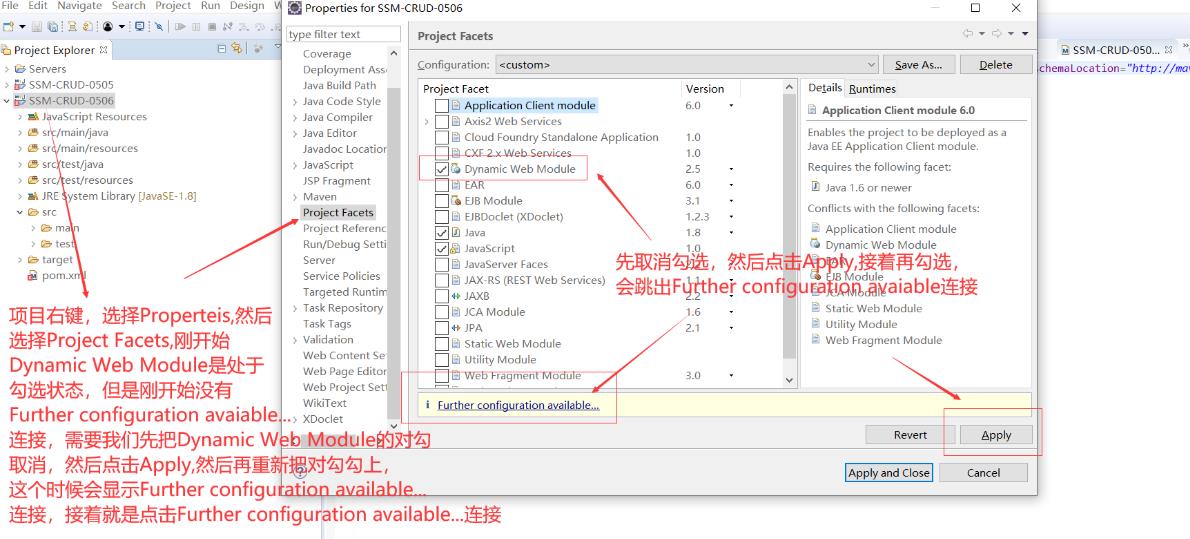
点击Further configuration available…链接之后,如下图:
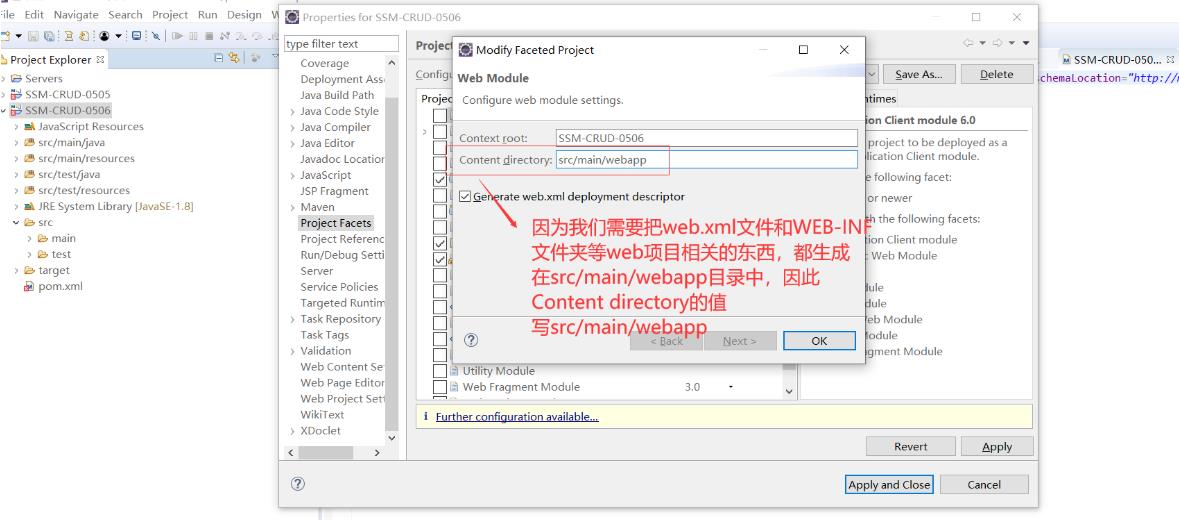
最后点击OK,看看项目中的变化,如下图:
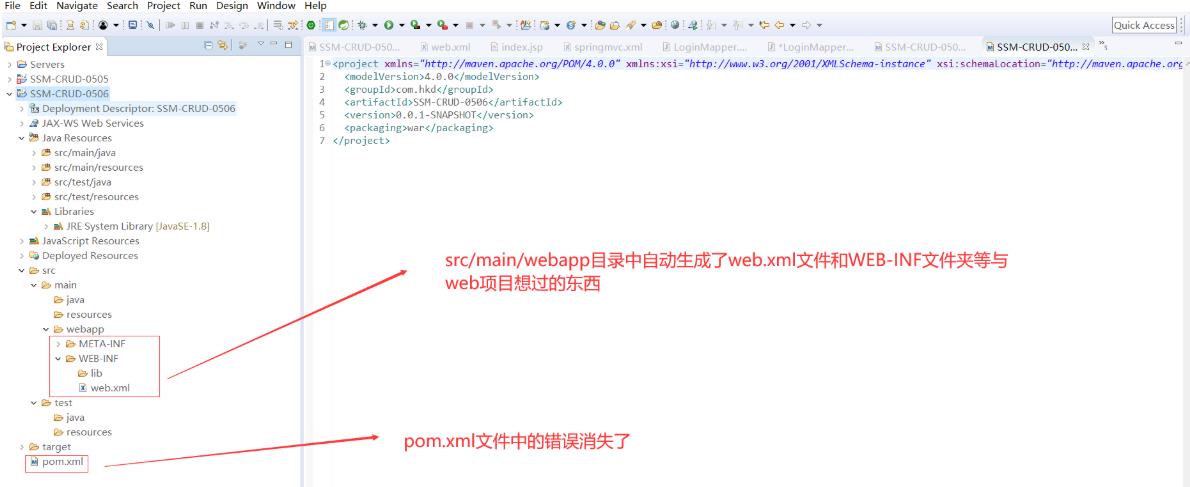
上图中的SSM-CRUD-0506项目,才是我们想要的规范的maven项目和web项目结合后的生成项目,这是规范的创建方法。
7.创建index.jsp首页文件
因为web.xml配置文件中,已经设置了index.jsp为首页,所以只需要在src/main/webapp目录下,创建一个index.jsp文件,这个文件就是首页,也就是说在浏览器中访问的时候,输入地址localhost:8080/SSM-CRUD-0506,其实就相当于是地址
localhost:8080/SSM-CRUD-0506/index.jsp
web.xml配置文件中的设置如下图:
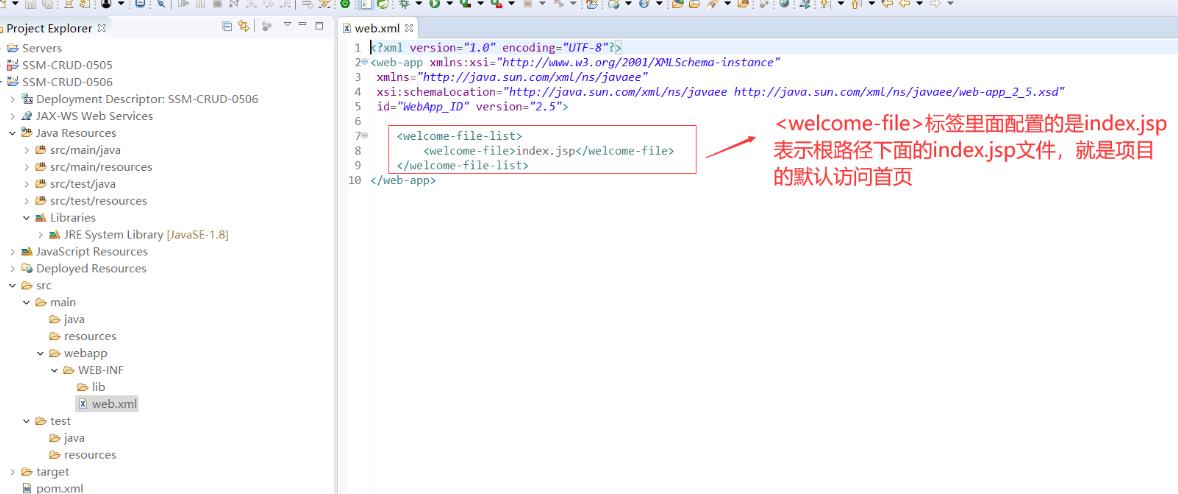
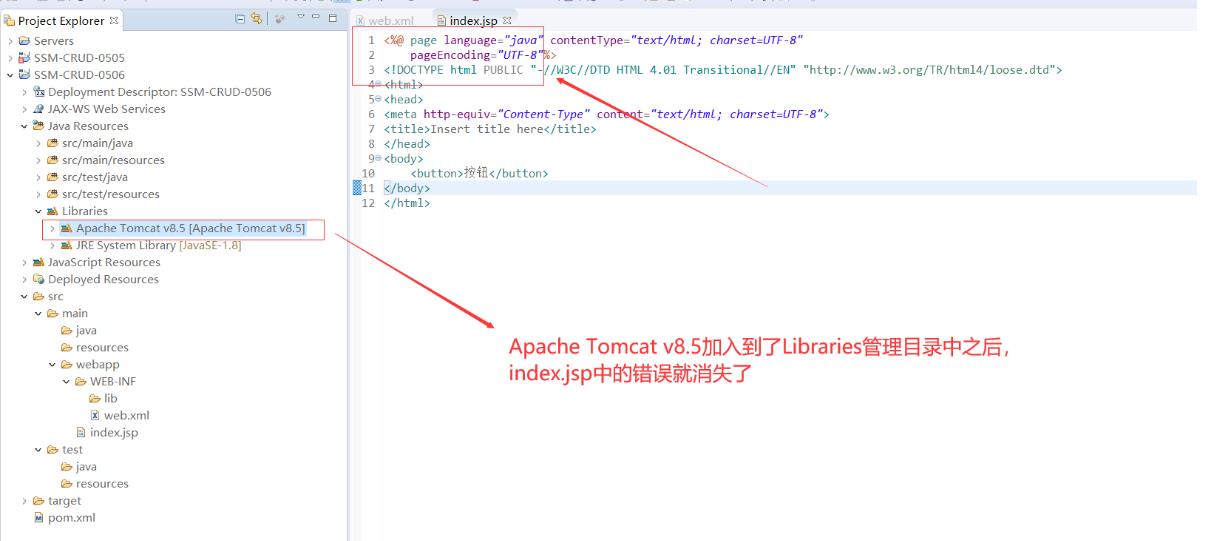
创建index.jsp首页文件之后,会出现一个错误:The superclass “javax.servlet.http.HttpServlet” was not found on the Java Build Path,如下图:
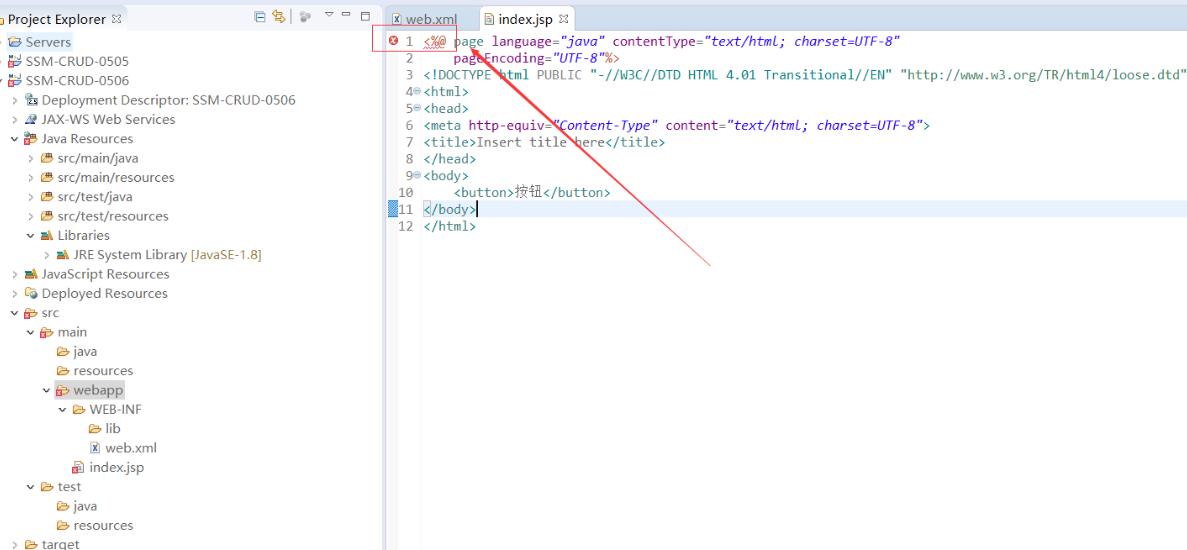
解决办法需要把Apache Tomcat v8.5加入到Libraries管理包中,流程如下图:
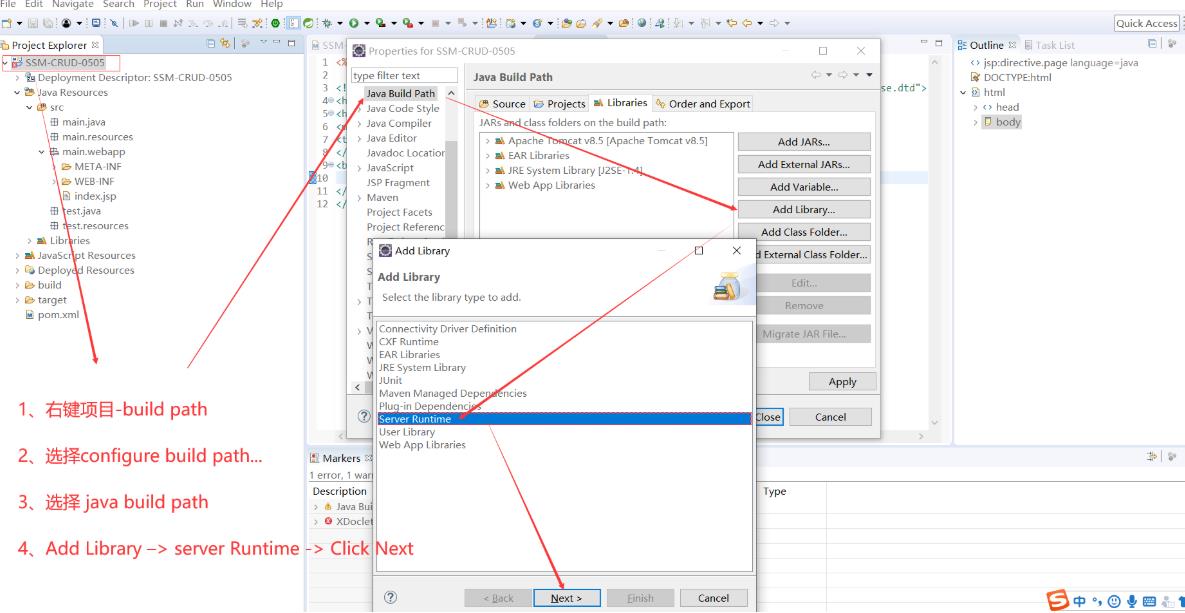
点击Next之后,如下图:
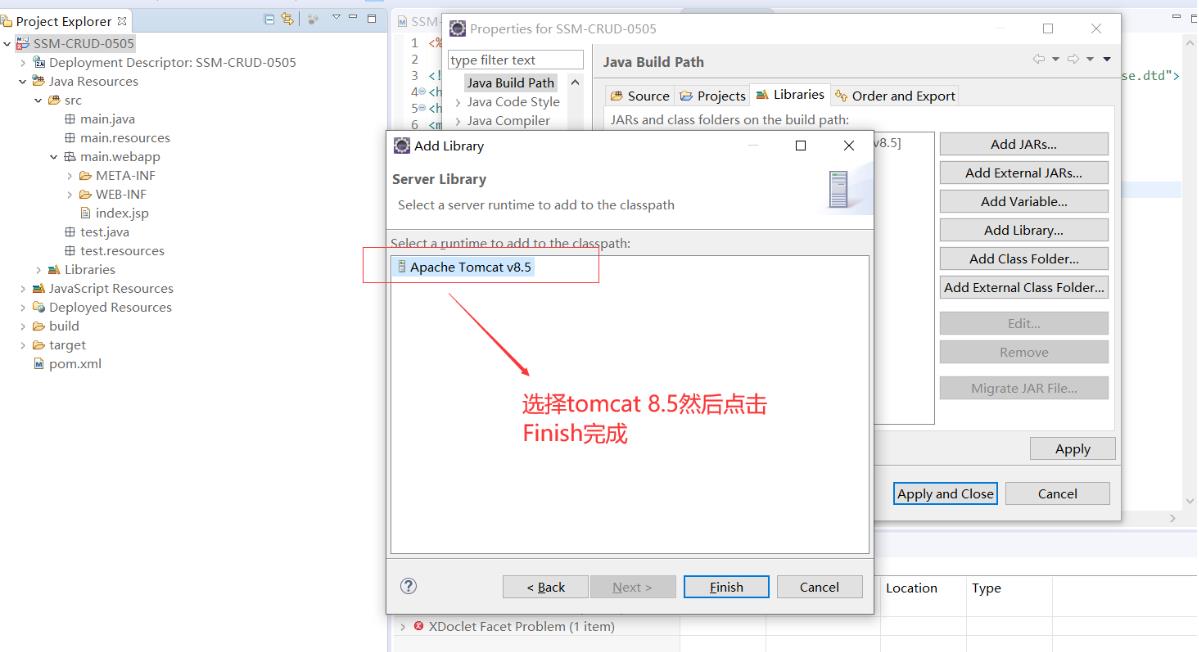
选择Apache Tomcat v8.5,点击Finish完成之后就把Apache Tomcat v8.5加入到了Libraries管理包中,index.jsp文件中的错误The superclass “javax.servlet.http.HttpServlet” was not found on the Java Build Path就会消失,如下图:
8.引入项目依赖的jar包
 <!-- 引入项目依赖的jar包 -->
  <!-- SpringMVC,Spring -->
  <dependencies>
      	<!--fastjson-->
  		<dependency>
  			<groupId>com.alibaba</groupId>
  			<artifactId>fastjson</artifactId>
  			<version>1.2.28</version>
  		</dependency>
  		<!-- spring-webmvc -->
  		<dependency>
		    <groupId>org.springframework</groupId>
		    <artifactId>spring-webmvc</artifactId>
		    <version>4.3.7.RELEASE</version>
		</dependency>
		<!-- Spring-Jdbc -->
		<dependency>
		    <groupId>org.springframework</groupId>
		    <artifactId>spring-jdbc</artifactId>
		    <version>4.3.7.RELEASE</version>
		</dependency>
		<!-- MyBatis -->
		<dependency>
		    <groupId>org.mybatis</groupId>
		    <artifactId>mybatis</artifactId>
		    <version>3.4.2</version>
		</dependency>
		<!-- MyBatis整合Spring的适配包 -->
		<dependency>
		    <groupId>org.mybatis</groupId>
		    <artifactId>mybatis-spring</artifactId>
		    <version>1.3.1</version>
		</dependency>
		<!-- 数据库连接池,驱动 -->
		<dependency>
		    <groupId>c3p0</groupId>
		    <artifactId>c3p0</artifactId>
		    <version>0.9.1.2</version>
		</dependency>
		<dependency>
		    <groupId>mysql</groupId>
		    <artifactId>mysql-connector-java</artifactId>
		    <version>5.1.41</version>
		</dependency>
		<!-- jstl,servlet-api,junit -->
		 <dependency>
		    <groupId>jstl</groupId>
		    <artifactId>jstl</artifactId>
		    <version>1.2</version>
		</dependency>
		<!--<dependency>
		    <groupId>junit</groupId>
		    <artifactId>junit</artifactId>
		    <version>4.12</version>
		    <scope>test</scope>
		</dependency> -->
		<!-- Spring-test -->
		<dependency>
		    <groupId>org.springframework</groupId>
		    <artifactId>spring-test</artifactId>
		    <version>4.3.7.RELEASE</version>
		    <scope>test</scope>
		</dependency>
		<!-- 引入pageHelper分页插件 -->
		<dependency>
		    <groupId>com.github.pagehelper</groupId>
		    <artifactId>pagehelper</artifactId>
		    <version>5.0.0</version>
		</dependency>
		<!-- 引入jackson包,返回json字符串的支持 -->
		 <dependency>
		    <groupId>com.fasterxml.jackson.core</groupId>
		    <artifactId>jackson-databind</artifactId>
		    <version>2.8.8</version>
		</dependency>
		<!-- jSR303数据校验包 -->
		<dependency>
		    <groupId>org.hibernate</groupId>
		    <artifactId>hibernate-validator</artifactId>
		    <version>5.4.1.Final</version>
		</dependency>
	</dependencies>
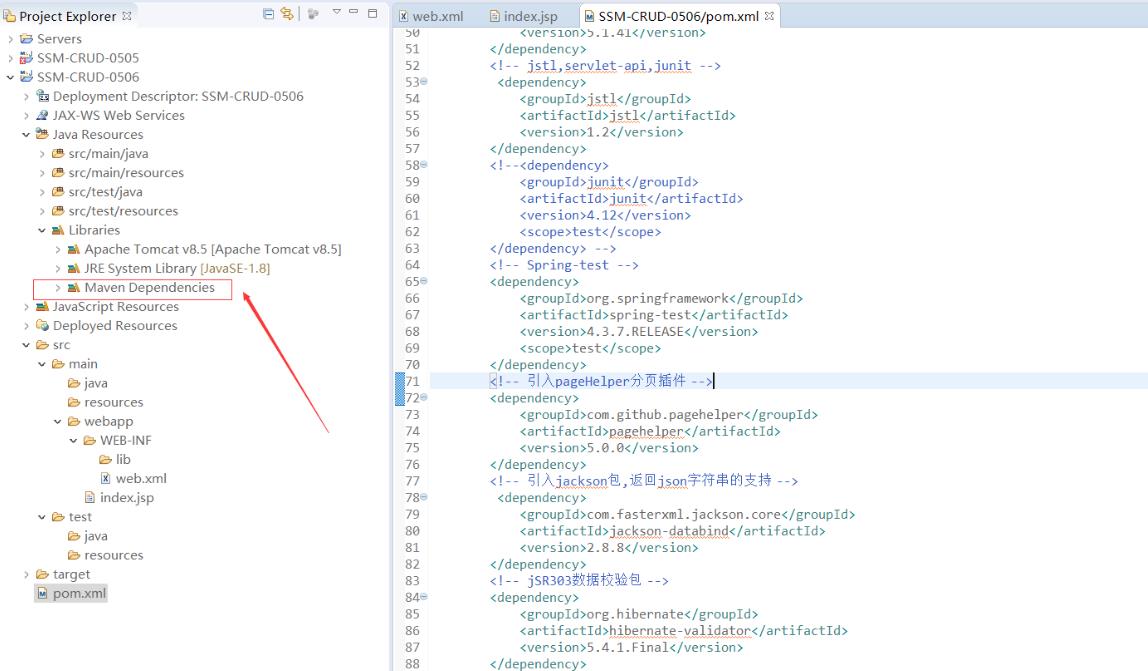
在pom.xml文件中共引入依赖之后,Libraries管理包中会增加一个Maven Dependencies依赖管理,如下图:
9.引入Bootstrap
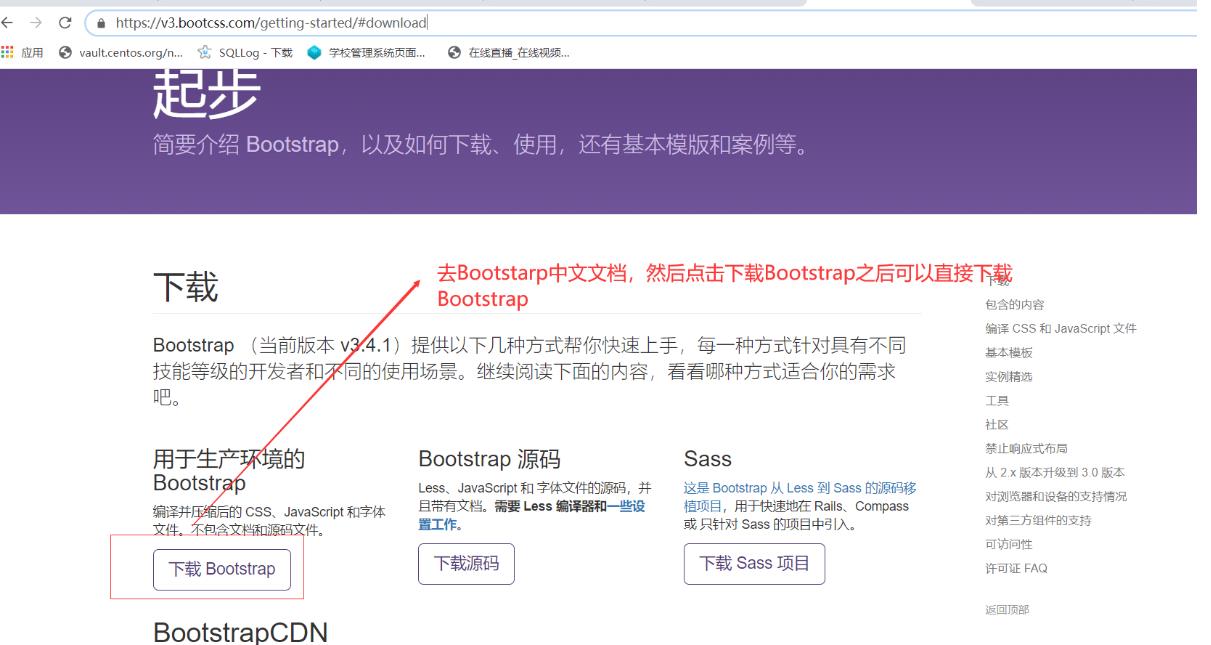
下载Bootstrap
首先下载Bootstrap,如下图:

此文件夹里的内容如下图:
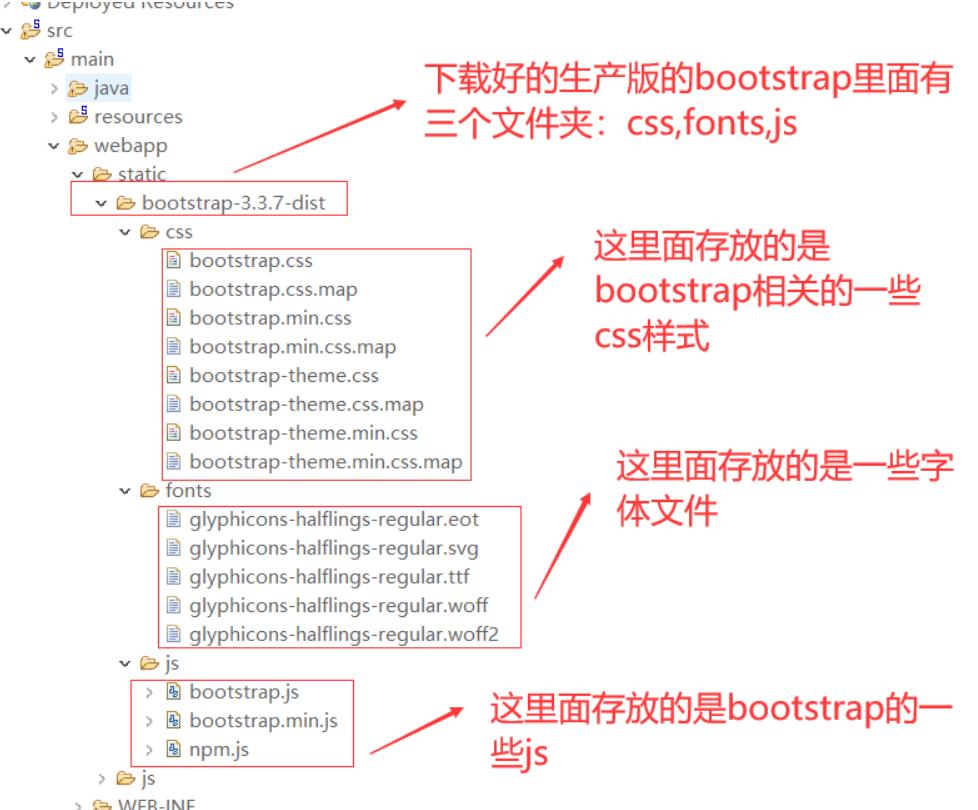
怎么引入Bootstrap
进入Bootstrap的官方中文文档,然后点击入门菜单,如下图:
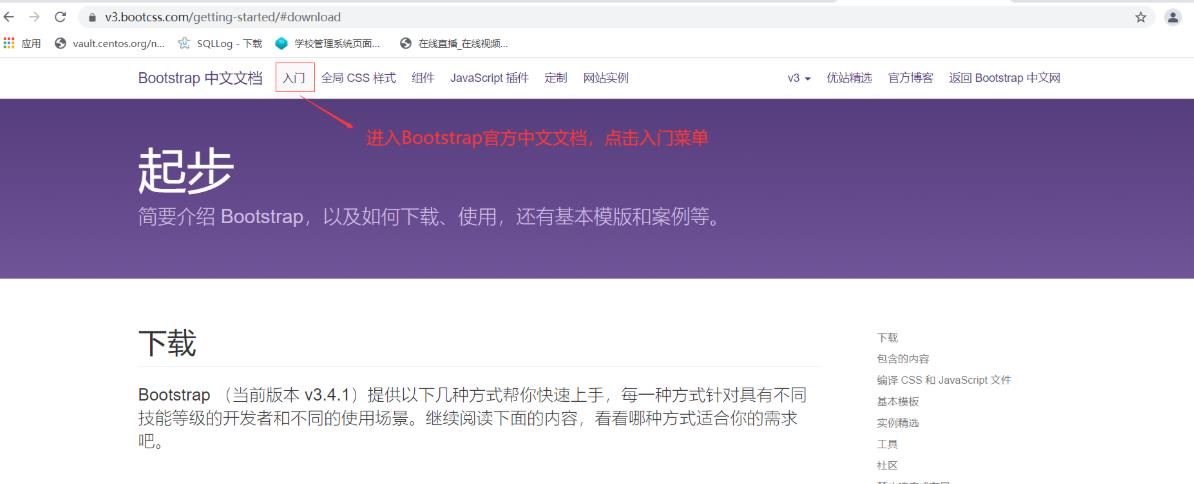
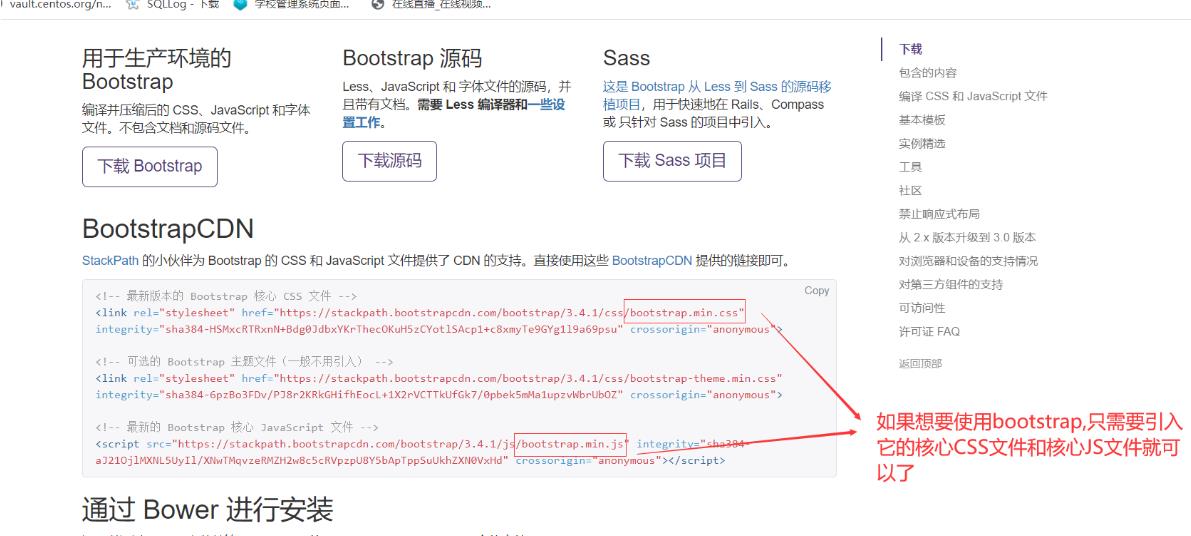
把下载好的Bootstrap文件夹放到src/main/webapp目录中
下载好的Bootstrap文件夹需要放到项目的webapp目录中,在webapp目录中创建一个static静态文件夹,专门用来存放静态资源,如下图:
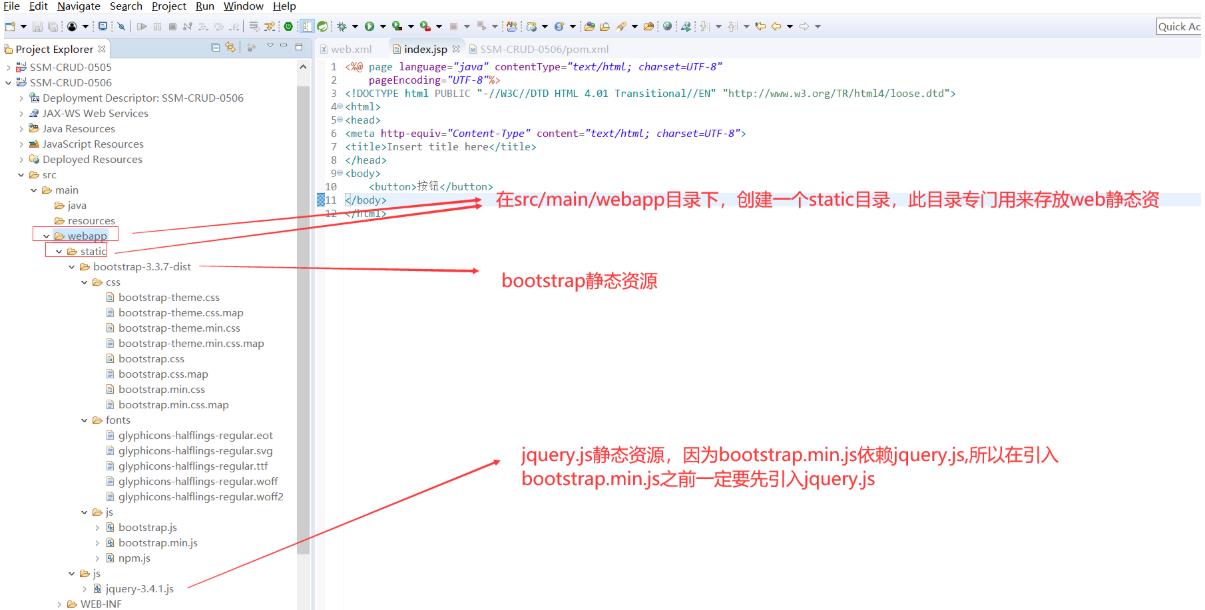
在项目中引入Bootstrap的实际操作
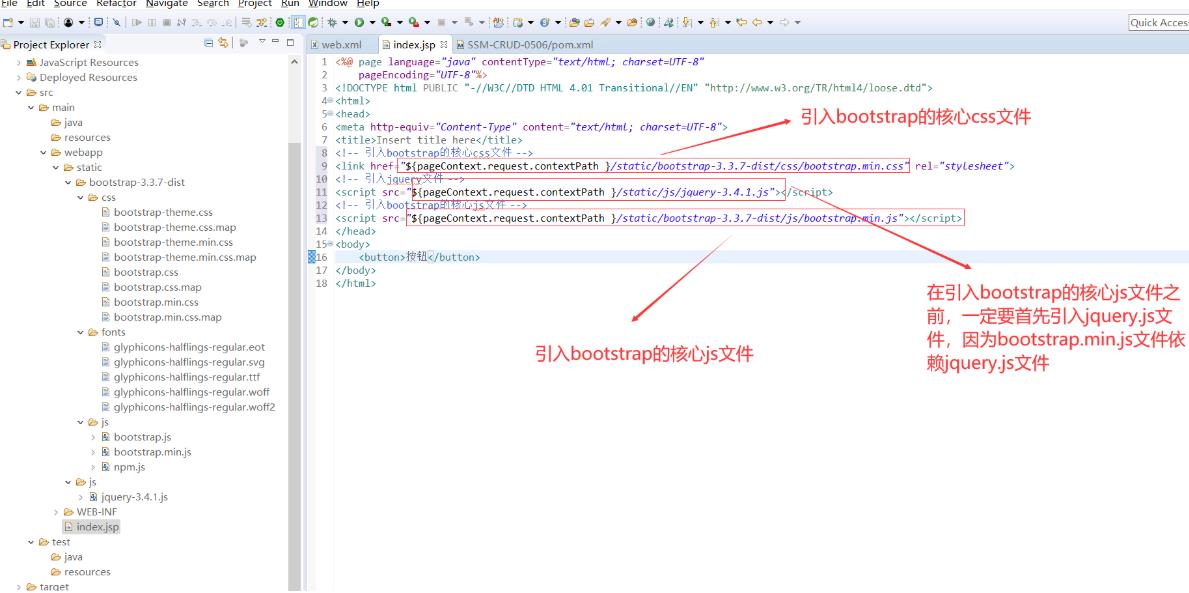
Bootstrap的实际效果简单实现
在项目中引入Bootstrap的核心css文件和核心js文件之后,就可以使用Bootstrap框架了,此框架的使用非常的简单,就比如,如果你想要给一个按钮加样式该怎么办呢?你只需要给按钮,加一个class属性即可,如下图:
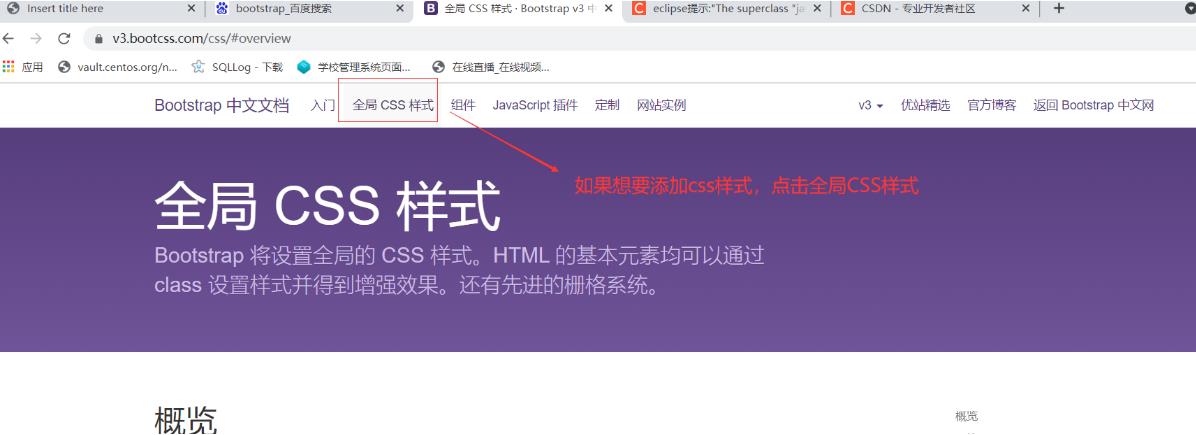
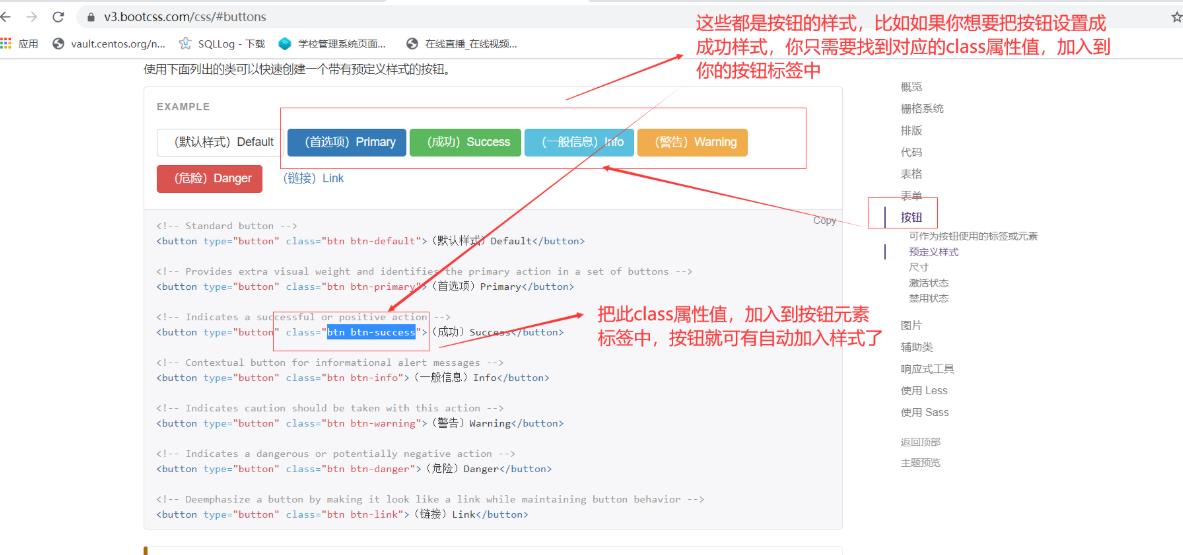
给index.jsp首页的按钮加一个bootstrap的css样式,如下图:
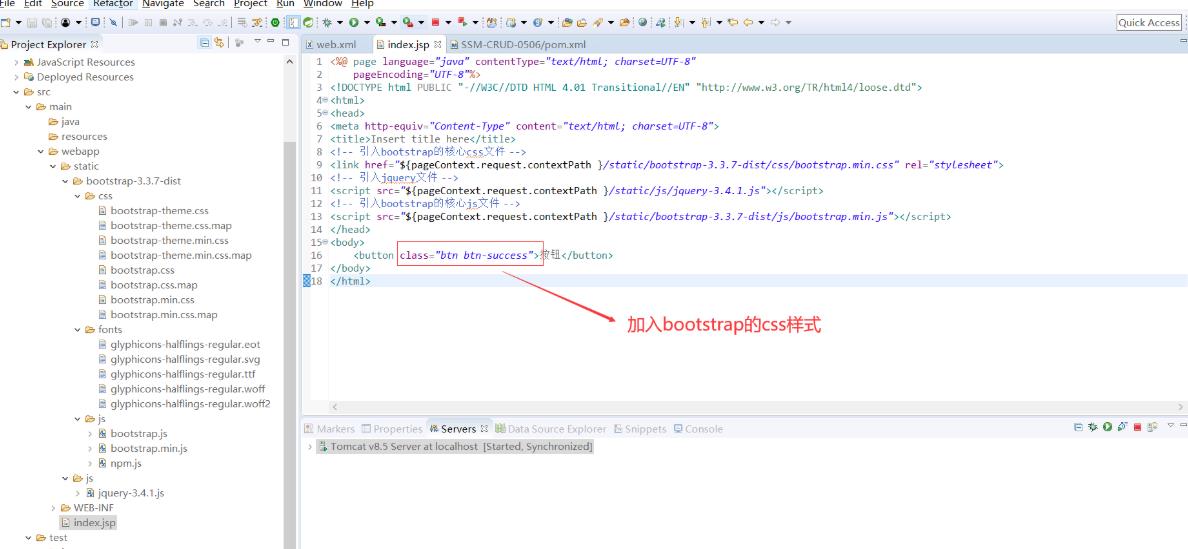
查看效果,如下图:

10.编写ssm整合的关键配置文件
编写springmvc.xml配置文件,applicationContext.xml配置文件,mybatis-config.xml配置文件,web.xml配置文件,顺便再编写一个存储数据源信息的dbconfig.properties属性文件。
springmvc.xml
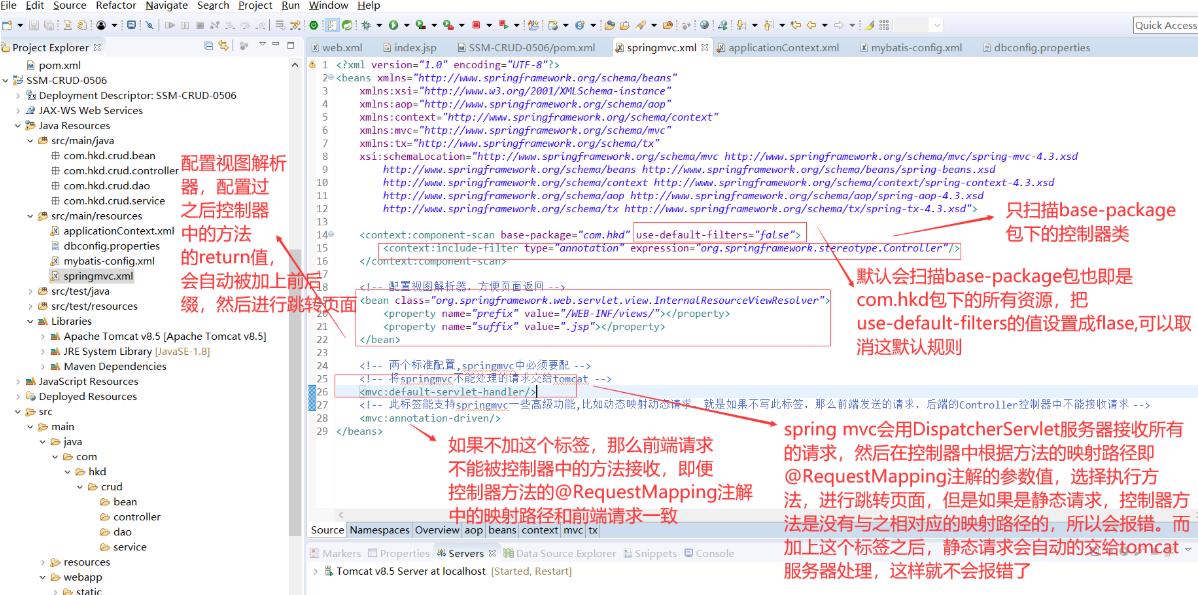
springmvc.xml配置文件的编码,如下图:
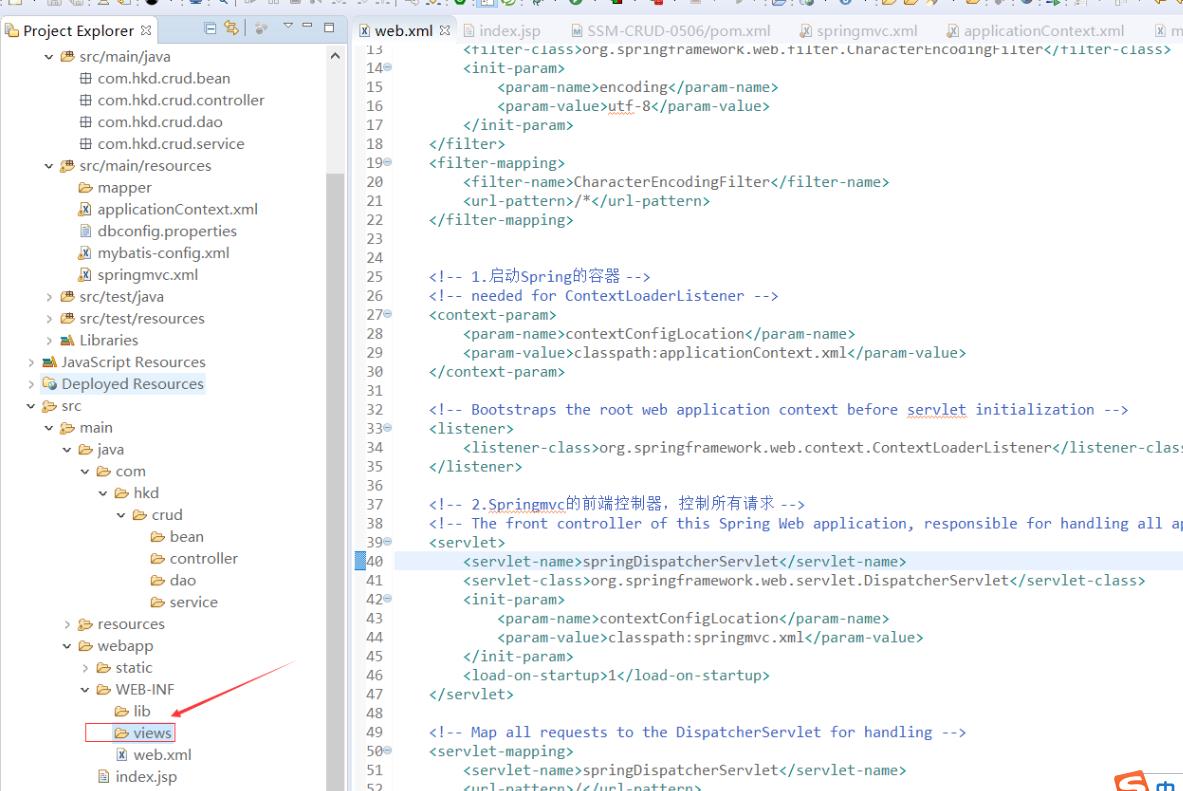
在WEB-INF目录下,创建一个views目录,用于存放所有的视图,如下图:
springmvc.xml的编码文件,如下:
<?xml version="1.0" encoding="UTF-8"?>
<beans xmlns="http://www.springframework.org/schema/beans"
	xmlns:xsi="http://www.w3.org/2001/XMLSchema-instance"
	xmlns:aop="http://www.springframework.org/schema/aop"
	xmlns:context="http://www.springframework.org/schema/context"
	xmlns:mvc="http://www.springframework.org/schema/mvc"
	xmlns:tx="http://www.springframework.org/schema/tx"
	xsi:schemaLocation="http://www.springframework.org/schema/mvc http://www.springframework.org/schema/mvc/spring-mvc-4.3.xsd
		http://www.springframework.org/schema/beans http://www.springframework.org/schema/beans/spring-beans.xsd
		http://www.springframework.org/schema/context http://www.springframework.org/schema/context/spring-context-4.3.xsd
		http://www.springframework.org/schema/aop http://www.springframework.org/schema/aop/spring-aop-4.3.xsd
		http://www.springframework.org/schema/tx http://www.springframework.org/schema/tx/spring-tx-4.3.xsd">

	<context:component-scan base-package="com.hkd" use-default-filters="false">
		<context:include-filter type="annotation" expression="org.springframework.stereotype.Controller"/>
	</context:component-scan>

	<!-- 配置视图解析器,方便页面返回 -->
	<bean class="org.springframework.web.servlet.view.InternalResourceViewResolver">
		<property name="prefix" value="/WEB-INF/views/"></property>
		<property name="suffix" value=".jsp"></property>
	</bean>

	<!-- 两个标准配置,springmvc中必须要配 -->
	<!-- 将springmvc不能处理的请求交给tomcat -->
	<mvc:default-servlet-handler/>
	<!-- 此标签能支持springmvc一些高级功能,比如动态映射动态请求,就是如果不写此标签,那么前端发送的请求,后端的Controller控制器中不能接收请求 -->
	<mvc:annotation-driven/>
</beans>
applicationContext.xml
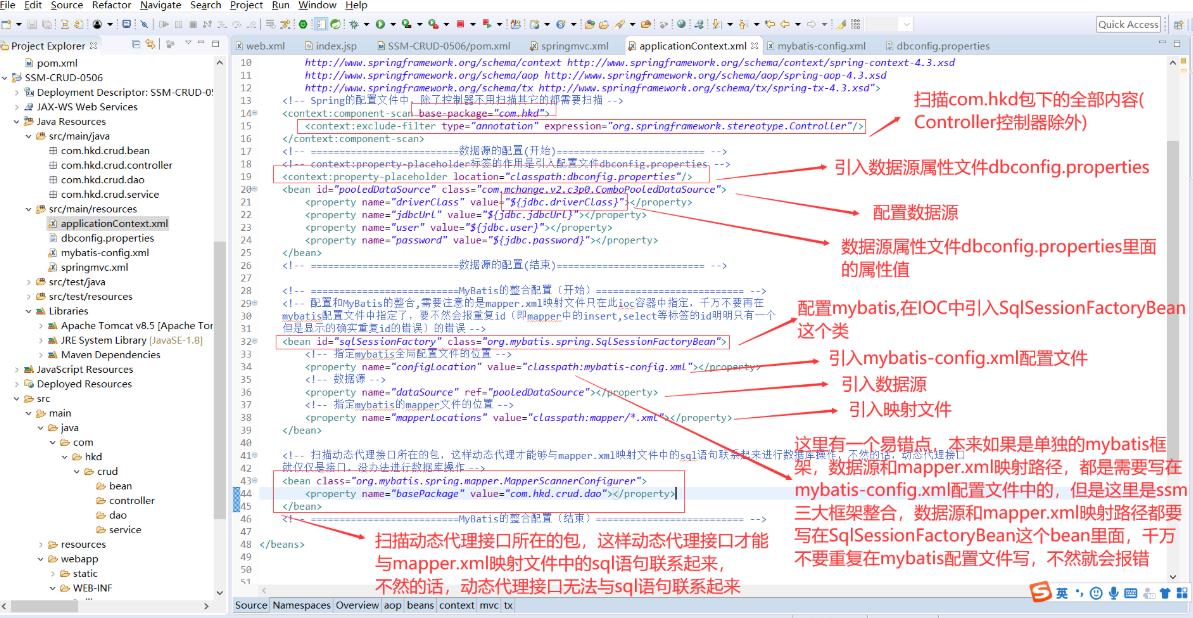
applicationContext.xml文件的编码如下图:
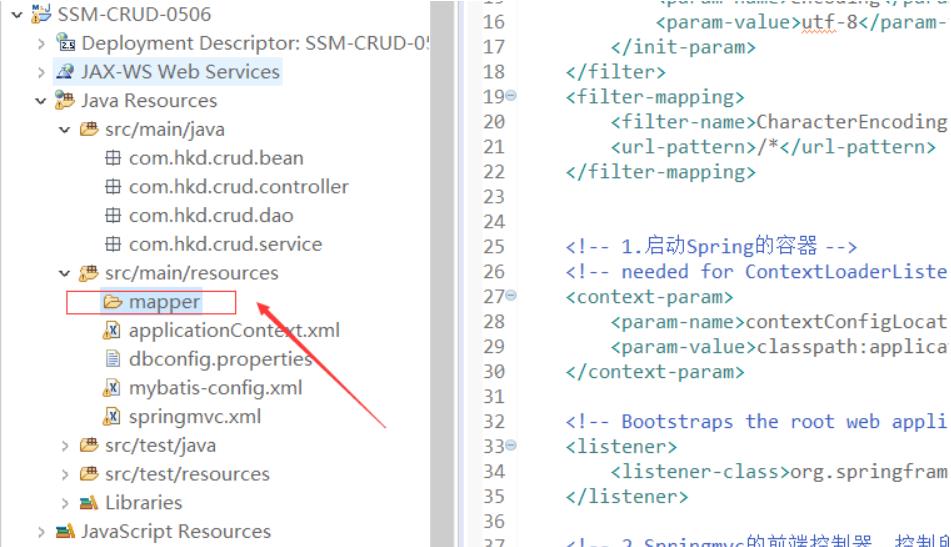
在src/main/resources目录下创建一个mapper目录,用于存放所有的映射文件,如下图:
applicationContext.xml文件的内容如下:
<?xml version="1.0" encoding="UTF-8"?>
<beans xmlns="http://www.springframework.org/schema/beans"
	xmlns:xsi="http://www.w3.org/2001/XMLSchema-instance"
	xmlns:aop="http://www.springframework.org/schema/aop"
	xmlns:context="http://www.springframework.org/schema/context"
	xmlns:mvc="http://www.springframework.org/schema/mvc"
	xmlns:tx="http://www.springframework.org/schema/tx"
	xsi:schemaLocation="http://www.springframework.org/schema/mvc http://www.springframework.org/schema/mvc/spring-mvc-4.3.xsd
		http://www.springframework.org/schema/beans http://www.springframework.org/schema/beans/spring-beans.xsd
		http://www.springframework.org/schema/context http://www.springframework.org/schema/context/spring-context-4.3.xsd
		http://www.springframework.org/schema/aop http://www.springframework.org/schema/aop/spring-aop-4.3.xsd
		http://www.springframework.org/schema/tx http://www.springframework.org/schema/tx/spring-tx-4.3.xsd">
	<!-- Spring的配置文件中,除了控制器不用扫描其它的都需要扫描 -->
	<context:component-scan base-package="com.hkd">
		<context:exclude-filter type="annotation" expression="org.springframework.stereotype.Controller"/>
	</context:component-scan>
	<!-- ==========================数据源的配置(开始)========================== -->
	<!-- context:property-placeholder标签的作用是引入配置文件dbconfig.properties -->
	<context:property-placeholder location="classpath:dbconfig.properties"/>
	<bean id="pooledDataSource" class="com.mchange.v2.c3p0.ComboPooledDataSource">
		<property name="driverClass" value="${jdbc.driverClass}"></property>
		<property name="jdbcUrl" value="${jdbc.jdbcUrl}"></property>
		<property name="user" value="${jdbc.user}"></property>
		<property name="password" value="${jdbc.password}"></property>
	</bean>
	<!-- ==========================数据源的配置(结束)========================== -->

	<!-- ==========================MyBatis的整合配置(开始)========================== -->
	<!-- 配置和MyBatis的整合,需要注意的是mapper.xml映射文件只在此ioc容器中指定,千万不要再在
	mybatis配置文件中指定了,要不然会报重复id(即mapper中的insert,select等标签的id明明只有一个
	但是显示的确实重复id的错误)的错误 -->
	<bean id="sqlSessionFactory" class="org.mybatis.spring.SqlSessionFactoryBean">
		<!-- 指定mybatis全局配置文件的位置 -->
		<property name="configLocation" value="classpath:mybatis-config.xml"></property>
		<!-- 数据源 -->
		<property name="dataSource" ref="pooledDataSource"></property>
		<!-- 指定mybatis的mapper文件的位置 -->
		<property name="mapperLocations" value="classpath:mapper/*.xml"></property>
	</bean>

	<!-- 扫描动态代理接口所在的包,这样动态代理才能够与mapper.xml映射文件中的sql语句联系起来进行数据库操作,不然的话,动态代理接口
	就仅仅是接口,没办法进行数据库操作 -->
	<bean class="org.mybatis.spring.mapper.MapperScannerConfigurer">
		<property name="basePackage" value="com.hkd.crud.dao"></property>
	</bean>
	<!-- ==========================MyBatis的整合配置(结以上是关于SSM项目---员工管理系统的基础环境搭建的主要内容,如果未能解决你的问题,请参考以下文章