2021-05-13
Posted 涂涂努力ing
tags:
篇首语:本文由小常识网(cha138.com)小编为大家整理,主要介绍了2021-05-13相关的知识,希望对你有一定的参考价值。
GO Web 项目初次实战总结
项目参考: https://www.pianshen.com/article/7828308085/
代码原创作者回首笑人间
本章重点
- GO web项目的项目结构
- GO web项目的配置文件和路由
- 定义响应的Handler层
- 自定义错误码
- GO web项目中两个常用包的重点解析
"github.com/spf13/viper"
"github.com/gin-gonic/gin"
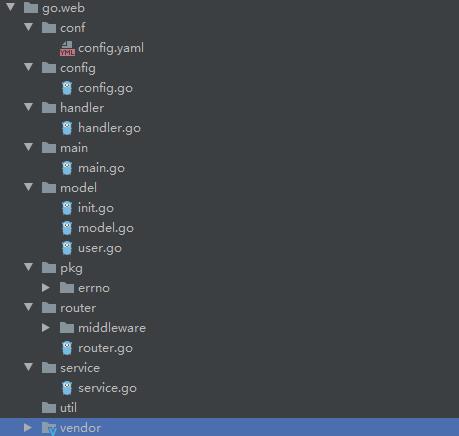
web项目目录结构
配置文件
如上图所示,项目的配置文件分为2部分conf包下的config.yaml和config包下的config.go
config.yaml:
mysql:
  max_idle_conns: 50 #最大空闲连接数
  source_name: root:root@tcp(127.0.0.1:3306)/test?parseTime=true&charset=utf8&loc=Local
addr: 127.0.0.1:9090 #HTTP绑定端口`在这里插入代码片`
config.go
func Init() error{
	if err := Config();err!=nil{
		return err;
	}
	return nil
}
/**
Config viper解析配置文件
*/
func Config()error{
	viper.AddConfigPath("conf")
	viper.SetConfigName("config")
	if err:= viper.ReadInConfig(); err !=nil{
		return  err
	}
	return nil
}
Config方法中调用viper(后面详细解释)来解析配置文件
项目逻辑顺序
main方法如下
func main(){
	//加载配置文件
	if err := config.Init(); err!=nil{
		panic(err)
	}
	//加载数据库等
	if err := model.Init(); err!=nil{
		panic(err)
	}
	gin.SetMode(viper.GetString("runmode"))
	g := gin.New()
	//加载路由
	router.InitRouter(g)
	log.Printf("Start to listening the incoming requests on http address: %s\\n", viper.GetString("addr"))
	if err := g.Run(viper.GetString("addr"));err != nil {log.Fatal("ListenAndServe:", err)}
}
初始化路由之后,访问相应路由位置调用相应service方法
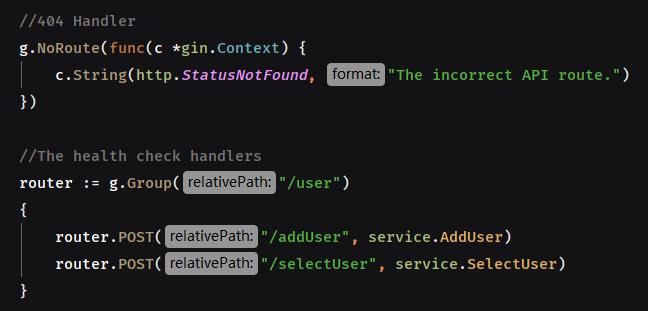
e.g.如上图,访问127.0.0.1:9090/user/addUser则会直接调用service中AddUser方法
注意!此处方式为post,因此在用postman测试的时候一定要记得选方法post
后续service逻辑则和java web逻辑大同小异,要注意的是把从获取的json数据转化为相应的结构体的时候建议用gin.Context包里面的Query("参数名”)方法直接给结构体赋值,直接用gin.Context包里面的Bind方法易得到空值
响应Handler层
type Response struct {
	Code int `json:"code"`
	Message string `json:"message"`
	Data interface{} `json:"data"`
}

func SendResponse(c *gin.Context, err error, data interface{}) {
	code, message := errno.DecodeErr(err)

	// always return http.StatusOK
	c.JSON(http.StatusOK, Response{
		Code:    code,
		Message: message,
		Data:    data,
	})
}
handler响应层其实就是在你发出请求后,得到的response,在postman中的呈现如下图
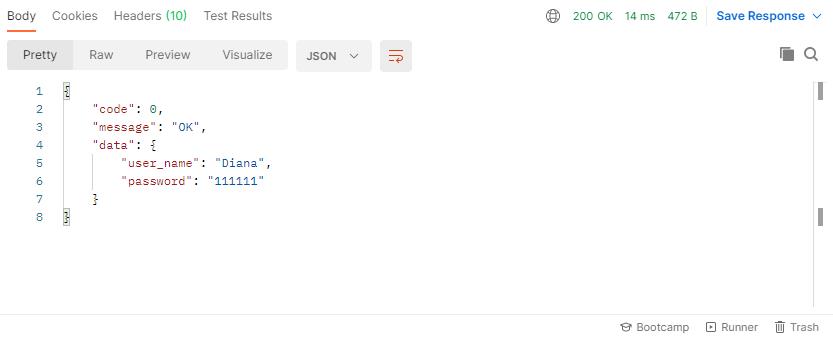
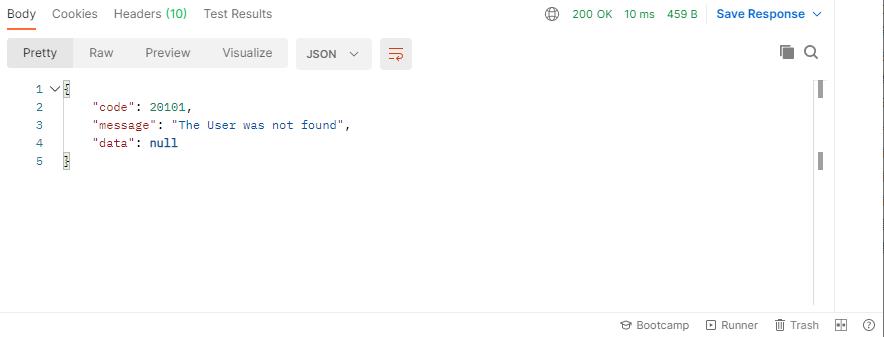
我的理解是为了配合自定义错误码使用,使开发更容易测试,返回结果更透明
此处定义了gin.Context, err,data
自定义错误码
首先建立errno结构体
type Errno struct {
	Code    int
	Message string
}
然后再code.go中自定义错误码以及错误msg
var(
	//Common Errors
	OK = &Errno{Code: 0, Message: "OK"}
	IntegernalServerError = &Errno{Code: 10001, Message: "Internal server errno"}
	ErrBind = &Errno{Code: 10002, Message: "Error occurred while binding the request body to the struct "}

	ErrValidation = &Errno{Code: 20001, Message: "Validation Failed"}
	ErrDatabase = &Errno{Code: 20002, Message: "Database Error"}

	//User Errors
	ErrUserNotFound = &Errno{Code: 20101, Message:"The User was not found"}
	ErrPasswordIncorrect = &Errno{Code: 20102, Message: "The password is incorrect"}
)
写一个decode方法用于被调用返回不同错误code和message
func DeCodeErr(err error)(int, string){
	if err == nil{
		return OK.Code,OK.Message
	}
	switch typed := err.(type) {
	case *Errno:
		return typed.Code, typed.Message
	default:
		return IntegernalServerError.Code, err.Error()
	}
}
然后就可以在别的地方调用了
e.g.
if err := u.Validate(); err!=nil{
	handler.SendResponse(c,errno.ErrValidation,nil)
	return
}
github.com/spf13/viper介绍
在本次项目中,前面提到在解析配置文件的时候我们用到了viper的两个方法。viper是什么,我们为什么用,怎么用呢?
Viper是Go语言中一套很完整的配置解决方案,它在应用程序中工作并可以处理所有类型的配置需求和格式
- 设置默认值
- 从JSON,TOML,YAML,HCL和Java属性配置文件中读取
- 实时观看和重新读取配置文件(可选)
- 从环境变量中读取
- 从远程配置系统(etcd或Consul)读取,并观察变化
- 从命令行标志读取
- 从缓冲区读取
- 设置显式值
##原文链接:https://blog.csdn.net/cs380637384/article/details/81217767
选择Viper的原因是因为它很灵活和方便,开发者在开发项目的时候不必在意配置文件的格式
viper的使用
viper.AddConfigPath(“conf”)//path to look for the config file in
viper.SetConfigName(“config”)// name of config file (without extension)
更多的Viper使用实例可参考https://blog.csdn.net/cs380637384/article/details/81217767
github.com/gin-gonic/gin介绍
github.com/gin-gonic/gin是一个轻量级的 WEB 框架,支持 RestFull 风格 API,支持
GET,POST,PUT,PATCH,DELETE,OPTIONS 等 http
方法,支持文件上传,分组路由,Multipart/Urlencoded FORM,以及支持 JsonP,参数处理等等功能,这些都和 WEB
紧密相关,通过提供这些功能,使开发人员更方便地处理 WEB 业务。
##原文连接:https://blog.csdn.net/ayqy42602/article/details/108669292
本文中我们用gin来构造不同的路由
g.SetMode()//gin有不同模式 DebugMode/ReleaseMode/TestMode。在我们开发调试过程中,使用debug模式就可以了。在上线的时候,一定要选择release模式。而test可以用在测试场景中。
g := gin.New() //新建一个中间件*Engine
gin.Context //Context是Gin最重要的部分。它允许我们在中间件之间 传递变量,管理流程,验证请求的JSON 并 呈现JSON响应。
func InitRouter(g *gin.Engine) {
	//404 Handler
	g.NoRoute(func(c *gin.Context) {
		c.String(http.StatusNotFound, "The incorrect API route.")
	})
	//The health check handlers
	router := g.Group("/user")
	{
		router.POST("/addUser", service.AddUser)
		router.POST("/selectUser", service.SelectUser)
	}
}
我就程序中遇到的gin方法给予以上解析
更多关于gin包可参考:https://blog.csdn.net/luo1324574369/article/details/108310032
今天就暂时分享这么多,其实关于后面两个包还有很多有用的方法没有细讲,鼓励大家踊跃讨论!
继续愉快学习
涂涂努力ing
以上是关于2021-05-13的主要内容,如果未能解决你的问题,请参考以下文章