vue.js项目实战运用篇之抖音视频APP-第四节:顶部导航栏组件功能
Posted enjsky.G
tags:
篇首语:本文由小常识网(cha138.com)小编为大家整理,主要介绍了vue.js项目实战运用篇之抖音视频APP-第四节:顶部导航栏组件功能相关的知识,希望对你有一定的参考价值。
【温馨提示】:若想了解更多关于本次项目实战内容,可转至vue.js项目实战运用篇之抖音视频APP-项目规划中进一步了解项目规划。
【项目地址】
项目采用Git进行管理,最终项目将会发布到GitHub中,感兴趣的小伙伴们可以一起学习,共同完善本项目。
项目地址:GitHub
第四节:顶部导航栏组件
开发思路
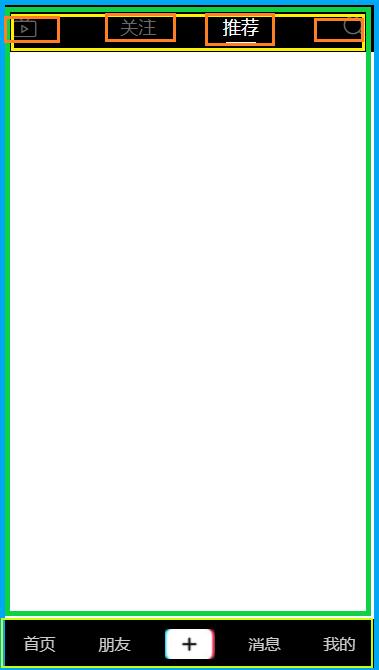
【项目思路】在上一节中我们实现了底部导航栏的实现,接下来我们来完成顶部导航栏的实现。顶部导航栏存在于首页中,分为四个部分,分别是左侧直播图标、中间部分(关注、推荐)、右侧搜索图标。
布局分析

基础架构实现
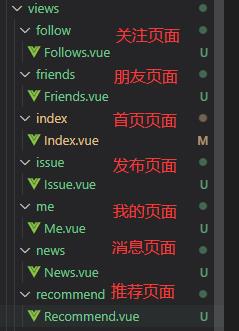
1.功能页面的实现
根据项目需求我们可以知道,本次项目 顶部只存在于首页中包含(关注、推荐)两个页面 。

2.路由配置
由于顶部导航只存在于首页中,所以我们应该在首页中增加子路由的配置参数加载页面。
路由配置代码:
import Vue from 'vue';
import VueRouter from 'vue-router';
import Home from '../views/Home.vue';

Vue.use(VueRouter);

const routes = [
  {
    path: '/',
    redirect: '/index/recommend/', // app打开之后 默认跳转到首页的推荐标签栏
  },
  {
    path: '/index',
    redirect: '/index/recommend/', // app打开之后 默认跳转到首页的推荐标签栏
  },
  {
    path: '/',
    name: 'Home',
    component: Home,
    children: [
      {
        path: '/index', // 首页页面路由
        name: 'index',
        component: () => import(/* webpackChunkName: "Index" */ '../views/index/Index.vue'),
        children: [
          {
            path: 'follows', // 关注页面路由
            name: 'follows',
            component: () => import(/* webpackChunkName: "Follows" */ '../views/follow/Follows.vue'),
            children: [
              {
                path: 'reVidelList', // 视频页面路由
                name: 'reVidelList',
                component: () => import(/* webpackChunkName: "reVidelList" */ '../common/components/index/VideoList.vue'),
              },
            ],
          },
          {
            path: 'recommend', // 推荐页面路由
            name: 'recommend',
            component: () => import(/* webpackChunkName: "Recommend" */ '../views/recommend/Recommend.vue'),
            children: [
              {
                path: 'reVidelList', // 视频页面路由
                name: 'reVidelList',
                component: () => import(/* webpackChunkName: "reVidelList" */ '../common/components/index/VideoList.vue'),
              },
            ],
          },
        ],
      },
      {
        path: '/friends', // 朋友页面路由
        name: 'friends',
        component: () => import(/* webpackChunkName: "fllow" */ '../views/friends/Friends.vue'),
      },
      {
        path: '/news', // 消息页面路由
        name: 'news',
        component: () => import(/* webpackChunkName: "news" */ '../views/news/News.vue'),
      },
      {
        path: '/me', // 我的信息页面路由
        name: 'me',
        component: () => import(/* webpackChunkName: "me" */ '../views/me/Me.vue'),
      },
    ],
  },
  {
    path: '/issue', // 发布页面路由
    name: 'issue',
    component: () => import(/* webpackChunkName: "issue" */ '../views/issue/Issue.vue'),
  },
];

const router = new VueRouter({
  mode: 'history',
  base: process.env.BASE_URL,
  routes,
});

export default router;
【温馨提示】
以上路由配置为完整代码,在原有的基础之上增加如下路由配置:children: [
{
path: ‘follows’, // 关注页面路由
name: ‘follows’,
component: () => import(/* webpackChunkName: “Follows” / ‘…/views/follow/Follows.vue’),
children: [
{
path: ‘reVidelList’, // 视频页面路由
name: ‘reVidelList’,
component: () => import(/ webpackChunkName: “reVidelList” / ‘…/common/components/index/VideoList.vue’),
},
],
},
{
path: ‘recommend’, // 推荐页面路由
name: ‘recommend’,
component: () => import(/ webpackChunkName: “Recommend” / ‘…/views/recommend/Recommend.vue’),
children: [
{
path: ‘reVidelList’, // 视频页面路由
name: ‘reVidelList’,
component: () => import(/ webpackChunkName: “reVidelList” */ ‘…/common/components/index/VideoList.vue’),
},
],
},
],
3.顶部导航栏组件
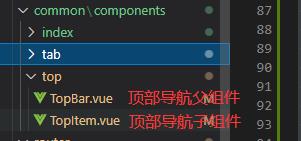
1)组件结构

2)实现代码
- TopBar
- 顶部导航父组件
/*
顶部导航组件
author:enjsky.g
time:2021-05-07
*/
<template>
    <div class="top-bar">
      <div class="left" @click="toLive">
        <span class="iconfont icon-zhibo"></span>
      </div>
      <div class="center">
        <TopItem title="关注" nav-path="/index/follows/reVidelList"></TopItem>
        <TopItem title="推荐" nav-path="/index/recommend/reVidelList"></TopItem>
      </div>
      <div class="right" @click="toSearch">
        <span class="iconfont icon-icon_search"></span>
      </div>
    </div>
</template>

<script>
import TopItem from './TopItem.vue';

export default {
  name: 'Topbar',
  components: {
    TopItem,
  },
  data() {
    return {
      topIndex: 1,
    };
  },
  methods: {
    toLive() {
      console.log('toLive');
    },
    toSearch() {
      console.log('toSearch');
    },
  },
};
</script>

<style lang="less" scoped>
  .top-bar {
    background: #000000;
    z-index: 999;
    width: 100%;
    height: 50px;
    line-height: 50px;
    font-size: 18px;
    color: #686868;
    display: flex;
    box-sizing: border-box;
    position: fixed;
    .left {
      width: 20%;
      padding-left: 10px;
      .icon-zhibo {
        font-size: 25px;
      }
    }
    .center {
      flex: 1;
      display: flex;
      justify-content: center;
      .item {
        flex: 1;
        text-align: center;
        span {
          padding: 2px 0px;
          text-align: center;
          position: relative;
        }
        .active {
          color: #ffffff;
          &:after {
            content: "";
            height: 1px;
            width: 30px;
            left: 3px;
            bottom: -2px;
            position: absolute;
            background: #ffffff;
          }
        }
      }
    }
    .right {
      width: 20%;
      padding-right: 10px;
      text-align: right;
      .icon-icon_search {
        font-size: 25px;
      }
    }
  }
</style>
- TopItem
- 顶部导航子组件,在父组件中使用。
/*
顶部导航单组件
author:enjsky.g
time:2021-05-07
router-link:默认会渲染成 a 标签所以我们需要将router-link 渲染成div标签
*/
<template>
    <router-link :to="navPath" tag='div' class="item" @click="itemClick">
        <span  :class="{active :isActive}">{{title}}</span>
    </router-link>
</template>
<script>
export default {
  name: 'TopItem',
  props: {
    title: {
      type: String,
      default: '',
    },
    navPath: {
      type: String,
      require: true,
    },
  },

  computed: {
    isActive() {
      return this.$route.path === this.navPath;
    },
  },
  methods: {
    itemClick() {
    },
  },
};
</script>
<style lang="less" scoped>
      .item {
        flex: 1;
        text-align: center;
        span {
          padding: 2px 0px;
          text-align: center;
          position: relative;
        }
        .active {
          color: #ffffff;
          &:after {
            content: "";
            height: 1px;
            width: 30px;
            left: 3px;
            bottom: -2px;
            position: absolute;
            background: #ffffff;
          }
        }
      }
</style>
结束语
本章主要讲述了顶部导航组件的实现相关内容,若有不足或不全面之处,欢迎留言讨论,本人将持续改进更新。
项目仓库
项目采用Git进行管理,最终项目将会发布到GitHub中,感兴趣的小伙伴们可以一起学习讨论,共同完善本项目。
项目地址:GitHub
上一篇:底部导航栏组件功能
下一篇: 视频播放列表组件功能
以上是关于vue.js项目实战运用篇之抖音视频APP-第四节:顶部导航栏组件功能的主要内容,如果未能解决你的问题,请参考以下文章