运维实战 Zabbix监控入门
Posted 洛冰音
tags:
篇首语:本文由小常识网(cha138.com)小编为大家整理,主要介绍了运维实战 Zabbix监控入门相关的知识,希望对你有一定的参考价值。
运维实战 Zabbix监控入门
Zabbix的安装
稳定起见使用LTS长期支持版本.
Server端的安装
##安装Zabbix后端
rpm -Uvh https://repo.zabbix.com/zabbix/5.0/rhel/7/x86_64/zabbix-release-5.0-1.el7.noarch.rpm
yum clean all
yum install zabbix-server-mysql zabbix-agent

##编辑添加依赖所需的scl源
cd /etc/yum.repos.d/
vim Cache.repo
##内容
[CentScl]
name=CentOS Release Scl
baseurl=https://mirrors.tuna.tsinghua.edu.cn/centos/7/sclo/x86_64/rh/
gpgcheck=0
enabled=1

##安装Zabbix前端
yum clean all
vim zabbix.repo
##开启软件源
[zabbix-frontend]
...
enabled=1
...

yum install zabbix-web-mysql-scl zabbix-apache-conf-scl

##安装mariadb充当数据库
yum install mariadb-server
systemctl enable --now mariadb.service

##创建初始数据库
mysql
mysql> create database zabbix character set utf8 collate utf8_bin;
mysql> create user zabbix@localhost identified by 'password';
mysql> grant all privileges on zabbix.* to zabbix@localhost;
mysql> quit;
##倒入初始架构和数据
zcat /usr/share/doc/zabbix-server-mysql*/create.sql.gz | mysql -uzabbix -p zabbix

##修改配置文件
vim /etc/zabbix/zabbix_server.conf
##修改其中的
DBPassword=password

##修改配置文件
vim /etc/opt/rh/rh-php72/php-fpm.d/zabbix.conf
##修改其中的
php_value[date.timezone] = Asia/Shanghai

##设置开机自启并启用
systemctl enable --now zabbix-server zabbix-agent httpd rh-php72-php-fpm
systemctl restart zabbix-server zabbix-agent httpd rh-php72-php-fpm
浏览器打开172.25.5.1/zabbix,出现初始化界面
依次进行操作输入后端相关信息后可以进入登陆界面.
默认登陆账户Admin,密码zabbix.
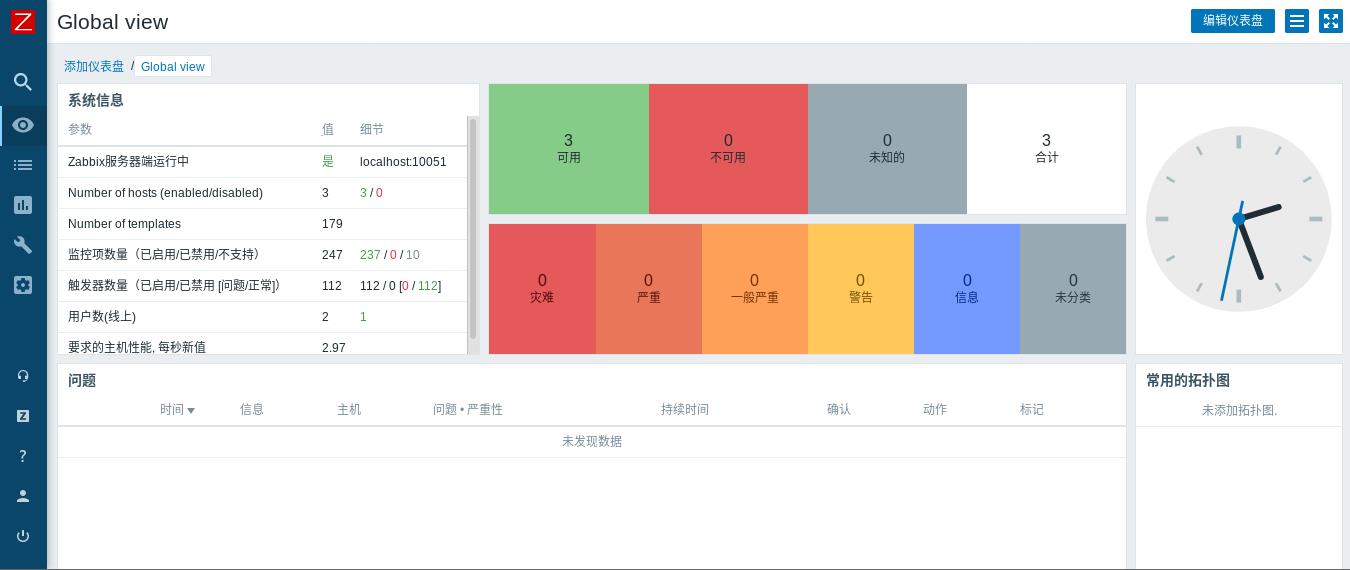
若操作无误,登陆后可以看到监控页面的主页.
Client端的配置
与Server端相比,Client端的配置就简单很多了,只需要安装zabbix-agent即可.
安装后编辑其配置文件
vim /etc/zabbix/zabbix_agentd.conf

##文件中的有效内容
PidFile=/var/run/zabbix/zabbix_agentd.pid
LogFile=/var/log/zabbix/zabbix_agentd.log
LogFileSize=0
Server=172.25.5.1
ServerActive=172.25.5.1
Hostname=Server2
Include=/etc/zabbix/zabbix_agentd.d/*.conf

##启用Client端
systemctl enable --now zabbix-agent.service
监控主机的添加
监控主机的添加可以分为手动添加和自动发现.
手动添加的操作方式:
配置 > 主机 > 创建主机
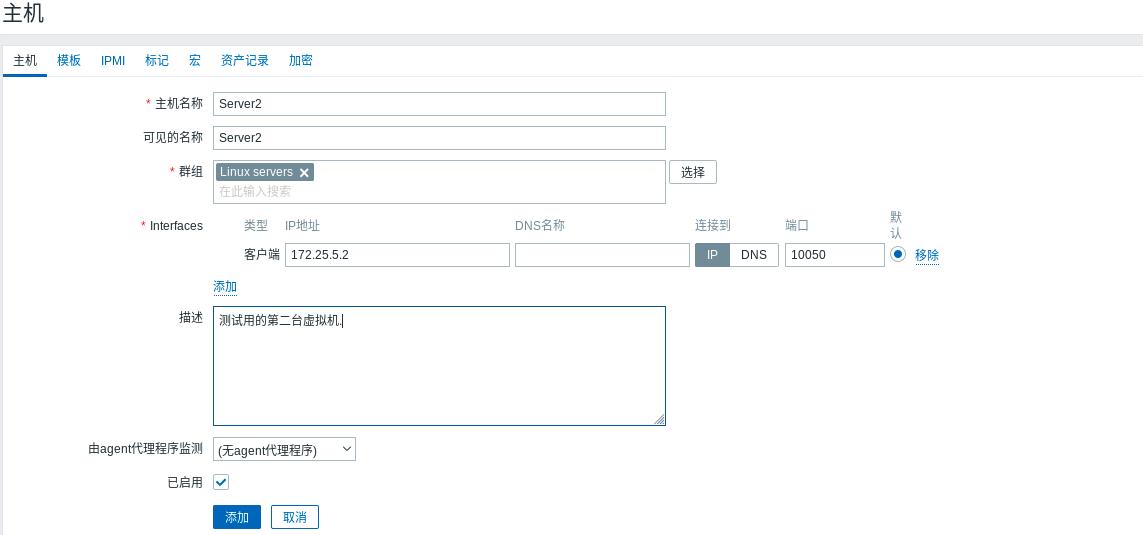
模板中可以选择预设的监控项:如监控硬盘/CPU的选项等等.
如果选择了模板,在主机页面选择监控项可以看到监控项的列表.

自动发现的添加方式
- 保证
Client端按照上面的配置进行了设置 配置>自动发现>创建自动发现规则
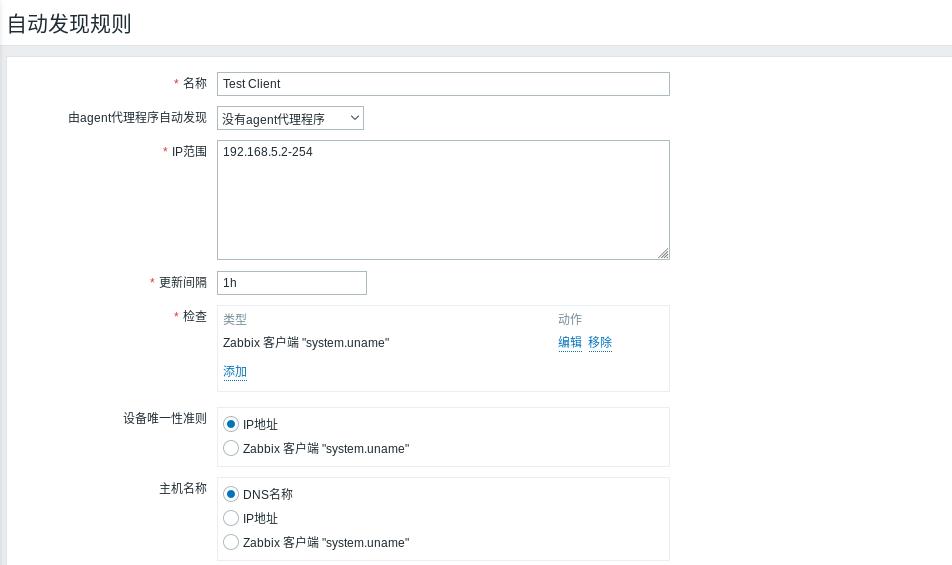
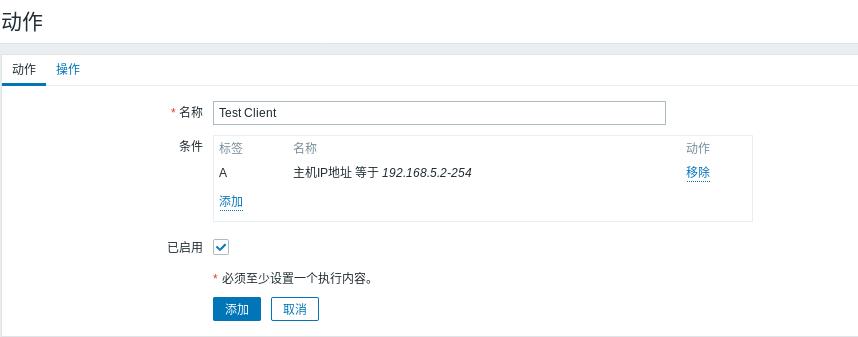
为了保证能够在发现主机时自动添加模板和分组,还需要创建相对应的动作.
配置>动作>创建动作

Zabbix API方式操作配置
Zabbix允许以编程方式检索和修改Zabbix的配置,并提供对历史数据的访问.它广泛用于:
- 创建新的应用程序以使用Zabbix;
- 将Zabbix与第三方软件集成;
- 自动执行常规任务.
以下为部分Zabbix API的简单尝试
登陆并获取身份验证令牌
由于后续的API操作都需要身分验证令牌(Token),因此我们需要通过登陆验证获取一个.
curl -XPOST http://172.25.5.1/zabbix/api_jsonrpc.php -H 'Content-Type: application/json-rpc' -d '
{
    "jsonrpc": "2.0",
    "method": "user.login",
    "params": {
        "user": "Admin",
        "password": "zabbix"
    },
    "id": 1,
    "auth": null
}' | python2 -m json.tool

##运行结果返回值
  % Total    % Received % Xferd  Average Speed   Time    Time     Time  Current
                                 Dload  Upload   Total   Spent    Left  Speed
100   229    0    68  100   161    511   1210 --:--:-- --:--:-- --:--:--  1721
{
    "id": 1,
    "jsonrpc": "2.0",
    "result": "5c99c26c07d2ebc2500e2875df456df5"
}
可以看到请求的返回值包含一个token:5c99c26c07d2ebc2500e2875df456df5.
之后的请求都需要用到它.
请求中包含了很多对象
jsonrpc			API使用的JSON-RPC协议的版本; Zabbix API实现的JSON-RPC版本是2.0;
method			被调用的API方法名;
params			将被传递给API方法的参数;
id				请求的任意标识符;
auth			用户认证令牌; 如果没有的话可以设置为null。
获取主机列表
curl -s -XPOST http://172.25.5.1/zabbix/api_jsonrpc.php -H 'Content-Type: application/json-rpc' -d '
> {
>     "jsonrpc": "2.0",
>     "method": "host.get",
>     "params": {
>         "output": [
>             "hostid",
>             "host"
>         ],
>         "selectInterfaces": [
>             "interfaceid",
>             "ip"
>         ]
>     },
>     "id": 2,
>     "auth": "5c99c26c07d2ebc2500e2875df456df5"
> }' | python2 -m json.tool

##运行结果返回值
{
    "id": 2,
    "jsonrpc": "2.0",
    "result": [
        {
            "host": "Zabbix server",
            "hostid": "10084",
            "interfaces": [
                {
                    "interfaceid": "1",
                    "ip": "127.0.0.1"
                }
            ]
        },
        {
            "host": "Server2",
            "hostid": "10373",
            "interfaces": [
                {
                    "interfaceid": "2",
                    "ip": "172.25.5.2"
                }
            ]
        }
    ]
}
不难发现返回值包含两台主机,符合之前添加的情况:监控端本身与额外添加的Server2.
删除现存主机
curl -s -XPOST http://172.25.5.1/zabbix/api_jsonrpc.php -H 'Content-Type: application/json-rpc' -d '
{
    "jsonrpc": "2.0",
    "method": "host.delete",
    "params": [
        "10373"
    ],
    "id": 1,
    "auth": "5c99c26c07d2ebc2500e2875df456df5"
}' | python2 -m json.tool

##运行结果返回值
{
    "id": 1,
    "jsonrpc": "2.0",
    "result": {
        "hostids": [
            "10373"
        ]
    }
}
删除前的监控界面情况

运行后的监控界面情况
可以看到只剩下了Server端本身.

增加一台主机
curl -s -XPOST http://172.25.5.1/zabbix/api_jsonrpc.php -H 'Content-Type: application/json-rpc' -d '
{
    "jsonrpc": "2.0",
    "method": "host.create",
    "params": {
        "host": "Server2",
        "interfaces": [
            {
                "type": 1,
                "main": 1,
                "useip": 1,
                "ip": "172.25.0.2",
                "dns": "",
                "port": "10050"
            }
        ],
        "groups": [
            {
                "groupid": "50"
            }
        ],
        "tags": [
            {
                "tag": "Host name",
                "value": "Server2"
            }
        ],
        "templates": [
            {
                "templateid": "10001"
            }
        ]
    },
    "id": 1,
    "auth": "5c99c26c07d2ebc2500e2875df456df5"
}' | python2 -m json.tool

##GID为50的组并不存在,因此运行的返回值报错
{
    "error": {
        "code": -32500,
        "data": "No permissions to referred object or it does not exist!",
        "message": "Application error."
    },
    "id": 1,
    "jsonrpc": "2.0"
}

##更改为存在的GID=2后,返回值正确,新主机添加成功
{
    "id": 1,
    "jsonrpc": "2.0",
    "result": {
        "hostids": [
            "10374"
        ]
    }
}

##如法炮制,将未安装Agant的Server3添加进监控列表

{
    "id": 1,
    "jsonrpc": "2.0",
    "result": {
        "hostids": [
            "10375"
        ]
    }
}
重新添加Server2

可以看到添加的被监控机器如果安装了Agant则可用性中ZBX显示为绿色.
添加Server3的情况
由于Server3一开始并没有安装Agant,因此可用性为红色,表示不可用.

正确安装后经过Server端主动刷新变为绿色.

手动增加监控规则
监控Apache服务
- 在
Server2安装Apache并编写简单的测试页面 - 启动
httpd服务后测试发布页

由于Zabbix有预设的对于HTTP的检查模板,因此我们可以直接添加.
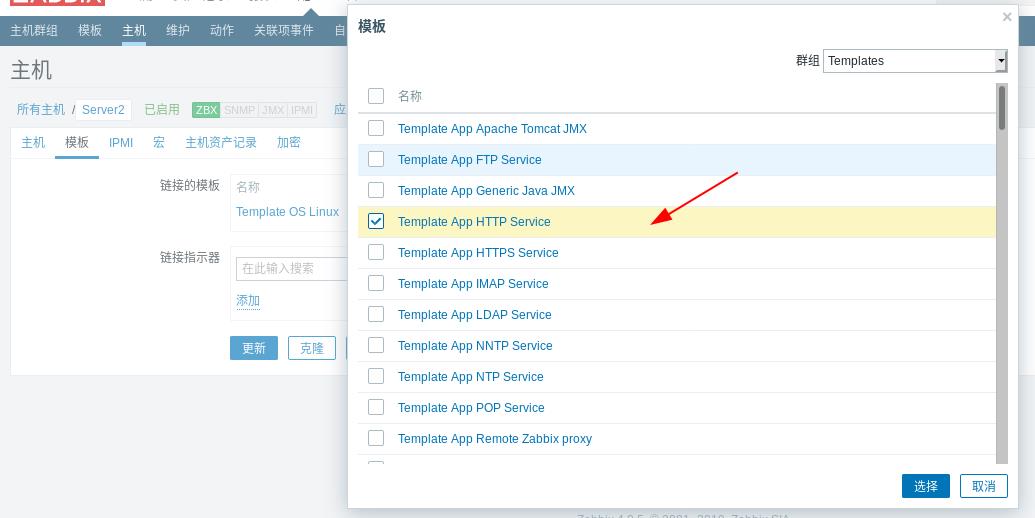
添加后可以在监控项中看到相关信息,只有一条监控项, 是关于HTTP运行情况的.
从截图可以看出, 很显然当前HTTP服务正常运行.

但是同样可以看出,这样的监控过于简单了.
而且在实际业务中使用的监控并不一定有现成模板,很大概率需要自行编写监控规则,下面用nginx来进行举例.
监控Nginx服务
- 在
Server3中安装Nginx - 检测发布页面
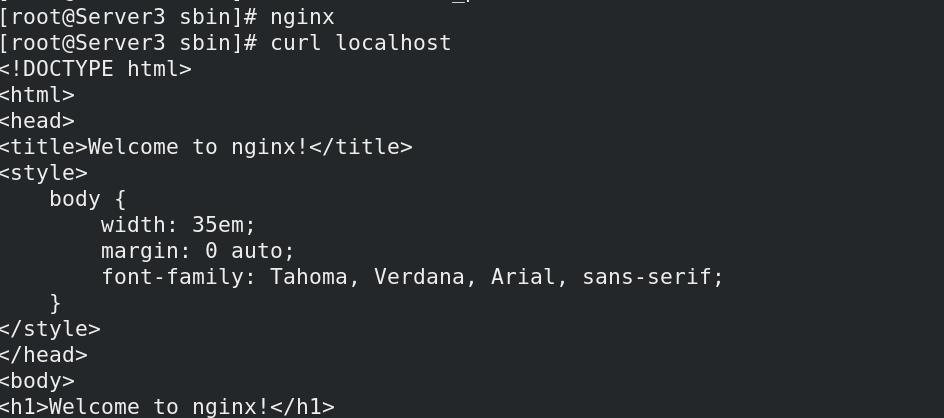
- 在配置文件中添加监控页的设置
location /status {
	stub_status on;
	access_log off;
	allow 127.0.0.1;
	deny all;
}
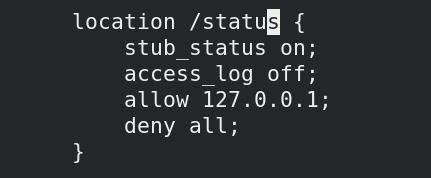
- 重启
Nginx服务,通过curl访问本机测试页面可以看到
curl localhost/status

Active connections: 1
server accepts handled requests
 3 3 3
Reading: 0 Writing: 1 Waiting: 0
那么主要问题就是Server端如何拿到这串信息中有用的部分了.
操作流程
- 在
Server1上安装zabbix-get
yum install zabbix-get.x86_64 -y
- 在
Server3上尝试截取出有用的监控信息
##尝试从输出内容中截取有用的部分
curl -s http://127.0.0.1/status | grep Active | awk '{print $3}'
1

##将这一操作编写为规则
cd /etc/zabbix/zabbix_agentd.d/
vim userparameter_nginx.conf

UserParameter=nginx_active,curl -s http://127.0.0.1/status | grep Active | awk '{print $3}'
不难看出,这条规则由两个不分组v哼,前半部分为规则的命名,后半部分其实就是脚本本身.
- 尝试在
Server1上通过刚刚安装的zebbix-get命令调用规则
zabbix_get -s 172.25.5.3 -p 10050 -k 'nginx_active'
1
可以看到调用成功,返回了我们想要的数值1.
- 返回前端监控页面完成规则的添加
新增监控项,注意键值与之前所写的一定要相同, 名称则没有要求.
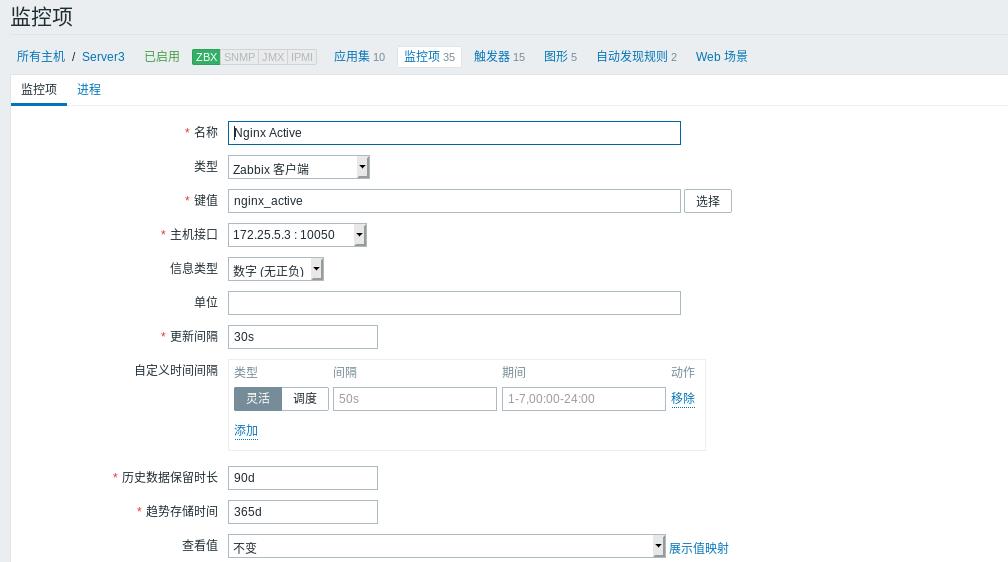
增加图形支持
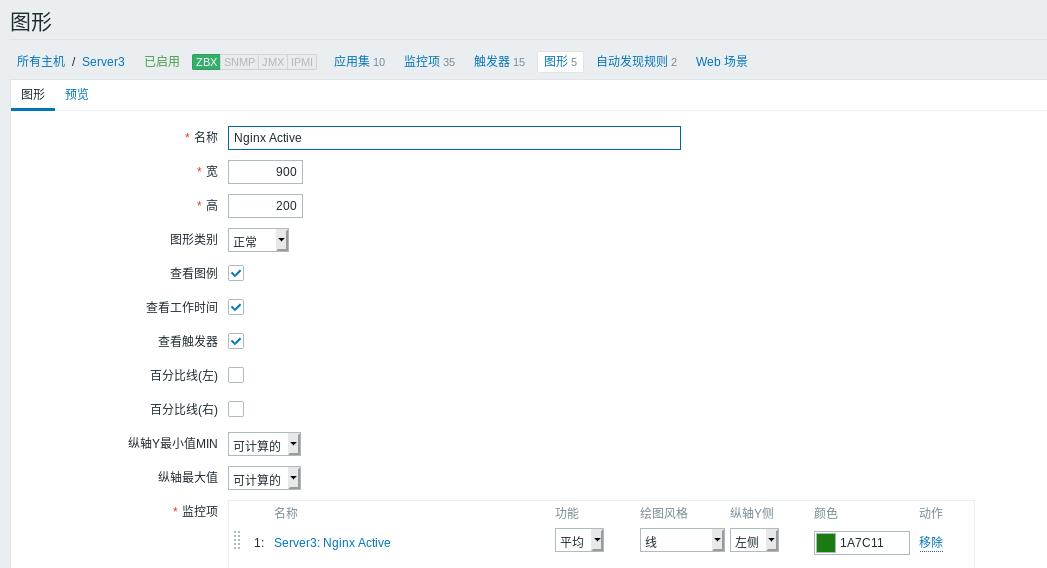

同理可以监控其他信息
curl -s http://127.0.0.1/status | awk 'NR==3 {print $1}'
49
curl -s http://127.0.0.1/status | awk 'NR==3 {print $2}'
50
curl -s http://127.0.0.1/status | awk 'NR==3 {print $3}'
51

vim userparameter_nginx.conf

UserParameter=nginx_active,curl -s http://127.0.0.1/status | grep Active | awk '{printf $3}'
UserParameter=nginx_accept,curl -s curl -s http://127.0.0.1/status | awk 'NR==3 {print $1}'
UserParameter=nginx_handle,curl -s curl -s http://127.0.0.1/status | awk 'NR==3 {print $2}'
UserParameter=nginx_request,curl -s curl -s http://127.0.0.1/status | awk 'NR==3 {print $3}'

##进行验证
zabbix_get -s 172.25.5.3 -p 10050 -k 'nginx_accept'
56
zabbix_get -s 172.25.5.3 -p 10050 -k 'nginx_handle'
58
zabbix_get -s 172.25.5.3 -p 10050 -k 'nginx_request'
59
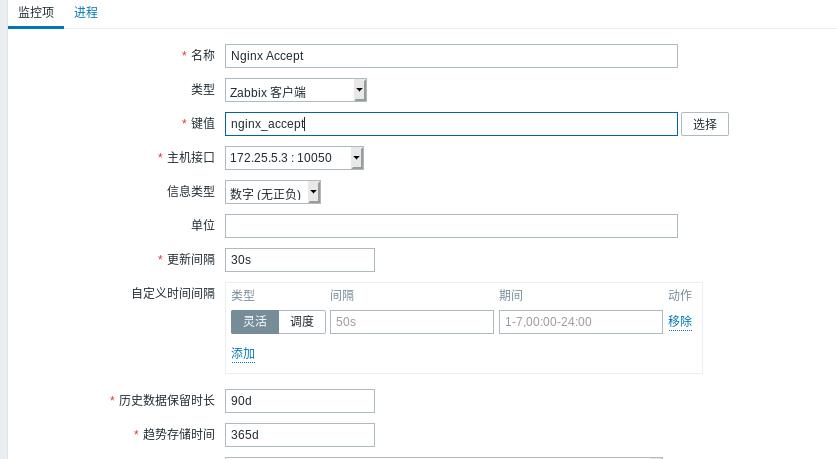
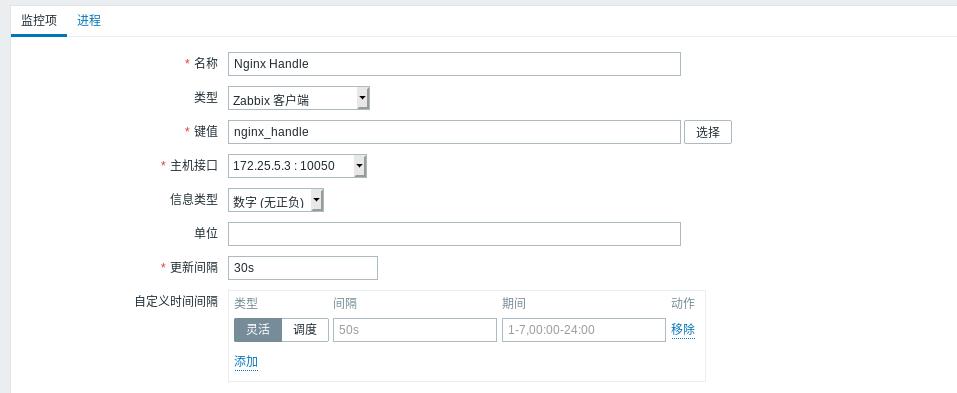
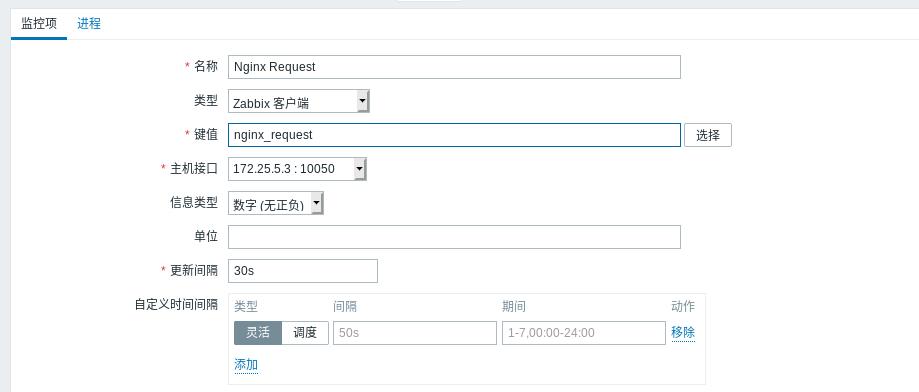
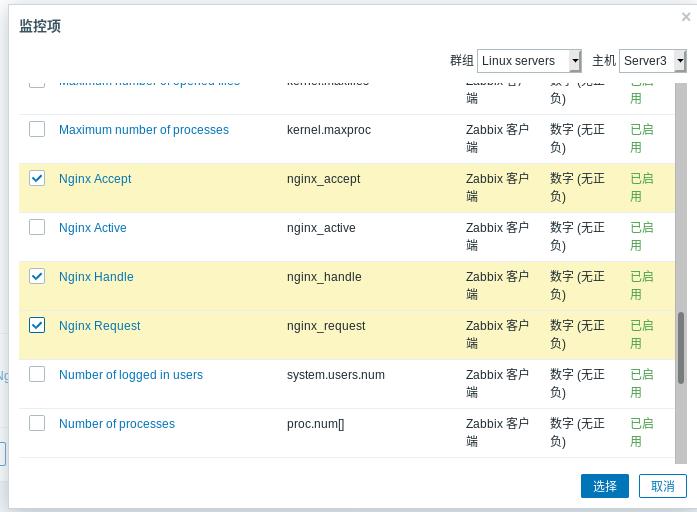
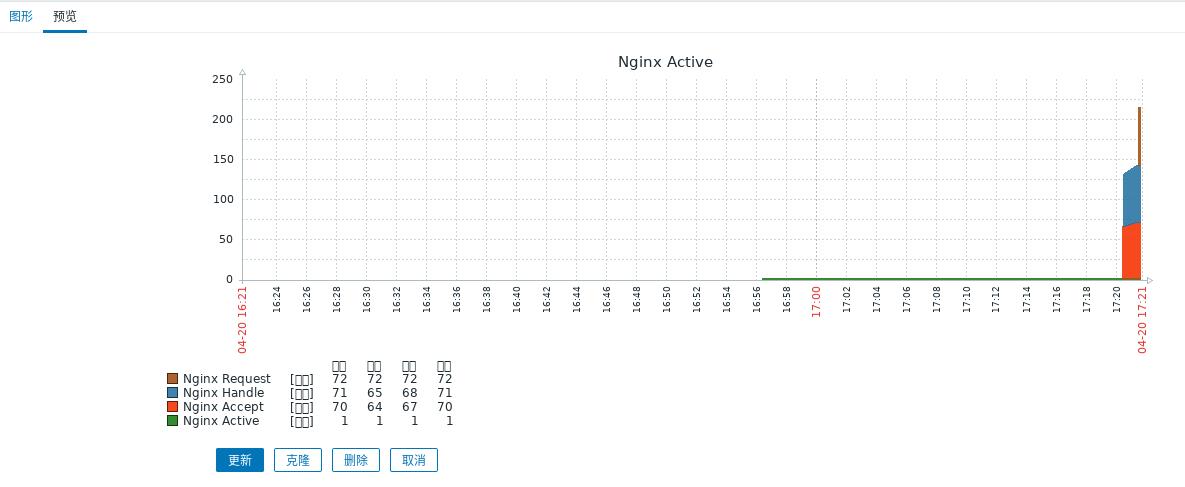
在刚才的图表里增加新的监控项
可以看到数据在图中出现
监控MariaDB服务
趁热打铁,再对这一逻辑进行一些练习.
由于Server1上本身就安装了MariaDB,我们对MariaDB进行监控.
cd /etc/zabbix/zabbix_agentd.d/
ls
userparameter_mysql.conf
可以看到Server1上本身就已经存在了一个配置文件.
而其内容是这样的.
[root@Server4 zabbix_agentd.d]# cat userparameter_mysql.conf
# For all the following commands HOME should be set to the directory that has .my.cnf file with password information.

# Flexible parameter to grab global variables. On the frontend side, use keys like mysql.status[Com_insert].
# Key syntax is mysql.status[variable].
UserParameter=mysql.status[*],echo "show global status where Variable_name='$1';" | HOME=/var/lib/zabbix mysql -N | awk '{print $$2}'

# Flexible parameter to determine database or table size. On the frontend side, use keys like mysql.size[zabbix,history,data].
# Key syntax is mysql.size[<database>,<table>,<type>].
# Database may be a database name or "all". Default is "all".
# Table may be a table name or "all". Default is "all".
# Type may be "data", "index", "free" or "both". Both is a sum of data and index. Default is "both".
# Database is mandatory if a table is specified. Type may be specified always.
# Returns value in bytes.
# 'sum' on data_length or index_length alone needed when we are getting this information for whole database instead of a single table
UserParameter=mysql.size[*],bash -c 'echo "select sum($(case "$3" in both|"") echo "data_length+index_length";; data|index) echo "$3_length";; free) echo "data_free";; esac)) from information_schema.tables$([[ "$1" = "all" || ! "$1" ]] || echo " where table_schema=\\"$1\\"")$([[ "$2" = "all" || ! "$2" ]] || echo "and table_name=\\"$2\\"");" | HOME=/var/lib/zabbix mysql -N'

UserParameter=mysql.ping,HOME=/var/lib/zabbix mysqladmin ping | grep -c alive
UserParameter=mysql.version,mysql -V
我们需要关注的点都集中在后两行.
##首先为数据库的root用户添加密码
mysqladmin password westos

##查看/var/lib/zabbix是否存在
cd /var/lib/zabbix
-bash: cd: /var/lib/zabbix: No such file or directory
##由于不存在,建立目录
mkdir /var/lib/zabbix
##发现仍然无法正常运行
zabbix_get -s 172.25.5.1 -p 10050 -k 'mysql.ping'
zabbix_get [16946]: Check access restrictions in Zabbix agent configuration
因此需要在目录中创建文件.my.cnf并写入相关的数据库需求信息.
vim .my.cnf

[mysql]
host     = localhost
user     = root
password = westos
socket   = /var/lib/mysql/mysql.sock
[mysqladmin]
host     = localhost
user     = root
password = westos
socket   = /var/lib/mysql/mysql.sock

##重启服务并进行测试
systemctl restart zabbix-agent.service

zabbix_get -s 127.0.0.1 -p 10050 -k 'mysql.ping'
1

zabbix_get -s 127.0.0.1 -p 10050 -k 'mysql.version'
mysql  Ver 15.1 Distrib 5.5.60-MariaDB, for Linux (x86_64) using readline 5.1
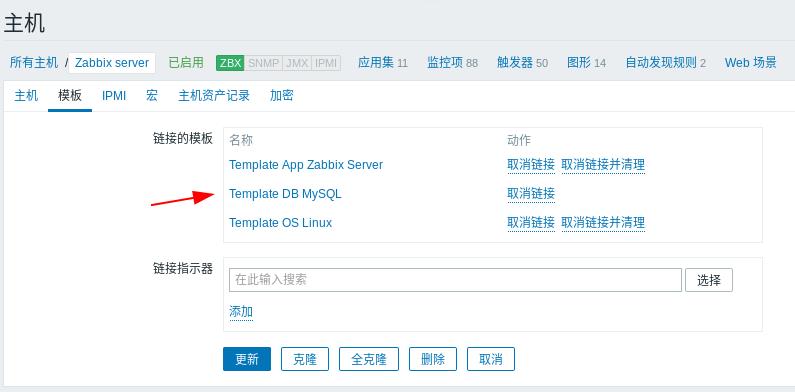
返回前端界面进行监控项的填写
解决中文字体显示问题
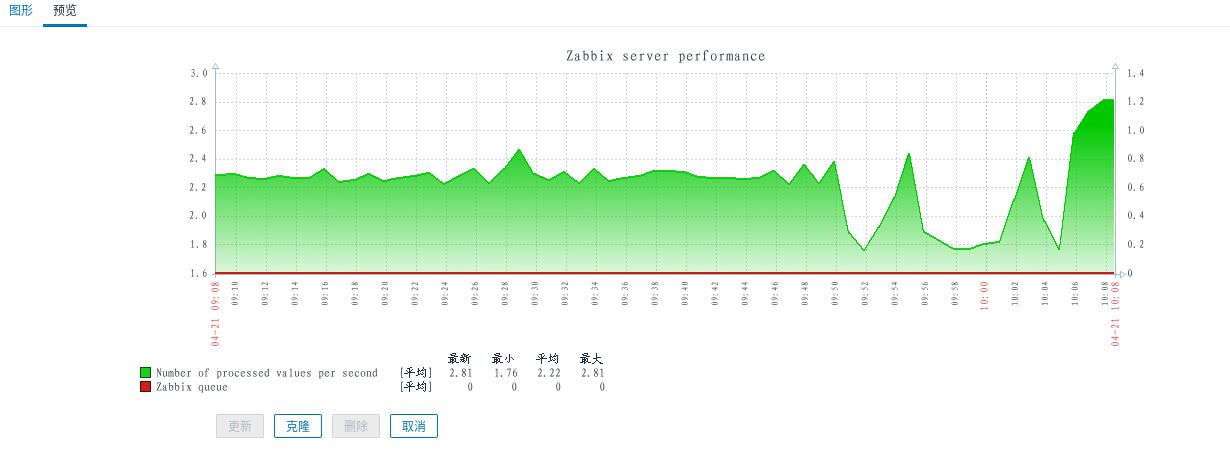
中文显示的问题本质是Linux字体对中文支持的问题,可以通过更换字体解决.
这里下载了Windows上可用的字体临时凑合.
cd /usr/share/zabbix/fonts/
ll
total 0
lrwxrwxrwx 1 root root 33 Apr 20 15:27 graphfont.ttf -> /etc/alternatives/zabbix-web-font

##可以看到使用的字体是个软链接
##修改软链接的指向,指向到我们新下载的字体
rm -rf graphfont.ttf
ln -s /usr/share/zabbix/fonts/simkai.ttf graphfont.ttf
ll
total 4040
lrwxrwxrwx 1 root root      34 Apr 21 10:08 graphfont.ttf -> /usr/share/zabbix/fonts/simkai.ttf
-rw-r--r-- 1 root root 4135804 Aug 17  2004 simkai.ttf
- 修改后重新打开监控界面图形显示页面,可以看到字体变更
以上是关于运维实战 Zabbix监控入门的主要内容,如果未能解决你的问题,请参考以下文章