聊聊如何对eureka管理界面进行定制化改造
Posted Linyb极客之路
tags:
篇首语:本文由小常识网(cha138.com)小编为大家整理,主要介绍了聊聊如何对eureka管理界面进行定制化改造相关的知识,希望对你有一定的参考价值。
蓝字
01
前言
在nacos还未面世之前,eureka基本上就是springcloud全家桶体系注册中心的首选,随着nacos的横空出世,越来越多基于springcloud的微服务项目采用nacos作为注册中心,但这是不是意味着eureka就没用武之地,其实并不是的,从springcloud截止目前最新版本2020.0.2来看,该版本废弃了netflix诸如hytrix、ribbon、zuul等组件,而eureka仍然坚挺着,这就说明eureka作为注册中心,在springcloud体系中仍然发挥着重要的作用。今天就来聊聊如何对eureka管理界面进行定制化改造
02
自定义登陆页面
eureka默认是没有登陆鉴权的,我们可以引入spring security来为eureka添加登陆鉴权功能

1、pom引入spring security

<dependency>
            <groupId>org.springframework.boot</groupId>
            <artifactId>spring-boot-starter-security</artifactId>
        </dependency>
2、在application.yml配置认证用户名密码

spring:
  security:
    user:
      # 认证的用户名
      name: lybgeek
      # 认证的密码
      password: lybgeek
仅需这两步,就可以实现一个带有登陆界面的eureka管理界面。但是spring security的登陆界面css引用
https://maxcdn.bootstrapcdn.com/bootstrap/4.0.0-beta/css/bootstrap.min.css在网络不好的情况下,会出现eureka登陆页面样式会加载不出来,很影响用户体验。因此我们要自定义登陆页面
ps: spring security的页面生成,如果感兴趣的朋友,可以查看如下类
org.springframework.security.web.server.ui.LoginPageGeneratingWebFilter它的登陆页面生成是通过该过滤器渲染生成。

3、自定义登陆页

因为不是专业前端,因此就把spring security默认页面拿来简单修改一下。
<html lang="en" xmlns:th="http://www.thymeleaf.org">
<head>
    <meta charset="utf-8">
    <meta name="viewport" content="width=device-width, initial-scale=1, shrink-to-fit=no">
    <meta name="description" content="">
    <meta name="author" content="">
    <title>请登录</title>
    <link href="../css/bootstrap.min.css" rel="stylesheet">
    <link href="../css/signin.css" rel="stylesheet">
</head>
<body>
<div class="container">
    <form class="form-signin" method="post" action="/login">
        <!--<h2 class="form-signin-heading">请登录</h2>-->
        <div class="alert alert-danger" role="alert" id="errorMsgAlert" style="display:none" ></div>
        <p>
            <label for="username" class="sr-only">用户名</label>
            <input type="text" id="username" name="username" class="form-control" placeholder="Username" required=""
                   autofocus="">
        </p>
        <p>
            <label for="password" class="sr-only">密码</label>
            <input type="password" id="password" name="password" class="form-control" placeholder="Password"
                   required="">
        </p>
        <button class="btn btn-lg btn-primary btn-block" type="submit">登录</button>
    </form>
</div>
</body>
<script src="../js/jquery-3.5.1.min.js"></script>
4、编写跳转登陆页controller

@Controller
@Slf4j
public class LoginController {

    @GetMapping("/toLogin")
    public String login(HttpServletRequest request) {
        return "login";
    }

}
5、配置WebSecurity

@EnableWebSecurity
@Configuration
public class WebSecurityConfig extends WebSecurityConfigurerAdapter {
    @Override
    protected void configure(HttpSecurity http) throws Exception {
        http.csrf().disable()
                .authorizeRequests()
                .antMatchers("/toLogin*","/login*","/css/*","/js/*","/actuator/**").permitAll()
                .and()
                .formLogin()
                .loginPage("/toLogin")
                .permitAll();
        super.configure(http);
    }
注: loginPage("/toLogin")中的toLogin,对应的就是我们写的LoginController 路由。
此时访问eureka,可以看到如下页面


6、配置登陆逻辑以及登陆失败配置

注: 登陆逻辑直接采用spring security默认的登陆逻辑login,自定义页面的用户名name要取名为username,密码要取名为password,不能自定义,比如password改成pwd,这样就无法走默认的登陆逻辑。其次因为我们使用自定义登陆页面,原生自带校验失败的页面渲染逻辑会失效,因此我们要自定义校验失败渲染逻辑
在原先的WebSecurityConfig 加上登陆逻辑配置和登陆失败配置
@EnableWebSecurity
@Configuration
public class WebSecurityConfig extends WebSecurityConfigurerAdapter {
    @Override
    protected void configure(HttpSecurity http) throws Exception {
        http.csrf().disable()
                .authorizeRequests()
                .antMatchers("/toLogin*","/login*","/css/*","/js/*","/actuator/**").permitAll()
                .and()
                .formLogin()
                .loginPage("/toLogin")
                .loginProcessingUrl("/login").failureUrl("/login/error").permitAll();
        super.configure(http);
    }

}
7、自定义登陆失败跳转逻辑controller

@Controller
@Slf4j
public class LoginController {

    @GetMapping("/login/error")
    public String loginError(HttpServletRequest request) {
        AuthenticationException authenticationException = (AuthenticationException) request.getSession().getAttribute(WebAttributes.AUTHENTICATION_EXCEPTION);
        log.info("authenticationException={}", authenticationException);
        String errorMsg;

        if (authenticationException instanceof UsernameNotFoundException || authenticationException instanceof BadCredentialsException) {
            errorMsg = "用户名或密码错误";
        } else if (authenticationException instanceof DisabledException) {
            errorMsg = "用户已被禁用";
        } else if (authenticationException instanceof LockedException) {
            errorMsg = "账户被锁定";
        } else if (authenticationException instanceof AccountExpiredException) {
            errorMsg = "账户过期";
        } else if (authenticationException instanceof CredentialsExpiredException) {
            errorMsg = "证书过期";
        } else {
            errorMsg = "登录失败";
        }
        request.setAttribute("errorMsg",errorMsg);
        return "login";
    }
    }
当用户名或者密码错误,页面会有如下提示

03
eureka管理界面指定环境信息

上图是eureka原生自带的环境信息。但我们在日常开发中,有时候会区分dev、sit、uat、prod环境,显然上图是没法满足我们要求。因此我们可以在application.yml配置如下内容
eureka:
  #此处设置会改变eureka控制台的显示
  datacenter: ${DATA_CENTER:LYBGEEK DATA CENTER}
  #此处设置会改变eureka控制台的显示
  environment: ${ENV:dev}
此时再查看页面

04
自定义管理页面
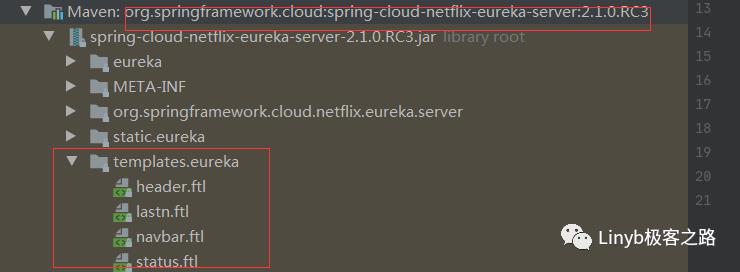
eureka的管理界面默认是使用使用freemarker来做模板渲染,其模板页面在
spring-cloud-netflix-eureka-server-具体版本.jar如图

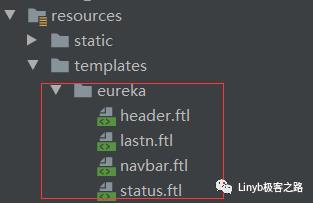
因此我们如果要进行定制,仅需把eureka的模板配置挪到我们代码的templates中,如图

然后根据我们的需要,进行修改,比如在本示例中,我就新增了一个登出按钮和一个版权信息列表,如下图


05
在进行定制时,可能踩到的坑

在自定义登陆页面时,出现如下异常


org.thymeleaf.exceptions.TemplateInputException: Error resolving template [eureka/status], template might not exist or might not be accessible by any of the configured Template Resolvers解决方案有两种,一种是在yml文件配置如下内容
spring:
  freemarker:
    prefer-file-system-access: false
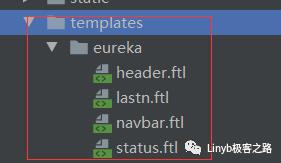
一种在把eureka的模板页面都放置在如下下图的位置

06
总结
最近和朋友聊天,他知道我所在的公司注册中心还是用eureka的时候,他就很诧异说怎么不用nacos,然后我就问他说为什么要用nacos,他给我的答案是现在eureka已经闭源了,nacos现在很火,可以做配置中心也可以做注册中心,erueka后面基本上不会有人用了。
其实所谓eureka的闭源,是指eureka2版本的闭源,而目前大部分用的eureka都是版本一,我们可以去看netflix对eureka的最近更新
截止当前,他更新时间是11天前,再来看看spring-cloud-netflix-eureka的最近更新

对技术选型,有时候并不是哪个火就用哪个,而是要满足当前业务需要,还有一点比如你正式环境已经稳定运行项目,你会因为出现更火的技术,就把当前项目技术栈替换掉吗?我所在项目组,eureka作为注册中心,因为注册上去的业务项目就那么一些,用eureka就完全满足需求了。
我这边并不是排斥nacos的意思,毕竟nacos也有一些其他注册中心所不具备的特性,比如动态DNS服务,同时支持AP和CP,nacos2的高性能,这些都是很值得去关注
07
demo链接
https://github.com/lyb-geek/springboot-learning/tree/master/springboot-custom-eureka
以上是关于聊聊如何对eureka管理界面进行定制化改造的主要内容,如果未能解决你的问题,请参考以下文章