Linux学习-LAMP
Posted 丢爸
tags:
篇首语:本文由小常识网(cha138.com)小编为大家整理,主要介绍了Linux学习-LAMP相关的知识,希望对你有一定的参考价值。
本文基于CentOS6.10
- 安装httpd
- 安装pcre-devel
- 如开启了openssl-devel,则需安装openssl-devel包【yum install openssl-devel -y】
- 编译安装apr
- 编译安装apr-util
- 编译安装httpd
#安装pcre-devel
[root@lotus download]# yum install -y pcre-devel
#安装openssl-devel
[root@lotus download]# yum install -y openssl-devel
#下载apr,apr-utils,httpd
[root@lotus download]# wget https://mirrors.tuna.tsinghua.edu.cn/apache//apr/apr-1.7.0.tar.gz
[root@lotus download]# wget https://archive.apache.org/dist/apr/apr-util-1.5.3.tar.gz
[root@lotus download]# wget wget https://mirrors.tuna.tsinghua.edu.cn/apache//httpd/httpd-2.4.46.tar.gz
#解压
[root@lotus download]# tar -xf apr-1.7.0.tar.gz
[root@lotus download]# tar -xf apr-util-1.5.3.tar.gz
[root@lotus download]# tar xf httpd-2.4.46.tar.gz
#安装apr,因apr安装centos时已经安装,为避免覆盖造成其它程序依赖出现问题,安装时指定与源apr不同的安装路径
[root@lotus download]# cd apr-1.7.0
[root@lotus apr-1.7.0]# ./configure --prefix=/usr/local/apr
[root@lotus apr-1.7.0]# make && make install
#安装apr-utils
[root@lotus download]# cd apr-util-1.5.3
[root@lotus apr-util-1.5.3]# ./configure --prefix=/usr/local/apr-util --with-apr=/usr/local/apr
[root@lotus apr-util-1.5.3]# make && make install
#安装httpd
[root@lotus httpd-2.4.46]# ./configure --prefix=/usr/local/apache --sysconfdir=/etc/httpd --enable-so --enable-rewrite --enable-ssl --enable-cgi --enable-cgid --enable-module=most --enable-mods-shared=most --enable-mpms-shared=all --with-apr=/usr/local/apr --with-apr-util=/usr/local/apr-util
[root@lotus httpd-2.4.46]# make && make install
#先关闭httpd服务器,修改httpd.pid文件的存放位置,由于编译安装时指定了httpd的配置文件放入/etc/httpd目录下,到/etc/httpd目录下找到httpd.conf文件,添加一行PidFile /var/run/httpd.pid
#在/etc/init.d/目录编写一个httpd的脚本,实现httpd的启动和停止等功能
#!/bin/bash
#
# httpd Startup script for the Apache HTTP Server
#
# chkconfig:- 85 15
# description:Apache is a World Wide Web Server .It is used to serve \\
#         html file and CGI.
# processname: httpd
# config: /etc/httpd/conf/httpd.conf
# config: /etc/sysconfig/httpd
# pidfile: /var/run/httpd.pid

# 载入函数库
. /etc/rc.d/init.d/functions

if [ -f /etc/sysconfig/httpd ];then
    .  /etc/sysconfig/httpd
fi

#设定HTTPD_LANG为C
HTTPD_LANG=${HTTPD_LANG="C"}

#This will prevent initlog from swallowing up a pass-parase prompt if
# mod_ssl needs a pass-phrase from the user.
INITLOG_ARG=""
apachectl=/usr/local/apache/bin/apachectl
#如HTTPD为空,则设定httpd为/usr/local/apche/bin/httpd
httpd=${HTTPD-/usr/local/apache/bin/httpd}
prog=httpd
pidfile=${PIDFILE-/var/run/httpd.pid}
lockfile=${LOCKFILE-/var/lock/subsys/httpd}
RETVAL=0
start() {
    echo -n $"Starting $prog:"
    LANG=$HTTPD_LANG daemon --pidfile=${pidfile} $httpd $OPTIONS
    RETVAL=$?
    echo
    [ $RETVAL = 0 ] && touch ${lockfile}
    return $RETVAL
}
stop() {
    echo -n $"Stopping $prog"
    killproc -p ${pidfile} -d 10 $httpd
    RETVAL=$?
    echo
    [ $RETVAL = 0 ] && rm -f ${lockfile} ${pidfile}
}
reload() {
    echo -n $"Reloading $prog"
    if ! LANG=$HTTPD_LANG $httpd $OPTIONS -t >&/dev/null; then
      RETVAL=$?
      echo $"not reloading due to configuration syntax error"
      failure $"not reloading $httpd due to configuration syntax error"
    else
      killproc -p ${pidfile} $httpd -HUP
      RETVAL=$?
    fi
    echo
}

case "$1" in
  start)
    start
    ;;
  stop)
    stop
    ;;
  status)
    status -p ${pidfile} $httpd
    RETVAL=$?
    ;;
  restart)
    stop
    start
    ;;
  condrestart)
    if [ -f ${pidfile} ];then
      stop
      start
    fi
    ;;
   reload)
    reload
    ;;
   graceful|help|configtest|fullstatus)
    $apachectl $@
    RETVAL=$?
    ;;
   *)
    echo $"Usage:$prog (start|stop|restart|reload|configtest|status|hep)"
    exit 1
esac
exit $RETVAL
- 安装MySQL
#下载二进制包
[root@lotus download]# wget https://downloads.mysql.com/archives/get/p/23/file/mysql-5.6.10-linux-glibc2.5-x86_64.tar.gz
#解压,MySQL二进制包是解压后就可以使用
[root@lotus download]# tar xf  mysql-5.6.10-linux-glibc2.5-x86_64.tar.gz -C /usr/local
#创建软链接
[root@lotus local]# pwd
/usr/local
[root@lotus local]# ln -sv mysql-5.6.10-linux-glibc2.5-x86_64 mysql
#添加mysql用户,mysql组
[root@lotus local]# groupadd -r -g 306 mysql
[root@lotus local]# useradd -g 306 -r -u 306 mysql
#修改mysql文件目录的属主,属组
[root@lotus mysql]# pwd
/usr/local/mysql
[root@lotus mysql]# chown -R mysql.mysql .
#初使化mysql,建议将数据库文件放到一个独立的分区,独立的逻辑卷上面,本文简单放入至单独的目录【/data】
[root@lotus mysql]# mkdir /data
[root@lotus mysql]# chown mysql.mysql /data
#减小其它用户权限为不能访问
[root@lotus mysql]# chmod o-x /data
#初使化mysql服务器
[root@lotus mysql]# scripts/mysql_install_db --user=mysql --datadir=/data/
#修改mysql目录下的文件的属主为root
[root@lotus mysql]# chown -R root .
#复制mysql启动脚本至/etc/init.d目录下
[root@lotus mysql]# cp support-files/mysql.server /etc/init.d/mysqld
#加入开机启动列表
[root@lotus mysql]# chkconfig --add mysqld
[root@lotus mysql]# chkconfig --list mysqld
mysqld         	0:off	1:off	2:on	3:on	4:on	5:on	6:off
#修改配置文件
[root@lotus mysql]# vim /etc/my.cnf

[mysqld]

# Remove leading # and set to the amount of RAM for the most important data
# cache in MySQL. Start at 70% of total RAM for dedicated server, else 10%.
# innodb_buffer_pool_size = 128M

# Remove leading # to turn on a very important data integrity option: logging
# changes to the binary log between backups.
# log_bin
#
# These are commonly set, remove the # and set as required.
basedir = /usr/local/mysql
datadir = /data
port = 3306
# server_id = .....
socket = /tmp/mysql.sock
thread_cache_size=8
query_cache_size=16M
sort_buffer_size=1M
read_buffer_size=1M
read_rnd_buffer_size=4M
myisam_sort_buffer_size=64M
max_allowed_packet=1M
key_buffer_size=256M
skip-external-locking
thread_concurrency=2
#启动MySQL
[root@lotus mysql]# service mysqld start
Starting MySQL. SUCCESS!
#添加/etc/profile.d/mysql.sh文件,增加mysql的bin目录到环境变量
[root@lotus mysql]# vim /etc/profile.d/mysql.sh
export PATH=$PATH:/usr/local/mysql/bin
#输出mysql的头文件和库文件
[root@lotus mysql]# vim /etc/ld.so.conf.d/mysql-x86_64.conf
/usr/local/mysql/lib
#重读库文件
[root@lotus mysql]# ldconfig -v
#输出头文件
[root@lotus mysql]# ln -sv /usr/local/mysql/include /usr/include/mysql
报错:
[root@lotus ~]# mysql
ERROR 2002 (HY000): Can't connect to local MySQL server through socket '/var/lib/mysql/mysql.sock' (2)
解决方法:
修改mysql的配置文件
添加
[client]
socket=同mysqld配置的socket
- 安装PHP
PHP安装链接
#安装libxml2-devel包
[root@lotus php-5.4.45]# yum install -y libxml2-devel
#安装bzip2-devel
[root@lotus ~]# yum install -y bzip2-devel
#编译安装libmcrypt
[root@lotus ~]# wget https://sourceforge.net/projects/mcrypt/files/Libmcrypt/2.5.8/libmcrypt-2.5.8.tar.gz
[root@lotus ~]# tar xf libmcrypt-2.5.8.tar.gz
[root@lotus ~]# cd libmcrypt-2.5.8
[root@lotus libmcrypt-2.5.8]# ./configure
[root@lotus libmcrypt-2.5.8]# make && make install
#下载php
[root@lotus ~]# wget https://www.php.net/distributions/php-5.4.45.tar.gz
#解压
[root@lotus ~]# tar xf php-5.4.45.tar.gz
[root@lotus ~]# cd php-5.4.45
#编译安装
[root@lotus php-5.4.45]#  ./configure --prefix=/usr/local/php --with-mysql=/usr/local/mysql --with-openssl --with-mysqli=/usr/local/mysql/bin/mysql_config --enable-mbstring --with-freetype-dir --with-jpeg-dir --with-png-dir --with-zlib --with-libxml-dir=/usr --enable-xml --enable-sockets --with-apxs2=/usr/local/apache/bin/apxs --with-mcrypt --with-config-file-path=/etc --with-config-file-scan-dir=/etc/php.d --with-bz2 --enable-maintainer-zts
#复制配置文件
[root@lotus php-5.4.45]# cp php.ini-production /etc/php.ini
#修改httpd配置文件,让httpd服务器可以解析php文件
#/etc/httpd/httpd.conf
  AddType application/x-httpd-php .php
  AddType application/x-httpd-php-source .phps
  #添加php文件
  <IfModule dir_module>
    DirectoryIndex index.php index.html
</IfModule>

#修改原html文件为php文件
[root@lotus php-5.4.45]# mv /usr/local/apache/htdocs/index.html /usr/local/apache/htdocs/index.php
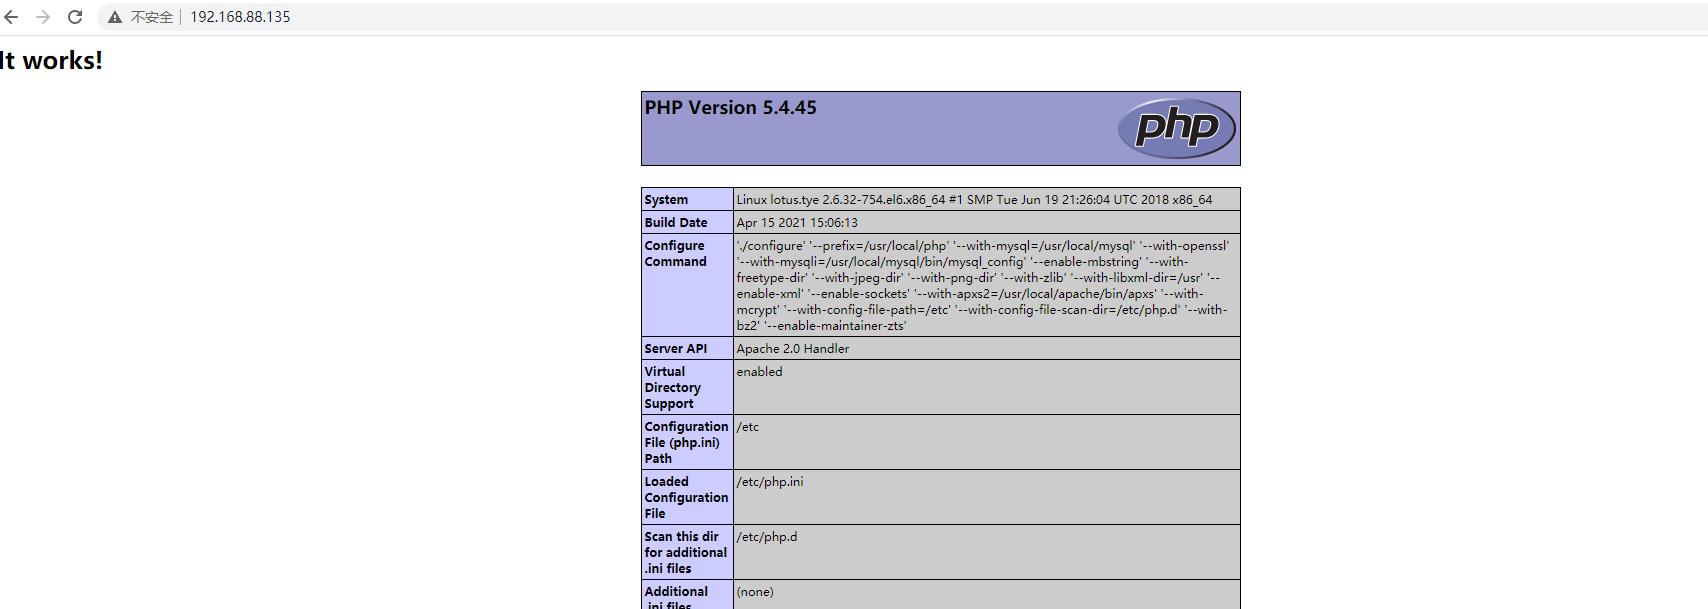
#测试php文件
#在index.php文件中,添加php代码
<html><body><h1>It works!</h1>

<?php
phpinfo();
?>
</body></html>
测试结果:

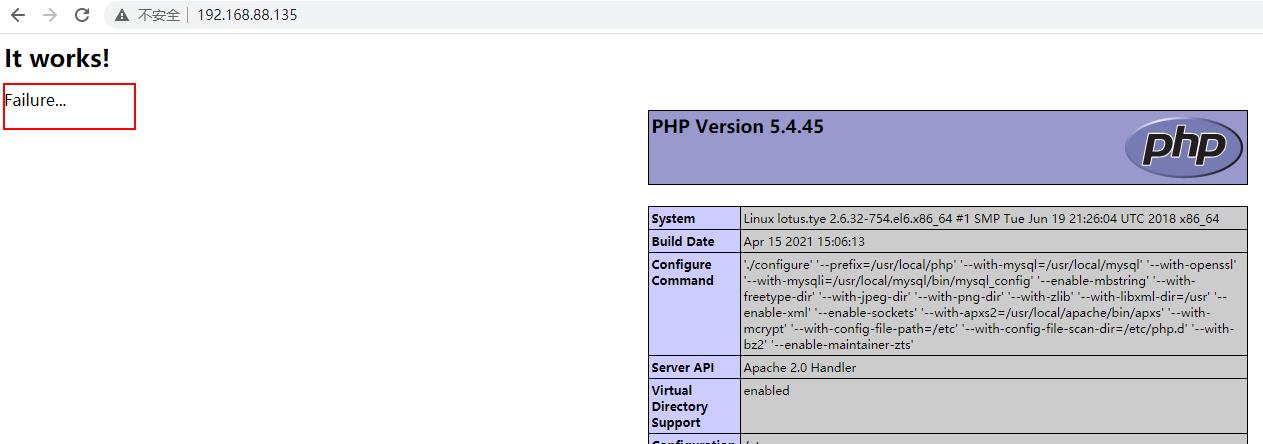
测试php与mysql的连通性
#修改index.php文件
<html><body><h1>It works!</h1>

<?php
$conn=mysql_connect("localhost","root","");
if ($conn)
  echo "Successfullly Connect MySQL...";
else
  echo "Failure...";
phpinfo();
?>
</body></html>
测试结果:

关闭mysql服务器,测试结果如下

以上是关于Linux学习-LAMP的主要内容,如果未能解决你的问题,请参考以下文章