Tendermint KVStore案例解析
Posted 小圣.
tags:
篇首语:本文由小常识网(cha138.com)小编为大家整理,主要介绍了Tendermint KVStore案例解析相关的知识,希望对你有一定的参考价值。
概述
Tendermint 简单的可以理解为是一个模块化的区块链开发框架,支持开发者个性化定制自己的区块链,而不需要考虑共识算法以及P2P网络的实现。
因为在 Tendermint 中,共识引擎和P2P网络都被封装在Tendermint Core 中,并通过ABCI与应用层进行交互。所以使用Tendermint开发时,我们只需要实现ABCI的接口,就可以快速的开发一个区块链应用。
KVStore 案例
KVStore官方文档地址:https://docs.tendermint.com/master/tutorials/go-built-in.html
KVStore application
package main

import (
	"bytes"
	abcitypes "github.com/tendermint/tendermint/abci/types"
	"github.com/dgraph-io/badger"
)

//实现abci接口
var _ abcitypes.Application = (*KVStoreApplication)(nil)

//定义KVStore程序的结构体
type KVStoreApplication struct {
	db           *badger.DB
	currentBatch *badger.Txn
}

// 创建一个 ABCI APP
func NewKVStoreApplication(db *badger.DB) *KVStoreApplication {
	return &KVStoreApplication{
		db: db,
	}
}

// 检查交易是否符合自己的要求,返回0时代表有效交易
func (app *KVStoreApplication) isValid(tx []byte) (code uint32) {
	// 格式校验,如果不是k=v格式的返回码为1
	parts := bytes.Split(tx, []byte("="))
	if len(parts) != 2 {
		return 1
	}

	key, value := parts[0], parts[1]

	//检查是否存在相同的KV
	err := app.db.View(func(txn *badger.Txn) error {
		item, err := txn.Get(key)
		if err != nil && err != badger.ErrKeyNotFound {
			return err
		}
		if err == nil {
			return item.Value(func(val []byte) error {
				if bytes.Equal(val, value) {
					code = 2
				}
				return nil
			})
		}
		return nil
	})
	if err != nil {
		panic(err)
	}

	return code
}

func (app *KVStoreApplication) BeginBlock(req abcitypes.RequestBeginBlock) abcitypes.ResponseBeginBlock {
	app.currentBatch = app.db.NewTransaction(true)
	return abcitypes.ResponseBeginBlock{}
}

//当新的交易被添加到Tendermint Core时,它会要求应用程序进行检查(验证格式、签名等),当返回0时才通过
func (app KVStoreApplication) CheckTx(req abcitypes.RequestCheckTx) abcitypes.ResponseCheckTx {
	code := app.isValid(req.Tx)
	return abcitypes.ResponseCheckTx{Code: code, GasUsed: 1}
}

//这里我们创建了一个batch,它将存储block的交易。
func (app *KVStoreApplication) DeliverTx(req abcitypes.RequestDeliverTx) abcitypes.ResponseDeliverTx {
	code := app.isValid(req.Tx)
	if code != 0 {
		return abcitypes.ResponseDeliverTx{Code: code}
	}

	parts := bytes.Split(req.Tx, []byte("="))
	key, value := parts[0], parts[1]

	err := app.currentBatch.Set(key, value)
	if err != nil {
		panic(err)
	}

	return abcitypes.ResponseDeliverTx{Code: 0}
}

func (app *KVStoreApplication) Commit() abcitypes.ResponseCommit {
	// 往数据库中提交事务,当 Tendermint core 提交区块时,会调用这个函数
	app.currentBatch.Commit()
	return abcitypes.ResponseCommit{Data: []byte{}}
}

func (app *KVStoreApplication) Query(reqQuery abcitypes.RequestQuery) (resQuery abcitypes.ResponseQuery) {
	resQuery.Key = reqQuery.Data
	err := app.db.View(func(txn *badger.Txn) error {
		item, err := txn.Get(reqQuery.Data)
		if err != nil && err != badger.ErrKeyNotFound {
			return err
		}
		if err == badger.ErrKeyNotFound {
			resQuery.Log = "does not exist"
		} else {
			return item.Value(func(val []byte) error {
				resQuery.Log = "exists"
				resQuery.Value = val
				return nil
			})
		}
		return nil
	})
	if err != nil {
		panic(err)
	}
	return
}

func (KVStoreApplication) Info(req abcitypes.RequestInfo) abcitypes.ResponseInfo {
	return abcitypes.ResponseInfo{}
}

func (KVStoreApplication) InitChain(req abcitypes.RequestInitChain) abcitypes.ResponseInitChain {
	return abcitypes.ResponseInitChain{}
}

func (KVStoreApplication) EndBlock(req abcitypes.RequestEndBlock) abcitypes.ResponseEndBlock {
	return abcitypes.ResponseEndBlock{}
}

func (KVStoreApplication) ListSnapshots(abcitypes.RequestListSnapshots) abcitypes.ResponseListSnapshots {
	return abcitypes.ResponseListSnapshots{}
}

func (KVStoreApplication) OfferSnapshot(abcitypes.RequestOfferSnapshot) abcitypes.ResponseOfferSnapshot {
	return abcitypes.ResponseOfferSnapshot{}
}

func (KVStoreApplication) LoadSnapshotChunk(abcitypes.RequestLoadSnapshotChunk) abcitypes.ResponseLoadSnapshotChunk {
	return abcitypes.ResponseLoadSnapshotChunk{}
}

func (KVStoreApplication) ApplySnapshotChunk(abcitypes.RequestApplySnapshotChunk) abcitypes.ResponseApplySnapshotChunk {
	return abcitypes.ResponseApplySnapshotChunk{}
}
Tendermint Core
package main

import (
	"flag"
	"fmt"
	"os"
	"os/signal"
	"path/filepath"
	"syscall"

	"github.com/dgraph-io/badger"
	"github.com/spf13/viper"

	abci "github.com/tendermint/tendermint/abci/types"
	cfg "github.com/tendermint/tendermint/config"
	tmflags "github.com/tendermint/tendermint/libs/cli/flags"
	"github.com/tendermint/tendermint/libs/log"
	nm "github.com/tendermint/tendermint/node"
	"github.com/tendermint/tendermint/p2p"
	"github.com/tendermint/tendermint/privval"
	"github.com/tendermint/tendermint/proxy"
)

var configFile string

// 设置配置文件路径
func init() {
	flag.StringVar(&configFile, "config", "$HOME/.tendermint/config/config.toml", "Path to config.toml")
}

func main() {

	//初始化Badger数据库并创建一个应用实例
	db, err := badger.Open(badger.DefaultOptions("/tmp/badger"))
	if err != nil {
		fmt.Fprintf(os.Stderr, "failed to open badger db: %v", err)
		os.Exit(1)
	}
	defer db.Close()

	// 创建 ABCI APP
	app := NewKVStoreApplication(db)

	flag.Parse()

	// 创建一个Tendermint Core Node实例
	node, err := newTendermint(app, configFile)
	if err != nil {
		fmt.Fprintf(os.Stderr, "%v", err)
		os.Exit(2)
	}

	// 开启节点
	node.Start()

	// 程序退出时关闭节点
	defer func() {
		node.Stop()
		node.Wait()
	}()

	// 退出程序
	c := make(chan os.Signal, 1)
	signal.Notify(c, os.Interrupt, syscall.SIGTERM)
	<-c
	os.Exit(0)
}

//创建一个本地节点
func newTendermint(app abci.Application, configFile string) (*nm.Node, error) {
	// 读取默认的Validator配置
	config := cfg.DefaultValidatorConfig()
	// 设置配置文件的路径
	config.RootDir = filepath.Dir(filepath.Dir(configFile))
	// 这里使用的是viper 工具,
	// 官方文档:https://github.com/spf13/viper
	viper.SetConfigFile(configFile)
	if err := viper.ReadInConfig(); err != nil {
		return nil, fmt.Errorf("viper failed to read config file: %w", err)
	}
	if err := viper.Unmarshal(config); err != nil {
		return nil, fmt.Errorf("viper failed to unmarshal config: %w", err)
	}
	if err := config.ValidateBasic(); err != nil {
		return nil, fmt.Errorf("config is invalid: %w", err)
	}

	// 创建日志
	logger := log.NewTMLogger(log.NewSyncWriter(os.Stdout))
	var err error
	logger, err = tmflags.ParseLogLevel(config.LogLevel, logger, cfg.DefaultLogLevel)
	if err != nil {
		return nil, fmt.Errorf("failed to parse log level: %w", err)
	}

	// 读取配置文件
	pv, _ := privval.LoadFilePV(
		config.PrivValidatorKeyFile(),
		config.PrivValidatorStateFile(),
	)
	nodeKey, err := p2p.LoadNodeKey(config.NodeKeyFile())
	if err != nil {
		return nil, fmt.Errorf("failed to load node's key: %w", err)
	}

	// 根据配置文件 创建节点
	node, err := nm.NewNode(
		config,
		pv,
		nodeKey,
		proxy.NewLocalClientCreator(app),
		nm.DefaultGenesisDocProviderFunc(config),
		nm.DefaultDBProvider,
		nm.DefaultMetricsProvider(config.Instrumentation),
		logger)
	if err != nil {
		return nil, fmt.Errorf("failed to create new Tendermint node: %w", err)
	}
	return node, nil
}
程序工作流程
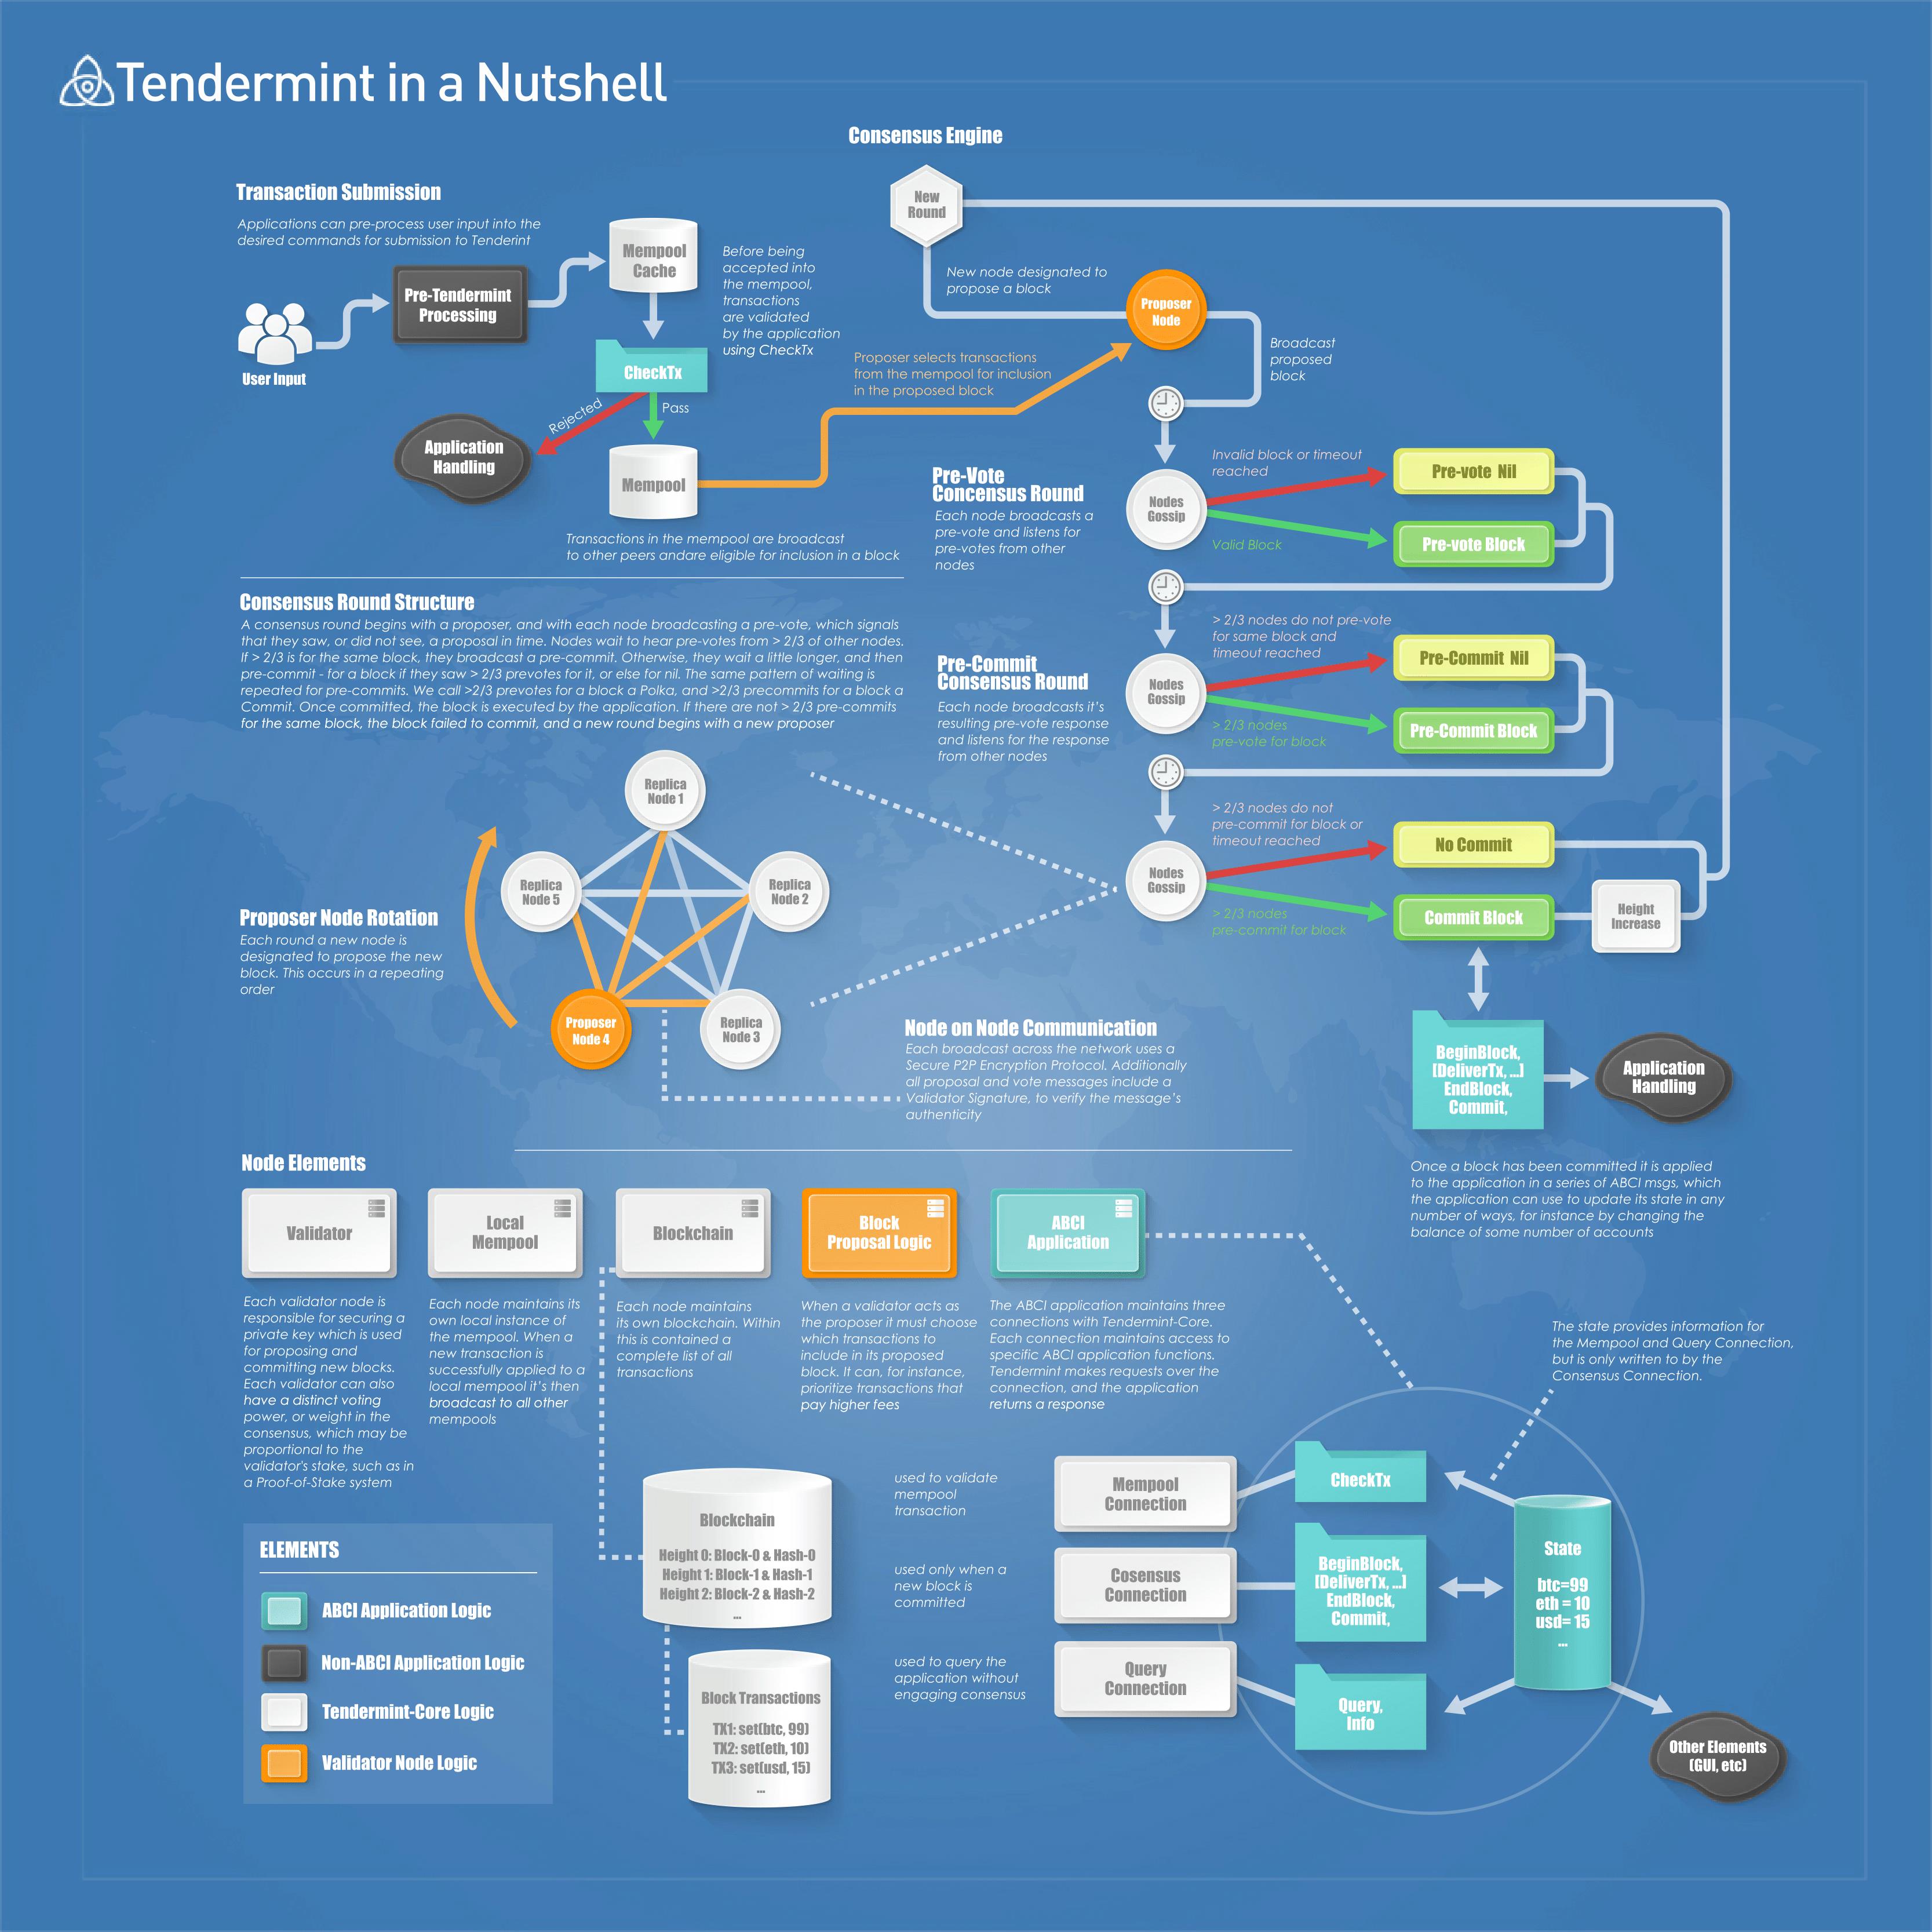
 1. 通过RPC调用broadcast_tx_commit,提交交易,也就是图中的User Input。交易首先被存放在交易池缓存(mempool cache)中。
2. 交易池调用CheckTx验证交易的有效性。验证通过就放入交易池。
3. 从Validator中选出的Proposer在交易池中打包交易、形成区块。
4. 第一轮投票。Proposer通过Gossip协议进行广播区块。全网的Validator对区块进行校验。校验通过,同意进行Pre-vote;不通过或者超时,产生一个空块。然后每个Validator都进行广播
5. 第二轮投票。所有的Validator收集其他Validator的投票信息,如果有大于2/3的节点同意pre-vote,那么自己就投票Pre-commit。如果小于2/3的节点或者超时,也继续产生一个空块。
6. 所有Validator广播自己的投票结果,并收集其他Validator的投票结果。如果收到的投票信息没有超过2/3的节点投票pre-commit或者超时。那么就不提交区块。如果有超过2/3的pre-commit那么就提交区块。最后,区块高度加1。
最后
这里只是通过一个简单的案例对Tendermint工作流程进行疏通。如果有任何问题可以来群里进行交流讨论。群里还有很多视频书籍资料可以自行下载。
 最后推荐一位大佬的公众号,欢迎关注哦:区块链技术栈
以上是关于Tendermint KVStore案例解析的主要内容,如果未能解决你的问题,请参考以下文章