Centos7/8 安装OpenVPN
Posted GoodLuck
tags:
篇首语:本文由小常识网(cha138.com)小编为大家整理,主要介绍了Centos7/8 安装OpenVPN相关的知识,希望对你有一定的参考价值。
一、添加EPEL源并安装git
[root@localhost~]# yum update -y
Last metadata expiration check: 0:01:42 ago on Wed 21Apr 2021 06:35:50 AM CST.
Dependencies resolved.
==============================================================================================
Package Arch Version Repo Size
==============================================================================================
Installing:
centos-linux-release noarch 8.3-1.2011.el8 BaseOS 22 k
replacing centos-release.x86_648.2-2.2004.0.1.el8
replacing centos-repos.x86_648.2-2.2004.0.1.el8
kernel x86_644.18.0-240.22.1.el8_3 BaseOS 4.4 M
kernel-core x86_644.18.0-240.22.1.el8_3 BaseOS 30 M
kernel-modules x86_644.18.0-240.22.1.el8_3 BaseOS 26 M
…
…
[root@server-3~]# dnf install git -y
Failed to set locale, defaulting to C.UTF-8
Repository extras is listed more than once in theconfiguration
CentOS-8 - Base - mirrors.aliyun.com 21 kB/s | 3.9 kB 00:00
CentOS-8 - Base - mirrors.aliyun.com 3.4 MB/s | 2.3 MB 00:00
CentOS-8 - Extras - mirrors.aliyun.com 27 kB/s | 1.5 kB 00:00
CentOS-8 - AppStream - mirrors.aliyun.com
…
…
Complete!
二、Cloneopenvpn-install存储库
使用git工具Cloneopenvpn-install存储库:
[root@server-3 ~]#cd ~
[root@server-3~]# git clone https://github.com/Nyr/openvpn-install.git
Cloning into 'openvpn-install'...
remote: Enumerating objects: 496, done.
remote: Total 496 (delta 0), reused 0 (delta 0),pack-reused 496
Receiving objects: 100% (496/496), 156.76 KiB |489.00 KiB/s, done.
Resolving deltas: 100% (259/259), done.
三、运行OpenVPN安装程序
切换到openvpn-install目录并运行安装程序脚本:
[root@server-3openvpn-install]# chmod +x openvpn-install.sh
[root@server-3 openvpn-install]#./openvpn-install.sh
将收到一些提示,以更改或确认安装的默认设置,如下:
Which protocol should OpenVPN use?
1) UDP(recommended)
2) TCP
Protocol [1]: 1
What port should OpenVPN listen to?
Port [1194]: 1194
Select a DNS server for the clients:
1) Currentsystem resolvers
2) Google
3) 1.1.1.1
4) OpenDNS
5) Quad9
6) AdGuard
DNS server [1]: 1
Enter a name for the first client:
Name [client]: gordon
OpenVPN installation is ready to begin.
Press any key to continue...
***需要设置:
2、如果在NAT内部,则为Server的主机名。
3、要使用的OpenVPN协议 - TCP或UDP。
4、OpenVPN端口。
5、与VPN一起使用的DNS名称服务器。
6、要创建的第一个客户档案的名称。
如果安装成功,将出现类似下面的消息:
主要的OpenVPN服务器配置文件是/etc/openvpn/server.conf,可以根据自己的喜好自由调整它:
[root@server-3openvpn-install]# cat /etc/openvpn/server/server.conf | grep -v "^$"
port 1194
proto udp
dev tun
ca ca.crt
cert server.crt
key server.key
dh dh.pem
auth SHA512
tls-crypt tc.key
topology subnet
server 10.8.0.0 255.255.255.0
push "redirect-gateway def1 bypass-dhcp"
ifconfig-pool-persist ipp.txt
push "dhcp-option DNS 223.5.5.5"
keepalive 10 120
cipher AES-256-CBC
user nobody
group nobody
persist-key
persist-tun
verb 3
crl-verify crl.pem
explicit-exit-notify
将在安装过程中创建tun0虚拟接口,这由OpenVPN客户端子网使用:
[root@gordon ~]# ip addr
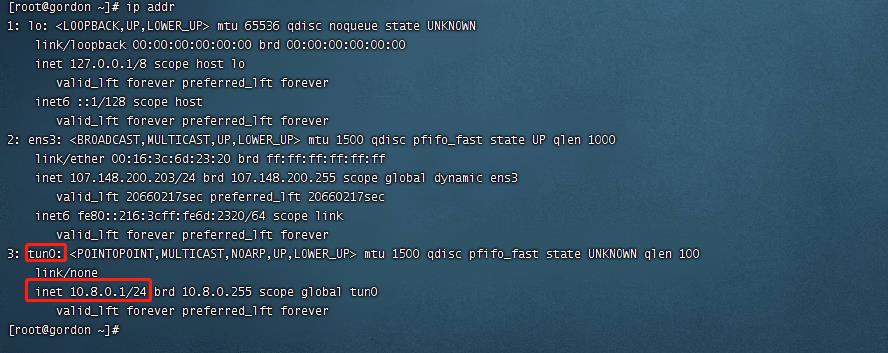
到这里,安装OpenVPNserver就算完成了。
四、生成OpenVPN用户配置文件(.ovpn文件)
完成上面三步后,你的OpenVPNserver就可以使用了,我们需要生成供用户使用的VPN配置文件,我们将使用与安装相同的脚本,它管理用户配置文件的创建和撤销。
运行脚本并选择1以添加新用户:
[root@gordon~]# cd openvpn-install/
[root@gordonopenvpn-install]# ./openvpn-install.sh
OpenVPN is already installed.
Select an option:
1) Add a newclient
2) Revoke anexisting client
3) RemoveOpenVPN
4) Exit
Option: 1
Provide a name for the client:
Name: user_test
Using SSL: openssl OpenSSL 1.0.2k-fips 26 Jan 2017
Generating a 2048 bit RSA private key
..............................................................................................................+++
........+++
writing new private key to'/etc/openvpn/server/easy-rsa/pki/easy-rsa-15721.kNG4aU/tmp.2aYWZ6'
-----
Using configuration from/etc/openvpn/server/easy-rsa/pki/easy-rsa-15721.kNG4aU/tmp.xuqYHi
Check that the request matches the signature
Signature ok
The Subject's Distinguished Name is as follows
commonName :ASN.1 12:'user_test'
Certificate is to be certified until Apr 27 23:50:202031 GMT (3650 days)
Write out database with 1 new entries
Data Base Updated
user_test added. Configuration available in:/root/user_test.ovpn
生成的文件格式为.ovpn,并存放在/root文件夹中:
附1:撤消OpenVPN用户个人资料
要撤消用户user_test配置文件,请运行该脚本并选择2:
[root@gordonopenvpn-install]# ./openvpn-install.sh
OpenVPN is already installed.
Select an option:
1) Add a newclient
2) Revoke anexisting client
OpenVPN is already installed.
Select an option:
1) Add a newclient
2) Revoke anexisting client
3) RemoveOpenVPN
4) Exit
Option: 2
Select the client to revoke:
1) client
2) user1
3)user_lover
4)user_wht
5) user_yj
6) user_rs
7)user_r_whf
8) user_hn
9)user_ysw
10)user_test
Client: 10
Confirm user_test revocation? [y/N]: y
Using SSL: openssl OpenSSL 1.0.2k-fips 26 Jan 2017
Using configuration from/etc/openvpn/server/easy-rsa/pki/easy-rsa-18065.d3aeK1/tmp.tLgO34
Revoking Certificate42A61DFCF6C10402E9B2C26AAF9E0F36.
Data Base Updated
Using SSL: openssl OpenSSL 1.0.2k-fips 26 Jan 2017
Using configuration from/etc/openvpn/server/easy-rsa/pki/easy-rsa-18107.43AOOI/tmp.BCvN28
An updated CRL has been created.
CRL file: /etc/openvpn/server/easy-rsa/pki/crl.pem
user_test revoked!
附2:在RHEL/CentOS 8上卸载OpenVPN server
如果不再需要OpenVPNserver,则可以使用相同的安装程序脚本完成卸载:
[root@gordonopenvpn-install]# ./openvpn-install.sh
OpenVPN is already installed.
Select an option:
1) Add a newclient
2) Revoke anexisting client
3) RemoveOpenVPN
4) Exit
Option: 3
出现OpenVPNremoved!字样即表示成功删除OpenVPN server
五、从客户端连接到OpenVPNServer
在网址https://sourceforge.net/projects/vpnwinclient/files/latest/download下载最新的OpenVpn客户端
或者
在百度网盘下载链接:https://pan.baidu.com/s/1l8B6EOnQaLMW4Ob2aaXXCQ
提取码:otz2
解压缩安装
打开安装目录例如我这儿是D盘 openvpn/config
将user.ovpn放入config文件夹
在任务栏打开openvpn软件 ,右击 openvpn图标选择 user1.ovpn
当图标变绿则连接成功
以上是关于Centos7/8 安装OpenVPN的主要内容,如果未能解决你的问题,请参考以下文章