详解nacos注册中心服务注册流程
Posted JAVA高级架构
tags:
篇首语:本文由小常识网(cha138.com)小编为大家整理,主要介绍了详解nacos注册中心服务注册流程相关的知识,希望对你有一定的参考价值。
说起注册中心,我们首先要知道注册中心是用来做什么的,注册中心一般都是用在微服务架构中,而微服务架构风格是一种将一个单一应用程序开发为一组小型服务的方法,每个服务运行在自己的进程中,服务间通信通常采用HTTP的方式,这些服务共用一个最小型的集中式的管理。这个最小型的集中式管理的组件就是服务注册中心。
一、nacos 简介
本文的目的在于详解 nacos 注册中心的服务注册流程,所以首先需要对 nacos 有个基本的了解。nacos 提供了一组简单易用的特性集,帮助您快速实现动态服务发现、服务配置、服务元数据及流量管理。Nacos 帮助您更敏捷和容易地构建、交付和管理微服务平台。nacos 是构建以“服务”为中心的现代应用架构 (例如微服务范式、云原生范式) 的服务基础设施。
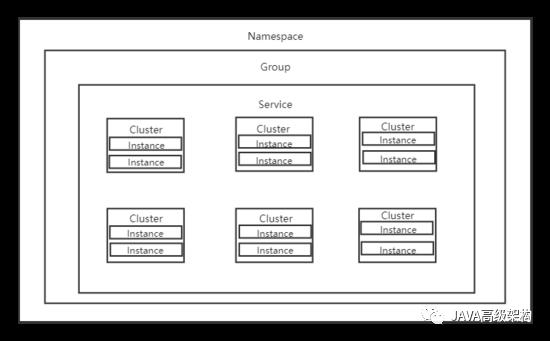
nacos 基本架构
二、nacos 注册中心
nacos 服务注册中心,它是服务,其实例及元数据的数据库。服务实例在启动时注册到服务注册表,并在关闭时注销。服务和路由器的客户端查询服务注册表以查找服务的可用实例。服务注册中心可能会调用服务实例的健康检查 API 来验证它是否能够处理请求。
nacos 服务注册表结构:Map<namespace, Map<group::serviceName, Service>>

三、demo 搭建
了解了 nacos 的基本架构和服务注册中心的功能之后,接下来就要来详解服务注册的流程原理了,首先建立一个 nacos 客户端工程,springboot 版本选择2.1.0,springcloud 版本选择 Greenwich
<spring-boot-version>2.1.0.RELEASE</spring-boot-version>
<spring-cloud.version>Greenwich.RELEASE</spring-cloud.version>
复制代码
随后引入 springcloud,springboot 和 springcloud-alibaba 的依赖
<dependencyManagement>
    <dependencies>
        <dependency>
            <groupId>org.springframework.cloud</groupId>
            <artifactId>spring-cloud-dependencies</artifactId>
            <version>${spring-cloud.version}</version>
            <type>pom</type>
            <scope>import</scope>
        </dependency>
        <dependency>
            <groupId>org.springframework.boot</groupId>
            <artifactId>spring-boot-dependencies</artifactId>
            <version>${spring-boot-version}</version>
            <type>pom</type>
            <scope>import</scope>
        </dependency>
        <dependency>
            <groupId>com.alibaba.cloud</groupId>
            <artifactId>spring-cloud-alibaba-dependencies</artifactId>
            <version>${spring-boot-version}</version>
            <type>pom</type>
            <scope>import</scope>
        </dependency>
    </dependencies>
</dependencyManagement>
创建服务提供者模块,在服务提供者模块的 pom 文件中引入 spring-cloud-starter-alibaba-nacos-discovery 依赖,在启动类中加上 @EnableDiscoveryClient 注解,使得注册中心可以发现该服务,运行启动类,可以看到 nacos 控制台中注册了该服务
[ ]( imgchr.com/i/rloNjg )
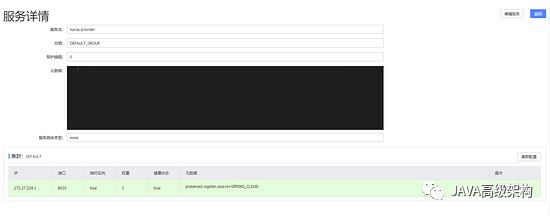
点击详情,可以看到服务详情,其中临时实例属性为true,代表服务是临时实例,nacos 注册中心可以设置注册的实例是临时实例还是持久化实例,默认服务都是临时实例。
[ ]( imgchr.com/i/rlTdxO )
四、原理详解
搭建好demo并且在 nacos 控制台上看到效果之后,接下来就要来分析服务注册的原理了,要先知道原理,最好的办法就是分析源码,首先要知道 nacos 客户端是什么时候向服务端去注册的,其次需要知道服务端是怎么执行服务注册的,对于客户端来说,由于引入了 spring-cloud-starter-alibaba-nacos-discovery 依赖,自然源码要到这里去找。PS:源码分析部分内容较多,望大家理解。
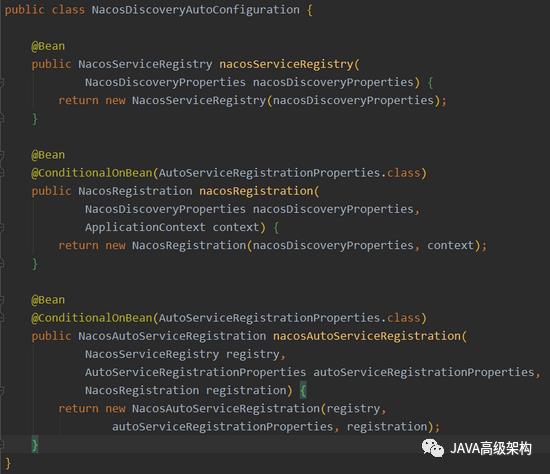
根据 springboot 自动配置原理,很容易可以想到, 要到 spring.factories 文件下去找相关的 AutoConfiguration 配置类,果不其然,我们找到了 NacosDiscoveryAutoConfiguration 这个配置类

从图中我们看到这个配置类中有三个方法上有 @Bean 注解,熟悉 Spring 的小伙伴们都知道,@Bean 注解表示产生一个 Bean 对象,然后这个 Bean 对象交给 Spring 管理,同时我们又看到最后一个 nacosAutoServiceRegistration 这个方法中的参数里有上面两个方法产生的对象,说明上面两个方法的实现不是很重要,直接来看 nacosAutoServiceRegistration 的实现。
public NacosAutoServiceRegistration(ServiceRegistry<Registration> serviceRegistry,
      AutoServiceRegistrationProperties autoServiceRegistrationProperties,
      NacosRegistration registration) {
   //父类先初始化,先看看父类的实现
   super(serviceRegistry, autoServiceRegistrationProperties);
   this.registration = registration;
}
public abstract class AbstractAutoServiceRegistration<R extends Registration>
      implements AutoServiceRegistration, ApplicationContextAware, ApplicationListener<WebServerInitializedEvent>
我们看到父类实现了 ApplicationListener 接口,而实现该接口必须重新其 onApplicationEvent() 方法,我们看到方法中又调用了 bind() 方法
public void bind(WebServerInitializedEvent event) {
   ApplicationContext context = event.getApplicationContext();
   if (context instanceof ConfigurableWebServerApplicationContext) {
      if ("management".equals(
            ((ConfigurableWebServerApplicationContext) context).getServerNamespace())) {
         return;
      }
   }
   //CAS 原子操作
   this.port.compareAndSet(0, event.getWebServer().getPort());
   this.start();
}
public void start() {
   if (!isEnabled()) {
      if (logger.isDebugEnabled()) {
         logger.debug("Discovery Lifecycle disabled. Not starting");
      }
      return;
   }

   // only initialize if nonSecurePort is greater than 0 and it isn't already running
   // because of containerPortInitializer below
   if (!this.running.get()) {
      this.context.publishEvent(new InstancePreRegisteredEvent(this, getRegistration()));
      // 开始注册
      register();
      if (shouldRegisterManagement()) {
         registerManagement();
      }
      this.context.publishEvent(
            new InstanceRegisteredEvent<>(this, getConfiguration()));
      this.running.compareAndSet(false, true);
   }

}
com.alibaba.cloud.nacos.registry.NacosServiceRegistry#register
public void register(Registration registration) {

   if (StringUtils.isEmpty(registration.getServiceId())) {
      log.warn("No service to register for nacos client...");
      return;
   }

   String serviceId = registration.getServiceId();

   Instance instance = getNacosInstanceFromRegistration(registration);

   try {
      // 把 serviceId 和 instance传入,开始注册流程
      namingService.registerInstance(serviceId, instance);
      log.info("nacos registry, {} {}:{} register finished", serviceId,
            instance.getIp(), instance.getPort());
   }
   catch (Exception e) {
      log.error("nacos registry, {} register failed...{},", serviceId,
            registration.toString(), e);
   }
}
com.alibaba.nacos.client.naming.NacosNamingService#registerInstance(java.lang.String, java.lang.String, com.alibaba.nacos.api.naming.pojo.Instance)
public void registerInstance(String serviceName, String groupName, Instance instance) throws NacosException {
	//如果实例是临时的,组装beatInfo,发送心跳请求,因为默认是临时实例,所以肯定走到这段代码
    //为什么要发送心跳请求,因为nacos在此时实现的是cap理论中的ap模式,即不保证强一致性,但会保证可用性,这就需要做到动态感知服务的上下线,所以要通过心跳来判断服务是否还正常在线
    if (instance.isEphemeral()) {
        BeatInfo beatInfo = new BeatInfo();
        beatInfo.setServiceName(NamingUtils.getGroupedName(serviceName, groupName));
        beatInfo.setIp(instance.getIp());
        beatInfo.setPort(instance.getPort());
        beatInfo.setCluster(instance.getClusterName());
        beatInfo.setWeight(instance.getWeight());
        beatInfo.setMetadata(instance.getMetadata());
        beatInfo.setScheduled(false);
        long instanceInterval = instance.getInstanceHeartBeatInterval();
        beatInfo.setPeriod(instanceInterval == 0 ? DEFAULT_HEART_BEAT_INTERVAL : instanceInterval);
		//添加心跳信息进行处理
        beatReactor.addBeatInfo(NamingUtils.getGroupedName(serviceName, groupName), beatInfo);
    }
	//服务代理类注册实例
    serverProxy.registerService(NamingUtils.getGroupedName(serviceName, groupName), groupName, instance);
}
心跳请求部分
com.alibaba.nacos.client.naming.beat.BeatReactor#addBeatInfo
public void addBeatInfo(String serviceName, BeatInfo beatInfo) {
    NAMING_LOGGER.info("[BEAT] adding beat: {} to beat map.", beatInfo);
    dom2Beat.put(buildKey(serviceName, beatInfo.getIp(), beatInfo.getPort()), beatInfo);
    //定时任务发送心跳请求
    executorService.schedule(new BeatTask(beatInfo), 0, TimeUnit.MILLISECONDS);
    MetricsMonitor.getDom2BeatSizeMonitor().set(dom2Beat.size());
}
com.alibaba.nacos.client.naming.beat.BeatReactor.BeatTask#run
public void run() {
    if (beatInfo.isStopped()) {
        return;
    }
    //服务代理类发送心跳,心跳时长为5秒钟,也就是每5秒发送一次心跳请求
    long result = serverProxy.sendBeat(beatInfo);
    long nextTime = result > 0 ? result : beatInfo.getPeriod();
    executorService.schedule(new BeatTask(beatInfo), nextTime, TimeUnit.MILLISECONDS);
}
com.alibaba.nacos.client.naming.net.NamingProxy#sendBeat
public long sendBeat(BeatInfo beatInfo) {
    try {
        if (NAMING_LOGGER.isDebugEnabled()) {
            NAMING_LOGGER.debug("[BEAT] {} sending beat to server: {}", namespaceId, beatInfo.toString());
        }
        Map<String, String> params = new HashMap<String, String>(4);
        params.put("beat", JSON.toJSONString(beatInfo));
        params.put(CommonParams.NAMESPACE_ID, namespaceId);
        params.put(CommonParams.SERVICE_NAME, beatInfo.getServiceName());
        //通过http的put请求,向服务端发送心跳请求,请求路径为/v1/ns/instance/beat
        String result = reqAPI(UtilAndComs.NACOS_URL_BASE + "/instance/beat", params, HttpMethod.PUT);
        JSONObject jsonObject = JSON.parseObject(result);

        if (jsonObject != null) {
            return jsonObject.getLong("clientBeatInterval");
        }
    } catch (Exception e) {
        NAMING_LOGGER.error("[CLIENT-BEAT] failed to send beat: " + JSON.toJSONString(beatInfo), e);
    }
    return 0L;
}
看到这里我们了解到,客户端是通过 http 请求的方式,和服务端进行通信,由于还涉及注册实例的源码和服务端的源码,心跳部分暂时告一段落,接下来回到服务代理类注册实例
com.alibaba.nacos.client.naming.net.NamingProxy#registerService
public void registerService(String serviceName, String groupName, Instance instance) throws NacosException {

    NAMING_LOGGER.info("[REGISTER-SERVICE] {} registering service {} with instance: {}",
        namespaceId, serviceName, instance);
	//组装各种参数
    final Map<String, String> params = new HashMap<String, String>(9);
    params.put(CommonParams.NAMESPACE_ID, namespaceId);
    params.put(CommonParams.SERVICE_NAME, serviceName);
    params.put(CommonParams.GROUP_NAME, groupName);
    params.put(CommonParams.CLUSTER_NAME, instance.getClusterName());
    params.put("ip", instance.getIp());
    params.put("port", String.valueOf(instance.getPort()));
    params.put("weight", String.valueOf(instance.getWeight()));
    params.put("enable", String.valueOf(instance.isEnabled()));
    params.put("healthy", String.valueOf(instance.isHealthy()));
    params.put("ephemeral", String.valueOf(instance.isEphemeral()));
    params.put("metadata", JSON.toJSONString(instance.getMetadata()));
	//发送注册实例请求,路径为/v1/ns/instance
    reqAPI(UtilAndComs.NACOS_URL_INSTANCE, params, HttpMethod.POST);

}
到这里,nacos 客户端部分的源码就分析完了,接下来开始分析 nacos 服务端的源码
首先去到 nacos 的官方 github,clone 一份源码到本地,选择1.1.4版本,通过 maven 编译后打开,源码结构如下
之前我们在分析客户端源码的时候看到客户端向服务端发送请求的部分都在 NacosNamingService 类中,相对应的在服务端应该也是到naming 的模块下寻找代码的入口,根据 springboot 开发接口的习惯,接口都是通过 controller 来实现调用的,所以直接找到controllers目录,其中在 InstanceController 中,我们看到了 register() 的方法,也看到了 beat() 方法,接上面的 客户端心跳发送部分,先分析 beat() 方法。
public JSONObject beat(HttpServletRequest request) throws Exception {

    JSONObject result = new JSONObject();

    result.put("clientBeatInterval", switchDomain.getClientBeatInterval());
    String serviceName = WebUtils.required(request, CommonParams.SERVICE_NAME);
    String namespaceId = WebUtils.optional(request, CommonParams.NAMESPACE_ID,
        Constants.DEFAULT_NAMESPACE_ID);
    String beat = WebUtils.required(request, "beat");
    RsInfo clientBeat = JSON.parseObject(beat, RsInfo.class);

    if (!switchDomain.isDefaultInstanceEphemeral() && !clientBeat.isEphemeral()) {
        return result;
    }

    if (StringUtils.isBlank(clientBeat.getCluster())) {
        clientBeat.setCluster(UtilsAndCommons.DEFAULT_CLUSTER_NAME);
    }

    String clusterName = clientBeat.getCluster();

    if (Loggers.SRV_LOG.isDebugEnabled()) {
        Loggers.SRV_LOG.debug("[CLIENT-BEAT] full arguments: beat: {}, serviceName: {}", clientBeat, serviceName);
    }

    Instance instance = serviceManager.getInstance(namespaceId, serviceName, clientBeat.getCluster(),
        clientBeat.getIp(),
        clientBeat.getPort());

    if (instance == null) {
        //如果实例为空,组装实例
        instance = new Instance();
        instance.setPort(clientBeat.getPort());
        instance.setIp(clientBeat.getIp());
        instance.setWeight(clientBeat.getWeight());
        instance.setMetadata(clientBeat.getMetadata());
        instance.setClusterName(clusterName);
        instance.setServiceName(serviceName);
        instance.setInstanceId(instance.getInstanceId());
        instance.setEphemeral(clientBeat.isEphemeral());
		//注册实例
        //为什么要在心跳方法中再次注册实例?因为客户端下线或停机重启之后原先注册表中的内容就没有了,所以需要定时发送心跳的时候再注册一次
        serviceManager.registerInstance(namespaceId, serviceName, instance);
    }

    Service service = serviceManager.getService(namespaceId, serviceName);

    if (service == null) {
        throw new NacosException(NacosException.SERVER_ERROR,
            "service not found: " + serviceName + "@" + namespaceId);
    }
	//处理客户端心跳,这里就不再展开阅读了
    service.processClientBeat(clientBeat);
    result.put("clientBeatInterval", instance.getInstanceHeartBeatInterval());
    return result;
}
分析完了 beat() 方法,接下来我们就开始分析最重要的 register() 方法
public String register(HttpServletRequest request) throws Exception {

    String serviceName = WebUtils.required(request, CommonParams.SERVICE_NAME);
    String namespaceId = WebUtils.optional(request, CommonParams.NAMESPACE_ID, Constants.DEFAULT_NAMESPACE_ID);
	//注册实例
    serviceManager.registerInstance(namespaceId, serviceName, parseInstance(request));
    return "ok";
}
public void registerInstance(String namespaceId, String serviceName, Instance instance) throws NacosException {
	//创建空的service
    createEmptyService(namespaceId, serviceName, instance.isEphemeral());

    Service service = getService(namespaceId, serviceName);

    if (service == null) {
        throw new NacosException(NacosException.INVALID_PARAM,
            "service not found, namespace: " + namespaceId + ", service: " + serviceName);
    }
	//添加实例
    addInstance(namespaceId, serviceName, instance.isEphemeral(), instance);
}
com.alibaba.nacos.naming.core.ServiceManager#createServiceIfAbsent
public void createServiceIfAbsent(String namespaceId, String serviceName, boolean local, Cluster cluster) throws NacosException {
    Service service = getService(namespaceId, serviceName);
    if (service == null) {

        Loggers.SRV_LOG.info("creating empty service {}:{}", namespaceId, serviceName);
        service = new Service();
        service.setName(serviceName);
        service.setNamespaceId(namespaceId);
        service.setGroupName(NamingUtils.getGroupName(serviceName));
        // now validate the service. if failed, exception will be thrown
        service.setLastModifiedMillis(System.currentTimeMillis());
        service.recalculateChecksum();
        if (cluster != null) {
            cluster.setService(service);
            service.getClusterMap().put(cluster.getName(), cluster);
        }
        service.validate();
		//放入service及初始化
        putServiceAndInit(service);
        if (!local) {
            addOrReplaceService(service);
        }
    }
}
com.alibaba.nacos.naming.core.ServiceManager#putServiceAndInit
private void putServiceAndInit(Service service) throws NacosException {
    //放入sevice
    putService(service);
    //service初始化
    service.init();
    consistencyService.listen(KeyBuilder.buildInstanceListKey(service.getNamespaceId(), service.getName(), true), service);
    consistencyService.listen(KeyBuilder.buildInstanceListKey(service.getNamespaceId(), service.getName(), false), service);
    Loggers.SRV_LOG.info("[NEW-SERVICE] {}", service.toJSON());
}
public void putService(Service service) {
    if (!serviceMap.containsKey(service.getNamespaceId())) {
        synchronized (putServiceLock) {
            if (!serviceMap.containsKey(service.getNamespaceId())) {
                //serviceMap,就是nacos存放服务的内存注册表
                //service的结构为Map<namespace, Map<group::serviceName, Service>>,其中,第一层map的key为命名空间,第二层map的key为service所在的组名加service名,对应之前的nacos服务注册表结构图
                serviceMap.put(service.getNamespaceId(), new ConcurrentHashMap<>(16));
            }
        }
    }
    serviceMap.get(service.getNamespaceId()).put(service.getName(), service);
}
public void init() {
	//服务健康检查定时任务,定时轮询检查服务是否还存在,不是特别重要,不做更多的深入分析
    HealthCheckReactor.scheduleCheck(clientBeatCheckTask);

    for (Map.Entry<String, Cluster> entry : clusterMap.entrySet()) {
        entry.getValue().setService(this);
        entry.getValue().init();
    }
}
回到之前的添加实例的地方
com.alibaba.nacos.naming.core.ServiceManager#addInstance
public void addInstance(String namespaceId, String serviceName, boolean ephemeral, Instance... ips) throws NacosException {

    String key = KeyBuilder.buildInstanceListKey(namespaceId, serviceName, ephemeral);

    Service service = getService(namespaceId, serviceName);

    synchronized (service) {
        List<Instance> instanceList = addIpAddresses(service, ephemeral, ips);

        Instances instances = new Instances();
        instances.setInstanceList(instanceList);
	    //把instance放到一个一致性service中,此时方法这里是个接口,有很多实现,找到定义consistencyService的地方发现存在@Resource(name = "consistencyDelegate")注解,所以应该去找delegate这个实现
        consistencyService.put(key, instances);
    }
}
com.alibaba.nacos.naming.consistency.DelegateConsistencyServiceImpl#put
public void put(String key, Record value) throws NacosException {
    //一致性service的map,在这里我们同样发现有好几个实现,还是通过寻找定义的地方,发现实现应为DistroConsistencyServiceImpl这个实现
    mapConsistencyService(key).put(key, value);
}
com.alibaba.nacos.naming.consistency.ephemeral.distro.DistroConsistencyServiceImpl#put
public void put(String key, Record value) throws NacosException {
    onPut(key, value);
    taskDispatcher.addTask(key);
}
com.alibaba.nacos.naming.consistency.ephemeral.distro.DistroConsistencyServiceImpl#onPut
public void onPut(String key, Record value) {

    if (KeyBuilder.matchEphemeralInstanceListKey(key)) {
        Datum<Instances> datum = new Datum<>();
        datum.value = (Instances) value;
        datum.key = key;
        datum.timestamp.incrementAndGet();
        //把实例组装成datum装入datastore
        dataStore.put(key, datum);
    }

    if (!listeners.containsKey(key)) {
        return;
    }
	//异步任务,直接去到异步任务的run方法
    notifier.addTask(key, ApplyAction.CHANGE);
}
com.alibaba.nacos.naming.consistency.ephemeral.distro.DistroConsistencyServiceImpl.Notifier#run
public void run() {
    Loggers.DISTRO.info("distro notifier started");

    while (true) {
        try {

            Pair pair = tasks.take();

            if (pair == null) {
                continue;
            }

            String datumKey = (String) pair.getValue0();
            ApplyAction action = (ApplyAction) pair.getValue1();

            services.remove(datumKey);

            int count = 0;

            if (!listeners.containsKey(datumKey)) {
                continue;
            }

            for (RecordListener listener : listeners.get(datumKey)) {

                count++;

                try {
                    if (action == ApplyAction.CHANGE) {
                        //监听器监听change事件,也就是监听实例列表变化事件,在此处实际就是注册事件
                        listener.onChange(datumKey, dataStore.get(datumKey).value);
                        continue;
                    }

                    if (action == ApplyAction.DELETE) {
                        listener.onDelete(datumKey);
                        continue;
                    }
                } catch (Throwable e) {
                    Loggers.DISTRO.error("[NACOS-DISTRO] error while notifying listener of key: {}", datumKey, e);
                }
            }

            if (Loggers.DISTRO.isDebugEnabled()) {
                Loggers.DISTRO.debug("[NACOS-DISTRO] datum change notified, key: {}, listener count: {}, action: {}",
                    datumKey, count, action.name());
            }
        } catch (Throwable e) {
            Loggers.DISTRO.error("[NACOS-DISTRO] Error while handling notifying task", e);
        }
    }
}
com.alibaba.nacos.naming.core.Service#onChange
public void onChange(String key, Instances value) throws Exception {

    Loggers.SRV_LOG.info("[NACOS-RAFT] datum is changed, key: {}, value: {}", key, value);
	//遍历实例列表
    for (Instance instance : value.getInstanceList()) {

        if (instance == null) {
            // Reject this abnormal instance list:
            throw new RuntimeException("got null instance " + key);
        }

        if (instance.getWeight() > 10000.0D) {
            instance.setWeight(10000.0D);
        }

        if (instance.getWeight() < 0.01D && instance.getWeight() > 0.0D) {
            instance.setWeight(0.01D);
        }
    }
	//更新所有的实例列表
    updateIPs(value.getInstanceList(), KeyBuilder.matchEphemeralInstanceListKey(key));

    recalculateChecksum();
}
com.alibaba.nacos.naming.core.Service#updateIPs
public void updateIPs(Collection<Instance> instances, boolean ephemeral) {
    Map<String, List<Instance>> ipMap = new HashMap<>(clusterMap.size());
    for (String clusterName : clusterMap.keySet()) {
        //复制一份实例Map放到ipMap里,这里复制一份的原因是利用了copyOnWrite思想,在写入时写入到副本中,这样可以在并发读时不需要加锁,提高了并发读的效率
        ipMap.put(clusterName, new ArrayList<>());
    }
	//遍历所有实例
    for (Instance instance : instances) {
        try {
            if (instance == null) {
                Loggers.SRV_LOG.error("[NACOS-DOM] received malformed ip: null");
                continue;
            }

            if (StringUtils.isEmpty(instance.getClusterName())) {
                instance.setClusterName(UtilsAndCommons.DEFAULT_CLUSTER_NAME);
            }

            if (!clusterMap.containsKey(instance.getClusterName())) {
                Loggers.SRV_LOG.warn("cluster: {} not found, ip: {}, will create new cluster with default configuration.",
                    instance.getClusterName(), instance.toJSON());
                Cluster cluster = new Cluster(instance.getClusterName(), this);
                cluster.init();
                getClusterMap().put(instance.getClusterName(), cluster);
            }

            List<Instance> clusterIPs = ipMap.get(instance.getClusterName());
            if (clusterIPs == null) {
                clusterIPs = new LinkedList<>();
                ipMap.put(instance.getClusterName(), clusterIPs);
            }

            clusterIPs.add(instance);
        } catch (Exception e) {
            Loggers.SRV_LOG.error("[NACOS-DOM] failed to process ip: " + instance, e);
        }
    }

    for (Map.Entry<String, List<Instance>> entry : ipMap.entrySet()) {
        //make every ip mine
        List<Instance> entryIPs = entry.getValue();
        //更新实例
        clusterMap.get(entry.getKey()).updateIPs(entryIPs, ephemeral);
    }

    setLastModifiedMillis(System.currentTimeMillis());
    getPushService().serviceChanged(this);
    StringBuilder stringBuilder = new StringBuilder();

    for (Instance instance : allIPs()) {
        stringBuilder.append(instance.toIPAddr()).append("_").append(instance.isHealthy()).append(",");
    }

    Loggers.EVT_LOG.info("[IP-UPDATED] namespace: {}, service: {}, ips: {}",
        getNamespaceId(), getName(), stringBuilder.toString());

}
com.alibaba.nacos.naming.core.Cluster#updateIPs
这个方法就是最终更新所有实例的方法
public void updateIPs(List<Instance> ips, boolean ephemeral) {

    Set<Instance> toUpdateInstances = ephemeral ? ephemeralInstances : persistentInstances;

    HashMap<String, Instance> oldIPMap = new HashMap<>(toUpdateInstances.size());

    for (Instance ip : toUpdateInstances) {
        oldIPMap.put(ip.getDatumKey(), ip);
    }

    List<Instance> updatedIPs = updatedIPs(ips, oldIPMap.values());
    if (updatedIPs.size() > 0) {
        for (Instance ip : updatedIPs) {
            Instance oldIP = oldIPMap.get(ip.getDatumKey());

            // do not update the ip validation status of updated ips
            // because the checker has the most precise result
            // Only when ip is not marked, don't we update the health status of IP:
            if (!ip.isMarked()) {
                ip.setHealthy(oldIP.isHealthy());
            }

            if (ip.isHealthy() != oldIP.isHealthy()) {
                // ip validation status updated
                Loggers.EVT_LOG.info("{} {SYNC} IP-{} {}:{}@{}",
                    getService().getName(), (ip.isHealthy() ? "ENABLED" : "DISABLED"), ip.getIp(), ip.getPort(), getName());
            }

            if (ip.getWeight() != oldIP.getWeight()) {
                // ip validation status updated
                Loggers.EVT_LOG.info("{} {SYNC} {IP-UPDATED} {}->{}", getService().getName(), oldIP.toString(), ip.toString());
            }
        }
    }

    List<Instance> newIPs = subtract(ips, oldIPMap.values());
    if (newIPs.size() > 0) {
        Loggers.EVT_LOG.info("{} {SYNC} {IP-NEW} cluster: {}, new ips size: {}, content: {}",
            getService().getName(), getName(), newIPs.size(), newIPs.toString());

        for (Instance ip : newIPs) {
            HealthCheckStatus.reset(ip);
        }
    }

    List<Instance> deadIPs = subtract(oldIPMap.values(), ips);

    if (deadIPs.size() > 0) {
        Loggers.EVT_LOG.info("{} {SYNC} {IP-DEAD} cluster: {}, dead ips size: {}, content: {}",
            getService().getName(), getName(), deadIPs.size(), deadIPs.toString());

        for (Instance ip : deadIPs) {
            HealthCheckStatus.remv(ip);
        }
    }

    toUpdateInstances = new HashSet<>(ips);

    if (ephemeral) {
        //把临时实例更新到cluster的ephemeralInstances上,服务发现最终查找到的实例就是这个属性
        ephemeralInstances = toUpdateInstances;
    } else {
        persistentInstances = toUpdateInstances;
    }
}
讲到这里,实际上的 nacos 注册中心服务注册的流程就结束了,不过刚才我们的流程是在 com.alibaba.nacos.naming.consistency.ephemeral.distro.DistroConsistencyServiceImpl#put 中的 onPut 方法中一直往下走,在 onPut 方法之后还有一个 taskDispatcher.addTask(key) 方法,这个方法是用来做什么的呢,这个方法的作用就是执行集群同步的任务,之前我们说过 nacos 的临时实例实现的是 cap 理论中的 ap 模式,也就是要保证可用性,所以在集群架构中一定会存在一个定时同步的机制,接下来我们就来看看这个同步的方法。
com.alibaba.nacos.naming.consistency.ephemeral.distro.TaskDispatcher#addTask
public void addTask(String key) {
    //往定时任务列表中添加任务
    taskSchedulerList.get(UtilsAndCommons.shakeUp(key, cpuCoreCount)).addTask(key);
}
我们跳过添加任务的部分,直接来看定时任务的 run 方法
com.alibaba.nacos.naming.consistency.ephemeral.distro.TaskDispatcher.TaskScheduler#run
public void run() {

    List<String> keys = new ArrayList<>();
    while (true) {

        try {

            String key = queue.poll(partitionConfig.getTaskDispatchPeriod(),
                TimeUnit.MILLISECONDS);

            if (Loggers.DISTRO.isDebugEnabled() && StringUtils.isNotBlank(key)) {
                Loggers.DISTRO.debug("got key: {}", key);
            }

            if (dataSyncer.getServers() == null || dataSyncer.getServers().isEmpty()) {
                continue;
            }

            if (StringUtils.isBlank(key)) {
                continue;
            }

            if (dataSize == 0) {
                keys = new ArrayList<>();
            }

            keys.add(key);
            //数据的数量+1
            dataSize++;
		    //如果数据数量达到了批量同步的阈值或者距离上次同步时间超过了2000ms,提交一次同步任务
            if (dataSize == partitionConfig.getBatchSyncKeyCount() ||
                (System.currentTimeMillis() - lastDispatchTime) > partitionConfig.getTaskDispatchPeriod()) {

                for (Server member : dataSyncer.getServers()) {
                    if (NetUtils.localServer().equals(member.getKey())) {
                        continue;
                    }
                    SyncTask syncTask = new SyncTask();
                    syncTask.setKeys(keys);
                    syncTask.setTargetServer(member.getKey());

                    if (Loggers.DISTRO.isDebugEnabled() && StringUtils.isNotBlank(key)) {
                        Loggers.DISTRO.debug("add sync task: {}", JSON.toJSONString(syncTask));
                    }

                    dataSyncer.submit(syncTask, 0);
                }
                lastDispatchTime = System.currentTimeMillis();
                dataSize = 0;
            }

        } catch (Exception e) {
            Loggers.DISTRO.error("dispatch sync task failed.", e);
        }
    }
}
com.alibaba.nacos.naming.consistency.ephemeral.distro.DataSyncer#submit
public void submit(SyncTask task, long delay) {

    // If it's a new task:
    if (task.getRetryCount() == 0) {
        Iterator<String> iterator = task.getKeys().iterator();
        while (iterator.hasNext()) {
            String key = iterator.next();
            if (StringUtils.isNotBlank(taskMap.putIfAbsent(buildKey(key, task.getTargetServer()), key))) {
                // associated key already exist:
                if (Loggers.DISTRO.isDebugEnabled()) {
                    Loggers.DISTRO.debug("sync already in process, key: {}", key);
                }
                iterator.remove();
            }
        }
    }

    if (task.getKeys().isEmpty()) {
        // all keys are removed:
        return;
    }
    //执行器执行异步任务
    GlobalExecutor.submitDataSync(() -> {
        // 1. check the server
        if (getServers() == null || getServers().isEmpty()) {
            Loggers.SRV_LOG.warn("try to sync data but server list is empty.");
            return;
        }

        List<String> keys = task.getKeys();

        if (Loggers.SRV_LOG.isDebugEnabled()) {
            Loggers.SRV_LOG.debug("try to sync data for this keys {}.", keys);
        }
        // 2. get the datums by keys and check the datum is empty or not
        Map<String, Datum> datumMap = dataStore.batchGet(keys);
        if (datumMap == null || datumMap.isEmpty()) {
            // clear all flags of this task:
            for (String key : keys) {
                taskMap.remove(buildKey(key, task.getTargetServer()));
            }
            return;
        }

        byte[] data = serializer.serialize(datumMap);

        long timestamp = System.currentTimeMillis();
        //批量同步数据
        boolean success = NamingProxy.syncData(data, task.getTargetServer());
        if (!success) {
            SyncTask syncTask = new SyncTask();
            syncTask.setKeys(task.getKeys());
            syncTask.setRetryCount(task.getRetryCount() + 1);
            syncTask.setLastExecuteTime(timestamp);
            syncTask.setTargetServer(task.getTargetServer());
            retrySync(syncTask);
        } else {
            // clear all flags of this task:
            for (String key : task.getKeys()) {
                taskMap.remove(buildKey(key, task.getTargetServer()));
            }
        }
    }, delay);
}
com.alibaba.nacos.naming.misc.NamingProxy#syncData
public static boolean syncData(byte[] data, String curServer) {
    Map<String, String> headers = new HashMap<>(128);

    headers.put(HttpHeaderConsts.CLIENT_VERSION_HEADER, VersionUtils.VERSION);
    headers.put(HttpHeaderConsts.USER_AGENT_HEADER, UtilsAndCommons.SERVER_VERSION);
    headers.put("Accept-Encoding", "gzip,deflate,sdch");
    headers.put("Connection", "Keep-Alive");
    headers.put("Content-Encoding", "gzip");

    try {
        //发送http请求同步数据,请求路径为/v1/ns/distro/datum,涉及到同步的内容本文不做深入的详解
        HttpClient.HttpResult result = HttpClient.httpPutLarge("http://" + curServer + RunningConfig.getContextPath()
            + UtilsAndCommons.NACOS_NAMING_CONTEXT + DATA_ON_SYNC_URL, headers, data);
        if (HttpURLConnection.HTTP_OK == result.code) {
            return true;
        }
        if (HttpURLConnection.HTTP_NOT_MODIFIED == result.code) {
            return true;
        }
        throw new IOException("failed to req API:" + "http://" + curServer
            + RunningConfig.getContextPath()
            + UtilsAndCommons.NACOS_NAMING_CONTEXT + DATA_ON_SYNC_URL + ". code:"
            + result.code + " msg: " + result.content);
    } catch (Exception e) {
        Loggers.SRV_LOG.warn("NamingProxy", e);
    }
    return false;
}
到这里,整个 nacos 注册中心的服务注册流程就已经分析完了,我画了一张注册流程的结构图给大家
五、总结
通过上述的源码阅读与分析,我们详细的了解了 nacos 注册中心服务注册的流程原理,看到了服务注册功能需要有心跳任务和健康检查任务,集群同步任务,可以看到这些任务都被设计成了定时的异步任务,这样做的好处在于可以保证不会在执行这些任务的时候引起不必要的阻塞,提升了系统的性能,而且在将服务添加进内存注册表的时候还设计成了 copyOnWrite 的方式,保证了在读多写少的场景下整个注册中心的并发性能。
本人文笔水平有限,本文如有错误或不足,还请大家多多指正,谢谢大家。
以上是关于详解nacos注册中心服务注册流程的主要内容,如果未能解决你的问题,请参考以下文章