Nvidia Jetson TX2 上编译安装 TensorFlow r1.5
Posted 慢慢学TensorFlow
tags:
篇首语:本文由小常识网(cha138.com)小编为大家整理,主要介绍了Nvidia Jetson TX2 上编译安装 TensorFlow r1.5相关的知识,希望对你有一定的参考价值。
Jetson TX2 简介
Jetson 是一款 Nvidia 推出的低功耗嵌入式平台,Jetson TX2 集成了 256 核 Nvidia Pascal GPU(半精度计算能力达 1.3 TFLOPS),ARMv8 64 位 CPU 集群,以及容量为 8GB、位宽 128 位 LPDDR4 存储器。CPU 集群包括双核 Nvidia Denver 2 和 4 核 ARM Cortex-A57。Jetson TX2 模块(核心板)如下图所示,尺寸为 50 x 87 mm,重量 85 g,典型功耗 7.5 W,最大功耗 15 W,便于集成到其他系统。

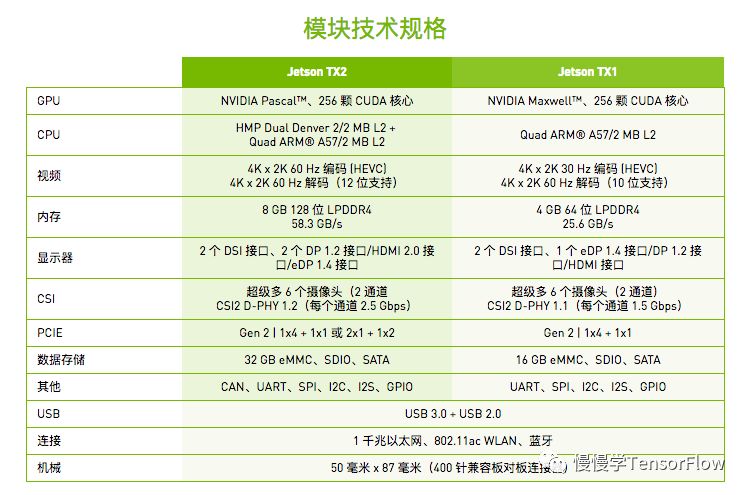
在无人机、机器人等嵌入式应用中,可以使用 TX2 加速视觉感知模型计算,而不会有太大功耗负担。TX2 相比上一代产品 TX1 具有两倍能效提升。下图列举了 TX2 和 TX1 的技术规格对比情况:

用惯桌面 GPU 的童鞋使用 TX2 会感到十分亲切,Nvidia 提供了与桌面 GPU 几乎一样的开发环境,CUDA、cuDNN、TensorRT 等工具和加速库都能无缝切换到嵌入式平台,我们今天以 TensorFlow 为例,只需几步就可以将最新 r1.5 版本编译安装到 TX2 板卡上并运行例程。
刷机
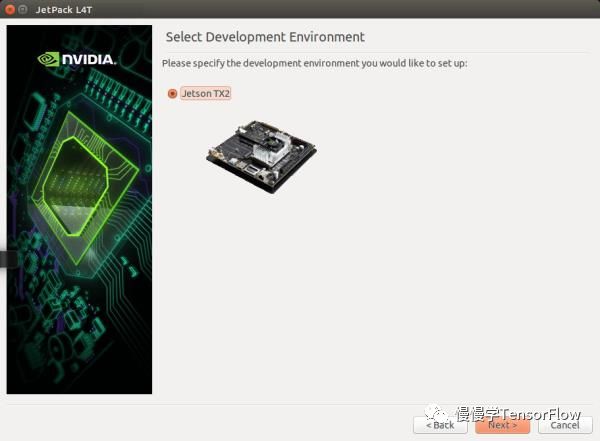
拿到板卡后第一步就是刷机了,刷机相当于给 TX2 重装系统。Nvidia 官网提供了 JetPack 下载链接【1】,我们下载 JetPack 3.2 Developer Preview 版本,这也是目前最新版本。刷机步骤墙裂推荐【2】。
几项注意:
务必用 Ubuntu 操作系统(14.04 或 16.04 均可)运行刷机程序;
务必留出 10 GB 磁盘空间,刷机程序会下载很多包;
JetPack 3.2 版本只支持 TX2 板卡;

刷机成功后,系统里面自带了 CUDA 9.0、cuDNN v7.0.5rc、TensorRT 3.0rc2、OpenCV 3.3.1、Multimedia API 等众多库,避免了手动安装的麻烦以及版本不匹配的情况发生。
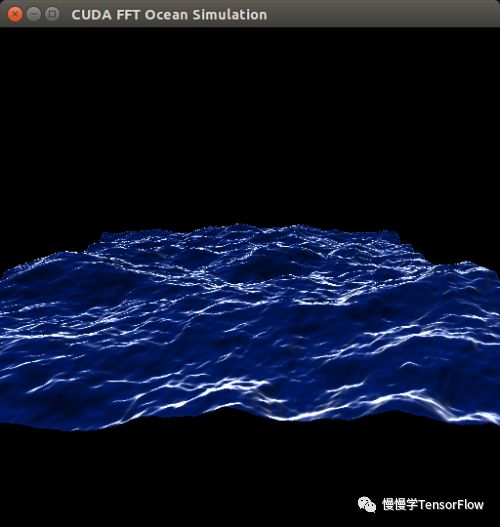
在 TX2 上运行 CUDA 自带例程(FFT Ocean Simulation):

下面开始折腾 TensorFlow 编译环境~
安装 Java
sudo add-apt-repository ppa:webupd8team/java
sudo apt-get update
sudo apt-get install oracle-java8-installer
安装其他库
sudo apt-get install zip unzip autoconf automake libtool curl zlib1g-dev maven -y
sudo apt-get install python-numpy swig python-dev python-pip python-wheel -y
安装 Bazel
从 https://github.com/bazelbuild/bazel/releases/ 下载 bazel-0.9.0-dist.zip,然后运行如下命令进行安装:
unzip bazel-0.9.0-dist.zip
./compile.sh
sudo cp output/bazel /usr/local/bin/
创建交换文件
由于编译 TensorFlow 需要大约 8GB 内存,我们将创建一个交换文件。
这里 /disk1 挂载了 SSD 硬盘,将交换文件建立在该目录下。
cd /disk1
mkdir swap
cd swap/
fallocate -l 8G swapfile
chmod 600 swapfile
mkswap swapfile
swapon swapfile
验证交换文件创建并使能成功:
nvidia@tegra-ubuntu:~$ free -m
              total        used        free      shared  buff/cache   available
Mem:           7844        2432        2725          19        2686        5304
Swap:          8191         457        7734
nvidia@tegra-ubuntu:~$ swapon -s
Filename				Type		Size	Used	Priority
/disk1/swap/swapfile                   	file    	8388604	468024	-1
编译 TensorFlow 源码
git clone https://github.com/tensorflow/tensorflow
cd tensorflow/
git checkout r1.5
编译前需要修改 TensorFlow 源码 tensorflow/stream_executor/cuda/cuda_gpu_executor.cc 函数 int TryToReadNumaNode(const string &pci_bus_id, int device_ordinal) 中起始处,增加两行:
LOG(INFO) << "ARM has no NUMA node, hardcoding to return zero";
return 0;
在 ARM 上没有 NUMA 节点,所以直接返回 0.
接着复制 cudnn.h,便于 TensorFlow 找到:
sudo cp /usr/include/cudnn.h /usr/lib/aarch64-linux-gnu/include/cudnn.h配置 TensorFlow:
root@tegra-ubuntu:/home/nvidia/tensorflow# ./configure
You have bazel 0.9.0- (@non-git) installed.
Please specify the location of python. [Default is /usr/bin/python]:


Found possible Python library paths:
  /usr/local/lib/python2.7/dist-packages
  /usr/lib/python2.7/dist-packages
Please input the desired Python library path to use.  Default is [/usr/local/lib/python2.7/dist-packages]

Do you wish to build TensorFlow with jemalloc as malloc support? [Y/n]: y
jemalloc as malloc support will be enabled for TensorFlow.

Do you wish to build TensorFlow with Google Cloud Platform support? [Y/n]: n
No Google Cloud Platform support will be enabled for TensorFlow.

Do you wish to build TensorFlow with Hadoop File System support? [Y/n]: n
No Hadoop File System support will be enabled for TensorFlow.

Do you wish to build TensorFlow with Amazon S3 File System support? [Y/n]: n
No Amazon S3 File System support will be enabled for TensorFlow.

Do you wish to build TensorFlow with XLA JIT support? [y/N]: y
XLA JIT support will be enabled for TensorFlow.

Do you wish to build TensorFlow with GDR support? [y/N]: n
No GDR support will be enabled for TensorFlow.

Do you wish to build TensorFlow with VERBS support? [y/N]: n
No VERBS support will be enabled for TensorFlow.

Do you wish to build TensorFlow with OpenCL SYCL support? [y/N]: n
No OpenCL SYCL support will be enabled for TensorFlow.

Do you wish to build TensorFlow with CUDA support? [y/N]: y
CUDA support will be enabled for TensorFlow.

Please specify the CUDA SDK version you want to use, e.g. 7.0. [Leave empty to default to CUDA 9.0]:


Please specify the location where CUDA 9.0 toolkit is installed. Refer to README.md for more details. [Default is /usr/local/cuda]:


Please specify the cuDNN version you want to use. [Leave empty to default to cuDNN 7.0]:


Please specify the location where cuDNN 7 library is installed. Refer to README.md for more details. [Default is /usr/local/cuda]:


Please specify a list of comma-separated Cuda compute capabilities you want to build with.
You can find the compute capability of your device at: https://developer.nvidia.com/cuda-gpus.
Please note that each additional compute capability significantly increases your build time and binary size. [Default is: 3.5,5.2]6.2


Do you want to use clang as CUDA compiler? [y/N]: n
nvcc will be used as CUDA compiler.

Please specify which gcc should be used by nvcc as the host compiler. [Default is /usr/bin/gcc]:


Do you wish to build TensorFlow with MPI support? [y/N]: n
No MPI support will be enabled for TensorFlow.

Please specify optimization flags to use during compilation when bazel option "--config=opt" is specified [Default is -march=native]:


Add "--config=mkl" to your bazel command to build with MKL support.
Please note that MKL on MacOS or windows is still not supported.
If you would like to use a local MKL instead of downloading, please set the environment variable "TF_MKL_ROOT" every time before build.

Would you like to interactively configure ./WORKSPACE for android builds? [y/N]: n
Not configuring the WORKSPACE for Android builds.

Configuration finished
编译:
bazel build -c opt --local_resources 3072,4.0,1.0 --verbose_failures --config=cuda //tensorflow/tools/pip_package:build_pip_package大约需要 2~3 个小时。编译成功的状态如下图所示。
安装 TensorFlow
bazel-bin/tensorflow/tools/pip_package/build_pip_package /tmp/tensorflow_pkg
cp /tmp/tensorflow_pkg/tensorflow-1.5.0rc0-cp27-cp27mu-linux_aarch64.whl .
pip install ./tensorflow-1.5.0rc0-cp27-cp27mu-linux_aarch64.whl
pip install --upgrade pip
验证 TensorFlow 安装成功
# python alexnet_benchmark.py
conv1   [128, 56, 56, 64]
pool1   [128, 27, 27, 64]
conv2   [128, 27, 27, 192]
pool2   [128, 13, 13, 192]
conv3   [128, 13, 13, 384]
conv4   [128, 13, 13, 256]
conv5   [128, 13, 13, 256]
pool5   [128, 6, 6, 256]
2018-01-07 06:23:06.176017: I tensorflow/stream_executor/cuda/cuda_gpu_executor.cc:858] ARM has no NUMA node, hardcoding to return zero
2018-01-07 06:23:06.176245: I tensorflow/core/common_runtime/gpu/gpu_device.cc:1105] Found device 0 with properties:
name: NVIDIA Tegra X2 major: 6 minor: 2 memoryClockRate(GHz): 1.3005
pciBusID: 0000:00:00.0
totalMemory: 7.66GiB freeMemory: 3.13GiB
2018-01-07 06:23:06.176316: I tensorflow/core/common_runtime/gpu/gpu_device.cc:1195] Creating TensorFlow device (/device:GPU:0) -> (device: 0, name: NVIDIA Tegra X2, pci bus id: 0000:00:00.0, compute capability: 6.2)
2018-01-07 06:23:16.991020: step 0, duration = 0.441
2018-01-07 06:23:21.358025: step 10, duration = 0.435
2018-01-07 06:23:25.765953: step 20, duration = 0.443
2018-01-07 06:23:30.162449: step 30, duration = 0.448
2018-01-07 06:23:34.555762: step 40, duration = 0.441
2018-01-07 06:23:38.927353: step 50, duration = 0.448
2018-01-07 06:23:43.376953: step 60, duration = 0.445
2018-01-07 06:23:47.794812: step 70, duration = 0.443
2018-01-07 06:23:52.212388: step 80, duration = 0.424
2018-01-07 06:23:56.666577: step 90, duration = 0.466
2018-01-07 06:24:00.578603: Forward across 100 steps, 0.440 +/- 0.010 sec / batch
2018-01-07 06:24:17.837117: step 0, duration = 1.196
2018-01-07 06:24:29.892157: step 10, duration = 1.208
^^2018-01-07 06:24:41.847129: step 20, duration = 1.196
2018-01-07 06:24:53.892654: step 30, duration = 1.196
2018-01-07 06:25:05.880071: step 40, duration = 1.182
2018-01-07 06:25:17.917854: step 50, duration = 1.177
2018-01-07 06:25:29.898351: step 60, duration = 1.159
2018-01-07 06:25:41.917304: step 70, duration = 1.225
^^2018-01-07 06:25:53.933106: step 80, duration = 1.241
2018-01-07 06:26:05.880422: step 90, duration = 1.210
2018-01-07 06:26:16.770962: Forward-backward across 100 steps, 1.201 +/- 0.022 sec / batch
结论
通过以上步骤,在 Jetson TX2 嵌入式开发板上编译、安装了最新 TensorFlow 并通过一个 AlexNet 计算例程验证安装成功。大部分步骤和基于桌面 GPU 的步骤相同。当一个应用中需要借助 Deep Learning 来解决问题时,使用 TX2 能迅速将服务器上训练好的模型部署到终端,无需冗长的移植过程。
【1】 https://developer.nvidia.com/embedded/jetpack
【2】 http://docs.nvidia.com/jetpack-l4t/index.html#developertools/mobile/jetpack/l4t/3.2rc/jetpack_l4t_install.htm
【3】 https://syed-ahmed.gitbooks.io/nvidia-jetson-tx2-recipes/content/first-question.html
以上是关于Nvidia Jetson TX2 上编译安装 TensorFlow r1.5的主要内容,如果未能解决你的问题,请参考以下文章