Spring+Log4j+ActiveMQ实现远程记录日志-Queue模式
Posted 三人乐园
tags:
篇首语:本文由小常识网(cha138.com)小编为大家整理,主要介绍了Spring+Log4j+ActiveMQ实现远程记录日志-Queue模式相关的知识,希望对你有一定的参考价值。
在使用 ActiveMQ 进行远程日志归档的时候,log4j 提供的 Appender 只支持 Topic 模式,在此模式下,服务端的 "destination" 配置为.ActiveMQTopic,此时有且只有一个监听器工作,无法应用 "concurrency" 属性,即无法设置多进程。
为了设置多个监听器,首先需要自定义使用 Queue 模式 log4j 的 Appender,然后在服务端的 Spring 项目中进行监听 Queue 的配置,即使用 ActiveMQQueue,并最终部署到 Tomcat 上。
参考:
1,Spring+Log4j+ActiveMQ实现远程记录日志——实战+分析(http://www.linuxidc.com/Linux/2015-12/126163.htm)
2,Asynchronous logging using Log4j, ActiveMQ and Spring(https://dzone.com/articles/asynchronous-logging-using)
第1步,定制 log4j JMS Appender
package com.test.utils;
import javax.jms.DeliveryMode;
import javax.jms.Destination;
import javax.jms.MessageProducer;
import javax.jms.ObjectMessage;
import javax.jms.Session;
import org.apache.activemq.ActiveMQConnectionFactory;
import org.apache.log4j.Appender;
import org.apache.log4j.AppenderSkeleton;
import org.apache.log4j.spi.LoggingEvent;
/**
* JMSQueue appender is a log4j appender that writes LoggingEvent to a queue.
* @author faheem
*
*/
public class JMSQueueAppender extends AppenderSkeleton implements Appender{
private String brokerUri;
private String queueName;
@Override
public void close() {
}
@Override
public boolean requiresLayout() {
return false;
}
@Override
protected synchronized void append(LoggingEvent event) {
try {
ActiveMQConnectionFactory connectionFactory = new ActiveMQConnectionFactory(
this.brokerUri);
// Create a Connection
javax.jms.Connection connection = connectionFactory.createConnection();
connection.start();
// Create a Session
Session Session = connection.createSession(false, javax.jms.Session.AUTO_ACKNOWLEDGE);
// Create the destination (Topic or Queue)
Destination destination = Session.createQueue(this.queueName);
// Create a MessageProducer from the Session to the Topic or Queue
MessageProducer producer = Session.createProducer(destination);
producer.setDeliveryMode(DeliveryMode.NON_PERSISTENT);
ObjectMessage message = Session.createObjectMessage(new LoggingEventWrapper(event));
// Tell the producer to send the message
producer.send(message);
// Clean up
Session.close();
connection.close();
} catch (Exception e) {
e.printStackTrace();
}
}
public void setBrokerUri(String brokerUri) {
this.brokerUri = brokerUri;
}
public String getBrokerUri() {
return brokerUri;
}
public void setQueueName(String queueName) {
this.queueName = queueName;
}
public String getQueueName() {
return queueName;
}
}
第2步,LoggingEventWrapper
package com.test.utils;
import java.io.Serializable;
import java.net.InetAddress;
import java.net.UnknownHostException;
import org.apache.log4j.EnhancedPatternLayout;
import org.apache.log4j.spi.LoggingEvent;
/**
* Logging Event Wraps a log4j LoggingEvent object. Wrapping is required by some information is lost
* when the LoggingEvent is serialized. The idea is to extract all information required from the LoggingEvent
* object, place it in the wrapper and then serialize the LoggingEventWrapper. This way all required data remains
* available to us.
* @author faheem
*
*/
public class LoggingEventWrapper implements Serializable{
private static final String ENHANCED_PATTERN_LAYOUT = "%throwable";
private static final long serialVersionUID = 3281981073249085474L;
private LoggingEvent loggingEvent;
//private Long timeStamp;
//private String level;
//private String logger;
//private String message;
private String detail;
//private String ipAddress;
//private String hostName;
public LoggingEventWrapper(LoggingEvent loggingEvent){
this.loggingEvent = loggingEvent;
//Format event and set detail field
EnhancedPatternLayout layout = new EnhancedPatternLayout();
layout.setConversionPattern(ENHANCED_PATTERN_LAYOUT);
this.detail = layout.format(this.loggingEvent);
}
public Long getTimeStamp() {
return this.loggingEvent.timeStamp;
}
public String getLevel() {
return this.loggingEvent.getLevel().toString();
}
public String getLogger() {
return this.loggingEvent.getLoggerName();
}
public String getMessage() {
return this.loggingEvent.getRenderedMessage();
}
public String getDetail() {
return this.detail;
}
public LoggingEvent getLoggingEvent() {
return loggingEvent;
}
public String getIpAddress() {
try {
return InetAddress.getLocalHost().getHostAddress();
} catch (UnknownHostException e) {
return "Could not determine IP";
}
}
public String getHostName() {
try {
return InetAddress.getLocalHost().getHostName();
} catch (UnknownHostException e) {
return "Could not determine Host Name";
}
}
}
第3步,设置 JMSQueueAppender 的 poem.xml
<!-- Use to cast object to LogEvent when received a log -->
<dependency>
<groupId>log4j</groupId>
<artifactId>log4j</artifactId>
<version>1.2.17</version>
</dependency>
<!-- Use to receive jms message -->
<dependency>
<groupId>org.springframework</groupId>
<artifactId>spring-jms</artifactId>
<version>4.3.11.RELEASE</version>
</dependency>
<!-- ActiveMQ lib -->
<dependency>
<groupId>org.apache.activemq</groupId>
<artifactId>activemq-core</artifactId>
<version>5.7.0</version>
</dependency>
第4步,配置 log4j.xml
<!-- Console Appender, used to record activemq log. -->
<appender name="console" class="org.apache.log4j.ConsoleAppender">
<param name="Target" value="System.out" />
<layout class="org.apache.log4j.PatternLayout">
<param name="ConversionPattern"
value="%d [%-5p] (%F:%L) - %m%n" />
</layout>
</appender>
<!-- JMS Appender, used to record log -->
<appender name="jms" class="com.test.utils.JMSQueueAppender">
<param name="brokerUri" value="tcp://localhost:61616" />
<!-- ActiveMQ 的队列名 -->
<param name="queueName" value="logQueue" />
<!-- 只输出 INFO 信息到 ActiveMQ -->
<filter class="org.apache.log4j.varia.LevelRangeFilter">
<param name="LevelMin" value="INFO" />
<param name="LevelMax" value="INFO" />
</filter>
</appender>
<!-- Log in org.apache.activemq are logged to console. -->
<logger name="org.apache.activemq">
<level value="INFO" />
<appender-ref ref="console" />
</logger>
<root>
<priority value="INFO" />
<appender-ref ref="jms" />
</root>
第5步,测试:发送日志
检查ActiveMQ的控制台
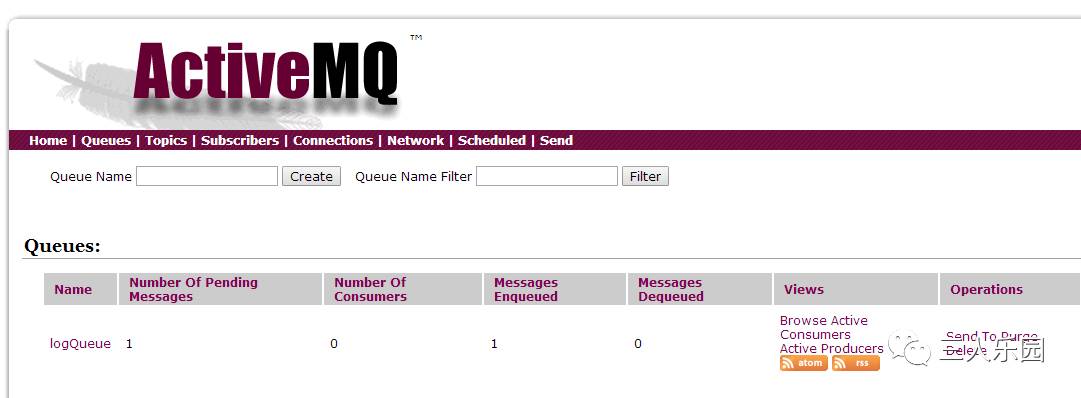
接收队列里有了一条消息(测试发送了3个不同级别的日志,但接收队列里只有一条,是因为在 log4j.xml 文件中,配置了过滤条件:只发送INFO级别的日志到 JMS)。
测试发送验证完成。接下来,准备服务端的消费者处理。
第6步,服务端监听程序
为了让监听器一直活着,把 Logging 做成 Web 项目,跑在 Tomcat 上。index.jsp 就是个 Hello World 字符串而已,用来验证 Logging 活着。
项目结构:
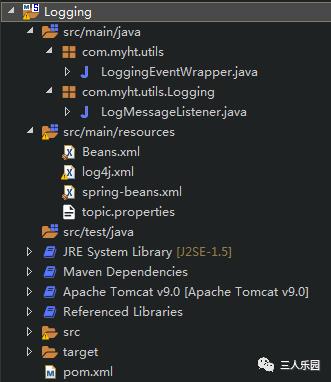
监听代码:
package com.myht.utils.Logging;
import java.sql.Timestamp;
import java.text.DateFormat;
import java.text.SimpleDateFormat;
import javax.jms.Message;
import javax.jms.MessageListener;
import javax.jms.ObjectMessage;
import com.myht.utils.LoggingEventWrapper;
public class LogMessageListener implements MessageListener {
public void onMessage(Message message) {
try {
final LoggingEventWrapper event = (LoggingEventWrapper)((ObjectMessage) message).getObject();
System.out.println(event.getLevel() + ":" + event.getMessage());
} catch (Exception e) {
e.printStackTrace();
}
}
}
spring-beans.xml配置
<?xml version="1.0" encoding="UTF-8"?>
<beans xmlns="http://www.springframework.org/schema/beans"
xmlns:xsi="http://www.w3.org/2001/XMLSchema-instance"
xmlns:context="http://www.springframework.org/schema/context"
xsi:schemaLocation="http://www.springframework.org/schema/beans
http://www.springframework.org/schema/beans/spring-beans-4.2.xsd
http://www.springframework.org/schema/context
http://www.springframework.org/schema/context/spring-context-4.2.xsd">
<bean id="targetConnectionFactory" class="org.apache.activemq.ActiveMQConnectionFactory">
<property name="brokerURL" value="tcp://localhost:61616" />
</bean>
<!-- Queue -->
<bean id="connectionFactory" class="org.springframework.jms.connection.CachingConnectionFactory">
<property name="targetConnectionFactory" ref="targetConnectionFactory" />
</bean>
<bean id="destination" class="org.apache.activemq.command.ActiveMQQueue">
<constructor-arg value="logQueue" />
</bean>
<!-- define the message-listener to receive and dipose log data. -->
<bean id="messageListener" class="com.myht.utils.Logging.LogMessageListener" />
<bean id="jmsContainer"
class="org.springframework.jms.listener.DefaultMessageListenerContainer">
<property name="connectionFactory" ref="connectionFactory" />
<property name="destination" ref="destination" />
<property name="messageListener" ref="messageListener" />
<!-- Topic 模式下, 无法应用多线程 -->
<property name="concurrency" value="4-10"/>
</bean>
</beans>
第7步,部署到 Tomcat,并启动 Tomcat
检查 ActiveMQ 状态
启动了4个监听进程,并将之前在队列的消息消费掉了。
全部验证结束。
以上是关于Spring+Log4j+ActiveMQ实现远程记录日志-Queue模式的主要内容,如果未能解决你的问题,请参考以下文章