R语言绘制时间序列数据
Posted 泥板书房
tags:
篇首语:本文由小常识网(cha138.com)小编为大家整理,主要介绍了R语言绘制时间序列数据相关的知识,希望对你有一定的参考价值。
#加载分析所需要的包
library(TSA)
library(zoo)
library(lubridate)
#读取并清洗数据
data <- read.csv("data1.csv", header=F)
data <- data[9:4008,]
data <- data.frame(data)
names(data) <- c("time", "OMI_value")
data$OMI_value <- as.character(data$OMI_value)
options(scipen = 3)
data$OMI_value <- as.numeric(data$OMI_value)
#将数据框数据转化为时间序列
data_time <- zoo(data$OMI_value, as.Date(as.character(data$time), format='%Y/%m/%d'))
#查看数据
head(data_time)
#清洗时间序列数据
data_time1 <- data_time[-which(data_time<0),]
data_time1 <- na.omit(data_time1)
#绘制时间序列图
#画图前将时间序列转换为数据框数据
a <- data.frame(Time=c(time(data_time1)),OMI_value=c(data_time1))
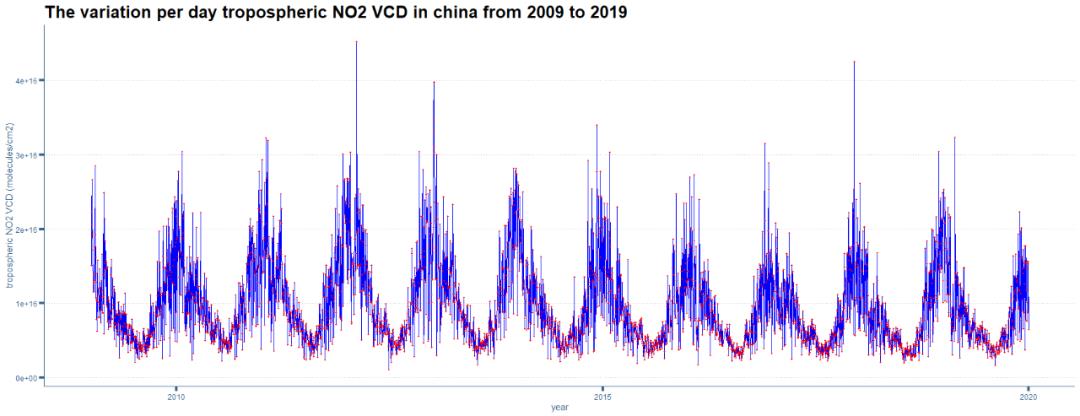
p <- ggplot(a,aes(x=Time,y=OMI_value))
p1 <- p + geom_line(colour = 'blue') +
geom_point(size=0.8, color = "red") + labs(x='year', y='tropospheric NO2 VCD (molecules/cm2)',
title="The variation per day tropospheric NO2 VCD in china from 2009 to 2019")
#调整绘图外观
axis_theme<-theme(
axis.title.x=element_text(colour="#36648B"),#x轴标题设置,优先级高于axis.title
axis.title.y=element_text(colour="#36648B"),#同上
axis.text=element_text(colour="#36648B"),#设置坐标轴刻度数字
axis.ticks=element_line(#坐标轴刻度线的设置
colour="#36648B",
size=1.5,
linetype=1,
lineend=1),
axis.ticks.length=unit(.4,"lines"),#设置刻度线的高度
axis.line=element_line(#设置轴线
colour="#36648B"))
p2 <- p1+axis_theme
p3 <- p2 + theme(plot.title = element_text(colour = "black", face = "bold", size = 20, vjust = 1))
p4 <- p3+theme(panel.grid.minor = element_blank(),panel.background = element_blank(), panel.grid.major.y = element_line(colour='gray',linetype=3))
p4

#创建空数据框
re <- data.frame(year = numeric(), month = numeric(), mean = numeric(), sd = numeric(), se = numeric())
#自定义计算指定年份和月份的时间序列平均值、标准差和标准误
time_summary <- function(time_data, year, month){
data_year <- time_data[which(year(time_data) == year & month(time_data) == month),]
res1 <- mean(data_year)
res2 <- sd(data_year)
res3 <- res2/sqrt(length(data_year))
result <- data.frame(year = year, month = month, mean=res1, sd=res2, se=res3)
return(result)
}
#基于for循环计算2009到2019年每月的数据,结果储存在新建的空数据框里面
for(year in 2009:2019){
for(month in 1:12){
res_year <- time_summary(data_time1,year,month)
re[month+(year-2009)*12,] <- res_year
}
}
re
#基于ggplot2绘制分面图
p <- ggplot(re, aes(x=month, y=mean)) +
geom_errorbar(aes(ymin=mean-se, ymax=mean+se), width=.1, size=0.8, color = 4) +geom_line(size=0.8, color = 4) +geom_point(size=0.8, color = 4) + labs(x='year', y='tropospheric NO2 VCD (molecules/cm2)', title="The variation of monthly mean tropospheric NO2 VCD in china from 2009 to 2019")+ facet_wrap( ~ year, ncol=3)
#设置绘图横坐标标签
lab <-rep(c("Jan","Feb","Mar","Apr","May","Jun","Jul","Aug","Sep","Oct","Nov","Dec"),11)
p1 <- p + scale_x_continuous(breaks=re$month, labels = lab)
#调整绘图格式
axis_theme<-theme(
axis.title.x=element_text(colour="#36648B"),#x轴标题设置,优先级高于axis.title
axis.title.y=element_text(colour="#36648B"),#同上
axis.text=element_text(colour="#36648B"),#设置坐标轴刻度数字
axis.ticks=element_line(#坐标轴刻度线的设置
colour="#36648B",
size=1.5,
linetype=1,
lineend=1),
axis.ticks.length=unit(.4,"lines"),#设置刻度线的高度
axis.line=element_line(#设置轴线
colour="#36648B"))
p2 <- p1+axis_theme
p3 <- p2 + theme(plot.title = element_text(colour = "black", face = "bold", size = 20, vjust = 1))
p4 <- p3+theme(panel.grid.minor = element_blank(),panel.background = element_blank(), panel.grid.major.y = element_line(colour='gray',linetype=3))
#创建空数据框
re <- data.frame(year = numeric(), mean = numeric(), sd = numeric(), se = numeric())
#自定义计算指定年份和月份的时间序列平均值、标准差和标准误
time_summary <- function(time_data, year){
data_year <- time_data[which(year(time_data) == year),]
res1 <- mean(data_year)
res2 <- sd(data_year)
res3 <- res2/sqrt(length(data_year))
result <- data.frame(year = year, mean=res1, sd=res2, se=res3)
return(result)
}
#基于for循环计算2009到2019年平均数据,结果储存在新建的空数据框里面
for(year in 2009:2019){
res_year <- time_summary(data_time1,year)
re[year-2008,] <- res_year
}
#基于ggplot2绘制具有拟合曲线的折线图
p <- ggplot(re, aes(x=year, y=mean)) +
geom_errorbar(aes(ymin=mean-se, ymax=mean+se), width=.1, size=0.8, color = 4) +geom_line(size=0.8, color = 4) +geom_point(size=0.8, color = 4) + labs(x='year', y='tropospheric NO2 VCD (molecules/cm2)', title="The variation of annual mean tropospheric NO2 VCD in china from 2009 to 2019")+geom_smooth(method="lm")
#设置绘图横坐标标签
p1 <- p + scale_x_continuous(breaks=re$year, labels = c(2009:2019))
#调整绘图格式
axis_theme<-theme(
axis.title.x=element_text(colour="#36648B"),#x轴标题设置,优先级高于axis.title
axis.title.y=element_text(colour="#36648B"),#同上
axis.text=element_text(colour="#36648B"),#设置坐标轴刻度数字
axis.ticks=element_line(#坐标轴刻度线的设置
colour="#36648B",
size=1.5,
linetype=1,
lineend=1),
axis.ticks.length=unit(.4,"lines"),#设置刻度线的高度
axis.line=element_line(#设置轴线
colour="#36648B"))
p2 <- p1+axis_theme
p3 <- p2 + theme(plot.title = element_text(colour = "black", face = "bold", size = 20, vjust = 1))
p4 <- p3+theme(panel.grid.minor = element_blank(),panel.background = element_blank(), panel.grid.major.y = element_line(colour='gray',linetype=3))
p4
以上是关于R语言绘制时间序列数据的主要内容,如果未能解决你的问题,请参考以下文章