NoSQL篇 | MongoDB Cluster安装部署
Posted 5ithink
tags:
篇首语:本文由小常识网(cha138.com)小编为大家整理,主要介绍了NoSQL篇 | MongoDB Cluster安装部署相关的知识,希望对你有一定的参考价值。
概览
简介
安装配置
运行
Q&A
参考链接
简介
MongoDB stores data in flexible, JSON-like documents, meaning fields can vary from document to document and data structure can be changed over time
The document model maps to the objects in your application code, making data easy to work with
Ad hoc queries, indexing, and real time aggregation provide powerful ways to access and analyze your data
MongoDB is a distributed database at its core, so high availability, horizontal scaling, and geographic distribution are built in and easy to use
MongoDB is free and open-source, published under the GNU Affero General Public License
安装配置
1.环境
Linux(CentOS release 6.9 )系统服务器3台:
ip:192.168.1.200
ip:192.168.1.202
ip:192.168.1.203
2.Mongodb cluster角色
Shard Server:
(复制集名称rs[\d+])/(主节点master)+(从节点slaver+仲裁节点arbiterOnly)
rs1/192.168.1.200:27017,192.168.1.202:27017,192.168.1.203:27017
rs2/192.168.1.200:27018,192.168.1.202:27018,192.168.1.203:27018
rs3/192.168.1.200:27019,192.168.1.202:27019,192.168.1.203:27019
Config Server:
mongodb3.x config-server require cluster model
{ _id:"crs1", members:[ {_id:0,host:'192.168.1.200:20000',priority:2}, {_id:1,host:'192.168.1.202:20000',priority:1}, {_id:2,host:'192.168.1.203:20000',arbiterOnly:true}] };
RouteServer:
192.168.1.200:30000
192.168.1.202:30000
192.168.1.203:30000
3.安装:
a.解压:tar xvf mongodb-linux-x86_64-3.6.3.tgz
b.配置/etc/profile
export MONGO_HOME=/home/mongodb/mongodb-linux-x86_64-3.6.3
export PATH=$MONGO_HOME/bin:$mysql_HOME/bin:$JAVA_HOME/bin:$PATH
c.生效配置
source /etc/profile
d.创建目录:
创建cluster根目录:
mkdir -p home/mongodb/cluster
创建data logs目录:
cd home/mongodb/cluster
mkdir config data logs
创建分片 shared1 shared2 shared3 数据目录
cd data
mkdir config shared1 shared2 shared3
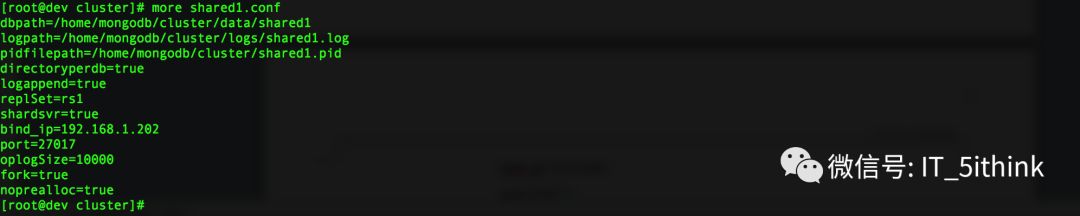
4.配置config文件:
cd home/mongodb/cluster
配置shared1.conf shared2.conf shared3.conf
配置shared2.conf

配置 shared3.conf

配置config.conf

配置router.conf

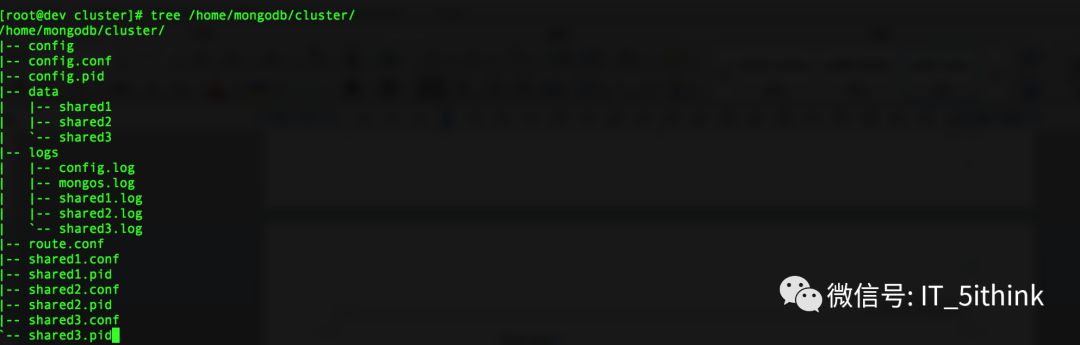
目录结构示意图:
5.设置复制集
启动mongo服务
192.168.1.[200|202|203]服务器均启动此脚本:
mongod -f /home/mongodb/cluster/shared1.conf
mongod -f /home/mongodb/cluster/shared2.conf
mongod -f /home/mongodb/cluster/shared3.conf
配置replicaset(rs1)
[root@base_ci ~]# mongo 192.168.1.200:27017
> use admin
switched to db admin
> cfg={ _id:"rs1", members:[ {_id:0,host:'192.168.1.200:27017',priority:2}, {_id:1,host:'192.168.1.202:27017',priority:1}, {_id:2,host:'192.168.1.203:27017',arbiterOnly:true}] };
> rs.initiate(cfg)
{ "ok" : 1 }
配置replicaset(rs2)
[root@base_ci ~]# mongo 192.168.1.200:27018
> use admin
switched to db admin
> cfg={ _id:"rs2", members:[ {_id:0,host:'192.168.1.200:27018',priority:2}, {_id:1,host:'192.168.1.202:27018',priority:1}, {_id:2,host:'192.168.1.203:27018',arbiterOnly:true}] };
> rs.initiate(cfg)
{ "ok" : 1 }
配置replicaset(rs3)
[root@base_ci ~]# mongo 192.168.1.200:27019
> use admin
switched to db admin
> cfg={ _id:"rs3", members:[ {_id:0,host:'192.168.1.200:27019',priority:2}, {_id:1,host:'192.168.1.202:27019',priority:1}, {_id:2,host:'192.168.1.203:27019',arbiterOnly:true}] };
> rs.initiate(cfg)
{ "ok" : 1 }
6.设置配置服务config server:
启动config server 服务(192.168.1.[200|202|203]服务器均启动此脚本)
mongod -f /home/mongodb/cluster/config.conf
连接:
mongo 192.168.1.200:20000/admin
配置
configsvr>cfg={ _id:"crs1", members:[ {_id:0,host:'192.168.1.200:20000',priority:1}, {_id:1,host:'192.168.1.202:20000',priority:1}, {_id:2,host:'192.168.1.203:20000',priority:1}] };
configsvr> rs.initiate(cfg);
7.设置路由服务router server:
启动router mongo服务
mongos -f /home/mongodb/cluster/route.conf
连接
mongo 192.168.1.200:30000/admin
配置router server
mongos> db.runCommand( { addshard : "rs1/192.168.1.200:27017,192.168.1.202:27017,192.168.1.203:27017"} );
mongos> db.runCommand( { addshard : "rs2/192.168.1.200:27018,192.168.1.202:27018,192.168.1.203:27018"} );
mongos> db.runCommand( { addshard : "rs3/192.168.1.200:27019,192.168.1.202:27019,192.168.1.203:27019"} );
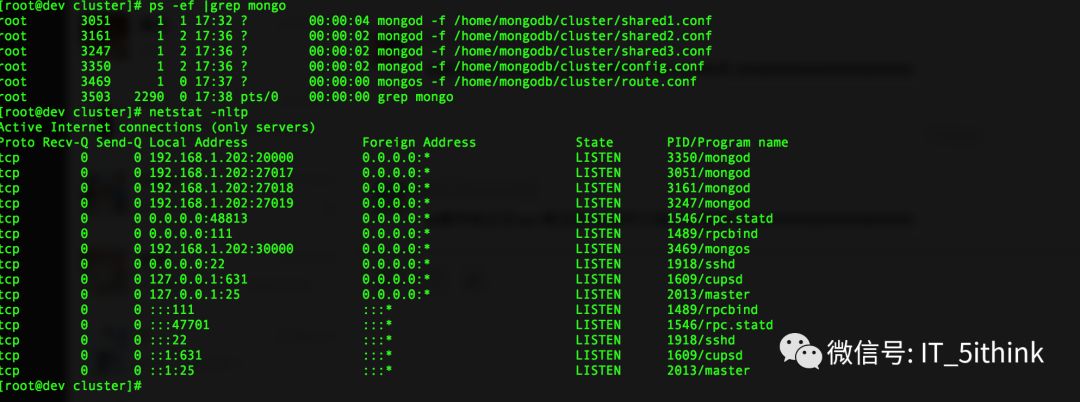
8.验证集群
查看进程
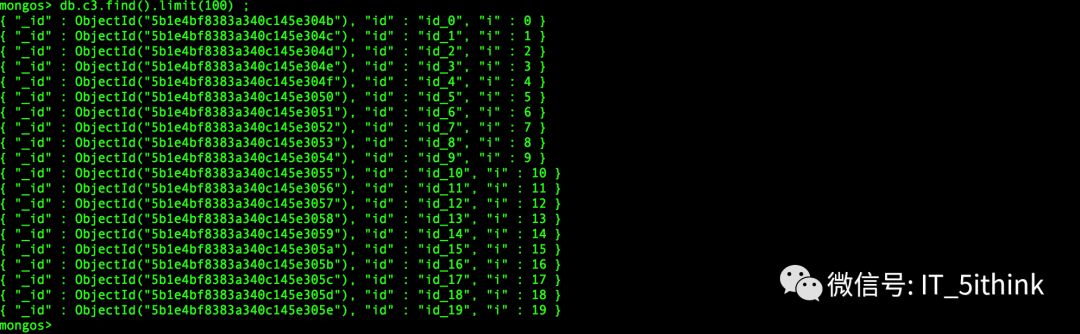
客户端连接:

批量插入数据:
mongos> use test ;
mongos> for (var i = 0; i < 20; i++) {db.c3.save({id:"id_"+i,i:i});} ;
9.下载MongoDB Compass
Q&A
参考链接:
https://www.mongodb.com
以上是关于NoSQL篇 | MongoDB Cluster安装部署的主要内容,如果未能解决你的问题,请参考以下文章