三分钟教你学会SaltStack安装部署
Posted 老男孩Linux
tags:
篇首语:本文由小常识网(cha138.com)小编为大家整理,主要介绍了三分钟教你学会SaltStack安装部署相关的知识,希望对你有一定的参考价值。

SaltStack是一个服务器基础架构集中化管理平台,具备配置管理、远程执行、监控等功能,一般可以理解为简化版的puppet和加强版的func。SaltStack基于Python语言实现,结合轻量级消息队列(ZeroMQ)与Python第三方模块(Pyzmq、PyCrypto、Pyjinjia2、Python-msgpack和PyYAML等)构建。
通过部署SaltStack环境,我们可以在成千上万台服务器上做到批量执行命令,根据不同业务特性进行配置集中化管理、分发文件、采集服务器数据、操作系统基础及软件包管理等,SaltStack是运维人员提高工作效率、规范业务配置与操作的利器。
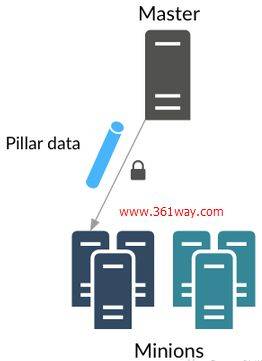
在Minion机器上启动salt后,会生成两把密钥,minion.pem(private key)和 minion.pub(public key),同时将minion.pub发送给给master。master接受到minion.pub后,可以通过salt-key 命令选择是否接受该公钥,保存在/etc/salt/pki/master/minions。这时候,master就可以发送相关指令到minion机器上了。
官方文档:https://docs.saltstack.com/en/latest/topics/installation/index.html
Salt should run on any Unix-like platform so long as the dependencies are met.Python 2.6 >= 2.6 <3.0msgpack-python - High-performance message interchange format YAML - Python YAML bindingsJinja2 - parsing Salt States (configurable in the master settings)MarkupSafe - Implements a XML/HTML/XHTML Markup safe string for Pythonapache-libcloud - Python lib for interacting with many of the popular cloud service providers using a unified APIRequests - HTTP libraryTornado - Web framework and asynchronous networking library futures - Backport of the concurrent.futures package from Python 3.2Depending on the chosen Salt transport, ZeroMQ or RAET, dependencies vary:ZeroMQ:ZeroMQ >= 3.2.0pyzmq >= 2.2.0 - ZeroMQ Python bindingsPyCrypto - The Python cryptography toolkit RAET:libnacl - Python bindings to libsodium ioflo - The flo programming interface raet and salt-raet is built on RAET - The worlds most awesome UDP protocol
master 的环境
root@rht6-mysql ~ # cat /etc/redhat-release Red Hat Enterprise Linux Server release 6.7 (Santiago)
minion 的环境
[root@m-node1 ~]# cat /etc/redhat-release Red Hat Enterprise Linux Server release 6.2 (Santiago)
2、安装Salt-master
安装相关的源
本次需要安装epel源和163的源
wget https://dl.fedoraproject.org/pub/epel/epel-release-latest-6.noarch.rpmrpm -ivh epel-release-latest-6.noarch.rpm wget http://mirrors.163.com/.help/CentOS6-Base-163.reposed -i 's/$releasever/6/g' /etc/yum.repo.d/CentOS6-Base-163.repo yum clean all && yum makecache yum repolist
yum install -y salt-master
启动master
/etc/init.d/salt-master start
3、安装Salt-minion
和master一样进行配置yum源。
wget https://dl.fedoraproject.org/pub/epel/epel-release-latest-6.noarch.rpmrpm -ivh epel-release-latest-6.noarch.rpm sed -i 's/https/http/g' /etc/yum.repo.d/epel.repo ##### 这步需要替换https为http的原因是redhat 6.2的ca-certificates为2010.63-3,需要升级,否则就会报错。
wget http://mirrors.163.com/.help/CentOS6-Base-163.reposed -i 's/$releasever/6/g' /etc/yum.repo.d/CentOS6-Base-163.repo yum clean all && yum makecache yum repolist
更新Python
由于我minion机子上的版本为redhat 6.2,因此python版本不符合要求,需要进行更新,否则会报如下错误
file xxx.pyc from install of python-libs-2.6.6-66.el6_8.x86_64 conflicts with file from package python-2.6.6-29.el6.x86_64
yum update python
修改配置文件
[root@m-node1 ~]# cat /etc/hosts127.0.0.1 localhost localhost.localdomain localhost4 localhost4.localdomain4::1 localhost localhost.localdomain localhost6 localhost6.localdomain610.0.0.6 rht6-mysql
修改文件 /etc/salt/minion
# Set the location of the salt master server. If the master server cannot be# resolved, then the minion will fail to start. master: rht6-mysql
这里注意Master前面2个空格,且冒号后面一个 空格,否则会报错
启动Minion
/etc/init.d/salt-minion start
4、在Master选择接受Minion
root@rht6-mysql ~ # salt-key -LAccepted Keys:Denied Keys:Unaccepted Keys:m-node1Rejected Keys:root@rht6-mysql ~ # salt-key -a m-node1The following keys are going to be accepted:Unaccepted Keys:m-node1Proceed? [n/Y] yKey for minion m-node1 accepted.
选择接受m-node1
此时就可以发送各种命令了,使用方法如下
Usage: salt [options] '
我先演示下基本的
a.查询是否存活
root@rht6-mysql ~ # salt '*' test.pingm-node1: True
b.发送主机的命令
root@rht6-mysql ~ # salt '*' cmd.run "du -sm /root"m-node1: 388 /root
参考资料:自动化运维工具SaltStack详细部署
更多IT技术性文章和福利活动
以上是关于三分钟教你学会SaltStack安装部署的主要内容,如果未能解决你的问题,请参考以下文章