Java实现超简单验证码识别
Posted Kotlin实战Android
tags:
篇首语:本文由小常识网(cha138.com)小编为大家整理,主要介绍了Java实现超简单验证码识别相关的知识,希望对你有一定的参考价值。
闲来想实现程序模拟登陆一个系统,说白了,就是写个简单的爬虫,但是无奈,遇到了数字图片验证码,在查阅了一些方案以后,遂决定自己手写代码实现验证码识别,分享一下整个过程。
图片验证码是什么
图片验证码,这个大家应该都见过。最普遍的图片验证码就是一张图片上面有4-6个歪歪扭扭的数字字母,图片还有点看不清楚,但是基本可以肉眼识别出上面的数字字母。那为什么要有这个东东呢?
其实验证码的出现为了区分人与机器。对于歪歪妞妞还有点看不清的数字字母图片,由于人脑的特殊构造,是可以完全无障碍识别的,但是想让奇迹识别出这些字母数字,就会出现识别错误。那为什么要区别人与机器呢?假如一个一个系统没有验证码,我知道了你的用户名,并且知道你的登录密码是8位的数字,那我完全可以写个脚本程序穷举出所有的8位数组合,挨个去尝试登录,这个过程对于人来说可能耗时耗力,但是对于程序来说,so easy。所以验证码的出现就会阻止程序进行这样的穷举登录。
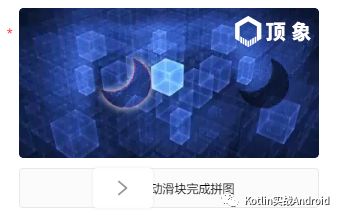
随着技术的发展,现在很多的验证码系统都可以通过图像处理、机器学习深度学习等方式进行攻破,图片验证码已经不再安全,即使是非常有名的12306验证码,也已经被利用深度学习达到了很高的识别精度。所以也出现了手机验证码、拖动滑块图片到指定位置的验证码等各种验证码。下面展示的就是几种常见的验证码。


超简单验证码
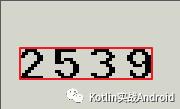
为什么说是超简单呢?因为这次需要处理的验证码,就是简单的数字图片验证码,并且图片很干净,没有干扰元素,数字也很规整,没有扭曲、变形和移位。如下图所示。

看到图片可能很多人就说了,这不就是个简单的图像处理问题吗,太简单了。
先说说我看到这个图片验证码的第一想法,不是自己手动实现,我先想到的是OCR(光学字符识别)。因为图片上的数字太规整了,OCR识别是最快、最省力的,只需要调用接口即可。但是查了一下目前的OCR接口,找到了腾讯的OCR接口,但是一个月只有1000次免费调用,感觉用在爬虫上不太够,而且我这个验证码是gif图片,腾讯的接口不支持gif。所以就干脆自己写一个识别程序。
首先说一下,对于这个程序的要求,识别速度要快,识别准确度要高,程序要尽量简单,尽量不涉及图像处理的内容。换句话说就是用最低的成本实现这个验证码的识别。
分析思路
实现的思路其实很简单,由于数字图片验证码只有0-9这10个数字,场景很少,加之数字很规整,所以可以先收集到包含有0-9这10个数字的图片。然后用程序进行图片裁剪,裁剪出0-9这10个单个数字的形态的图片并存储。然后对于一张新的验证码图片,我们可以采用先裁剪为4张单个数字图片,然后与我们事先准备好的10个数字图片进行相似度对比,最相似的即为正确的数字。
具体实现
下面看看具体的代码实现。
图片边缘空白裁剪
这一步主要是把图片边缘的空白裁减掉,让剩余的图片刚好包含四个数字即可。图片的原始大小是60px*36px,将其导入ps中查看需要裁剪的部分,然后用程序进行裁剪。如图,就是把红色框之外的部分裁减掉。

这里为了程序尽可能简单,所以不使用第三方的Java包,知识用Java本身内置的ImageIO工具类进行图片的读写和简单裁剪,封装的函数如下图所示:
/**
 * 裁剪图片
 * @param srcPath 原始图片路径
 * @param readImageFormat 读取图片的格式
 * @param x 裁剪的x坐标
 * @param y 裁剪的y坐标
 * @param width 裁剪后图片宽度
 * @param height 裁剪后图片高度
 * @param writeImageFormat 保存裁剪后图片的格式
 * @param isSave 是否保存裁剪后的图片到本地[不保存会返回裁剪后图片的字节数组]
 * @param toPath 裁剪后的图片保存路径
 *
 * @return byte[] 如果图片不保存在本地,则返回裁剪后图片的字节数组
 */
public static byte[] cropImg(String srcPath, String readImageFormat, int x, int y,
                           int width, int height, String writeImageFormat, boolean isSave, String toPath) {
    FileInputStream fis = null;
    ImageInputStream iis = null;
    try {
        //读取图片文件
        fis = new FileInputStream(srcPath);
        Iterator it = ImageIO.getImageReadersByFormatName(readImageFormat);
        ImageReader reader = (ImageReader) it.next();
        //获取图片流
        iis = ImageIO.createImageInputStream(fis);
        reader.setInput(iis, true);
        ImageReadParam param = reader.getDefaultReadParam();
        //定义一个矩形
        Rectangle rect = new Rectangle(x, y, width, height);
        //提供一个 BufferedImage,将其用作解码像素数据的目标。
        param.setSourceRegion(rect);
        BufferedImage bi = reader.read(0, param);

        if (isSave){
            //保存新图片
            ImageIO.write(bi, writeImageFormat, new File(toPath));
            return null;
        }else {
            //返回字节数组
            ByteArrayOutputStream byteArrayOutputStream = new ByteArrayOutputStream(100);
            ImageIO.write(bi, writeImageFormat, byteArrayOutputStream);
            return byteArrayOutputStream.toByteArray();
        }
    } catch (IOException e) {
        e.printStackTrace();
    }
    return null;
}
为了提升性能,我们在部分情况下无需将裁剪后的图片图片保存到本地,而是直接转化为字节数组然后进行处理即可。
使用下面的代码调用上面的函数即可完成对图片边缘空白的裁剪。
File sourceImgDir = new File("./sourceimg/");
    File[] sourceImgList = sourceImgDir.listFiles(new FileFilter() {
        @Override
        public boolean accept(File pathname) {
            if (pathname.getName().endsWith("gif")){
                return true;
            }
            return false;
        }
    });
    if (sourceImgList == null) {
        return;
    }

    for (File file : sourceImgList) {
        try {
            BufferedImage bufferedImage = ImageIO.read(file);
            System.out.println("width = " + bufferedImage.getWidth() + "\theight = " + bufferedImage.getHeight());
            //进行图片边缘空白的裁剪
            ImgUtil.cropImg(file.getPath(), "gif", 6, 16, 44, 10, "png", true, file.getPath() + ".png");
        } catch (IOException e) {
            e.printStackTrace();
        }
    }
}
裁剪完成后的对比如下:
图片分割为单个数字
由于图片非常规整,每个数字的宽度也是一致的,所以我们可以继续使用上面的裁剪函数进行图片裁剪,即可将包含四个数字的图片裁剪为单个的数字的图片,代码如下:
int oneW = (bufferedImage.getWidth() - 15) / 4;
for (int i = 0; i < 4; i++) {
    cropImg(file.getPath(), "png", i * (oneW + 5), 0, oneW, 10, "png", file.getPath() + i + ".png");
}
经过上面的步骤,我们就获得0-9这10个数字的单个图片,如下图
验证码对比识别
经过查看,由于图片非常规整,我们每次裁剪出来的数字图片都是一样的,也就是同一个数字的两张图片的每一个字节都是相同的,并且经过裁剪后的图片其实非常小,所以我们的识别其实就是对比,只需要将待识别的图片裁剪为4张小图,然后与我们提前准备好的单张数字图片对比即可。代码如下:
/**
 * 比较两个图片字节数组是否相同
 * @param img1Byte
 * @param img2Byte
 * @return
 */
public static boolean compareImg(byte[] img1Byte, byte[] img2Byte) {
    if (img1Byte == null || img2Byte == null){
        return false;
    }

    if (img1Byte.length == 0 || img2Byte.length == 0){
        return false;
    }

    if (img1Byte.length != img2Byte.length){
        return false;
    }

    for (int i = 0; i < img1Byte.length; i++) {
        if (img1Byte[i] != img2Byte[i]){
            return false;
        }
    }
    return true;
}

/**
 * 通过比较字节来获得是该图片是数字几
 * @param imgData 原始的0-9这10张图片的字节信息
 * @param srcBytes 待识别的图片字节
 * @return
 */
public static int chooseImg(List<byte[]> imgData, byte[] srcBytes){
    if (imgData == null || imgData.size() == 0
            || srcBytes == null || srcBytes.length == 0){
        return -1;
    }
    for (int i = 0; i < imgData.size(); i++) {
        if (compareImg(imgData.get(i), srcBytes)){
            return i;
        }
    }
    return -1;
}
上面的函数就是对比字节的函数。当然在对比之前,我们还需要将我们的10张数字图片加载到内存中,便于后续对比,代码如下:
/**
 * 图片文件转字节数组
 * @param imgFile
 * @return
 */
public static byte[] imgToBytes(File imgFile){
    if (imgFile == null){
        return null;
    }
    try {
        FileInputStream inputStream = new FileInputStream(imgFile);
        ByteArrayOutputStream outputStream = new ByteArrayOutputStream(200);
        byte[] bytes = new byte[200];
        int n;
        while ((n = inputStream.read(bytes)) != -1){
            outputStream.write(bytes, 0, n);
        }
        inputStream.close();
        outputStream.close();
        return outputStream.toByteArray();
    } catch (IOException e) {
        e.printStackTrace();
    }
    return null;
}

/**
 * 载入图片数据[装载需要进行比较的图片数据]
 * @param imgPath
 * @return
 */
public static List<byte[]> loadImgData(String imgPath){
    if (imgPath == null || "".equals(imgPath)){
        return null;
    }
    File imgDir = new File(imgPath);
    List<byte[]> imgData = new ArrayList<>(10);
    //获得0-9的图片数据
    File[] imgs = imgDir.listFiles(new FileFilter() {
        @Override
        public boolean accept(File pathname) {
            if (pathname.getName().endsWith(".png")){
                return true;
            }
            return false;
        }
    });
    if (imgs == null){
        return null;
    }

    for (File file : imgs){
        imgData.add(imgToBytes(file));
    }
    return imgData;
}
这里的载入我们是按顺序载入的,也就是下标为0的位置存放的就是数字0这个图片的字节数组,以此来推。
下面就是我们载入图片,并进行对比识别的代码:
public static void main(String[] args) {
    long start = System.currentTimeMillis();
    //载入0-9这10个数字的单张图片
    List<byte[]> imgData = ImgUtil.loadImgData("./one/");

    File[] imgsPath = new File("./sourceimg/").listFiles(new FileFilter() {
        @Override
        public boolean accept(File pathname) {
            if (pathname.getName().endsWith(".gif")){
                return true;
            }
            return false;
        }
    });
    String distImgPath = "./distimg/dist.png";
    String srcImgPath = "";
    if (imgsPath == null){
        return;
    }
    for (File f : imgsPath) {
        srcImgPath = f.getPath();
        try {
            //裁剪图片并存储在本地
            //先做图片一次裁剪,裁剪掉边缘空白
            ImgUtil.cropImg(srcImgPath, "gif", 6, 16, 44, 10, "png", true, distImgPath);
            BufferedImage bufferedImage = ImageIO.read(new File(distImgPath));

            int oneW = (bufferedImage.getWidth() - 15) / 4;
            StringBuilder stringBuilder = new StringBuilder();
            //循环裁剪4个数字
            for (int i = 0; i < 4; i++) {
                //裁剪出每个数字
                byte[] bytes = ImgUtil.cropImg("./distimg/dist.png", "png", i * (oneW + 5), 0, oneW, 10, "png", false, null);
                //对比裁剪出的数字
                stringBuilder.append(ImgUtil.chooseImg(imgData, bytes));
            }
            //打印出识别结结果
            System.out.println(stringBuilder.toString());
        } catch (IOException e) {
            e.printStackTrace();
        }
    }
    System.out.println("用时" + System.currentTimeMillis() - start + "毫秒");
}
经过测试,7张图片的识别时间为2200毫秒左右,识别准确率为100%。
写在最后
上面介绍的这种方法只能用于特定的场合,由于不需要做图像处理,所以处理效率肯定是较高的,并且没有使用第三方库,所以项目依赖少。后续会陆续介绍稍微复杂验证码的识别处理方式。
以上是关于Java实现超简单验证码识别的主要内容,如果未能解决你的问题,请参考以下文章