使用TestNG实现系统集成测试
Posted 乱七八糟谈技术
tags:
篇首语:本文由小常识网(cha138.com)小编为大家整理,主要介绍了使用TestNG实现系统集成测试相关的知识,希望对你有一定的参考价值。
很多项目在开发初期忽略了自动化测试,原因不外乎以下几种:项目比较紧张,自动化测试投入比较大,影响项目的交付;自动化测试投入很大,效果初期不是很明显;团队开发人员对自动化测试不是很了解,在开发过程中需要制造很多假数据,开发很繁琐,因此主观上不愿意开发自动化测试代码。但随着项目越做越大,以及开发人员的变更,代码不断被重构和修改,会出现改一个很小的地方导致很多相关功能出现异常。
自动化测试(Automated Test),很多团队都在做,但是往往效果不明显。究其原因还是对自动化测试的理解误区, 以为有了自动化后,就不需要手工测试了,因此将一些不适合做自动化的测试用例进行自动化,导致了投入产出比过高。同时,由于缺乏好的统一的测试框架支持,自动化测试脚本编写的复杂度过高,维护性差,耗费了测试人员大量的精力来编写和维护自动化测试用例。因此,为了更好的发挥自动化测试的功效,不能为了自动化测试而做自动化测试,主要是从项目的功能角度,开发比较合理和核心的测试用例尤为重要。在 Java的世界有两个测试框架JUnit和TestNG,关于它们的比较有很多,可以参考https://www.jianshu.com/p/d1e4d4aa9aa5。在考虑所有功能比较之后,建议使用TestNG作为Java项目的核心单元测试框架,因为TestNG在参数化测试,依赖测试和套件测试(分组概念)方面更加突出。 TestNG用于高级测试和复杂集成测试。 它的灵活性对于大型测试套件尤其有用。 此外,TestNG还涵盖了整个核心的JUnit4功能。因此在项目中使用了TestNG作为测试框架,选TestNG更加重要的原因是因为TestNG的运行不依赖于Eclipse,可以独立运行,因此更适合用作集成测试。
安装TestNG
测试场景
在项目中需要实现的一个测试用例是,我们对设备某个参数进行控制,比如我们需要设置空调的温度为23度,通过平台下发控制命令,然后延时去读取下发的控制参数是否设置成功,读取设备返回的温度是否是23度。这是一个典型的集成用例。此外,我们需要持续测试这个功能,每小时测试一次来监控平台的稳定运行。下面将根据具体的例子详细介绍如何实现此测试用例,并使其独立运行。
开发测试用例
步骤一,熟悉TestNG基本语法
使用TestNG开发测试用例实际不复杂,主要使用annotation来标注每个方法,理解应该不复杂。
Annotation使用
public class TestngAnnotation {

       // Test Case 1
       @Test
       public void testCase1() {
          System.out.println("in Test Case 1");
       }

       // Test Case 2
       @Test
       public void testCase2() {
          System.out.println("in Test Case 2");
       }

       @BeforeMethod
       public void beforeMethod() {
          System.out.println("in Before Method");
       }

       @AfterMethod
       public void afterMethod() {
          System.out.println("in After Method");
       }

       @BeforeClass
       public void beforeClass() {
          System.out.println("in Before Class");
       }

       @AfterClass
       public void afterClass() {
          System.out.println("in After Class");
       }

       @BeforeTest
       public void beforeTest() {
          System.out.println("in Before Test");
       }

       @AfterTest
       public void afterTest() {
          System.out.println("in After Test");
       }

       @BeforeSuite
       public void beforeSuite() {
          System.out.println("in Before Suite");
       }

       @AfterSuite
       public void afterSuite() {
          System.out.println("in After Suite");
       }

}
输入的结果如下:
[TestNG] Running:

in Before Suite
in Before Test
in Before Class
in Before Method
in Test Case 1
in After Method
in Before Method
in Test Case 2
in After Method
in After Class
in After Test
in After Suite

===============================================
Default suite
Total tests run: 2, Failures: 0, Skips: 0
===============================================
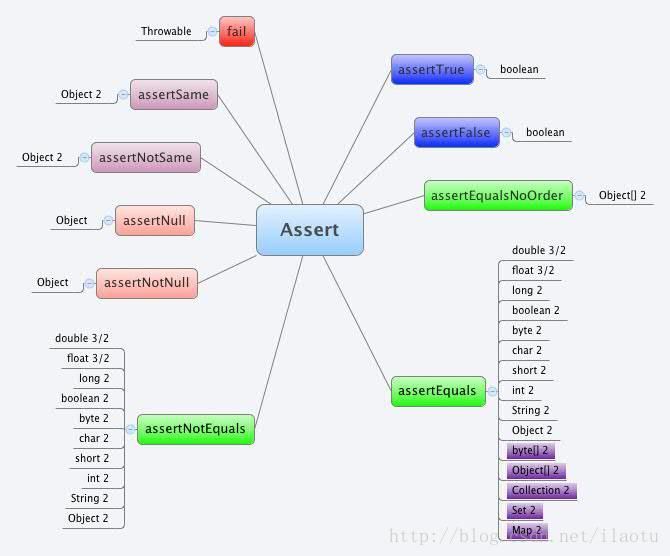
Assert使用
下面是Assert支持的方法

步骤二,使用DataProvider传入参数
在我的项目中,需要有很多的sample数据,比如上个用例中提到的具体设备参数,这些都可以统统DataProvider传入。以下是部分代码,从json文件中读取样例数据,传入到testPointValue方法。
protected Sample prepareData() {
        try {
            FileReader fr = new FileReader("src/main/resources/samples.json");
            Gson gson = new Gson();
            return gson.fromJson(fr, Sample.class);

        } catch (IOException e) {
            LOG.error(LogStackTrace.getStringFromException(e));
        }
        return null;
    }
@DataProvider(name="sampleData")
    public Object[][] getSampleData() {
        Sample sample = prepareData();
        Object[][] arr = null;
        if(sample != null){
            List<PointValueSample> pointValueSamples = sample.getPointvaluesamples();
            arr = new Object[][]{{pointValueSamples, null}};
        }
        return arr;
    }

@Test(dataProvider="sampleData")
    public void testPointValue(List<PointValueSample> pointValueSamples, Object unUsed){
}
步骤三,修改Report的位置
因为我们的需求需要每一个小时运行一次,因此需要把每次的report放置到一个独立的位置,不会被下次运行而覆盖,TestNG提供了修改report的方法。如下每次运行创建一个以当前时间为目录的文件夹,每次运行的Report将被放在此目录下。
@BeforeTest
    public void setup(ITestContext ctx) {
        TestRunner runner = (TestRunner) ctx;
        String date = getCurrentTime();

        File directory = new File(date);
        if (!directory.exists()) {
            directory.mkdir();
        }
        runner.setOutputDirectory(date);
    }
步骤四,开发测试用例
以上面提到的测试用例为例子,先设置参数值,延时读取参数值来验证是否设置成功,代码如下:
@Test(dataProvider="sampleData")
    public void testPointValue(List<PointValueSample> pointValueSamples, Object unUsed){
        try {
            Assert.assertTrue(pointValueSamples != null && !pointValueSamples.isEmpty());
            Reporter.log("start pointvalue integration test at " + getCurrentTime());

            Map<Integer, List<PointValueSample>> pointValueSampleMap = pointValueSamples.stream().collect(Collectors.groupingBy(PointValueSample::getSiteId));
            for(Map.Entry<Integer, List<PointValueSample>> item:pointValueSampleMap.entrySet()){
                List<Integer> points = item.getValue().stream().map(p->p.getPointId()).collect(Collectors.toList());
                Map<String, PointInformation> map = getPointInformation(item.getKey(), points);
                List<PointValue> pointValues = new ArrayList<PointValue>();
                if (map != null && !map.isEmpty()) {
                    for (Map.Entry<String,PointInformation> m : map.entrySet()) {
                        PointValue pointValue = generateRandomPointValue(Integer.parseInt(m.getKey()), m.getValue().getValueType());
                        pointValues.add(pointValue);
                    }
                }
                //set parameter
                boolean bRet = setPoint(item.getKey(), pointValues);
                Assert.assertTrue(bRet);

                //wait 1 minute
                Thread.sleep(20000);
                //get parameter value
                Map<String, PointValue> responsePointValues = getPointValues(item.getKey(), points);
                Assert.assertNotNull(responsePointValues);
                for(Map.Entry<String, PointValue> entry:responsePointValues.entrySet()){
                    PointValue pv = pointValues.stream().filter(p->p.getId() == Integer.parseInt(entry.getKey())).findFirst().get();
                    Assert.assertNotNull(pv);
                    Assert.assertTrue(comparePointValue(pv, entry.getValue()));
                }
            }
            Reporter.log("end pointvalue integration test at " + getCurrentTime());

        } catch (Exception e) {
            log.error(LogStackTrace.getStringFromException(e));
        }
    }
步骤五,生成TestNG的xml文件并运行
为了使TestNG独立运行,需要生成TestNG的配置文件,可以通过Eclipse来自动生成,方法如下:
选择TestNG的类文件,右键,菜单中会有TestNG
选中Convert to TestNG
这样会生成一个testng.xml文件,也可以自己按照自己的测试用例修改这个xml文件。
在Eclipse中也可以运行TestNG,方法如下:选择TestNG的类文件,右键Run as 选择TestNG
步骤六,输入所有的依赖包
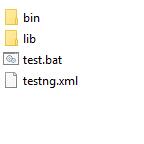
为了使TestNG能独立运行,必须将所有的依赖包输出在一个目录下,目录结构可以按如下组织,使用Maven的maven-compiler-plugin实现将编译class输出到bin目录,使用Maven的maven-dependency-plugin实现将依赖的jar包输出到lib目录下,使用Maven的maven-assembly-plugin实现打包。
目录结构如下:

maven的配置文件如下:
<plugins>
            <plugin>
                <groupId>org.apache.maven.plugins</groupId>
                <artifactId>maven-compiler-plugin</artifactId>
                <version>3.1</version>
                <configuration>
                    <source>1.8</source>
                    <target>1.8</target>
                    <encoding>UTF-8</encoding>
                    <compilerArguments>
                        <d>bin</d>
                    </compilerArguments>
                </configuration>
            </plugin>
            <plugin>
                <groupId>org.apache.maven.plugins</groupId>
                <artifactId>maven-dependency-plugin</artifactId>
                <executions>
                    <execution>
                        <id>copy-dependencies</id>
                        <phase>prepare-package</phase>
                        <goals>
                            <goal>copy-dependencies</goal>
                        </goals>
                        <configuration>
                            <outputDirectory>lib</outputDirectory>
                            <overWriteReleases>false</overWriteReleases>
                            <overWriteSnapshots>false</overWriteSnapshots>
                            <overWriteIfNewer>true</overWriteIfNewer>
                        </configuration>
                    </execution>
                </executions>
            </plugin>
            <plugin>
                <artifactId>maven-assembly-plugin</artifactId>
                <configuration>
                    <descriptors>
                        <descriptor>src/main/assembly/deploy-assembly.xml</descriptor>
                    </descriptors>
                </configuration>
                <executions>
                    <execution>
                        <id>create-artifacts</id>
                        <phase>package</phase>
                        <goals>
                            <goal>single</goal>
                        </goals>
                    </execution>
                </executions>
            </plugin>
        </plugins>
打包的assembly文件src/main/assembly/deploy-assembly.xml如下
<assembly>
    <formats>
        <format>tar.gz</format>
    </formats>
    <includeBaseDirectory>false</includeBaseDirectory>
    <dependencySets>
        <dependencySet>
            <!-- include dependencies of our dependencies -->
            <useTransitiveDependencies>false</useTransitiveDependencies>
            <unpack>false</unpack>
            <useProjectArtifact>true</useProjectArtifact>
            <outputDirectory>lib</outputDirectory>
        </dependencySet>
    </dependencySets>
    <fileSets>
        <fileSet>
            <directory>bin</directory>
            <outputDirectory>bin</outputDirectory>
        </fileSet>
        <fileSet>
            <directory>lib</directory>
            <outputDirectory>lib</outputDirectory>
        </fileSet>
        <fileSet>
            <directory>src/main/resources</directory>
            <outputDirectory>src/main/resources</outputDirectory>
        </fileSet>
    </fileSets>
    <files>
        <file>
            <source>testng.xml</source>
            <outputDirectory></outputDirectory>
            <destName>testng.xml</destName>
        </file>
        <file>
            <source>test.bat</source>
            <outputDirectory></outputDirectory>
            <destName>test.bat</destName>
        </file>
    </files>
</assembly>
步骤七,运行TestNG
在不依赖于Eclipse运行TestNG,使用命令 java org.testng.TestNG来运行测试用例,
set projectLocation=%~dp0
cd /D %projectLocation%
set classpath=%projectLocation%\bin;%projectLocation%\lib\*
java org.testng.TestNG %projectLocation%\testng.xml
pause
步骤八,查看test报告
每次运行会自动创建一个以当前时间为目录名的文件夹,里面有test.html,打开此文件即可查看test结果,如下图

步骤九,定时执行测试用例
为了更好的测试系统的稳定性,减少人为的测试干预,我们设为每小时执行一次测试任务,用到了Windows的定时任务,方法如下:
在windows 10或以上搜索Task Scheduler
打开此工具,设置每天每小时执行此脚本,如下图
设置定时计划
设置执行命令
以上是关于使用TestNG实现系统集成测试的主要内容,如果未能解决你的问题,请参考以下文章